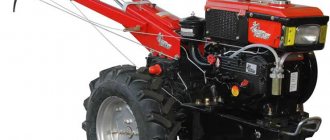
Any complex technical equipment has a limited working life. And with an increase in the intensity of its operation, the risk of its failure increases. However, every owner has the power to reduce the number of such emergency situations if he strictly adheres to the rules of operation and maintenance recommended by the manufacturer. In any case, you should be prepared for the fact that, at a certain period, problems with the device will still arise. Malfunctions that may occur during the operation of the trimmer can be of a different nature. However, in some cases it is quite possible to repair the trimmer yourself.
Electrical problems
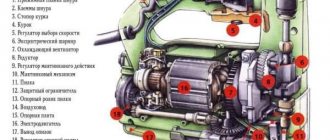
Equipment that operates from the network differs from similar devices that have a built-in power drive in that it has a simpler design. The main elements of the trimmer are the following components:
- the mechanical part that transmits torque to the trimmer head;
- electric motor;
- power cable.
In this case, all problems that may arise with this equipment can be presented in the following groups.
Mechanical problems
The main function when using the device is assigned to the trimmer head , whose cutting surface is made of fishing line. In most cases, the device fails due to problems with its supply.
- If the supply of fishing line is used up, it is necessary, following the instructions in the instructions, to wind a new one.
- One of the reasons for stopping work may be tangling of the fishing line. In such a situation , you need to unwind it and insert a new bobbin if it shows signs of damage.
- The trimmer can also fail due to sticky nylon thread, which may be due to overheating of the device during long-term operation. This problem is solved by rewinding the fishing line.
- Problems may be related directly to the coil: for example, its bottom may fall off. Repair in this case will come down to replacing it or creating a new bottom with your own hands. Having chosen the last option, you need to prepare a piece of PCB or a bolt with a nut.
- In some cases, the coil may not show signs of damage, and the motor may also be fine, but the head does not rotate. In such a situation, you should look at the drive shaft. If the fear of its breakage is confirmed, then the device must be returned to a service center.
If the failure of a gasoline trimmer is associated with problems in the mechanical part, then the repair technology will mostly repeat the work carried out on electric models.
Electrical damage
To repair electric trimmers, you need to prepare the appropriate tools:
- indicator screwdriver;
- multimeter;
- blowtorch.
It is quite difficult to find out by visual inspection what caused the problem; in most cases, only the most obvious faults can be determined “by eye”.
Regardless of the nature of the malfunction, this in any case leads to the engine stopping.
- If there are signs of damage to the power cable, you will need to consider installing a new one.
- If the problem is in the socket, then in this case you need to make sure with an indicator screwdriver that this is really the case. If your fears are confirmed, you should choose a different outlet to connect to.
- Engine failure may be due to damage to the fork. In this case, it must be disassembled and replaced with a functional product.
- Sometimes problems can be related to the control knob. First you need to make sure of this, for which you use an indicator screwdriver : if one of the wires breaks, the contact will not close. In this case, the damaged wiring is replaced.
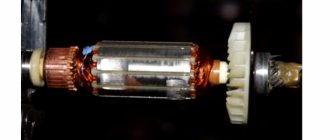
- The motor stator winding can also cause the motor to fail. First, check with a multimeter. To do this, the measuring device must be switched to operating mode with minimal resistance , and then its probes are connected to graphite brushes. If there are no resistance readings, then based on this we can conclude that the winding has burned out. The repair will consist of installing a new engine. Usually, there are no problems finding the necessary spare parts for an electric trimmer.
- Also, the engine may fail as a result of a break in one of the contact connections. If there are no signs of damage to the winding, it is necessary to check all connections using a multimeter. When a damaged contact is detected, you need to solder it yourself.
Troubleshooting electric trimmers
As mentioned above, the electric group of trimmers has its own typical set of faults, along with problems common to all manual mowers. How to eliminate them is below.
Assembly and disassembly
For most mechanisms, dismantling is the reverse process of installation. Electric mowers are no exception. Therefore, assembly instructions will be given below, and disassembly, accordingly, will be performed in the reverse order.
- First you need to connect the protective cover using the multi-faceted wrench included in the kit.
- To attach the head to the fishing line, align the holes in the gearbox cup and the hub and secure them with a locking rod. Then you need to unscrew the nut clockwise and remove the shaft cup, leaving the hub. Then you need to twist the head with the fishing line all the way counterclockwise. The knife is also attached to the hub, but a cup is also put on top and a nut is attached.
- To assemble the trimmer rod, you need to connect its two parts. After making sure that the latch is in the hole, you should tighten the fastening knob.
- Use the large bolts from the kit to attach the rod to the engine.
- The handles need to be screwed at an equal distance from each other in the attachment point on the rod.
Start button
This part of the electric trimmer fails quite often. To check its performance, use an ohmmeter or other circuit testing device. If there is no resistance, the part must be replaced. Often the problem is with the plug, socket or wiring.
On a note! Sometimes the switch does not work due to a thermal relay, designed to protect the motor from overheating, and the problem is found in the button.
Electric motor
In the “heart” of the electric trimmer, it is necessary to check the armature, stator, bearings, and temperature sensors for malfunctions. You also need to ring the windings and pay attention to the condition of the brushes and contacts. Repairing burnt windings is more expensive. It's better to change it. Worn brushes also need to be replaced . You can repair the contacts yourself using a soldering iron. Problems in the engine are often indicated by a burning smell, sparking and vibration.
Mechanical breakdowns
Mechanical failures of this kind are typical for electric scythes.
- If the engine is running but the cutting tool does not rotate, the flexible shaft has broken. To replace it, you need to unscrew the rod and remove the damaged part. If necessary, you will have to detach the lower part of the trimmer.
- Often the rod itself breaks. During operation, it can be temporarily fixed using improvised objects. But later you will have to purchase a new stand.
- Often during repairs you have to deal with cutting tools, especially a fishing line spool. To avoid unnecessary problems, you need to learn how to thread the string correctly.
- Quite often it is necessary to replace the main shaft bearing for a cutting tool, as it breaks.
On a note! Mechanical failures can occur in the main trimmer segment where the main components are located. They may be chipped or cracked. Replacing or repairing such parts will indicate the severity of the damage.
Troubleshooting a petrol trimmer
Equipment of this type is distinguished by a more complex device, since it contains not only a drive , but also a number of other elements: a gas distribution system, a fuel tank and control.
When considering mechanical damage, it should be taken into account that this includes filter clogging. The operating requirements stipulate that they must be changed during regular maintenance of the device.
highly undesirable to choose models from little-known manufacturers , since the level of their performance is often quite low. Considering that components for gasoline trimmers are not offered in every store, it may be difficult to purchase them.
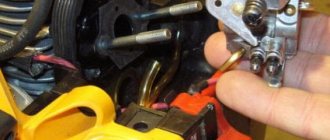
Replacing the ignition coil
The main sign that the ignition coil has failed and trimmer repair is required is the absence of a spark at the spark plugs. In this case, it is very important not to rush to replace the coil; in most cases, the cause of the breakdown is a lack of contacts, a switch button that may have broken, or a problem in the spark plug itself. It definitely needs to be checked, perhaps there is current flowing somewhere or there are gaps or carbon deposits.
An unpleasant situation when mowing grass occurs at the most inopportune moment: you need to work quickly, but the electric mower is broken.
It is necessary to urgently repair the electric trimmer, the design of which at first glance is simple, but in fact there can be a lot of places of damage.
The article contains an overview of typical breakdowns. Familiarity with it will help save time on troubleshooting and troubleshooting.
Fuel supply and ignition system
In most cases, malfunctions arise precisely in this area, and each owner can fix such problems with his own hands.
- If attempts to start the lawn mower do not lead to anything or it stops working after a couple of moments, then a problem in the ignition system can be considered as a possible cause. To confirm this hypothesis, the candle should be removed and examined. If signs of a fuel mixture are detected on the body, we can conclude that the problems are related to the carburetor adjustment. The presence of black carbon deposits on the spark plug indicates the need to replace it. Most often, there are no problems finding such components for trimmers.
- The body of the spark plug may be covered with soot if low-octane gasoline is used as fuel or the device operates in cold start mode with irregularities.
- A dry spark plug may indicate that the problem is due to a clogged fuel hose. This will be confirmed by the flow of gasoline from the disconnected hose. If nothing like this happens, then you need to inspect the filter: if there are signs of clogging, a new product is installed instead. Also, the reason may lie in the breather , which can be restored to working condition by cleaning it with a needle.
- When diagnosing a gasoline trimmer, it is important to pay attention to the muffler: very often its body is covered with soot. In this case, it must be removed, cleaned with kerosene and annealed with a burner.
Where do trimmer electrical faults occur and how to identify them
It so happened in my practice that neighbors already asked for help twice when their engine did not turn on. The most interesting thing is that it was in full working order, and the defect was inside the extension cord.
Therefore, I recommend starting the proceedings by checking its serviceability. To do this, just insert the extension cord into the socket and measure the voltage at its end.
When using a screwdriver with an indicator, you will have to turn the power plug over twice, checking the integrity of each core by the presence of a phase on the socket contact.
If it is missing, then it makes sense to look for broken wires in the power supply circuit. By the way, an insufficient voltage level can also affect the operation of the electric motor. This often happens in rural areas.
Then the voltage will have to be increased in one of the most appropriate ways for your particular case. Otherwise, the electric trimmer may work with overload and overheat. Pay attention to this.
The strength of its glow allows you to indirectly judge the amount of power and look for a broken wire in the extension cord. You just have to move the wire along its entire length with your hands. Loss of contact usually occurs near the socket, where vibrations are most often created when mowing.
If everything is fine with the power supply, then we will need access to the internal electrical circuit. To do this, you need to open the housing mounting screws. They are all located on one side, including the self-tapping screw that secures the rod.
Both halves of the case, except for the screws, are held on by plastic locks with latches. They must be opened with any flat and thin metal object, such as the blade of a knife or screwdriver.
After this, the top cover can be easily removed. I immediately recommend taking a camera and taking a photo of the wiring along the numerous internal channels and recesses. The photo will help in future assembly.
After this, you can begin an internal inspection and analysis of the serviceability of all electrical components of the circuit.
How to safely test the operation of a circuit breaker
Electrical switching is performed by a small-sized switch having two fixed positions:
- disabled, ensuring that the power contact is broken when the microphone button is released;
- on - when pressed.
Its operation must be checked with an ohmmeter or continuity tester. When the button is lowered, the readings on the display will indicate a very high resistance value - ∞ or 0L, as on my device.
When you press the button with your fingers, electrical contact occurs and the resistance drops sharply to almost zero.
How to call electrical wires
A broken wire or loss of electrical contact anywhere in the circuit can be detected by testing a section of the circuit or measuring its resistance with a multimeter in ohmmeter mode.
To do this, it is enough to use even the simplified circuit of the commutator motor shown above. It will allow you to sequentially check all sections of the voltage supply circuits to the electric motor.
I show this process on a segment from the power cable plug to the switch contact.
Engine malfunctions
If the failure of the trimmer is associated with a non-working engine, then in this case it will not be so easy for the owner to understand what caused the problem and how it can be fixed. It’s good if the device is still under warranty, in which case you can take the trimmer to a repair shop, whose specialists will handle this task fairly quickly and efficiently. Among the causes of engine failure that are often identified and least associated with difficulties in eliminating the causes of engine failure is the destruction of the piston rings. You can verify this by removing the cylinder head and piston.
How typical mechanical defects manifest themselves and how to fix them yourself
The following damage to the kinematic circuit most often occurs on an electric trimmer:
- the electric motor bearings jam or become loose;
- the line gets tangled or breaks due to improper winding on the reel;
- torque is not transmitted from the engine to the mowing head;
- the plastic case and individual parts melt when overheated due to increased loads;
- increased vibration of the rotating head is created, making mowing difficult.
I'll look at them in a little more detail.
How to easily check the operation of bearings
It is enough to rotate the outer race relative to the shaft and immediately evaluate the smoothness of their operation and the state of play using the tactile sensations of the fingers.
Broken and worn bearings must be replaced. Don’t forget to update the lubricant if necessary: remove the jet and apply a new one.
How to prevent mowing head malfunctions associated with common mistakes made by DIYers
Trimmer heads are created in three types of designs, which involve dispensing line in one of the following ways:
The vast majority of products use semi-automatic line feed. It also allows for manual adjustment of the length of the cutting section.
A large number of breakdowns are associated with violation of the operating rules recommended by the manufacturer, when the trimmer begins to work beyond its capabilities. These include:
- a significant excess in the diameter of the cutting line, leading to increased load on the engine, intermediate shafts, gearbox and mechanical parts of the head;
- installation of homemade knives or chains instead of standard structures;
- Incorrect line winding.
In simple words about the design and operating principles
The trimmer device can be divided into two parts:
- Electrical diagram;
- Kinematics system.
The electrics are based on supplying voltage from the outlet to a commutator motor, which rotates the rotor.
Depending on the purpose of a particular model, this engine is located above or below the trimmer and is equipped with various protections and controls.
Powerful models are created for quickly mowing large areas, while medium and low-power models allow you to decoratively cultivate lawns, trim shrubs, and form flower beds.
The mechanical part is made of a collapsible body with a kinematic diagram that transfers the rotational energy of the engine rotor to the working body of the mowing head.
Mechanics and electrical are closely interconnected: a breakdown in any place leads to the trimmer being taken out of operation. Let us consider these situations in more detail to make repairs possible.
DIY electric trimmer repair. Description of repair - trimmer with fishing line
We all have to improve our plots of land - in the summer and, of course, to give the plot a beautiful appearance:
- You can’t do without a trimmer. The cause of breakdowns of electric trimmers is strong vibration during operation, which affects various electrical connections of this electrical device.
Here is a photograph with technical data of an electric trimmer. The trimmer repair will be accompanied by personal photographs with a detailed description of the repair.
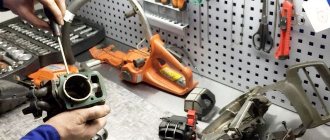
Disassembling the trimmer
Let's start disassembling the electric trimmer:
First, we separate the two connected halves of the trimmer, the control handle from the contact connection with the electric motor itself.
Two photographs \photo No. 2, photo No. 3\ show the sequence of disconnecting the electric motor from the control handle.
Checking with an indicator screwdriver
To check the electrical connections, we need a simple tool - an indicator screwdriver.
Photo No. 6 shows a detachable contact connection from the control handle. To check the electrical circuit of connections from the contacts of the plug \photo No. 7\ to the detachable contacts \photo No. 6\ - for this, you can short-circuit the plug with the fingers of your left hand and connect it alternately with the detachable contacts using the tip of an indicator screwdriver.
If there is integrity and the absence of any break \photo No. 9\ in the electrical connections, the signal light of the indicator screwdriver will light up, that is, the electrical circuit is closed to the LED light of the indicator screwdriver.
When performing this diagnostic, it is also necessary to close the contact of the potentiometer \press contact\ as shown in photograph No. 8.
We checked one half of the electric trimmer \control handle\ - the handle of the manual trimmer is in good condition and then we need to check the second half of the trimmer, consisting of an electric motor and a capacitor.
Diagnostics with a multimeter
For this test we will need a digital multimeter. You can also use a dial multimeter or a device such as an Ohmmeter - there is no difference at all.
We set the digital multimeter to the measurement range of the least resistance, connect the probes of the device to the detachable connection socket \electric motor output contacts\. The device in this example \photo No. 10\ shows one - the display of the device means a break in the electrical circuit of the electric motor.