How to disassemble the MAKITA GA 9050 gearbox
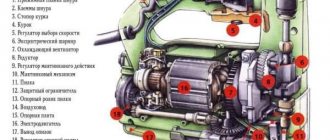
A breakdown of the stator, position 24 of the grinder, indicates the appearance of a burning aroma, overheating of the grinder body, and a spontaneous increase in the grinder’s speed. In the body of the angle grinder, pos. 33, the stator is secured with 4 self-tapping screws 4×70, pos. 21. To prevent damage, the stator is locked with protection pos. 20.
Repairing the stator of a Makita consists of identifying a short circuit or break in the windings. It is best to diagnose the stator with a special device called IK-2. The stator is considered faulty if traces of darkening of the winding are visible, a break or short circuit of the winding turns is detected.
The stator is easy to repair. You need to rewind its windings.
If the grinder overheats, a burning aroma appears, or an increase in sparking in the collector area, you need to examine the integrity of the rotor, pos. 13.
Dismantling the rotor involves performing one-by-one disassembly. To remove the rotor, it must be released from the gearbox pos.3. For this purpose you need to unscrew the M6 hex nut pos.4. To unscrew the nut, you need to hold the rotor with one hand. With your second hand, using an open-end wrench, unscrew the nut counterclockwise.
Remove the nut, take out the flat washer pos.5, remove the helical bevel gear pos.6, remove the locking spring pos.7. Rocking the rotor to the sides, carefully remove it from the gearbox housing, pos. 3. After removing the retaining ring pos. 8, use a puller
pos.9.
The Makita 9565 angle grinder uses bearing .
It remains to remove the flat washer pos. 10 and the gearbox cover pos. 11.
You will see the external appearance of the rotor of the Makita 9565 angle grinder with a mounted insulating washer pos. 14, a flat washer 7 pos. 15, a bearing pos. 16 and a rubber boot 22 pos. 17. The grinder, which is not familiar to the manifold, uses bearing . Russian analogue 80027.
Electrical faults of the Hitachi angle grinder
Hitachi grinders suffer from failure of switches, carbon brushes, and broken wires of the stator windings. As with all electric tools, the appearance of faults in the electrical part largely depends on the condition of the carbon brushes. Hitachi angle grinders are equipped with carbon brushes with a built-in device, popularly called a “shot”. The purpose of such a device is to prevent Hitachi angle grinders from turning on when there is a high degree of wear on the carbon brushes. The weak point in the design of the electrical part of Hitachi angle grinders is the place where the power cable is inserted. This is where the cable most often breaks, breaks, or becomes exposed.
Checking the electric motor
Several points indicate that the grinder is not working properly:
- Rotation of the working body in jerks;
- Drop in speed and power of Hitachi angle grinders;
- Spontaneous set of revolutions;
- Strong heating of the stator housing;
- The appearance of significant sparking in the collector area;
- The appearance of a burning smell, smoke.
A drop in power from a power tool is associated with a break or short circuit in the rotor windings.
Rotor repair
Repairing the rotor of a Hitachi angle grinder is no different from repairing the rotor of any angle grinder. Not every consumer will be able to fix this kind of malfunction. To do this, you need to have not only special equipment, but also the skills of a winder. It is preferable to send the failed rotor to specialized service centers.
But for those who like to get to the bottom of the truth, we recommend that you familiarize yourself with the rotor rewinding algorithm.
The failure of the rotor is indicated by the appearance of burning in the collector area. As a rule, the lamellas burn out and a dark coating appears on the winding wires.
The rotor must be removed from the housing:
- Remove the carbon brushes;
- Remove the gearbox cover;
- Unscrew the nut securing the drive gear;
- Pull the rotor out of the gearbox housing;
- Pull the rotor out of the stator housing.
If you have an IK-2 device, then you can measure the presence of a short circuit in the turns or a break in the windings without disassembling the rotor.
Dismantling a failed rotor begins with removing the rotor bearings and impeller from the armature shaft. It is recommended to remove the bearings and impeller using special pullers to avoid damaging the parts. If the collector is damaged and cannot be restored, it must also be dismantled using a puller. Pre-solder the ends of the windings soldered to the collector lamellas. All that remains is to remove the burnt winding. Having cut off the end of the winding with a hacksaw, count the number of turns in several grooves, sketch the winding direction, and determine the percentage of filling of the armature core grooves. Using a micrometer, measure the diameter of the wire being used. You will need this data if you decide to wind the anchor of a Hitachi angle grinder with your own hands.
For other consumers, we recommend purchasing a new rotor from service centers or online stores.
Stator repair
Failure of the stator is most often indicated by significant overheating of the angle grinder body and a spontaneous increase in speed that cannot be controlled. The malfunction can be determined by removing the stator from the housing:
- Disconnect the gear housing and stator housing by unscrewing the four screws;
- Pull the gearbox with rotor out of the stator housing;
- Pull out the plastic stator protection;
- Unscrew the two screws securing the stator and pull it out.
A stator break is easily determined by a tester. But the interturn short circuit is best measured with an IK-2 device or an oscilloscope. You can repair the stator of a Hitachi angle grinder yourself at home. But you need to have some skills.
A failed stator is first disassembled:
- The output contacts are released;
- The winding is cut off from one end of the core with a hacksaw;
- The number of laid turns of wire, the direction of winding, and the percentage of filling of the grooves are calculated;
- The diameter of the wire used is measured using a micrometer;
- The core is cleaned of traces of soot and drops of molten copper wire.
The manufacture of the stator is described in detail on the pages of our website. For those who wish, it will not be difficult to complete this work.
Some useful tips when winding:
- Use a wire of the same diameter as was used in the stator;
- If the volume of the stator slots allows, it is preferable to use a larger cross-section wire, but do not overdo it;
- Try to lay the turns tightly when winding, controlling the shape of the winding;
- Carefully tie the winding with a mounting thread or cord;
- Be sure to impregnate the winding of the wound stator with paint or varnish, using alternating voltage through the LATR during impregnation;
- Upon completion of winding, clean the middle of the stator core from traces of paint and varnish.
Video:
Repair of electrical control circuits for Hitachi angle grinders
Electrical control circuits for power tools are a simple design. They perform the task of smoothly starting the tool, possibly adjusting the speed, turning the tool on and off. The control circuits include a switch, speed controller, electric motor, carbon brushes, power cable and switching elements. Let's look at the operation of the electrical part of a Hitachi angle grinder using the example of two models: Hitachi G13SB3 and Hitachi G23SCY.
Electrical diagram of the angle grinder Hitachi G13SB3 angle grinder 125
Assembly diagram of the Hitachi angle grinder.
Power is supplied via cable pos. 52 to the terminals pos. 53, connected to the switch pos. 42. At the entrance to the angle grinder body, the cable is fixed with a clamp pos. 55. The noise suppressor pos. 46 and the wires to the carbon brushes pos. 39 are connected to the switch. Hitachi angle grinders use self-stop carbon brushes. The size of the carbon brushes in the Hitachi G13SR3 angle grinder is 6.5×7.5 mm. Carbon brushes are installed in the brush holder pos. 38. The Hitachi angle grinder is turned on by moving the switch button pos. 36.
The most common malfunctions in Hitachi angle grinders occur when the power cable fails at the entry point, wear of the carbon brushes pos. 39, or failure of the switch pos. 42.
This kind of malfunction is eliminated by replacing the failed part or piece of wire.
Scheme of the angle grinder Hitachi G23SCY angle grinder 230
How to change gears on Makita 9558HN
Rotor repair consists of replacing it with a new or repaired one. There is an option to repair the rotor without the help of others; alas, you need not only patience, equipment, and material. This is the type of work of the highest class.
In addition to the electronic part, the grinder also includes a mechanical part, the main component of which is the gearbox.
The gearbox consists of a housing, drive and driven gears. The drive gear is mounted on the rotor shaft. The driven gear is mounted on the spindle, pos. 50.
On the Makita 9565 angle grinder, the driven gear is pressed onto the spindle. In the Makita 9558HN angle grinder model, the driven gear is mounted on the shaft using a keyway.
Gearbox malfunctions are associated with failure of gear teeth. The gears are licked off or some of the teeth are chipped.
Repairing a Makita angle grinder gearbox involves replacing a pair of helical gears. Changing gears is done exclusively in pairs.
To remove the driven gear, you cannot do without a press or a special puller. There is no need to use a hammer as the gear housing is made of brittle material.
Some general useful tips for organizing the repair of an angle grinder
Before you start repairing your angle grinder, let's consider a few useful tips:
- Before you start disassembling the angle grinder, carefully read its description, assembly diagram and work order.
- Be sure to follow the sequence of technological operations.
- Strictly follow safety precautions.
The most common reason why an angle grinder breaks down is a broken wire near the handle. First you need to check the presence of voltage on the button, this is done with a regular voltage tester. Then we check the button itself for functionality.
How to remove a needle bearing or a damaged journal bearing race
Grinder gearboxes use various bearings. They are subject to heavy loads and cause malfunctions.
Bearing failure is determined by an increase in spindle shaft play. By disassembling the gearbox housing and removing the large gear shaft, you will see the needle bearing.
The needle bearing is not used in all angle grinders. In the same grinders in which it is installed, its dismantling can be done in several ways.
Having removed the destroyed part of the bearing, the inner race can be removed using a machine tap. Clamp a machine tap of a suitable diameter into the screwdriver chuck and try to screw it into the bearing race until the tap rests on the bottom of the housing. Continue to slowly screw the tap into the cage. It will lift the clip along the threads.
The second method is that the remaining race of the destroyed needle bearing can be removed using a special bolt and a retaining ring.
How to remove helical gears of an angle grinder gearbox
Repair of the grinder gearbox begins with the dismantling of the helical gears. It is the gears that become the main cause of malfunctions of the grinder gearbox. In grinders, you most often have to change the small drive gear attached to the rotor shaft.
The helical gear can be attached to the rotor shaft in two ways:
- The gear is secured with a keyed connection and clamped with a nut.
- The gear is attached using a threaded connection. Moreover, both right-hand and left-hand threads are used.
The large driven helical gear is mounted on the spindle shaft in two ways:
- The gear is pressed onto the shaft.
- The gear is secured using a keyed connection.
In addition to replacing gears, angle grinders often require replacing one or another bearing. And there are at least three of them in the design of the grinder.
General instructions for disassembling an angle grinder
All angle grinders consist of two main parts: a plastic drive housing and a metal gearbox. In addition, for many angle grinders you can separately disassemble the rear handle, inside of which there is a power input, as well as control system units. To repair an angle grinder at home, you may need Phillips and flathead screwdrivers, wrenches and thin pliers. In addition, to check and repair electrical circuits, you will need a multimeter and tools for working with wires. Before disassembling the grinder, it is necessary to remove the cutting disc and protective casing.
Design features of foreign angle grinder manufacturers
In this chapter, we will look at the design features of angle grinders produced under the Bosch, Hitachi and Makita brands, as well as do-it-yourself angle grinder repairs.
Bosch angle grinder repair
Bosch grinders are a reliable tool that does not cause much trouble to the user. But not every user treats the tool correctly. Bosch angle grinder repair most often involves replacing bearings.
Structurally, all Bosch angle grinders are made according to the same design. The spindle shaft pos. 25 is pressed into the driven helical gear pos. 26 and rests in the gear housing pos. 821 on the needle bearing pos. 51.
When a bearing is destroyed, a bearing race remains inside the housing, which is not easy to obtain. We recommend two methods for removing the needle bearing race. They are described in the section “How to remove a needle bearing”.
If the teeth of a pair of gears are worn out or licked, both must be replaced and only in pairs. When dismantling the gears, remember that the drive gear is attached to the rotor shaft on a thread, and the LEFT gear is secured with a nut. The driven large helical gear, pos. 26, is pressed onto the spindle shaft, pos. 25.
Hitachi angle grinder repair
Hitachi grinders have gained particular popularity among Russian consumers. And this is natural. There are practically no handicraft fakes of Hitachi angle grinders on the market. The simplicity of the design makes it easy to carry out repairs of any complexity.
Grinders from Hitachi are highly reliable and rarely come to the attention of repairmen. The main reason why a Hinachi angle grinder needs to be repaired is a gearbox failure, namely, the wear of gear teeth.
The grinder gearbox is easy to disassemble. To disconnect the gearbox housing, pos. 3, from the stator housing, pos. 37, the carbon brushes must be released.
Unscrew the four screws, item 1, securing the gearbox housing and stator housing. Separate the gearbox housing and the stator housing. The gearbox housing will be disconnected together with the rotor, pos. 8.
To remove the gearbox cover pos. 23, you need to unscrew the four screws pos. 24. The driven helical gear pos. 33 is fixed on the spindle shaft pos. 26 using a key pos. 25 and is driven off with a puller. Bearing pos. 21 is removed with a puller.
Makita angle grinder repair
A special feature of the Makita family of angle grinders is the quick-release protective cover pos. 19.
Makita grinders are more likely than others to be repaired. But the reason is the high percentage of counterfeits that have flooded the Russian market.
A true Makita is a reliable, durable tool. But, like all angle grinders, it suffers from failure of the gearbox and its gears.
Reducer gears are replaced if they become jammed or destroyed.
To repair a Makita 9069 or Makita 9558 HN angle grinder, you need to disassemble the angle grinder.
If the gearbox is faulty, and this is determined by the appearance of play in the spindle shaft, jamming of the gearbox, or slipping of the driven gear, then the gearbox should be disconnected from the stator housing. Release the carbon brushes, pos. 35, unscrew the four screws, pos. 10, and disconnect the gear housing from the stator housing, pos. 37.
At the next stage, unscrew the four screws pos. 18 holding the rotor cover pos. 15. The driven gear pos. 14 is removed using a tool. The drive gear, pos. 43, is secured by a keyed connection and secured with a nut, pos. 42. The rotor shaft bearings pos. 3 are removed using pullers.
How to disassemble an angle grinder gearbox correctly, video
There are many companies specializing in the production of angle grinders. The basic design principles of angle grinders for all companies are practically the same. However, there are some features that should be taken into account when repairing angle grinders of a certain brand. The experience of such repairs is presented by craftsmen in video formats, it is presented below.
Bosch
An overview of one of the household models of an angle grinder from Bosch is presented in the following video. It disassembles the gearbox, after which a visual inspection of the bevel gear . The presence and condition of the lubricant is determined. It is possible to determine the degree of gear wear. In this case, since the angle grinder is new, you can only make sure that there is one support on the spindle in the form of a plain bearing and a bevel gear - it is spur gear . The author classifies these design features of this Bosch angle grinder model as disadvantages. Indeed, the service life of such an angle grinder and the noise level will not be good .
In the following video, after disassembling the gearbox of another model of a Bosch angle grinder, significant contamination of the lubricant with abrasive particles is observed. Conclusion: the internal cavity of the gearbox should be inspected regularly to avoid early failure of the power tool.
The author suggests replacing expensive lubricant from Bosch with another cheaper and more accessible domestic one. Important: the postulate that there is no such thing as too much lubrication is not acceptable here. A large amount of lubricant will lead to its squeezing out through the seals on the gear housing, for example, through the retainer seal. Therefore, a strictly defined amount of lubricant should be placed in the gearbox.
Hitachi
The following video describes in detail the process of disassembling the gearbox spindle of an angle grinder of one of the Hitachi models. This is caused by replacing a stuck bearing located in the gear housing cover. In order to get to it, you must remove the driven gear pressed onto the shaft. Due to the small distance between the gear and the gearbox cover, the puller jaws are modified by grinding their surface to the required thickness in order to fit into this gap. Important: before pressing out the gear, you must remove the retaining ring that secures it.
DeWalt
A design feature of the angle grinder of one of the DeWalt models is the design of the gearbox housing. The lid here does not have any additional functions other than protection against abrasive particles getting inside. The flange where the bearing unit is located is made as a single unit together with the housing.
Usually, when replacing a structural element (in this case brushes), in most cases the lubricant in the gearbox is replaced. To do this, the DeWalt angle grinder is completely disassembled with the rotor removed, so that it is convenient to rinse and clean the gearbox cavity from old grease.
Another feature of the DeWalt grinder is the design of the driven large gear . A conical insert inside the gear housing prevents operation under overloads. The preload force of the conical insert is adjusted to operate under permissible loads. With increased effort, the gear will slip along the conical surface.
For convenience, when changing oil, the author uses a measuring syringe . Here it is easy to control the amount of lubricant required for refilling.
Makita
The following video shows a preventive inspection of the gearbox of one of the models of Makita angle grinders. After a certain amount of operating time, the grinder was completely disassembled and the rotor was removed . Wear on the teeth of both gears is visually visible, and there are chips. The author, unfortunately, did not analyze the reasons for their appearance. Replacing worn gears with new ones does not guarantee their long-term operation.
Sparky
In the Sparky angle grinder, in the following video, the author shows the reason for the one-sided rotation of the spindle and how to eliminate the defect. A collapsed rotor bearing with a support in the gearbox casing caused its misalignment, which contributed to damage to the aluminum casing in the form of chipped chips. Using pullers and a wooden drift, the author can easily disassemble the gearbox and replace both bearings on the rotor supports.
Lepse
The video shows a very reliable angle grinder from Lepse, which broke down after ten years of use. During disassembly, a defect was discovered that is quite rare . The reason for the breakage of the bolt securing the drive gear remains unclear to the author. Perhaps these are fatigue stresses from periodic loads. The repair method using a drill and sprocket is worthy of attention.
Fiolent
In the following video, disassembling the gearbox helped to identify the cause of the malfunction of the Fiolent angle grinder. After carefully unscrewing the fasteners on the gearbox housing, a large spindle play in the bearing assembly support. Particles of the bearing race confirmed the direction of repair work to replace the collapsed support unit.
Diold
the reason for the increased noise of the Diold grinder in the following video. After disassembling the gearbox, large gaps were discovered in the bearing units . It should be noted that they did not in any way affect the quality of the gear teeth - they are in full working order. That is, if the gears are made of high-quality material in compliance with heat treatment technology, they can work reliably in the most difficult conditions. Using the tools necessary for such repair work, the author shows how to replace defective bearings .
DWT
A jammed spindle in an angle grinder model DWT, which is described in the following video, is repaired using well-established technology . The brushes are disconnected from the rotor so as not to damage them in further repairs, and the gearbox is disassembled . Then the wear of the gears and the play of the bearing units are visually checked.
In this particular case, it was the failed bearing that caused the grinder to malfunction. The video shows how one faulty bearing can lead to a whole train of broken other parts. You should carefully monitor the condition of the bearing units and regularly check for play.
Design features of angle grinders from domestic manufacturers
Among domestic manufacturers, a special place is occupied by the products of such well-known brands as Interskol, Fiolent, Lepse.
Angle grinder repair Interskol
With proper use, Interskol grinders can work for years.
Along with the infrequent failure of the grinder gearbox, in which the weak link is a pair of gears and a bearing, there have been cases of malfunctions in the stator.
To replace the gears of the gearbox, it is necessary to disassemble the gearbox housing, pos. 19, by releasing the cover, pos. 6.
The driven gear pos. 11 is pressed onto the shaft pos. 8 and is removed using a press. The bearing pos.9 is removed with a puller.
You can repair the stator of an Interskol angle grinder yourself if you know the necessary data. When disassembling a burnt stator, you must count the number of turns of the wire used and its cross-section.
Repair of angle grinder Lepse
Grinders under the Lepse brand are marked with the LPS Lepse Kirov 1.8-230-A. These grinders trace their history back to the famous Soviet-made grinder IZH. An amazingly durable tool with the most vandal-proof design.
The advantages of the Lepse grinder are the ability to replace worn carbon brushes without disassembling the body of the machine.
Repairing Lepse angle grinders in terms of replacing brushes is simple. Through special windows pos. 45, closed with caps pos. 48, carbon brushes pos. 47 are inserted into the brush holder housing pos. 46.
Read also: Rules for storing acetylene cylinders
When repairing the gearbox of a Lepse angle grinder, it is necessary to dismantle the gear pair.
The driving small helical gear is mounted on the rotor shaft on a key and secured with a nut.
The driven gear, pos. 15, is screwed onto the spindle shaft, pos. 10, and secured with a nut, pos. 18.
Repair of angle grinder Fiolent
Recently, Fiolent grinders have become especially popular. What attracts us is not only the affordable price, but also the reliability of the tool.
It is recommended to start repairing the Fiolent angle grinder with your own hands by studying emerging faults. If you need to disassemble the Fiolent angle grinder, then in order to remove the driven gear, pos. 11, it must be pressed out from the spindle shaft, pos. 8.
To remove the spindle shaft bearing, you must first remove the large helical gear. These are minor inconveniences.
Replacing the rotor bearings requires the removal of the small helical gear, pos. 22.
Collector-brush unit
Before you start disassembling the angle grinder, the first step is to remove the brushes, which are pressed to the commutator by a spring. Otherwise, damage to the brushes and cheek holders is possible when removing the rotor (armature). If the remaining graphite body of the brushes is less than 50% of new ones, it makes sense to replace them.
READ How to Make a Grinder Holder
The old set, with a balance of at least 30%, should be saved in NZ for backup. They will be useful in cases of long searches and time for delivery of a new set or other force majeure situations. If the brushes are not equipped with an auto-stop function (“shot or groove with a mating pin in the brush holder”), critical wear will most likely lead to the destruction of the commutator, up to and including replacement of the entire armature. IT IS IMPOSSIBLE TO SAVE ON BRUSHES!
In cases of extreme necessity and the impossibility of choosing the right size brushes (described in more detail in the category) and the willingness to adjust the size, do it correctly!:
- If you choose, then it is desirable that only one side does not match, preferably the smaller one (width).
- Treat with a fine-grained abrasive cloth (sandpaper no larger than 1000 grit, the brush is very fragile and brittle).
- Work on a flat surface (eg glass), without pressure. After every few cycles of movements, check the size with a caliper, and also check that the planes of the brush body are parallel.
During service, the brush wears out, leaving a graphite-carbon deposit on the parts of the entire assembly. I have a separate post and video on how to clean the commutator and prepare it for installing a new set of brushes. It is difficult to overestimate the importance of this procedure.
Also, it is worth paying attention to the brush holder shafts. A layer of graphite particles and dust impedes nominal advancement, which can cause the brush to “hang”, causing a disruption of contact with the commutator, accompanied by increased sparking, even up to breaking the circuit, i.e. stopping the engine, and in rare cases, burning out the lamellas and the known outcome of the armature. Cleaning only takes a couple of minutes. If the shaft is slightly dirty, then a dry rag will suffice (it is convenient to use a small flat-head screwdriver, the edge of which is wrapped in several layers of rags, as a guide). Sometimes it’s worth using additional alcohol on rags;)
What repairs can a user make to an angle grinder with his own hands?
Although the grinder is not a particularly complex tool, the user cannot perform repair work on all components.
Along with simply replacing the bearings or gears of the gearbox, there are malfunctions that cannot be made without special equipment or devices.
- To press out the driven gear you will need a press. It will not be possible to wind the rotor without tools.
- Such malfunctions include rotor failure. For the average consumer, such a malfunction ends with a trip to the service center.
- Advanced users can revive a burnt out rotor with certain skills and concepts. But sometimes it’s easier to buy a new one than to rewind.
For most users, repairing an angle grinder with your own hands is limited to a certain range of faults.
Systematization of faults in the electrical part of angle grinders
- The simplest fault that causes the angle grinder to not turn on is a broken power cord. Most often, a break occurs in the power cord near the plug or at the entrance to the instrument. The malfunction can be easily resolved by replacing the power cord or removing the broken piece of wire.
- Increased heating in the area where carbon brushes are installed. Most often, such a malfunction occurs due to shortening the carbon brushes below the nominal size. The length of carbon brushes cannot be shorter than 8 mm.
- The grinder's power button goes down. The malfunction is due to burnout of the internal contacts in the button. Eliminated by completely replacing the switch with a new one.
- Some models of angle grinders use a device that allows you to smoothly regulate the speed of the angle grinder. The angle grinder's speed regulator improves the smooth operation of the angle grinder and prevents the working tool from biting. Repair of the angle grinder speed controller consists of completely replacing it.
Grouping of faults according to the mechanical part of the angle grinder
- The appearance of extraneous noise in the grinder gearbox, heating of the gearbox. The malfunction is associated with the destruction of the support bearing, wear of the gear teeth of the gearbox, and drying out of the lubricant. Eliminated by replacing gears when tooth wear is high. If there is slight wear on the gear teeth, you can try to fix it. The tooth profile is corrected manually by filing using a round file and a drill. The lubricant is replaced with a new one every time the gearbox is repaired. New lubricant is applied to thoroughly washed parts.
- Bearing replacement is required when it is damaged or large play appears. In some models, the bearing is mounted on the spindle with interference. Replacement requires special equipment, in particular a press. Parts need to be cooled or heated.
- Replacing the bearings on the rotor is required when large runout occurs. The presence of increased runout can be easily seen on the rotor commutator and by the wear rate of the carbon brushes.
Simple faults and methods for diagnosing and eliminating them yourself
If your grinder does not turn on when you press the “Start” button, then the test begins by inspecting the power cable at the point of entry into the tool.
Unscrew the lid of the angle grinder and check the integrity of the power cord using a tester or phase. Strictly follow safety rules.
If the power cord is intact and the angle grinder does not turn on, replace the “Start” button.
If the grinder does not work when installing a new button, check the quality of fastening of the carbon brushes and their tight fit to the rotor commutator.
Do-it-yourself complex malfunctions and repairs of angle grinders
The following types of breakdowns require certain knowledge and skills to eliminate them:
- Seized or damaged bearings.
- Licking or destruction of gear teeth of the gearbox.
- Open circuit or short circuit in the rotor or stator.
- Failure of control circuit parts.
- Destruction of the gearbox housing.
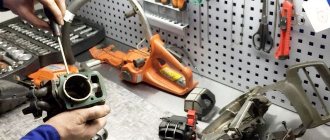
Repair of Makita 9555HN angle grinder. Replacement of stator and rotor. :: AutoMotoGarage
In all the time I’ve been using the power tool, this is the first time I’ve “burned” it myself. During prolonged work, my Makita 9555HN angle grinder began to smoke a lot. This happened due to haste and at the same time due to oversight. The totality of all my actions and events resulted in a very strong overheating of the instrument. Overheating was not noticed in a timely manner due to the fact that the work was carried out in welding goggles. Since they are leather, it is safer to work in them, since they will not get wound up, unlike rag or knitted ones. And since the leggings are designed to protect against temperature, the work was carried out as if nothing had happened.
In addition to just long work, which lasted about an hour and a half, there was another aggravating point: the tool used somewhat heavy equipment in the form of a thick, six-millimeter grinding wheel and a metal brush in the form of a cup.
The operating time of this angle grinder is small, therefore, we will repair it.
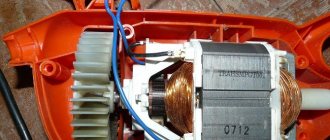
Let's disassemble the tool. The process is quite simple: unscrew the screw securing the black plastic casing and route it along the power cable. Next, lift the spring-loaded brush clamps and remove the brushes (there are two of them, located on different sides).
Let's move on to analyzing the front part of the angle grinder. Unscrew the four screws securing the gearbox and remove it. Next, remove the electric motor rotor. To do this you need to use a screwdriver. We install it in the technological groove and carefully turn it, controlling the process. The rotor is pulled out easily, without any excessive force (the main thing is not to forget to remove the brushes before doing this).
We blow the rotor with compressed air and inspect it. Externally there is absolutely nothing to complain about - it is perfect. The enamel on visible areas of the wires has not darkened and has retained its integrity. Unfortunately, there is nothing to test it for interturn short circuit yet. We put it aside and disassemble it further.
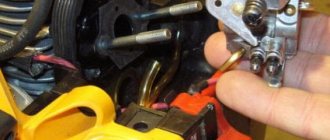
Now you need to get to the stator. After we removed the rotor, we had access to the plastic stator protection fasteners. Unscrew the two long screws and pull it out. Before you begin to remove the stator, you need to disconnect its windings and straighten the wires. You can use a rubber hammer to remove the stator. The process is as follows: with a hammer we apply light blows to the front end of the angle grinder body, and due to the sufficiently large mass, the stator will begin to come out of the seat. When removing the stator, you must ensure that its wires pass through the technological windows freely and do not cling to anything.
An inspection of the stator revealed the presence of burnt conductors in its windings. The enamel on them has darkened significantly and damage has appeared. The stator needs to be replaced.
We still have an open question with the rotor. I remember that some large retail outlets that sell spare parts for power tools can suggest and check some parts. We take the stator and rotor and go in search of spare parts.
We will begin the assembly by preparing all the parts and components of the angle grinder. First you need to blow off the dusty elements with compressed air. Next, rinse the gearbox parts in gasoline. After this, we will lay out all the components of the angle grinder and begin assembly.
It snaps into place without any difficulty or special tools. Just hand effort is enough. The main thing in this process is to correctly route the four wires that connect to the terminals. It is also worth paying attention to the red wire. jumper (the one that connects two windings). When installing the stator, this wire tends to take a position directly opposite the mounting hole of the plastic protection. If this is not taken into account, then during further assembly, when screwing in one of the screws, the wire will be guaranteed to be broken.
After the stator has taken its place, we install its protection.
Next, you need to prepare a new rotor for installation.
Here you need to install the previously removed plate, bearing, gear with nut and don’t forget to move the rubber ring from the old rotor to the rear bearing. In the diagram it is indicated as number 3 and is called a labyrinth rubber ring.
READ Checking the Grinder Stator with a Multimeter
After completing the above work, we place the assembled rotor in place. Next, use four screws to fasten the gearbox housing. The screws must be tightened evenly crosswise.
Now the rotor is fixed and the brushes can be installed. We place them in special brush holder channels, fix them and connect flexible contacts.
Next, install the protective casing and try to start the electric motor. In our case, everything worked without any complaints, the engine ran smoothly, there were no sparks on the brushes.
The final part of the work will be lubrication and assembly of the gearbox. Having sufficiently filled the cavity inside the gearbox, we installed the last element of this device and securely fixed it.
Having started the angle grinder, it became clear that there was so much lubrication in the gearbox that the first start was even somewhat difficult. During subsequent launches this effect was no longer present. But then it was revealed that after about 30-40 seconds the gear housing begins to heat up. This effect had not been observed previously. disassemble the gearbox again and remove some of the lubricant.
But the gear is “dry”. Centripetal acceleration removes all lubricant.
Excess lubricant has been removed.
But two questions remain: what is the lubrication rate for an angle grinder gearbox? And what type of lubricant should be used?
A few words about lubrication
The reliability of the gearbox and its durability largely depend on the timely replacement of lubricant and its correct selection.
The Russian fuel and lubricants market offers a wide range of lubricants. Among them, lubricants from Russian manufacturers stand out.
Modern tool manufacturers strongly recommend using only their own lubricants. This is the manufacturer's policy.
Among Russian lubricants, we recommend using lubricants specially designed for gearboxes.
But the quality of work of an angle grinder is affected not only by correctly selected lubricant, but, to a greater extent, by its timely replacement! Do not delay replacing the lubricant; monitor its condition.
Video block about repairing angle grinders - typical faults
SC GsmMoscow offers the services of qualified craftsmen who will repair Makita angle grinders efficiently and inexpensively. Our service uses original spare parts from suppliers who supply them directly to us. We provide a warranty card for each replaced part. We will eliminate even the most complex breakdowns such as bearing damage, control board restoration, armature replacement, etc. The repair will take 55 minutes. You can also be present during the repair.
The cost of repairing an angle grinder
In the price list below we have presented all the prices for service from the service center:
| Name | Repair cost | Repair time | Order | |
| Diagnostics | 40 min. | Order service | ||
| Call a courier/master | — | Order service | ||
| Replacing electric brushes | from 350 rub. | from 40 min. | Order service | |
| Replacing the anchor | 490 rub. | from 40 min. | Order service | |
| Stator replacement | 490 rub. | from 40 min. | Order service | |
| Replacing the electric button | 380 rub. | from 40 min. | Order service | |
| Replacing the reverse button | 350 rub. | from 40 min. | Order service | |
| Bearing replacement | 350 rub. | from 1 hour. | Order service | |
| Replacing the gearbox | 350 rub. | from 1 hour. | Order service | |
| Replacing the cord | 300 rub. | from 1 hour. | Order service | |
| Replacing the capacitor | 450 rub. | from 1 hour. | Order service | |
| Replacing the control controller | 590 rub. | from 1 hour. | Order service | |
| Replacing keys on the board | 490 rub. | from 1 hour. | Order service | |
| Replacing the board trim | 390 rub. | from 1 hour. | Order service | |
| Control board repair | from 390 rub. | from 1 hour. | Order service | |
| Hull repair | from 700 rub. | from 1 hour. | Order service | |
Our managers will answer all your questions, call or write to us.
Frequently asked questions and their solutions
For those who want to repair a Makita angle grinder themselves, we have prepared video instructions on how to repair power tools with your own hands. In addition, on our website you will find answers to frequently asked questions from the owners of this tool. If you haven’t found the answer to the question you were interested in, then ask our master.