Chuck mounting methods
Chucks are most often attached to the shaft in the following ways:
- Via Morse taper
- Threaded way
- Using a fixing screw
The Morse cone is one of the easiest and most practical methods that began to be used in the 19th century. The shaft plane is processed in the form of a cone with assigned parameters. A similar cone is located in the middle of the cartridge. When they are combined, a quick and strong connection of the component parts occurs.
The next method is equipped with a thread that is cut on the edge of the working shaft of the power tool.
The fixing screw is used to additionally connect the screw-in chuck to the shaft. As a rule, the screw has a head for a Phillips screwdriver, as well as a left-hand thread. It is necessary to unscrew the jaws of the chuck as much as possible to see it.
How to choose a new cartridge
A screwdriver chuck is selected based on a number of aspects. When choosing a suitable part, you should be guided by the following recommendations:
- if bits have to be changed frequently, it is better to prefer quick- or self-clamping cylinders; otherwise the work will go slower;
- gear-rim design - the choice of those who strive for maximum cartridge reliability; if 100% fixation of the bit is a priority, it is better to purchase a key cartridge;
- when choosing a part, it is necessary to take into account its characteristics; parameters are regulated by relevant GOSTs; the larger the clamping cone, the larger the number with which it is marked;
- it is necessary to take into account the country of origin - the alphanumeric designations of foreign models differ from domestic ones.
If it is difficult to decide on the type of “clamp” on your own, it is better to seek advice from a specialist.
An incorrect choice is tantamount, at a minimum, to incorrect operation of the tool.
In the worst case, it is possible not only to re-spend on a new cylinder, but also to replace the entire screwdriver.
How to determine the fastening method on a screwdriver
The fastening method is easy to recognize if you carefully examine the parts. The cartridge of the Morse taper variety will have the following inscription: 1-6 B10. This means that the chuck can accommodate attachments with a shank diameter of 1-6 mm, and B10 is an indicator of the size of the Morse cone.
The cartridge, fixed with a threaded fastener, is marked:
- Metric thread (domestic products) – 1.0-11 M12x1.25
- Inch thread (foreign production) – 2-13 mm ½-20 UNF
Principles for choosing a new product
If the old cartridge requires replacement, it's time to choose a new one. It is worth remembering that the design can use different types of key chucks, in which the tool is clamped with a key, and keyless or quick-clamping ones.
Read also: USSR woodworking machines models
The advantage of the key product is that the clamping on it is performed with better quality; however, quick-clamping ones are also not inferior in this parameter, but they have to be changed more often due to wear of the clamping mechanism.
If you have to frequently change equipment while performing the task, then it is better to choose a quick-clamping option, which will significantly save time. But when using large-diameter equipment, preference should be given to key chucks.
The chucks, which are attached to the screwdriver using a cone, can be made with quick-release or key-type chucks; the choice is always up to the consumer.
If, after all of the above, you still have questions, then we advise you to watch the video, everything is the same there, only a little more clearly.
Owners of screwdrivers sometimes need to remove the chuck from a power tool. This can be caused by various circumstances:
- Repair, lubrication and cleaning of this unit.
- The desire to replace this cartridge with another model (of a different design, size).
This operation does not require any special tools, skills or abilities. But when performing it, you need to remember some features that complicate disassembly actions. Most three-jaw self-centering chucks mounted on screwdrivers are quick-clamping. That is, they have several differences from the usual (key types):
- The unit has a plastic surface that can be destroyed even with minimal mechanical impact on it with metal tools.
- The chuck is located very close to the drill body, with a small gap that will not allow you to fix the spindle with a pipe wrench or a vice.
Another factor that can complicate disassembly in the easiest way is the relative low power of the screwdriver (when compared with drills).
How to remove and change cartridge + (Video)
If you are faced with replacing a cartridge, you should first understand the method of its fastening. To carry out the procedure with a minimum of effort, experts do not recommend overloading the screwdriver in everyday use. If you operate the tool continuously for fifteen minutes, the rotating parts may overheat and become firmly locked in the socket. Then it will be more difficult to replace. Experts recommend proven methods for removing the cartridge, described below:
- Unscrew the threaded fastener using an L-shaped hexagon, which every owner probably has. Next, you should insert a hexagon (size - 10 mm), place the short edge into the chuck and squeeze tightly in the jaws. After this, start and immediately turn off the device at low speeds so that the free edge hits the table slightly, thus loosening the thread and allowing you to unscrew the cartridge.
- If the cartridge is held on a thread with a fixing screw, then:
- Unscrew the screw with the left-hand thread in a clockwise direction.
- Then insert the hexagon into the cams, and with a quick movement of your hand or hammer, turn the free edge counterclockwise. Now you can unscrew the cartridge.
- If both methods didn't work:
- We take out the shaft on which the gearbox and cartridge are located from the open housing. To remove the cartridge you need to use a pipe wrench.
- To remove and change a cartridge with a Morse taper, you need to have a hammer with you, which will release the shank from the housing socket.
How to disassemble a screwdriver chuck
Sometimes disassembly of the cartridge is required.
To perform this operation, you need to remove the plug at the base.
It is enough to pry off the plastic part with a knife.
The metal one can be knocked out with a heavy object by hitting the base of the clamping sleeve.
The process is as follows:
- take a large bolt and insert it into the cylinder, after which it is slightly centered with a small clamp of the cams; in this case, the head of the bolt protrudes a couple of centimeters above the sleeve;
- hit the bolt with a hammer.
After this, the most interesting part remains - disassembling the cylinder itself.
It is necessary to divide it into its component parts - sleeve, base, washer, bearing and nut.
The design may be slightly different, but in general the part consists of these elements.
In rare cases, it is impossible to disassemble the cylinder without damaging it and being able to reassemble it in the same form.
But if the design suggests such a possibility, then you can use the following method.
Instructions on how to disassemble the cartridge in the simplest and most effective way - using a hammer drill:
- some kind of adapter is inserted into the hammer drill; the role of the latter can be played, for example, by a broken drill with a diameter of 10-12 mm;
- put the cartridge on the adapter with the back side - the one opposite the cams;
- remove the cams and rest the cylinder against a hard surface, but always through a shock-absorbing buffer (rubber, foam, etc.);
- turn on the hammer drill in impact mode.
Thanks to vibration, we disassemble the cartridge in a matter of seconds.
As a result of manipulations, the sleeve flies off the cylinder, exposing other parts.
After cleaning, the elements are easily put back together.
It is important not to mix up the cams - although they are similar, during the operation of the tool the parts grind in and require correct assembly.
Some complex designs require sawing of the coupling.
After maintenance or repair work, the halves are assembled using a makeshift “tire”.
But in most cases, the indicated method - using an impact drill or hammer drill - works.
Removing the chuck: Makita screwdriver + (Video)
Typically, Makita brand power tools are equipped with a threaded mount with auxiliary fixation using a screw with a left-hand thread.
A number of actions should be followed:
- Unscrew the fixing screw (clockwise).
- Activate the spindle lock button.
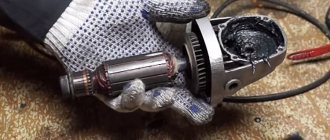
- Wrap the body with thick cloth and squeeze in a vice.
- Squeeze the hexagon in your fists.
- By hitting the free plane of the key with a hammer, the cartridge is rotated and then removed from the shaft.
The first mandatory stage! Unscrewing the fixing screw
The first, mandatory step when removing the chuck from most household screwdrivers is to unscrew the fixing screw located at the end of the spindle between the cams. This fastener is designed to protect the quick-release assembly from self-screwing when working with a load in reverse mode (counterclockwise).
For example, when unscrewing old fasteners, when it is necessary to increase the torque. In this case, the cartridge can remain motionless, fixed with a bit in the surface being processed, and the spindle will rotate “to the left” (counterclockwise) and will independently unscrew from the screwdriver mounting unit.
To avoid such situations, manufacturers use a control screw with a “left-hand” thread. It is this that must first be removed by performing the following steps:
- Spread the cams so that the tip of the screwdriver can pass between them freely.
- Unscrew the screw, turning to the right, since it has a “left-hand” thread.
Attention! Grooves on screw heads can be of different sizes and shapes (straight or cross-shaped). Therefore, it is necessary to have screwdrivers with different tips.
Unscrewing the keyless chuck from the screwdriver spindle After the fixing screw with a “left-hand thread” has been unscrewed from the end of the spindle, you can remove the keyless chuck from the screwdriver.
Due to the fact that the gap between the coupling and the body is several millimeters, it is not possible to fix the spindle with a vice or a pipe wrench. Therefore, there are several other ways to remove the cartridge.
Holding the cartridge with your hand
The easiest way is to hold the cartridge with your hand. To do this you need to do the following:
- Put a protective glove on the hand that will hold the cartridge.
- Set the torque regulator to maximum or switch the screwdriver to drilling mode.
- Make sure that the fixing screw is removed from the end of the spindle.
- Bring the chuck jaws to the minimum clearance.
- Holding the chuck with one gloved hand, start rotating the screwdriver in the reverse direction (counterclockwise). While the cams are moving apart, the electric motor will pick up speed, and at the moment they are fully opened, a kind of blow will be produced, which should move the threaded connection. Now screwing the cartridge will not be difficult.
Attention! This is not a safe method! It is prohibited to use it if at least one point is confirmed:
- Lack of special gloves.
- The power of the screwdriver exceeds 500 watts.
- Lack of self-confidence.
- Lack of good physical fitness (teenagers, women, elderly people).
If this method is not suitable for the prohibiting reasons stated above or is ineffective, then the following must be applied.
Using an L-shaped tool
This method is quite simple and safe, so it is a priority. The actions must be performed in the following sequence:
- Make sure that the fixing screw is removed from the end of the spindle.
- Attach the L-shaped tool to the cams. A hex wrench is best.
- Set the torque control to the maximum value or switch it to drilling mode.
- Switch the direction of spindle rotation to reverse mode (counterclockwise).
- Start the engine and allow it to reach maximum speed.
- Bring the rotating L-shaped tool fixed between the cams to a rigid stop. For example, a bench vise, a gymnastic weight.
- At the moment of impact of the fixed L-shaped tool, the chuck will quickly screw off the spindle.
Read also: How to drill a hole in a bolt
Attention! The cartridge unscrews very quickly, in less than one second. Therefore, it is necessary to ensure that it falls from a minimum height, that is, the stop against which the L-shaped tool will be struck should be as close to the floor as possible.
A second option for this method is also possible:
- After unscrewing the screw and securing a faceted key (three-, four-, five-, hexagonal) between the cams, hold the screwdriver in one hand, and with the other hand, hit the shoulder of the protruding tool with a hammer (mallet) so that the rotation occurs counterclockwise.
- Having thus “torn” the cartridge from its place, you can continue to unscrew it by hand.
This subtype of unscrewing is especially effective in cases where there is no voltage in the network (corded screwdriver), the battery is low, or the power tool is inoperative.
Removing the chuck: Bosch screwdriver
Bosch brand screwdrivers are usually equipped with a fixing screw.
- We place the key in the cams and tighten it a couple of clicks.
- The tool is placed on the edge of the table.
- By pressing the stop button, remove the cartridge lock on the shaft.
- The cartridge is removed counterclockwise.
All actions require special attention and consistency during disassembly/assembly.
Having acquired theoretical knowledge about the types of cartridges, it will be easier for you to independently repair screwdrivers from Interskol, Hitachi, and other manufacturers.
How to change the attachment in a screwdriver
An indispensable power tool with a self-explanatory name, the screwdriver is actively used in construction work. The most common procedure with such a device is replacing the drill. Sometimes it seems that this process is very complicated and almost impossible. However, in reality, replacing a drill in a screwdriver will not be difficult, the main thing is to follow the instructions step by step and pay attention to the details.
Can a screwdriver be used as a drill?
You can drill with a screwdriver only if this mode is provided by the manufacturer. Then drilling will be safe. Read the instructions carefully. On the coupling this is the last position or the drill icon.
Screwdrivers with a drilling function are equipped with a keyless chuck or a key chuck. A magnetic or snap chuck will not hold the drill and ensure safe operation. To replace the equipment, do the following:
- In a two-clutch quick-release chuck, hold the rear clutch and turn the front clutch counterclockwise.