adapter for grinder for grinding and polishing pipes AGPT 610 1S
Adapter (nozzle, attachment, for an angle grinder - “grinder”) belt AGPT 610 1S is intended:. for use for production purposes in ra
The belt sander is a very useful machine in the workshop. It's actually an electric file. This item is very convenient for sanding various objects and materials. Such machines are especially popular in the manufacture of knives. The cost of such machines is still quite high, so it makes sense to think about assembling it yourself. This can be done easily and relatively cheaply, and the power of this machine is quite enough for various household works.
Read also: In what year was light invented?
The author decided to use a small grinder as the main power element. They are relatively inexpensive, and almost everyone has them. All that is needed is to assemble the frame for the grinder, and also make and install wheels for the sanding belt. All these elements are assembled from practically waste materials. For example, driven wheels are made of bearings onto which a piece of hose or something similar is pulled. It's fast, simple, cheap and practical. As for the drive shaft, the author decided to use a bicycle stand; it is ideally suited for these purposes. So, let's look in more detail at how to make such a machine.
Materials and tools used by the author:
List of materials:
– Bulgarian; – bicycle stand (which are installed on the axle); - Sheet steel; – bolts with nuts; – square pipes; – spring; – bearings.
List of tools:
– vice; - hammer; – drill; - welding machine; - spanners; - roulette.
Step one. Making a bracket for an angle grinder
First of all, let's make a bracket for the angle grinder. In this regard, everything is individual, since all grinders are different in shape. The bracket is made of steel plates that bend in a vice in the shape of a “P” or another. Next, all these parts are securely welded to each other. The essence of the bracket is that it securely holds the angle grinder. Among other things, adjustment bolts are installed on the bracket. When they are tightened or unscrewed, the angle of the drive wheel changes, as a result you can center the belt. The bracket itself is hinged to the frame, and it is also spring-loaded so that the belt has the required tension.
Step three. Making a working plane
The working plane is the part of the structure on which you will rest the product when working. To make it you will need sheet steel. We make three parts and then weld them together. The outside welds must be cleaned, otherwise the belt will quickly fail.
We drill holes at the ends of the part, now you can install the driven wheels in their places!
Step six. The final stage of assembly
Finally, weld a support to the base; this will be a leg that will not allow the machine to tip over during operation. A piece of square steel pipe is perfect for these purposes. If desired, you can glue rubber feet to it.
It will be mandatory to install a “working table” on the machine; you will rest against this element when grinding. For these purposes, it will be quite enough to weld a piece of steel plate in the right place. That's all, the machine is ready! Finally, it is highly advisable to paint it so that the metal does not rust.
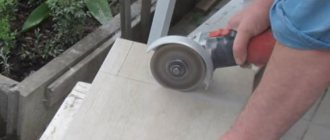
Step seven. Testing
The machine is ready, you can start working! We start the grinder and, using the adjusting bolts, adjust the machine so that the sanding belt is strictly in the center of the wheels. That's all, now the machine can be used. The author easily sharpened a kitchen hatchet to such an extent that it cuts paper. The machine also easily copes with grinding off a file, which is a fairly hard metal.
That's it, the project is finished, I hope you liked it. Good luck and inspiration in making your own homemade products. Don't forget to share them with us.
There are difficult situations when you cannot do without a manual grinding machine. Unfortunately, such a device has a rather high price, and models in stores may not always have a convenient design and design. There is a way out - you can make a homemade grinder from a grinder.
Read also: Service life of a 50 liter propane cylinder
How to choose a tape?
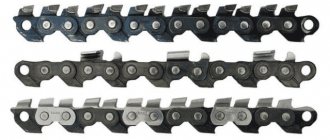
The sanding belt is one of the main components of a homemade sanding machine. The main indicator of the quality of a sanding belt is the size of the abrasive grains. They are responsible for the quality of material grinding. Belts can be coarse-grained, medium-grained or fine-grained. The abrasive grains themselves are artificial minerals with a high degree of hardness. Also, the tape material should not be too hard. Such tapes are often prone to breaks. You can also use rolls of regular sandpaper for a homemade sanding machine.
So, you can make a belt sander from an angle grinder without any problems and quite quickly with your own hands. And considering the cost of ready-made grinding machines, making them yourself is quite a relevant and reasonable solution.
To learn how to make a belt sander from an angle grinder, see the video below.
There are difficult situations when you cannot do without a manual grinding machine. Unfortunately, such a device has a rather high price, and models in stores may not always have a convenient design and design. There is a way out - you can make a homemade grinder from a grinder.
Introduction
There are many modifications of grinding devices, but the design presented in this article is, in our opinion, very interesting and quite successful, since it is compact and easy to use. By design, such a tool is a device shaped like a slingshot, which is attached to a grinder. Rollers are installed on the “whiskers”, which form the track of the sander belt.
This article will describe step-by-step instructions for creating a grinder from an angle grinder with detailed photos, drawings and videos of all necessary operations. The result should be the following design.
Preparing for work
Before we start manufacturing, we need to prepare the tool that we will need for work, these are:
- Sawing machine (circular saw or jigsaw machine for sawing;
- Jigsaw with files;
- Grinding machine or grinder;
- Milling machine;
- Drilling machine.
- Various hand tools - screwdrivers, pencils, pliers, etc.
- Vacuum cleaner.
In addition, you need to plan and prepare the necessary material, fasteners and necessary elements:
- Plywood 20-35 mm;
- Varnish;
- Bolts and nuts;
- Sealed bearings;
- Sander belt.
In the article “Jigsaw machine for sawing” there was a table with background information on the thickness and ply of plywood. Below we provide another reference - the types of veneer of the outer layers of plywood:
| Veneer grade of outer layers of plywood | Maximum number of allowed wood defects and processing defects |
| E |
No visible blemishes or processing defects
Main structural elements
Our grinding machine consists of the following elements:
- Bulgarian herself;
- Base;
- Movable bracket;
- Drive roller (on the gearbox shaft of the angle grinder);
- Two driven rollers - one on the base, the other on a movable bracket.
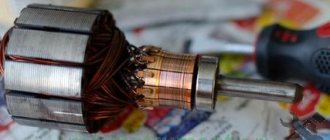
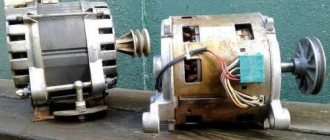
Preparation of the grinder
In our case, we didn’t take a new grinder, which means it needs to be cleaned. It is necessary to remove all excess grease and remove visible defects and debris with a brush. This stage does not carry a functional load, but thanks to cleaning, nothing will interfere during work, and performing certain stages of work will be more convenient and much more enjoyable.
Making a grinding machine
Base
We begin to manufacture the base on which the movable bracket and rollers are attached. The future workpiece should be marked for fastening the sanding machine belt as shown in the picture below. All dimensions of the part are adjusted exclusively to the dimensions of the grinder. It is important that the part fits exactly under the angle grinder and fits tightly to the body, since the sizes of angle grinders are different, the dimensions may also differ.
And then start cutting out the desired part. This work requires precision, especially when drilling a hole for the gearbox shaft.
Having cut out the part according to the indicated sketches, you need to proceed to drilling the hole through which the gearbox shaft will pass. Next it was the turn to drill holes to attach the entire structure of the future grinding machine directly to the angle grinder gearbox. There is an easy way to make accurate markings within a few seconds.
To do this, you will need to put on the workpiece and tap it several times with a hammer. As a result, we get precise markings that need to be outlined with a pencil. This method is very accurate and saves time.
After the work done, the result will be something like this:
All marks should be outlined well with a pencil, and then holes for the bolts should be drilled. Two holes diagonally will be enough. Before drilling a larger hole for the bolt head, it is better to place the blank of the future grinder from an angle grinder on the mounting bolts, and make sure that all the work is done correctly.
Half the battle is done, the main part of the hand sander is done. The next stage will be the production of rollers for the grinder shaft, as well as rollers for the sanding belt.
Read also: High pressure washer for Karcher car wash
Rollers
Blanks for rollers
There is a method that will help greatly simplify the cutting of all blanks for future rollers, but for this you will need a milling machine. In the photographs you can see the entire milling process.
Below is the first plate, which has one half cut out for the shaft, and two halves of the whole roller for the belt.
The photo below shows a diagram of milling the second half of the larger roller (for the gearbox shaft), and the roller for the belt (on the “whiskers” of the Y-structure).
Both schemes are quite practical and save material well. After milling is completed, the necessary parts for our homemade grinder can be cut out with a construction knife.
Gluing and sanding
After the blanks for the rollers are cut out, you need to glue them together using PVA glue or wood glue. It is advisable to leave the rollers to dry under pressure for about a day.
After gluing, you can start grinding the rollers. The easiest way is to use a grinding machine. All sharp edges should be ground off and given a rounded appearance. For ease of grinding, the rollers can be placed on several bearings and the structure can be tightened with a bolt and nut.
The same procedure is done with the drive roller for the future angle grinder. To speed up the work, you can turn on the grinder while stripping.
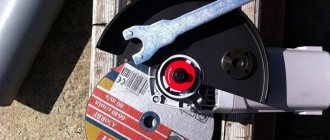
Bearing installation
Our work on making a homemade grinding machine from an angle grinder has come to the halfway point. An important part of the stage is pressing the bearings. You need to measure everything so that the two bearings on the small rollers are located exactly at the edges. To do this, you can use nuts that are installed between the bearings, as shown in the photo.
This results in the following construction:
- Hex bolt
- Bearing
- screw
- Washer
- screw
- Bearing
- screw
The final view of the roller with the bearing is shown in the picture below.
For better fastening of the clutch, it is better to coat the inside of the bearing holes with glue and coat everything with varnish.
We do the same work with a large video.
Completion of base fabrication
In the last stage, you need to glue the base for the second part of the fastening. For reliability, everything is bolted together. It is important to do everything efficiently so that during the work everything is held tightly and reliably, for safety purposes.
The glue needs to be given time to dry. While it is drying, you can start cutting out the movable bracket, as well as processing the ends and corners.
Movable bracket
The movable bracket is marked in place based on the size of the sanding belt.
First, you need to take all the measurements, then drill holes for the roller shafts. After this, the shape and design of the movable bracket is marked.
Assembling and installing the sanding belt
It is better to cut the sanding belt with a knife on a ruler, since it will not be possible to cut it straight with scissors. So, the width of the tape should not exceed the width of the roller. It should also have no visible defects.
The tension of the sanding belt is carried out by a special bolt, which moves the movable bracket to the side.
Drill a through hole and insert a bolt as shown in the picture.
Adjust the bolt so that it does not interfere with the belt movement. It should be remembered that the grinder operates at high speeds, and if the belt gets caught on one of the elements, the operator may be injured.
Machine device
The supporting structure of the tape machine consists of a vertical stand and support. The first is a metal strip, the lower part of which is bent at an angle of 90º, and the second is a rectangular sheet of thick metal. The bent part of the rack acts as its supporting platform, with the help of which it is attached to the front edge of the support. A drive is mounted on the support plane, the role of which is an angle grinder (grinder), connected from the mains via a speed controller.
A drive pulley in the form of a metal roller is attached to the grinder spindle on a thread, which sets the movement of the sanding belt. The driven roller is installed on the top of the rack. Behind it there is a T-shaped rocker arm, which is fixed at the lower end to the support and connected by a cross member to the stand. At the near end of the rocker there is a tension roller, and a spring is attached to the far end, providing tension on the belt.
The most important and complex component of any belt sander is the system of rollers along which the belt moves at high speed. The size of the drive pulley determines the linear speed of movement, so its diameter must be determined by calculation.
The linear speed of the belt is calculated by the formula: V = (π × D × N) / 1000 × 60, where V is the speed (m/sec), D is the drive pulley diameter (mm), N is the number of drive revolutions (rpm) . Accordingly, the diameter is determined by the formula: D = V × 1000 × 60 / π × N (mm).
Recommended processing speeds for materials vary:
- wood - approximately 25 m/sec;
- steel - 25-30 m/sec;
- plastics (depending on type) - 10÷30 m/sec;
- titanium - 15 m/sec.
Since the main materials processed in a home workshop are steel, wood and plastic, the calculation will be based on a limit of 26 m/sec. The maximum spindle speed of our angle grinder is 11,000 rpm, so the calculated diameter will be 45 mm.
Many people try to make rotating elements themselves from chipboard, plywood or plastic, or select them from the availability of used tension rollers in auto repair shops. But since a specific diameter was chosen, and you want to make a belt grinding machine with your own hands with the specified parameters, it is best to order these products from a qualified turner.
All three rotating elements have the same diameter of 45 mm, but a different design:
- Drive pulley. Cylindrical in shape with edges at the edges to prevent the tape from coming off. The glass is machined inside to a depth sufficient for attaching it to the threaded end of the spindle with a long M14 nut. The total width of the working surface is 60 mm, the side is 1 mm.
- Driven roller. The outer surface is the same as that of the drive pulley. Rotates on two bearings, flush on both sides. A bolt with a diameter of 8 mm with a short end thread protruding beyond its overall dimensions is used as a shaft.
- Tension roller. The shaft and bearings are the same as the driven roller. The outer surface is barrel-shaped, without sides, 60 mm wide.
All three products are best tested and assembled where they were made. Experienced craftsmen will certainly help you seat the bearings correctly and correct possible defects. In addition, the workshop must make a hole in the bottom of the rack with a diameter of 42 mm to install the drive.
Structural elements and components
All other structural elements can be made independently or purchased at hardware stores and metal depots. To assemble a belt sanding machine with your own hands you need:
- Rotating elements. Described above.
- Bulgarian. For example, a Hitachi g12 sr2 manual angle grinder with 11,000 rpm and a power of 650 W. Connects to the mains via a power regulator.
- Base. A sheet of metal 10 mm thick, measuring 30 x 40 cm. 10 mm holes are drilled along the edges to attach it to the workbench. Two holes for screws are hidden in the place where the rack is installed and another one is located where the drive is fixed.
- Rack. The plate is 8 mm thick and 8 cm wide. The bottom is bent at a right angle (4 cm shelf) for installation on a support. The height from the fold to the upper end is 65 cm. In the lower part there is a hole for the drive, and in the upper part for attaching the driven roller. At a height of 20 cm from the bend there is a hole for attaching the connecting strip of the rocker arm.
- Tension roller rocker arm. It consists of a stand (thickness - 8 mm, width - 3 cm, height - 25 cm) and an asymmetric crossbar attached to its upper end (through a bushing with a bolt). A hole is drilled at both ends of the latter: on the long end for installing the tension roller, and on the short end for attaching the tension spring.
- Hardware and other materials. Screws, bolts, nuts, grommets and bushings required for assembly, as well as wooden pads and a clamp for attaching the angle grinder to the support.