Types of chargers
The popularity of the screwdriver is due to the fact that it simplifies the process of twisting or unscrewing various fasteners and. Characterized by mobility and small size, it is indispensable for assembling furniture structures, dismantling equipment, roofing and other construction work. The mobility of the device is due to the presence of batteries included in its design.
The screwdriver battery is charged in two ways: using the built-in or external charger. The built-in charger allows you to charge the battery without removing it from the screwdriver. The capacity restoration circuit is located directly with the battery. While remote control involves removing them and installing them in a separate charger. Memory differs depending on the type of battery. Used batteries:
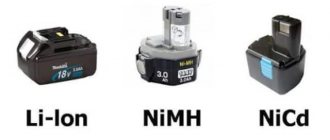
- Nickel-cadmium (NiCd);
- Nickel hydride (NiMH);
- Lithium-ion (LiIon).
The final cost of a screwdriver depends not least on the type of battery used and the capabilities of the charger. Batteries are available in 12 volt, 14.4 volt and 18 volt. In addition, storage devices are divided depending on their capabilities and may have:
- Instructions;
- Fast charging;
- Different types of protection.
Most commonly used memory devices use slow charging due to low current. They do not include operating instructions in their design and do not turn off automatically. This applies to a greater extent to built-in capacity recovery devices. Memory devices built on pulse circuits provide the possibility of accelerated charging. They automatically turn off when the desired voltage is reached or in the event of an emergency.
Types of batteries used
Nickel-cadmium batteries do not experience problems when charging in accelerated mode. Such batteries have a high load, low cost and can easily withstand operation at sub-zero temperatures. Disadvantages include: memory effect, toxicity, high self-discharge rate. Therefore, before charging this type of battery, it must be completely discharged. The battery has a high degree of self-discharge. And it discharges quickly, even when not in use. Currently practically unavailable due to its toxicity. Of all the types, they have the smallest capacity.
Nickel Metal Hydride is superior to NiCd in every way. They have less self-discharge and a less pronounced effect on memory. With the same size, they have a large capacity. They do not contain toxic substances, cadmium. In the price category, this type ranks in the middle, so it is the most common type of capacitive elements in a screwdriver.
Lithium-ion is characterized by high capacity and low self-discharge value. These batteries cannot withstand overheating and deep discharge. In the first case, they may explode, and in the second, they will not be able to restore their strength. They are also capable of operating at low temperatures and have no memory effect. Using a microcontroller charger protected the battery from overcharging, making this type the most attractive to use. They are more expensive than the first two types.
In addition, the main characteristic of batteries is their capacity. The higher this figure. The longer the screwdriver lasts. Unit of power. Milliamps per hour (mA/h). The battery design consists of connecting batteries in series and placing them in a common housing. For Li-Ion, the voltage per element is 3.3 V, for NiCd and NiMH. 1.2 V.
Tools
0 votes
+
Vote for!
—
Vote against!
Among power tools, both household and professional, a screwdriver is one of the most popular. With its help you can not only unscrew and screw in self-tapping screws, but also drill holes. Tools powered by the mains cannot be used always and everywhere, and the cord always interferes with the work. Cordless screwdrivers are free from these disadvantages. You can move freely with them and not depend on the presence of an outlet in the room.
An important element of every cordless tool is the battery, which allows you to work with it autonomously. This is very convenient, but sooner or later every owner of such a power tool faces the question of how to charge the screwdriver battery.
Content
- Types of batteries used to operate a screwdriver
- Features of battery charging
- How long does it take to charge screwdriver batteries?
- Do batteries need to be charged before storage?
- What to do if the screwdriver battery does not charge?
Types of batteries used to operate a screwdriver
Before purchasing new batteries for a screwdriver, you must carefully study the instructions for the device. The tools needed for work can be professional, household and semi-professional. The batteries for them differ from each other in capacity, quality and price.
Certain types of cordless tools are designed for certain jobs, designed for different loads, and therefore they require different batteries. The higher the battery power rating, the longer it can last. For convenience, it is better to have two batteries so that you can recharge the second while working with one. Often a second battery is already included when the tool is sold.
Screwdrivers can use different types of batteries. The most commonly used are nickel-cadmium (Ni-Cd) and nickel-metal hydride (Ni-MH), and more recently also lithium-ion (Li-Ion).
The most common of them are nickel-cadmium batteries, characterized by their compact size, high capacity and reasonable price. These batteries can be effectively charged more than a thousand times, depending on their design, purity of materials, operating conditions, including correct charging. However, these devices have a so-called memory effect, and if they are charged without waiting for complete discharge, the battery capacity will gradually decrease. In addition, the production of such elements is so toxic that the European Union has abandoned it on its territory.
In second place in terms of frequency of use are nickel-metal hydride batteries, which represent a new generation of such devices. From an environmental point of view, both the production and disposal of these batteries are practically safe. The advantages of batteries of this type include the fact that they have a less pronounced memory effect, and the disadvantages are a high self-discharge current. These batteries must be kept charged and must be fully recharged when not in use for more than a month.
Recently, more powerful lithium-ion batteries have been used for cordless tools. They also do not have the disadvantage of a memory effect, which requires periodic discharge cycles to restore capacity. However, these batteries do not tolerate low temperatures well, and it is not advisable to work with them in frosty conditions. Despite the fast charge and high capacity, they are not yet very popular, since their price is quite high.
Features of battery charging
How to properly charge a screwdriver battery so that it lasts as long as possible?
Batteries must be charged before first use as they will discharge during storage. To ensure that the battery capacity of the screwdriver reaches the maximum possible for a nickel-cadmium cell, it is recommended to charge it three times and then discharge it. Thus, since the new battery does not have full capacity, it must be brought to its working full capacity. After this, the batteries will need to be charged as soon as their power reaches a minimum. Lithium-ion batteries are easier to use. They do not have a memory effect, so you don’t have to let them fully discharge and charge them when it’s convenient.
When charging, you need to take into account the optimal temperature conditions of the process. It is better that the ambient temperature is above ten degrees and does not exceed forty. During charging, batteries sometimes get warm, but this should not happen, since overheating negatively affects their performance and they need to be cooled. It is not advisable to leave batteries in the charger. And it’s better to store them by disconnecting them from the screwdriver, separately from the tool itself. If the batteries are not used for a long time, they should be recharged once a month.
It is better to buy batteries at specialized sales points. Proper operation will help increase their service life. It is not advisable to completely discharge the elements during operation until the engine stops. The fact that they need charging will be indicated by their noticeably reduced performance.
How long does it take to charge screwdriver batteries?
As a rule, the charging time for a screwdriver battery is indicated in the instructions for the tool. These recommendations should be followed carefully. Often the charger has a special display system that helps you understand how the charging process is progressing. Thanks to this, you can easily determine how long to charge the screwdriver battery. When charging is completed, you need to interrupt it in time to avoid damaging the batteries. On average, a battery charger for a screwdriver can recharge in about half an hour to 7 hours. Practice shows that a Ni-Cd battery with a capacity of 1.2 Ah can be charged with a current of 250 mA for about seven hours. The charging current is maintained using the AC adapter.
Please note that there are two types of battery chargers - regular and pulse. A standard conventional charger is more often used in non-professional tools, it charges the battery in about 3-7 hours. Pulse – more suitable for professional mechanisms. Thanks to it, the battery's performance can be restored in a maximum of an hour.
Do batteries need to be charged before storage?
If a cordless tool is not used for a long time, experts advise paying close attention to the battery cells.
It is recommended to discharge nickel-cadmium batteries before storage, but not to zero, but to a state where the tool stops working at full capacity. During long-term storage, to restore the battery capacity, you need to perform 3-5 complete cycles of discharging and charging it. During operation of the tool, it is also advisable to ensure that the battery is not partially, but completely discharged before charging.
Nickel-metal hydride batteries have a higher self-discharge rate than previous cells. They are recommended to be stored charged, and after a long “rest” to be charged for about a day. For this type of battery, partial discharge is preferable. Their capacity decreases after 2-3 hundred charge-discharge cycles.
Lithium-ion batteries, characterized by the absence of a “memory effect,” can be charged at any time, no matter what their level of discharge. These batteries have the lowest self-discharge rate with high capacity. It is not recommended to completely discharge them as this may cause the protection circuit to be disabled. Power tools with such batteries are equipped with control electronics that, when the temperature or voltage increases, disconnects the element from the load. It is recommended to store these batteries at 50 percent charge. The number of charge-discharge cycles does not affect the capacitive characteristics of the elements, however, their service life is limited by time and is about two years.
What to do if the screwdriver battery does not charge?
If the screwdriver battery does not charge, perhaps the reason should be sought in its wear or malfunction of the charger. However, often the problem lies in poor contact between the battery terminals of the screwdriver and the charger, as they become unbent over time. In this case, you can disassemble the charger and bend its terminals.
In addition, after some time of use, both the battery contacts and the charger contacts can oxidize and become dirty. Even minor changes of this nature may prevent the batteries from charging properly. This usually results in a significant reduction in both the charging time and the operating time of the cordless power tool itself. To prevent this from happening, you need to periodically wipe the contacts of the battery, the screwdriver battery charger and the tool.
Unfortunately, the performance of battery cells deteriorates over time. Thus, if nickel-cadmium batteries, most often used in household models of screwdrivers, are used incorrectly, they quickly lose capacity. Experts sometimes advise “overclocking” such batteries. The battery pack is disassembled and the problematic elements are identified. After this they need to be charged. What current should I use to charge the screwdriver battery in this case? Experts recommend first charging such elements with a higher current than required, then discharging them and charging them again, but with a low current. If the electrolyte in Ni-Cd batteries has not yet evaporated, such “therapy” may help bring them back to life.
In addition, you can restore one battery pack from two that have partially lost capacity by selecting entire “banks” from them and soldering them together. After this, to equalize the charge, you need to fully charge and discharge the restored unit several times.
Also, the reason that the battery is not charging may be the temperature sensor (video).
Memory principle
If a memory device fails, it makes sense to try to repair it first. For repairs, it is advisable to have a circuit diagram of the device and a multimeter. The circuit of many chargers is based on the HCF4060BE chip. Its switching circuit delays the charging interval. It includes a crystal oscillator circuit and a 14-bit binary counter to facilitate timer implementation.
READ What is the Power of a Screwdriver for Home
The operating principle of the charger circuit is easier to understand using a real example. This is what it looks like in an Interskol screwdriver:
This circuit is designed for charging 14.4 Volt batteries. It has an LED display showing the network connection, LED 2 is on, and the charging progress indicator is on 1. The U1 HCF4060BE chip or its analogues: TC4060, CD4060 is used as a counter. The rectifier is assembled on power diodes VD1-VD4 type 1N5408. PNP type transistor Q1 operates in switch mode and relay control contacts S3-12A are connected to its terminals. The key is controlled by controller U1.
When the charger is turned on, the 220 V AC mains voltage is supplied through a fuse to a step-down transformer, at the output of which its value is 18 Volts. Then, having passed through the diode bridge, it is straightened and falls onto a smoothing capacitor C1 with a capacity of 330 microfarads. The voltage on it is 24 volts. When the battery is connected, the relay contact group is in the open position. The U1 microcircuit is powered through a zener diode VD6 with a constant signal of 12 volts.
The SK1 button used works without blocking. After it is released, all energy is supplied through the circuit VD7, VD6 and the limiting resistance R6. And power is supplied to LED1 through resistor R1. The LED lights up to indicate that the charging process has begun. The operating time of the U1 chip is set to one hour of operation, after which power is taken from the transistor Q1 and, accordingly, from the relay. Its contact group is broken and the charging current disappears. LED1 goes out.
This charger is equipped with overheat protection. This protection is implemented using a temperature sensor. SA1 thermocouples. If during the process the temperature exceeds 45 degrees Celsius, the thermocouple will operate, the microcircuit will receive a signal and the charging circuit will be broken. At the end of the process, the voltage at the battery terminals reaches 16.8 volts.
This charging method is not considered intelligent, the charger cannot detect the battery status. . As a result, the battery life of the screwdriver will be reduced due to the development of memory effect. That is, the battery capacity decreases each time it is charged.
Home chargers
Doing this yourself for a 12-volt screwdriver is quite simple, similar to what is used in the Interskol charger. To do this, use the ability of a thermal relay to break contact when a certain temperature is reached.
In circuits R1 and VD2 there is a charge current sensor, R1 is designed to protect the diode VD2. When voltage is applied, transistor VT1 opens, current flows through it, and LED LH1 begins to glow. The voltage drops to the circuit R1, D1 and is supplied to the battery. The charging current passes through the thermal relay. As soon as the temperature of the battery to which the thermal relay is connected exceeds the permissible value, it is turned off. The relay contacts switch, and charging current begins to flow through resistor R4, LED LH2 lights up, indicating the end of the charge.
Dual transistor circuit
Another simple device can be made using readily available items. This circuit operates on two transistors KT829 and KT361.
The value of the charge current is controlled by the KT361 transistor on the collector to which the LED is connected. This transistor also monitors the state of the KT829 component. As soon as the battery capacity begins to increase, the charging current decreases and the LED goes out poorly. Resistance R1 sets the maximum current.
The moment when the battery is fully charged is determined by the required voltage across it. The required value is set by a 10 kOhm variable resistor. To test this, you will need to install a voltmeter across the battery connection terminals without connecting it yourself. Any rectifier unit designed for a current of at least one ampere is used as a constant voltage source.
READ How to Cut a Mirror Without a Glass Cutter
Using a dedicated chip
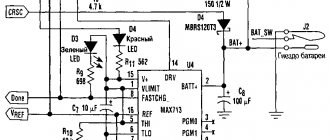
Screwdriver manufacturers try to reduce the price of their products by often simplifying the memory circuitry. But such actions lead to rapid failure of the battery itself. Using a universal chip designed specifically for MAXIM MAX713 memory, you can achieve good charging performance. This is what a charger for an 18-volt screwdriver looks like:
The MAX713 chip can charge nickel-cadmium and nickel-metal hydride batteries in fast charging mode with a current of up to 4 C. It can monitor battery settings and automatically reduce the current if necessary. At the end of charging, the IC chip consumes virtually no battery power. This may interrupt operation in time or when the temperature sensor is triggered.
HL1 is designed to indicate power, and HL2. For quick display of charge. The circuit is configured as follows. First, the charging current is selected, usually its value is 0.5 C, where C. Battery capacity in ampere-hours. The PGM1 pin is connected to the positive supply voltage (U). The power of the output transistor is calculated by the formula P = (Uin. Ubat) Isar, where:
- Uin. Highest input voltage;
- Kill it. Battery voltage;
- Izar. Charging current.
Resistance R1 and R6 is calculated using the formulas: R1 = (Uin-5) / 5, R6 = 0.25 / Isar. The choice of time after which the charging current is turned off is determined by connecting the PGM2 and PGM3 contacts to different terminals. So for 22 minutes PGM2 remains unconnected and PGM3 is connected to U, for 90 minutes PGM3 is connected to 16 feet of REF chip. If you want to extend the charging time to 180 minutes, connect PGM3 to 12 pins of the MAX713. The longest time of 264 minutes is achieved by connecting PGM2 to the second section, and PGM3. To the 12th section of the chip.
If the battery overheats
Strong heating of the battery indicates either poor contact between the elements, or the failure of one storage element. But you only need to panic if the temperature is very high (over 40 degrees), because charging the battery is always accompanied by the release of heat. Almost all devices are equipped with a temperature sensor, which prevents overheating.
If the battery heats up above 40 degrees, this indicates a problem either in the temperature sensor or in other battery elements. It is best to take the device to a repair shop to diagnose and replace faulty parts.
Charging with a screwdriver without a charger
Repairing a battery without a charger is not difficult, but many people don’t know how. You can charge the cordless screwdriver without a charger using a DC power source. Its value should be equal to or slightly greater than the voltage of the charged battery. For example, for a 12V battery, you can take a rectifier to charge your car. Using terminal blocks and wires, connect, observing polarity, to each other for thirty minutes, monitoring the temperature of the battery.
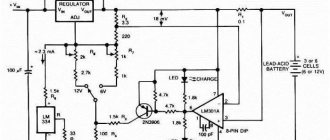
And you can improve and power high voltage devices using a simple built-in regulator. The LM317 chip allows you to control the input signal up to 40 volts. Two stabilizers are required: one connected in accordance with the voltage stabilization circuit, and the other. According to the current. This circuit can also be used when changing a storage device that does not have nodes to control the charging process.
The scheme works quite simply. During operation, resistor R1 experiences a voltage drop sufficient to illuminate the LED. As charging progresses, the current in the circuit drops. After some time, the voltage on the stabilizer will become low and the LED will go out. Resistor Rx sets the maximum current. Its power is selected to be at least 0.25 W. When using this scheme, the battery will not be able to overheat, since the device will automatically turn off when the battery is fully charged.
Originally published 2018-04-06 09:06:40.
Source
DC motor
made in the form of a cylinder in which permanent magnets are arranged in a circle. The motor armature is located on brass bushings-bearings. The anchor itself is made of electrical steel with high magnetic permeability. Windings of insulated copper wire are laid in the grooves of the armature. Thanks to the same number of turns, the winding has access to the collector plates. The drive (solar) is pressed against the armature shaft. The motor brushes touch the commutator plate “tail” of the armature. For reliable contact, the brushes are spring-loaded and isolated from the motor housing. According to the screwdriver diagram, voltage is supplied only to the brushes. If you reverse the polarity of the voltage applied to the motor brushes, the direction of rotation will change.
READ How to Repair a Battery Using a Screwdriver
Planetary gearbox
The screwdriver is made in a separate housing. The transmission consists of the following elements: gear train, sun transmission (pressed on the valve shaft), pinions and carrier. Gearbox parts can be made of either plastic or metal. For a more complete picture of the transmission, it is necessary to clarify the location of individual parts.
A ring transmission is a cylinder, inside of which the teeth are arranged in a circle, along which the satellites move during operation. The satellites are installed on carriers. Between the satellites of the first carrier there is the drive gear of the engine (the first solar one). The first carrier on the opposite side of the satellites has a gear drive (the second solar), which during assembly falls between the satellites of the second holder.
If the gearbox is two-speed, the second holder is rigidly connected to the shaft on which the cartridge is installed. Thus, a kind of “sandwich” of the two came with satellites. This “sandwich” is located inside the gear.
The ring gear is rigidly fixed in the housing using protrusions at its end or on the sides. The protrusions are located next to protruding balls, tensioned by a spring with an elastic ring around the circumference. The ring, in turn, is injected by the spring of the load limiting mechanism. The spring force may vary depending on the position of the load regulator.
The operation of the gearbox is as follows: the solar transmission of the engine rotates the satellites in a circular gear, accordingly, the carrier rotates at a lower speed than the engine speed. The first carrier transmits torque through its solar gear to the second trio of satellites, which also rotate in a circular gear, which means the speed of the second carrier is reduced even more. The second holder, as mentioned above, is connected to the cartridge shaft. This occurs in two-speed transmission. There are models of screwdrivers with a three-speed gearbox; they have another planetary mechanism installed. At the end of the article there is a video showing the operation of the planetary gear.
There are models of screwdrivers with a conventional gearbox.
For convenience, some screwdrivers have two-speed gearboxes. The first speed is for tightening screws (0-450 rpm and increasing torque), and the second is for drilling work (0-1400 rpm).
As the chuck rotates under load, there comes a point when you need to apply more force to complete the job, such as during the final stage of tightening a screw, or when you need to limit the force. Load controller activated. The adjuster spring force is not enough to hold the ring gear and its “breaks” with the balls. It turns out that the engine begins to rotate the gear with characteristic clicks, while the cartridge stops at this time. To use the screwdriver in drilling mode, the gear wheel is locked and its rotation is disabled.
Speed control
assembled on the basis of a PWM controller and an N-channel field key transistor. The regulator is controlled by a variable resistor, the position of which depends on the force of pressing the power button (trigger).
Reversal is limited by changing the polarity of the voltage applied to the motor brushes. For this purpose, switching contacts are provided, which are actuated by a return lever.
Battery
. A small battery is installed in the housing to power the screwdriver. A screwdriver battery is a set of small elements that fit into one housing.
The supply voltage range for different brands of screwdrivers is from 9 to 18 volts. The higher the supply voltage, the more powerful the screwdriver itself.
Video demonstrating the principle of planetary gearing:
Source