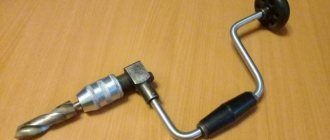
Possible tool malfunctions - we carry out repairs ourselves
If your tool begins to work worse, or even stops performing its direct duties, it’s time to diagnose the problems and try to deal with them. First, we check the wire for damage and the voltage in the outlet, for which you can plug in any other device - a TV or a kettle.
If you are inspecting battery-powered devices, they should be checked using a tester - in this case, the voltage indicated on the case should have a similar value to the battery voltage.
If the voltage is less, you will have to replace the batteries with new ones. If the battery is working normally, the power supply is normal, look for hardware problems. The most common breakdowns are:
- Problems with engine operation;
- Brush wear;
- Problems with the button operation.
Knowing how the electric drill button is connected, you can quickly solve the problem. In addition, a problem with the operation of the drill can also arise due to the dustiness of the tool, because the drill “takes” wood, brick, and other materials. This means that you should take care to clean the device after each use - this is the only way to reduce the risk of malfunctions due to contamination of the tool. That is why, after you have carried out renovations in your apartment, immediately clean the drill.
Drill button device
Well, at the end of this article, I would like to address the issue that many of you will encounter in the process of dismantling the old drill button. In order to perform high-quality dismantling of the button, you will need minimal knowledge of the design of modern drill start buttons. The video above shows how the button works when you press it. If the reverse lever is set to tighten bolts, nuts, etc., then both lower terminals are closed. If you turn on the reverse in the opposite direction, then only one lower terminal is connected to the network, the second when this doesn't work. As a rule, in all modern drill buttons, the wire clamping devices are designed from durable steel and are not very convenient for dismantling.
The fact is that button manufacturers are concerned about increasing productivity when assembling their products. They design buttons in such a way that it is as convenient, easy and quick as possible to install electrical equipment, but at the same time the convenience of replacing and repairing buttons suffers.
Photo-3. The design of electrical wiring clamp terminals in modern drill buttons
In other words, the prepared wire of a winding or other drill part for installation can easily be inserted into the hole provided for it in the button body, but pulling it back out is problematic - this requires skill and ingenuity. The clamp terminals in the button body itself are installed at an angle of 45 degrees, and made of hardened steel.
If you look carefully at photo 3 presented in this article, you will agree with me that in order to pull out the wire you just need to push out the clip inside the button body and release the mounting cable. To do this, you will need a thin large needle or a thin strong awl, which you need to insert into the hole reserved for mounting the wire and push the clamp inside, thereby freeing the wire from the grip. That’s all, in conclusion I can say that the method I told you works very well (I checked it myself more than once). You can safely get to work and replace the drill button yourself with your own hands. That’s all for today, I’m waiting for your comments below, bye, see you next time!
Regular on/off button
Repairing or replacing a drill button is considered a simple process, but you need to have certain skills - if you open the side wall carelessly, many parts can fly apart in different directions or fall out of the case.
As written above, the button may not function due to oxidation or burnt contacts. To fix this, you need to disassemble it, following the following order.
- Carefully unhook the protective cover latches and open it.
- Remove carbon deposits on the contacts with alcohol, or clean them with sandpaper.
- Then assemble and check.
If everything works fine, it means the problem was in the contacts, otherwise the button needs to be replaced.
You should know that the special layer that is applied under the rheostat slider during manufacturing often wears off - in this case the button also needs to be replaced.
Quite often, the drill button connection diagram is used to check the functionality of the entire structure: only if it is available, can partial repairs be made or the button be connected correctly if it is replaced. The diagram should come along with the product’s operating instructions, but if for some reason it is not there, then you can search on the Internet.
Let's move on to reconstruction
Having disassembled the drill, I determined a place to install the button and, using a round file, cut a hole in the body to install the button, soldered wires of the required length to the contacts of the button and began reconnecting the connections. The fact is that the drill has a trigger with a thyristor rotation speed controller, and when upgrading, this must be taken into account.
How to turn on your mobile without the power button
Contrary to what you thought, there are many ways to turn on your mobile without the power button. Options include computer, code, button combinations, and more. You also have the option of setting up a dedicated button in Settings to perform this task, and there are even apps that can control when the screen turns on and when you sleep.
READ DIY Drill Storage Box
Next, we will tell you all the options that are at your fingertips so that you can turn on your mobile phone without pressing any buttons. Very simple tricks to perform and that can get you out of more than one rush. Let's look at the different options to consider.
Electrical faults
We will begin the description of common breakdowns with the electrical and switching parts. The electrical compartment of almost every drill is located in the handle, where the button is located. To gain access to it, most often you have to completely disassemble the drill. This is not difficult, but it may be difficult to snap the case off: in addition to several screws, it is held in place by clamps. Having halved the case, remember the location of the elements and wiring, or better yet, take a photo, because the layout can be very intricate.
The main sign of an electrical malfunction is that the drill simply does not turn on. Try to move the power cord with the button pressed in the place where it comes out of the housing: a fracture of the core in this place causes 90% of all malfunctions; if it occurs, the drill will show signs of life. You can also determine a power failure by dialing.
Another common cause of breakdown is failure of the reverse button or switch. Try ringing the contacts to which the wires are connected to check for commutation. A faulty button can be replaced, or you can try to repair it. By unscrewing a couple of small bolts that hold the case together, you will gain access to the insides. Assess the condition of the lamellas (they may wear off or oxidize), check the serviceability of the ejection mechanism, the cleanliness of the printed circuit board and the presence of burns on the main contacts.
Malfunctions of a small printed circuit board or potentiometer inside a button, which acts as a speed controller, cannot be treated independently. In such cases, the drill either does not turn on at all, with the contact group fully operational, or operates at a constant speed. The button will have to be changed.
Don’t forget to also check the reliability of the crimping of the terminals, the integrity of the insulation, and the presence of oxides on the contacts. The electrical circuit of the drill is extremely simple; the main thing is to remember the order in which the wires are connected.
Drill button connection diagram - how to fix the problem?
Unfortunately, to check the functionality of the tool, a tester will not be enough for you, which is due to the fact that most of the device’s buttons are equipped with smooth speed control, and therefore a regular tester may give you incorrect data. In this case, you will need a special connection diagram for the drill button. Often in instruments one wire is connected to a terminal, and therefore pressing the button simultaneously leads to ringing of the terminals. If the light comes on, everything is fine with the button, but if you notice a malfunction, it’s time to replace the button.
When making a replacement, keep in mind that the circuit can be either simple or with reverse. Due to this, all work on replacing the button must be carried out exclusively according to the diagram, without adding anything “on your own”. So, the part must be suitable in size and match the power of the tool. At the same time, calculating power is a fairly simple task. We use the formula P = UI (taking into account that the drill power is 650 W), I = 2.94 A (650/220), which means the button should be at 2.95 A.
Speed controller
The speed of the power tool is controlled by a triac regulator located in the device's power button on a special gasket made of textolite. When the button is pressed, an alternating voltage is supplied to the control output of the triac. The triac opens and current flows into the load. When the input polarity changes, the semiconductor device closes. Then everything repeats in a cycle.
READ How to Use a Drill and Screwdriver
As a result, the signal at the output of the triac will be in the form of pulses. The higher the signal level is supplied to the semiconductor, the longer the time it is open, which means the longer the pulse length at its output. The degree of opening of the triac is regulated by a variable resistance, which limits the magnitude of the signal supplied to the semiconductor.
In addition, the rotation speed of the chuck in an electric drill depends on the force of pressing the start button. This is realized by connecting a button with a speed controller. Drills, depending on their type, may have a different circuit for connecting the switch, but its structure is the same. The button housing contains a contact group and spring-loaded plates (resistors). These plates are made in the form of sliding contacts.
When the button is pressed, they are set in motion and returned to their original state under the action of a spring. The pressure is limited using an adjusting screw with a flywheel. By determining the length of sliding of the contact plates over the resistors, he thereby sets the highest speed of the device. If the flywheel is removed from the structure and unscrewed, then when you press the button, the contacts will simply close and the electric motor will begin to operate at maximum speed.
The connection of the electric drill circuit with reverse and speed controller is different, since these are independent units from each other. The electrical connection diagram, for example, used in Interskol electric drills, looks like this: a power cord consisting of two wires is connected to the speed controller with one wire. The contact wire coming out of it is connected to the beginning of the first stator winding. In the absence of reverse, the end of the first winding is connected to the armature brush, while the second armature brush is closed to the beginning of the second stator winding. The second wire of the cord is connected directly to the stator winding.
Reverse operation is ensured by changing the connection of the stator windings. As a result, the direction of the magnetic field and, accordingly, the rotation of the motor changes. To do this, the first brush is connected to the beginning of the second stator winding, and the second to the end of the first. Quite often, a winding connection diagram is depicted on the reverse block.
To avoid sparking during switching and filter out interference, a capacitor is used that is connected in parallel with the wires of the power cord.
CONNECTING A PUNCHER WITHOUT A BUTTON. PART 1
Replacing a button
For the procedure you will need a flat and Phillips screwdriver, as well as an awl. In the absence of the latter, a bag needle or any other thick needle will do. If the model is small in size, then for greater convenience you can also take tweezers.
Button replacement:
- Loosen a couple of screws holding the network cable.
- We insert the awl into the stator next to the wire and carefully remove the core.
- We pull out the second cable in the same way.
- If the button is not on the clips, then unscrew the screws and take it out.
- We put the new key in place and connect the wires using an awl.
- We install the block on the drill, not forgetting about reverse.
- Carefully lay the wires and press them with screws.
- Close the casing.
Interskol drill power button
In a good half of cases, the wires coming from the stator differ in color. If they are the same, then they will need to be marked so as not to be confused when connecting.
Electric drill: device diagram
For example, remember that opening the case may cause all parts and loose parts to simply fall out of the case. Naturally, this should be avoided, because then it will be quite difficult to assemble the device together. To do this, you can smoothly lift the cover, noting the exact location of the spare parts on paper.
The button is repaired as follows:
- First, the clamps for the casing are hooked, after which it is carefully pulled together;
- All rusted and darkened terminals are cleaned of carbon deposits, for which you can use alcohol or sandpaper;
- We reassemble the tool, making sure that all parts of the device are in place, and check the functionality of the drill - if nothing has changed, we change the part;
- We fill the speed regulator with a compound, and therefore if a part fails, we simply replace it;
- A frequent breakdown is the abrasion of the working layer under the rheostat - it’s better not to repair it, it’s just a waste of time, it’s better to buy a new one and replace it.
Many people are interested in where to get such a scheme? First of all, it should come with the instrument when you purchase it, but if there is no diagram or you have lost it, you will have to look on the Internet. After all, only with its help will you be able to carry out repairs competently, without errors. By the way, the speed control button and the reverse control button are located in different places, and therefore you will have to check them separately.
Video: How to Test a Drill Directly Without a Button
How to connect the drill button yourself?
Although the process is quite complicated, you can do the entire job yourself by following some important rules. For example, be aware that opening the case may cause all parts and loose parts to fall out of the case. Naturally, this should be avoided as it will be difficult to assemble the device. To do this, you can gradually lift the lid, marking the exact location of the parts on the paper.
The button is restored as follows:
- First select the latches for the casing, then carefully remove it;
- All rusty and darkened terminals are free of soot, which can be used with alcohol or sandpaper;
- We reassemble the tool, make sure all parts of the device are in place, and check the performance of the drill. if nothing has changed, we change the part;
- We fill the speed controller with the compound, so when a part fails, we simply replace it;
- Frequent breakdowns. erasing the working layer under the rheostat. It’s better not to repair it, just waste time, it’s better to buy a new one and replace it.
Many people are interested in where to get a similar scheme? First of all, you need to buy it with a tool, but if the diagram is missing or you have lost it, you will have to search online. Only with its help will you be able to carry out repairs competently, without errors. By the way, the speed knob and reverse knob are located in different places, so they need to be checked separately.
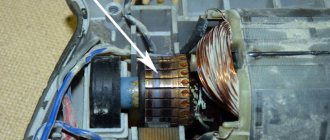
Engine check: causes of damage and repairs
There are several reasons why an anchor or stator drill can break. First of all, this is an illiterate operation of the device. For example, many users simply overload the tool by doing work without interruption. This leads to the fact that the drill motor does not have time to “rest”. The second reason is poor wire winding, which is often found in cheap models. This is why breakdowns of cheap tools are much more common. In this case, repairs should be carried out using specialized tools. And it will be better if you entrust this work to professional professionals.
However, if you decide to do the renovation yourself, you must ask yourself. how to do this correctly? As you already understand, an electric drill will be “broken” by the armature and stator, and this can be checked by several signs, for example, when the tool suddenly sparks during operation. If there are no "bright" signs, you can use an ohmmeter.
The stator changes as follows:
- First, carefully disassemble the device body;
- We remove the wires and all internal parts;
- Having found out the causes of the malfunction, we will replace the spare part with a new one and close the case again.
How to replace brushes: work in a couple of minutes
But the drill may not work due to habitual faults. for example, through brushes inside the motor. Thus, brush repair is a must and the job is quite simple. you don't even need to have special knowledge or tools. To do this, we disassemble the device, remove the brush holders from it and replace the broken parts. By the way, there are models that cannot be disassembled. you just need to remove the special plugs through the installation window, then change the brushes .
As you can see, there are various breakdowns, many of which will be your responsibility, while others will only be handled by service center specialists. And to reduce the risk of such damage, you need to take care of your tool, clean it after use, check the condition of the parts and brushes in order to replace them with new ones in time. However, if you cannot handle this, take your device to a repair shop.
Checking the electric motor: causes of breakdowns and repairs
There are several reasons for damage to the armature or stator of a drill. First of all, this is illiterate operation of the device. For example, many users simply overload the tool, working without interruption. This leads to the fact that the drill motor does not have time to “rest”. The second reason lies in poor coil wire, which is often found in cheap models. That is why breakdowns of cheap tools are much more common. In this case, repairs must be carried out using specialized tools. And it will be better if you entrust this work to professional specialists.
However, if you decided to carry out the repairs on your own, you will definitely have a question - how to do everything right? As you already understand, an electric drill “suffers” from damage to the armature and stator, and this can be checked with several signs, for example, when the tool suddenly sparks during operation. If there are no “bright” signs, you can use an ohmmeter.
The stator is changed like this:
- First, carefully disassemble the device body;
- Remove the wires and all internal parts;
- After finding out the causes of the breakdown, we replace the spare part with a new one and close the housing again.
Is it possible to connect a drill without a button?
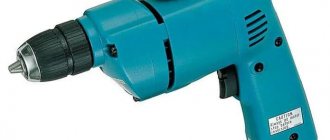
A drill is one of the most used power tools in everyday life. Often, during its operation, an element such as the power button fails. This is due to the fact that the switch responsible for turning the device on and off is subject to mechanical stress, as a result of which it quickly wears out. It is for this reason that most people who use an electric drill have a completely logical question: is it possible to connect the drill directly without a power button and how to do it?
As a rule, in most cases, a similar question arises among people when the on/off switch of an electric drill fails, and it is not possible to purchase a new one. It should be noted right away that it is quite possible to connect power to an electric drill and start it without a button. However, during such a connection, you must follow all the rules and instructions for connecting the contacts of the device’s electric motor to the wires that supply power from the electrical network.
How to select spare parts for replacement
During disassembly and maintenance of the drill, you may be faced with the fact that some parts are worn out and require replacement. This is a common practice, however, you should not try to replace it with third-party components or, even worse, look for complex workarounds. A typical and serious mistake is when, instead of a broken standard button, a regular toggle switch is attached to the outside of the handle. Such “tuning” is unsafe and should be avoided.
Internal structure of the drill: 1 - network cable; 2 - noise suppression capacitor; 3 — start button; 4 - electric motor stator; 5 — motor bearing; 6 — brush holders with brushes; 7 — rotor collector; 8 — drill body; 9 — impeller that cools the electric motor; 10 — button for switching between normal and shock modes; 11 — gear housing; 12 - gearbox; 13 — cartridge bearings; 14 — return spring; 15 - chuck holding the drill
Moreover, today the market for spare parts for power tools is accessible and extensive. If you bought a tool in a large chain store, then most likely you will find everything you need for repair there: from buttons and brushes to motor rotors and gearbox parts.
All you need is to determine the manufacturer of the drill and the exact name of the model; this information is necessarily present on the nameplate. The problem is that different modifications of the same model may have both compatible components and completely unsuitable ones. Focus on the appearance, do not be lazy to clarify the main dimensions and dimensions of the replacement part.
With the components of the drive mechanism, everything is somewhat simpler due to the high degree of unification: the bearings are marked on the protective rings of the cages, and nomenclature codes are stamped on the gears. Practice shows that spare parts can be found for all popular tool models, including representatives of the foreign Proftula series. The only exceptions are drills over 30 years old, but even for them it is quite possible to find a donor.
Switch faults
In the process of familiarizing yourself with the question of how to assemble a Makita 2450, you should find out frequent switch malfunctions. They may be caused by worn metal pins. In this case, any of the modes will not be activated. The switch will need to be replaced. This should also be done if the landing lugs are broken.
If the rubber ring is worn out, a slight leakage of lubricant will occur. We'll have to replace it.
It happens that the clamp breaks the beak with which it is attached to the cavities of the gearbox. The clamp tabs may be damaged. To avoid all of the above damage, you need to handle the tool carefully.
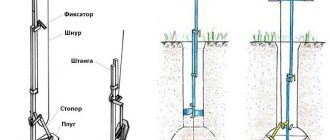
Wiring diagram for a shovel drill switch
Quite often, an electric drill stops working due to a breakdown of its speed control switch (it does not turn on, the speed cannot be adjusted), we disassemble the drill, try to do something, and when we realize that the problem is in the speed control switch, there are many wires from it already torn off and which one was unknown where. To solve this problem, you will need information: how to replace an adjustable switch on a drill: In order for the motor to start working in the reverse direction, you need to swap the connections of the wires to the brushes (in a reverse button, this is done using the switch lever). I would like to draw your attention when purchasing a switch, it must match not only the size, but also the power of your drill. Let's do the math: we have a 650W drill, P=U*I, I=650/220=2.95A, it turns out we need a switch for U=
How to connect?
Connecting a drill directly to an electrical outlet without a switch is not as difficult a task as it might seem at first glance. Before you start connecting the electric drill and dismantling the power button, you need to stock up on the appropriate tools:
- screwdriver;
- soldering iron;
- insulating tape;
- sharp knife or blade (for stripping wires).
Before connecting the drill motor directly, the device's power button is removed. To do this, use a screwdriver to unscrew the screws located on the side of the electric drill. Then, after the screws have been removed, you need to dismantle (remove) one part of the power tool body. Then, when access to the switch is open, it must also be dismantled.
The wires that were connected to the switch are connected directly to each other. This entire procedure usually takes no more than 15 minutes. It is strongly recommended to solder the wires together using a soldering iron, and then the soldering points must be properly insulated using electrical tape. As an alternative to soldering, you can use a terminal block (blocks), thanks to which the wires are connected to each other. You can also use a cambric to insulate the connection point.
The field winding consists of four wires. Two wires located diagonally from the coils must be connected to the wires that are connected to the brushes. The connection points must be insulated. Then the other two wires need to be connected to the power cord that powers the power tool. If the electric drill chuck, after connecting the device to the power supply, starts to rotate in the wrong direction (reverse mode), then the connection wires just need to be swapped. That is, the wires that go directly to the brushes need to be connected to the electrical network, and those contacts that were previously connected to the network need to be connected to the brushes.