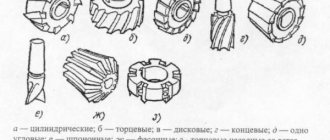
Types of milling cutters and their scope of application
Initially, the router was created as a tool for processing wood. Modern milling cutters can handle plastic, non-ferrous metals, plexiglass, artificial stone, various composites, but wood still remains a priority.
The main area of use of the router is carpentry, making furniture and various decorative wood products.
It will help you with a variety of operations:
- quarter sample;
- creation of grooves, folds, splines, tenons;
- production of seats for door locks and fittings;
- straight or shaped edge profiling;
- drilling holes;
- perfect fit of connected parts;
- rough alignment of contours;
- decorative wood carving.
Depending on the purpose and some design features, all milling cutters can be divided into several types. Some of them are universal, others are highly specialized.
Submersible (aka vertical or rod)
Can do all the basic milling operations: creating grooves, holes, roundings, chamfering, milling a closed contour, etc. It is used both in home workshops and in production workshops.
Edging (aka edging or trimmer)
Performs groove selection, groove making, chamfering, cutting shallow recesses according to a template. Able to accurately process parts covered with veneer or laminate. Suitable only for daily use, i.e. in production conditions.
Rotary
Used for cutting holes in wood, as well as drywall, plastic, and ceramic tiles. Can handle edges.
Lamellar
Used exclusively for making grooves.
Additive
A highly specialized tool for creating paired holes intended for connecting parts on dowels. Used in furniture production.
What type of router you need depends on the nature of the tasks you face and their volume. For example, in furniture production, milling is one of the main operations; in a home workshop, the need for such a tool usually arises only occasionally.
The most versatile and most widely used is the plunge router. It is this that those who are trying to decide for themselves the question of how to choose a manual wood router for their home should first pay attention to. And it is on this type of milling cutter that we will concentrate our main attention here.
Popular models
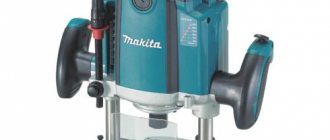
Manufacturers offer a large number of wood edge routers to choose from in various configurations. Large brands are represented by such companies as Makita, DeWalt, Bosh. The most common Makita edging machines, the 37xx series, are high-quality tools positioned for occasional use. The 440 or 550 W motor with a rotation speed of 35,000 rpm allows processing with cutting depths of up to 40 mm. Among the shortcomings, it should be noted the all-plastic construction of the body and sole parts, as well as the only collet with a diameter of 6 mm. The DeWalt catalog contains similar Trimmer models DWE6005. Its special feature was the presence of a spindle speed controller. The Bosh product line is limited to the professional model GKF600. The advantages of this model include a 600 W electric motor, a metal base and 6 and 8 mm collets. Domestic manufacturers did not stand aside either. For example, Interskol offers the FM30/430 edge-loop router. The low engine power is compensated by a comfortable handle. Such a tool will easily find its place in the home workshop.
Vertical manual milling device
Of all the hand-held power tools, the router is perhaps the simplest from a design point of view. Its equipment is attached directly to the electric motor shaft (spindle), i.e., torque is transmitted without the mediation of gears, belts, etc. Thanks to this, the cutter easily gains high speed.
The router body, also called the “head” or simply the “head,” moves up and down along guide rods that are rigidly mounted on a support platform. When the operator presses on the handles, the head goes down; when the pressure is released, the springs return it to its original position.
A milling cutter is secured to the motor shaft (spindle) using a collet clamp. When the head is lowered, the cutter smoothly plunges into the workpiece material to a given depth, the latter being adjusted using a stop. When the tool is subsequently moved horizontally, the sharp edges of the cutter drill out the groove.
1. Collet clamp for attaching the cutter. 2. Support platform 3. Stepped milling depth limiter. 4. Grip handle. 5. Vertical stop.
6. Handle for fine adjustment of milling depth. 7. Cutter speed regulator. 8. Milling cutter body with installed electric motor. 9. Accidental activation lock button. 10. Knob for fine adjustment of the rip fence.
11. Parallel stop. 12. Tightening lever. 13. Router on/off button. 14. Parallel fence adjustment screws. 15. Guide rods.
What technical characteristics must be taken into account when choosing a router?
Power
The capabilities of a router are largely determined by the power of the electric motor with which it is equipped. The greater the power consumption of the unit, the greater the maximum permissible diameter and length of the cutter that can be installed on it, the longer it can operate continuously without overload.
It would seem that if you do not take into account the financial side of the issue, then the best router should be considered the most powerful. However, in reality it is not so simple. An increase in power entails a significant increase in the weight and dimensions of the engine, and therefore the entire tool.
According to this parameter, milling cutters are divided into:
Lightweight (power up to 750 W, weight 2-3 kg).
Medium (power 750–1500 W, weight 3-5 kg).
Heavy (power 1500–2300 W, weight 5-6 kg or more).
For regular milling work, experts recommend a tool with a power of at least 1500 W. A powerful milling cutter, of course, can easily cope with any professional tasks. However, when performing a number of delicate jobs, for example, when processing edges, it will not be so easy to cope with a heavy and bulky machine, especially for a beginner.
Your task at the stage of choosing a tool is to analyze the intensity and nature of the work that is supposed to be performed with the help of a milling cutter, and to find that very golden mean - a tool whose power will not be excessively large, but sufficient to solve the assigned tasks, long-term work without break, processing of hardwood.
Spindle speed
The significance of such technical characteristics of a milling cutter as spindle rotation speed is understandable even to the most technically untrained users. The higher the rotation speed of the cutter, the higher the quality of the machined surface. If high accuracy is required, it makes sense to work at lower speeds. A low rotation speed is also needed when processing plastic, otherwise the working area will overheat and, as a consequence, the material will melt.
The spindle speed of most milling machines ranges from 20 to 30 thousand rpm, but there are both slower (10–20 thousand rpm) and faster (up to 35 thousand rpm) operating units. It should be taken into account that the larger the diameter of the cutter used, the lower the angular speed of rotation should be, since the linear speed of movement of a point on the periphery of the circle will still be quite high, and if you “accelerate” the cutter even more, the wood begins to burn.
Since the optimal spindle speed depends on the size of the cutter currently being used, the depth of cut, and the density of the workpiece material, it is very useful to be able to adjust the speed, which determines the functionality of the router. The adjustment can be smooth or stepwise (up to 8 positions). The optimal milling mode for given conditions is chosen by the operator himself, based on his practical experience, however, manufacturers often indicate recommended values in the tool data sheets or on the cutters.
Cutting stroke
The working stroke of the cutter, i.e. the maximum possible milling depth is one of the most important parameters demonstrating the functionality of the tool. For light milling machines for household use, this figure, as a rule, lies in the range of 20–50 mm; for powerful professional models it can reach 70–80 mm. The longer the cutter stroke, the deeper it can dive into the material being processed, the thicker the parts can be processed.
A groove of full depth is usually not cut at one time - this can ruin the workpiece and damage the tool. Moreover, the harder the material being processed, the smaller the depth of a single pass. But in general, it is impossible to make a groove with a depth greater than the working stroke of the cutter. Many models of milling cutters are equipped with a regulator for fine-tuning the immersion depth; the accuracy of setting this parameter is usually 0.1 mm.
Additional functions
Constant electronics . As the density of the material being processed or the speed of moving the tool along the workpiece increases, the speed begins to fall. A constant electronics system that controls the power of the electric motor in order to stabilize the spindle speed will help maintain them at a given level. The need for this function usually arises when there is heavy load on the tool, so it is found, as a rule, only in professional milling cutters.
Contact electronics allows maintaining consistently high quality of material processing.
Smooth start . Powerful professional milling cutters are often equipped with a “soft start” system. Thanks to this function, the engine picks up speed gradually, which eliminates a sharp jerk of the equipment when turned on. Such a tool will serve you longer, since its components do not experience periodic short-term overloads, it is safer to work with it, and the chance of damaging the workpiece at the very beginning of work is minimized.
Overload protection system . If the temperature of the motor winding exceeds a critical level, the overload protection system will come into play. For different models, this function can be implemented in different ways - from a simple light indication to automatic power off.
You can find a milling cutter with an overload protection system only among professional models, since they are the ones that are used for prolonged intensive work, which means they are more likely to begin to overheat as a result of increased loads.
Protection against unintentional start-up . On the body of most modern milling cutters, regardless of their price category, there is an additional button, without pressing which simultaneously with the main start button, voltage will not be supplied to the motor windings.
Its main purpose is to prevent unintentional starting of the router. This button, as a rule, also performs one more function - it allows you to block the trigger in the on position. When using a router stationary (milling table), you cannot do without such an option.
Design features that must be considered when choosing a router
Sole
The support platform of the router, called the sole by users, is one of the most important structural elements of the tool, so special attention should be paid to its quality. The sole can be made of either cast or stamped metal. The cast platform, thanks to its clear geometry and good fit to the surface of the workpiece, guarantees high quality work. It is not surprising that it is considered a sign of a high-class instrument.
The stamped sole is cheaper to produce, so it is usually installed on inexpensive milling cutters for household use.
The lower plane of the platform, i.e. the sole itself, must be covered with a special overlay. This element is usually made of plastic. For most routers, the plastic pad is removable, which makes it easy to replace it with a new one when worn.
When choosing a router, you should pay attention not only to the quality of the sole, but also to the size of the hole in it - the opening. It limits the maximum permissible size of the equipment: you simply will not be able to install a large-diameter cutter on a unit with a small opening in the support platform.
Rod mechanism
The milling cutter head moves along two vertically located guide rods. The ease of use of the tool and work productivity largely depend on how easy and smooth its movement is. The presence of backlashes and distortions, as well as excessive resistance to movement of the unit in the vertical direction, is considered a serious drawback, since it makes it difficult to use the router.
The depth of immersion of the cutter into the material being processed is limited by a vertical stop. This metal rod rests against a special area on the platform, preventing the head of the instrument from falling lower. When setting the milling depth, you simply move the stop rod up or down. This can be done using a special screw.
In addition to this, advanced units also have an adjusting screw for fine-tuning the depth with a micrometer scale. The more accurate the adjustment and the wider its range, the more high-quality and functional the tool you hold in your hands.
A multi-stage turret stop will help you make several passes with a gradual increase in the processing depth up to the specified one. Essentially, this is a special platform on a platform with several steps of different heights, into which a vertical rod rests, limiting the depth of milling. Sometimes the turret stop is made in the form of several bolts screwed into the platform; in this case, the height of the steps can be adjusted by screwing or unscrewing the bolts.
Equipment fastening unit
The hand router equipment is secured to the spindle using a collet chuck. It is a special nut with a collet located inside, screwed onto the spindle and clamping the shank of the inserted cutter. Lightweight milling cutters are designed for cutters with a shank diameter of 6–8 mm; powerful ones, as a rule, are equipped with collets with a diameter of 10–12 mm. The latter is easily explained: the larger the cutter, the thicker its shank and, at the same time, the higher the requirements for the power characteristics of the tool.
The diameter of the cutter must match the diameter of the collet. However, it is still possible to install a cutter with a thinner shank into a seat with a larger diameter. To do this, you will have to use a replaceable collet (or, in extreme cases, a special adapter sleeve). Even if it is not included in the tool kit, it can always be purchased separately.
When “replacing” a cutter like this, you should carefully ensure that the recommended rotation speed for it coincides with the parameters of the tool, otherwise the thin shank may not withstand excessive load.
A high-quality collet reliably fixes the shank strictly along the axis of the spindle, which eliminates the occurrence of vibrations that negatively affect both the quality of material processing and the condition of the tool. Collet clamps with a large number of clamping blades are preferable, as they better center the cutter.
Auxiliary devices used at work
A milling cutter is rarely used for rough fitting of a workpiece; more often, filigree precision is required from the tool (and the operator working with it). All sorts of auxiliary devices come to the rescue, making working with the router easier and more convenient.
The parallel (side) fence is used for milling parallel to the edge of the workpiece. It allows you to evenly guide the tool at a given (relatively small) distance from the edge. It is attached to the base of the tool by means of two rigid steel rods, which are fixed to the base with screws. The quality of work ultimately depends on the rigidity of the resulting structure. A parallel stop is made of cast or stamped metal, isolated from direct contact with the workpiece by a removable plastic cover.
The guide rail is also used when milling along a straight line, but unlike the side stop, it can be installed at any distance from the edge of the workpiece and at any angle to the edge. It is a profiled ruler secured to the workpiece with clamps. A special shoe is connected to the router, which moves along the grooves of the tire and guides the tool.
The copying sleeve is used for milling along a complex trajectory by copying the contours of the template. During operation, the side of the sleeve rests against the edge of the template, as a result the cutter reproduces its outline on the workpiece, and you get a slightly enlarged copy of the product used as a template. The sleeve is selected to match the diameter of the cutter and is fixed using a quick-clamping mechanism.
A compass ruler helps to mill the workpiece along a radial line. With its help you can make, for example, a rounded tabletop. One end of the ruler-compass is attached with screws to the base of the router, the other is fixed with a pin in a hole drilled in the workpiece in the center of the circle.
The connection pipe for connecting a vacuum cleaner is an element whose necessity today, probably, no one doubts. Allows you to keep the cutting area clean and therefore clearly visible during work.
Edge and loop routers
For milling grooves for hinges.
Such machines are adapted for cutting recesses for loop maps. They have a separate handle with a switch button and a stop that allows you to accurately mill on a narrow edge. There are only a few such machines on the market, and their specialization is very narrow, and therefore they are purchased purposefully, for a specific task, and not on the principle of “may be useful in the future.”
Among the variety of hand-held woodworking tools, the edge router occupies a very high place, since with its small size and low energy consumption it is capable of performing many different works with wood. Why is it needed and how do they work? Let's find out!
Tips for choosing a router
We hope that your knowledge about milling cutters, thanks to our efforts, has been significantly expanded. But has the question of which manual wood router to choose become clear enough for you? If still not, let me give you some practical recommendations so that you understand what criteria you should focus on.
Tip #1 . By choosing a high-power milling cutter, you choose high productivity and the ability to work for a long time under significant loads. However, you should not mindlessly chase a higher value of this indicator. Remember that along with the power, the weight of the unit also increases - it will no longer be so easy and comfortable to operate. The advantages of high power must be weighed against the disadvantages of using a heavy tool for small jobs. However, if you plan to use the router in a stationary position (milling stand or milling table), high power will be a definite plus.
Tip #2 . Please note that the router you choose has the ability to adjust the spindle speed. The speed switch on an ideal tool should move in steps, or at least fairly tightly, and be located in a place where the likelihood of accidentally touching and dislodging it is minimized.
Tip #3 . Be sure to check the actual immersion depth of the cutter, which can vary greatly depending on the design features of the collet used. It's great if the collet extends to the bottom of the support platform, but ideally it should extend beyond the base. This characteristic greatly influences the functionality of the tool, but, alas, the “extension” of the sole is not indicated in the passports - you can find out its size only by holding the router in your hands.
Tip #4 . Test the operation of the rod mechanism. The tool head should move freely and without distortion, and the vertical stop should be securely fixed in the specified position. Make sure that the depth setting accuracy meets your requirements.
Tip #5 . Find out what diameter and geometry of equipment can be used with this router. To do this, you need to compare the size of the cutter with the diameter of the opening in the sole, as well as in auxiliary devices (copy sleeve, compass ruler, etc.). Be sure to compare the diameter of the shanks of the cutters you plan to use with the seat size of the collet.
Tip #6 . Evaluate the ergonomics of the tool. It is important to choose the type of handle that is most convenient for you. There are not so many options - pistol and mushroom-shaped.
The opinions of experienced users regarding the location of controls, in particular the immersion depth stop, are divided - some believe that there should be no buttons on the handles, others, on the contrary, prefer to have switches in the most accessible place so that, if necessary, they can be used without interrupting work.
From our point of view, the most suitable place for the stop lever is near the handle, in the reach of the fingers, but not on the handle itself. However, it makes no sense to listen to anyone’s advice regarding convenience: what is convenient for one may not be suitable for another. It’s worth holding the model you like in other respects in your hands and evaluating the convenience of the location of the controls. Also pay attention to the length of the power cable - a short power cord causes a lot of inconvenience during work.
Tip #7 . If you plan to frequently work without guides, a good view of the work area will be very important. It also depends on the size of the opening in the sole, the location of the dust extraction pipe, and the presence of LED lighting.
Tip #8 . Find out how accessible the auxiliary elements are for the model you have chosen, and whether it is possible to replace them with analogues from other manufacturers.
Tip #9 . If possible, test the selected router at idle and under load. Extraneous noise and increased vibration are a sign of poor quality assembly or problems.
Tip #10 . Undoubtedly, an important criterion for choosing an electric router for many is price. We cannot give any advice here. You must understand that a good tool cannot be cheap. If you're on a budget, try to evaluate which features you're willing to pay for and which aren't particularly important to you.
Sequence of work with an edge router
Let's look at it using the example of one of the most successful models of similar equipment designed for woodworking - the Makita rt0700cx2 trimmer. This edge router has increased requirements for electrical safety, but is not intended for work in low light conditions, since there is no illumination of the working area. The presence of a rotating base allows you to perform work on processing straight and inclined edges, milling corners, and even perform so-called plunge milling, when the processed area of the workpiece surface is located on the opposite side from the plane of the trimmer.
The manual router has a block design of the units, so disassembling the unit (for example, to replace brushes or clean) does not take much time. It is advisable to have a set of edge cutters that are suitable for use with a specific trimmer, as well as suitable keys for convenient change of equipment.
Preparing the edge router for work is carried out in the following sequence. Depending on the type of surface of the workpiece, the required type of support sole is selected (there are at least three of them in the basic configuration, all of them are comfortable and stable, and are made of cast aluminum alloy). Similarly, a collet with the required mounting diameter for the cutter is selected.
Using a rubber roller, the desired depth of edge milling is set. Before direct use, the manual milling cutter is turned on at idle speed to identify the possible presence of vibrations: they are possible if a fairly heavy (weight 1.8 kg) milling cutter is positioned non-perpendicular to the working axis of rotation of the cutter.
If the milling volumes are large, a dust collector should be attached. Then fix the locking lever, turn on the trimmer, and smoothly move the equipment with both hands to the stop. The quality of the finished result is ensured by minimal clearances in the guides of the sole, as well as the use of a high-precision bearing that reduces runout of the collet during the milling process.