A drill is a tool that is present in the inventory of every master. A drill can be used instead of a machine for polishing products, a mixer for building mixtures, or simply for creating holes in walls. To make drilling faster and more accurately, use a stand for an electric drill. Thanks to such stands, you can turn a regular drill into a machine that looks like a professional one. Below we will describe in detail how to make a stand for a drill with your own hands.
Drill stand
What should a drill stand be like?
The machine should be easy to use and not limit the capabilities of the drill, but rather expand them. The right stand allows you to not only drill holes in walls, but also mill parts.
Also, a drill stand for a drill, made by yourself, must be stable and correctly guide the drill. It should not move during operation, otherwise the holes will be made at an angle. But at the same time, using a high-quality bed, it is possible to drill holes at an angle. Some commercial models allow you to create holes with an inclination of up to 65 degrees.
Other qualities that a drill stand should have include:
- Possibility of adjusting the tool height
- Ability to absorb vibrations and vibrations emanating from the drill
- Solid base for stability
- Fixed hole depth
Not all tools presented in stores can combine power and reliability. And those that are capable of this will be very expensive. You can combine several functions at once by making a drill stand with your own hands.
Purpose and features
Working on the principle of vertical drilling, a holder for a drill (or screwdriver) is used to perform such technological operations as:
- Precise drilling of holes to a given depth, their boring and finishing;
- Chamfering, forming recesses and grooves (countersinking);
- Thread cutting (if the power of the drill and the strength of the stand structure allow).
However, it is worth understanding that such devices do not have a load-bearing capacity comparable to factory equipment. Therefore, drilling into hard material with great force is not recommended.
The quality of work performed is directly dependent on the quality of assembly of the equipment. Therefore, when choosing (or assembling) a rack, you should avoid backlash, inaccuracies, and unstable construction. You should also not skimp on the quality of materials: frames assembled from cheap plastic and dubious metal can fall apart under load during operation.
Material selection
To choose what material to make a stand from, you need to decide what qualities the future device should have. If the device will only be used to create holes, then you can make a guide from wooden blocks. In other cases, the drill stand is made of metal material. It is better to use steel, then the stand will be more compact and durable. For additional strengthening, you can combine metal with wood.
drill stand
Block of information! The greater the power of the drill, the stronger the structure should be. Chipboard panels are suitable for creating stands only for low-power drills.
Often the support is made from the steering rack of cars. It can act not only as a stand, but also as a lift. It is better to choose racks from used Soviet cars, as they are cheaper. The base of the drill stand can be made from wood with your own hands.
Pros and cons of a DIY stand
In addition to the possibility of producing a structure from materials available at hand, self-made drill machines contain many advantages. These include:
- Low price compared to products presented in stores.
- A large number of varieties of designs.
- Availability of instructions for creating a rack in the public domain.
- The ability to combine several functions in one device to create an improved machine model.
The disadvantages include the fact that specialized equipment will be required when constructing the rack. For example, not every craftsman has a lathe or welding. Also, the disadvantages may be the following:
- The appearance of a gap between the two components of the rack due to poor fit of the parts.
- Lack of some functions that store models have. For example, due to a stationary tripod, it will not be possible to make holes at an angle.
- Advanced models require expensive parts to create.
drilling machine for drill
Also, the disadvantages include the difficulty of creating a machine. Beginners will have to turn to professionals for help, for which they will need to pay extra.
Making a device at home
Many users complain about the flimsy design of Chinese-made stands. Accuracy is very difficult to achieve with this right angle drilling jig. Therefore, craftsmen design drill guides with their own hands, relying on reliability and accuracy of drilling.
Like standard products, the homemade product consists of a table, a stand, a traverse and a steering wheel. The base is made of metal, and at the same time it serves as a work table. For manufacturing, metal sheets with a thickness of 10 or more millimeters are used. In the proposed design, the base is made of two channels, electrically welded into a single unit. Table size - 400x320x64 mm. The column is made of a square profile pipe measuring 25x25 mm and a wall thickness of 1 mm. Column length - 600 mm.
The traverse is made from the same pipe, but 30x30 mm in size, to which a 15 mm thick plate with a hole for the drill neck and a 4 mm slot for fixation with a clamping device is welded.
The lifting device is designed on the basis of a cable, one end of which is attached to the traverse, the other to the upper end of the rack. The cable is wound around an axle fixed to the traverse. A steering wheel is installed at one end of the axis. The traverse is put on the column and strengthened by a cable.
The stand assembled with a traverse is installed in a pocket made of a square profile with a cross-section of 30x30 mm and a height of 150 mm. Fixed in the pocket with screws.
The DIY drill guide design is powerful. It ensures precision and vertical drilling.
Homemade conductor
A home craftsman often has to repair furniture or make simple wood products where the parts are joined end-to-end. In this case, it is necessary to ensure the accuracy and perpendicularity of the holes. You can’t do this by eye; not everyone has a drilling machine or a guide attachment for a drill, so the workshop should have a device for drilling holes at right angles.
A classic device for precision drilling is a drill jig or drill guide. The device looks very simple: a metal strip 200x40x10 mm wide, in which holes of different diameters are drilled. This type of conductor is called a waybill, its advantages:
- simplifies work;
- increases drilling accuracy;
- guarantees a hole at an angle of 90 degrees.
You can buy such a thing in a store, but it is not always suitable for a specific job. Therefore, you can make a simple drill guide yourself.
To make a nozzle for drilling at right angles at the end of a chipboard, you will need:
- jigsaw;
- sander;
- two clamps;
- set of drills;
- chipboard, thick-layer plywood and fiberboard trim;
- a set of bushings of the same outer diameter;
- screws 4x25 and 3.5x16 mm.
It is necessary to prepare a chipboard strip measuring 200x20x20 mm for the bushings, as well as two side panels made of plywood 200x30x5 mm. Draw a center line in the chipboard strip and mark holes for drilling. Drill all holes with a drill to match the outer diameter of the bushings. To ensure accuracy and an angle of 90 degrees, you need to drill on a machine. The inner diameter of the bushings must meet the needs for furniture assembly.
Bushings should be pressed into the resulting holes. To assemble the device, you need to attach 5 mm thick plywood sides with screws on both sides to the bar where the bushings are installed. Then you need to check the manufacturing accuracy. To do this, you need to place the jig on the end of the chipboard.
DIY router
An electric drill is a perfectly balanced, quiet and reliable tool. Craftsmen are constantly coming up with attachments and making accessories for the drill with their own hands to expand its functionality.
The operating principle of the multifunctional tool is simple. The basis is the rotational movement of the shaft at high frequency. The multifunctional device allows you to perform a wide range of work: drilling, grinding, cutting, stripping, sawing, milling. It is enough to install a suitable working attachment on the spindle - and the drill turns into a machine. Thanks to this transformation, it is called a universal tool. She may be
- grinder;
- sharpener;
- milling cutter;
- drilling or lathe.
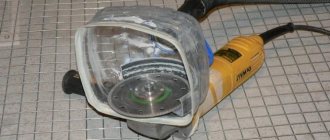
For a small amount of wood milling work, there is no point in buying an expensive manual router if you have an electric drill in the house. With its help you can design a simple attachment for a drill. From plywood 8 mm thick, cut a ring with an outer diameter of 100 mm and an inner diameter of 50 mm. At the edges of the ring, screw two wooden blocks 20x30 mm and 100 mm long against each other with screws.
Make a mount for a drill from two bars, having previously cut a 42 mm hole in them. Install the resulting fastening using screws on the bars of the ring. That's it, the nozzle is ready. Attach it to the neck of the electric drill, clamp the end mill into the chuck, having previously set the size, and mill the contours of the wooden products.
Any device you make yourself to simplify work in the workshop and garage will be beneficial. Very often you have to drill a hole at the edge of the board, which makes it possible for the drill to move to the side, so you can’t do without a device or a jig. It is very difficult to start drilling small-diameter pipes without a special attachment, since the drill goes to the side. And there are a lot of such problems, so every device made in a home workshop will come in handy.
Main parts of the frame
The main part of the drill stand is the supporting frame. It is the basis of the entire device on which other parts are attached. Its size depends on the power of the tool. So, for vertical drilling, a stand measuring 0.5 * 0.5 meters is suitable, but for other operations it is better to choose a design with dimensions of 1 * 0.5 meters.
DIY drilling machine from a steering rack
Next, you should pay attention to the guide for the drill itself. Thanks to this part, the drill is mounted on the machine and can move in a vertical direction. The clamp located on the stand is also responsible for securing the tool.
The carriage can be of two types. In the first case, the drill is secured to the machine using clamps that are threaded into special holes in the carriage. The second option is to fix the tool using a block. It is attached to the carriage at a right angle. To ensure that the drill holds firmly, a hole with a smaller diameter than the diameter of the drill is created in the block. Next, a slot is made where the tool is installed.
Accessories for power tools:
- Limit attachments. At the time of repair and construction work, it will be necessary to make holes of the required diameter to a precisely specified depth. Directly for this purpose, a fairly elementary nozzle is used, which consists of 3 elements. It can be done with your own hands, and the characteristics of the holes can be easily and quickly changed as needed. The first part of the device is a clamp for holding it; it is installed directly into the block housing of the device. This kind of clamp has 2 holes; guide stops in the form of metal rods of 6 millimeters are inserted into them. The rods are bent if necessary. During operation, the required angle of inclination of the drill is exposed in order to create holes with the set parameters.
Drilling depth limiter - Circle cutters are a specialized device that in appearance resembles a huge compass. The nozzles are made from metal rods. The vertical lobe serves as a stop; at its end there is a specialized thickening. The horizontal part is attached to the vertical part, on one side of which a comfortable handle is made, and on the other side a ring is welded. The diameter of the fastening ring should be provided for the device so that the electric drill does not slip out and stays tightly in it during operation. It is generally better to attach a rubber ring from the inside, which can help make the fixation more reliable.
Various accessories for power tools are needed in order to make the work more convenient and simpler.
It is not always possible to buy such devices, of course, and they are often only needed for a couple of times. For this reason, it is much easier to do them without the help of others, spending not so much time.
How to make a drill stand yourself
First you need to take care of preparing the material for the machine. It is important that the base for the stand is rectangular. Several holes should be made in it and the base should be attached to the workbench to avoid errors due to random movements of the material.
instructions How to make a stand for a drill yourself
The guide can be made from an aluminum tube half a meter long. It must be welded to the base. To lighten the load on the structure, it is advisable to use several guides.
To allow the drill to move freely, you need to make a special stand. To do this, clamps are attached to a piece of chipboard or metal, and anti-slip material is placed under them. And in order for the tool to lift automatically, springs are additionally used.
Next, the finished stand is fixed onto the prepared guides. Afterwards you need to take care of laying and installing the drill. The tool is secured using clamps. The drill can be controlled using a handle. It is installed on the guide.
After preparing all the elements, the assembly of the entire structure begins. This must be done very carefully, avoiding the formation of gaps. At the end, you can add additional elements to the design in the form of a ruler, protractor or clamps. In the same way, you can make a stand for a drill yourself from plywood.
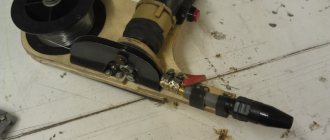
Do-it-yourself vertical stand for a screwdriver
Now let's look at the second option for a homemade stand. In general, the design is very simple, but most importantly, it works. The idea belongs to the author of the YouTube channel Gökmen ALTUNTAŞ.
In this case, it is quite compact, since it is designed for use in conjunction with a screwdriver.
However, you can adapt it for an electric drill by slightly increasing its size. And then you will get a homemade drill stand.
The advantage of this design is that its manufacture requires a small amount of materials. You don’t even have to buy many parts - you can find them in the garage.
We will make the drill stand stand from 20 mm thick plywood. You can also take a piece of board.
First of all, we saw off a blank of the required size from the plywood. Then we mark and drill two holes in it. Using epoxy glue, glue the guides.
We round the sharp corners of the base on a grinding machine. We make a movable platform from wood or plywood.
In the moving part we drill holes with a diameter of 19 mm for the bearings. Lubricate the outer part of the bearings with epoxy glue and insert the bearings into the holes.
We screw an adapter into the drill chuck, onto which we put a round tube. It must not only be put on, but firmly fixed with epoxy glue.
In the moving part we drill seats with a diameter of 29 mm for round bearings.
We put the first bearing on the tube and press it into place from the bottom of the platform. Then we put the second bearing on the pipe and also press it into the seat. For reliability we use epoxy glue.
We put springs and washers on the guides. Then we install a movable platform with a drill chuck.
It will be necessary to press wooden “plugs” onto the upper part of the guides to limit the stroke.
We clamp the shank of the drill chuck in the screwdriver chuck, and then use a crown of a suitable diameter to drill a hole in the base.
At this point, the process of making a homemade product can be considered complete. Then all that remains is to paint everything or coat it with mineral oil. Of all the racks, this option is the simplest and most cost-effective.
You can watch the author's video for details on how to make this device.
How to make a drill press
A stand for a drill for vertical drilling is not difficult to make. More effort will be required when constructing a drilling machine. This device is large in size. But if you follow the recommendations, you can make an improved compact device.
To make a drilling machine yourself, you need to use a stand, the creation of which was described in the previous paragraph. Next you need to complete the following steps:
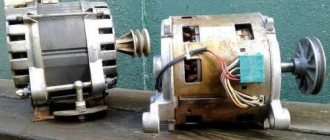
- Disassemble the drilling tool and remove the motor and starting device from it.
- Secure the engine to the stand using clamps.
- Prepare a separate box in which to install the starting device.
- Increase the length of the wires from the starter and install the box on the base of the stand.
- Firmly secure the cartridge by first placing it on the shaft.
The small drilling machine is ready. You don’t have to disassemble the tool, but then the machine will turn out to be bulky. Or it is possible to use engines from any household appliance. In this case, you will need to purchase an additional cartridge.
Drilling machine device
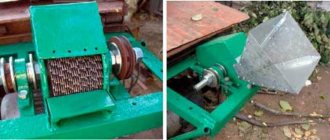
Do-it-yourself drilling machine from shock absorbers
Many craftsmen install springs, which are an addition to the machine. This allows you to make holes with automatic lifting of the drill. The prepared stand must be fixed on the guides. It is important to make sure that the connection is strong. The tool is fixed with clamps; in addition, it is necessary to use a gasket.
This will reduce vibrations. A handle is attached to the platform, which will be responsible for moving the tool. It is also important to take care of the console.
It will make the fastening reliable. This will be so if the shape and dimensions of the stand are equal to the parameters of the drill or other tool used.
When all the elements are ready, you can begin assembling the rack. The part is fixed carefully to avoid backlash. Clamps and a protractor are additionally installed on the surface. You can supplement the design with several rulers.
You can create something similar to install a drill or other tool that will be permanently located in the structure. These manipulations are not difficult. It will be necessary to prepare the stand using the technology described above.
Then some changes are made to the design. Using a drill on a drilling machine is not always convenient, due to the size of the tool. For this reason, the unit is first disassembled, only after its internal elements are installed. Having examined the drawings, you can make a homemade stand for a drill with your own hands, and in the end you will get a motor and a starting device for this. The motor is mounted on a stand, which will eliminate vibration and displacement during operation of the equipment.
For this purpose, gaskets are used, all clamps are tightened tightly. As a result, the size of the stand will decrease slightly. The starting device must be placed in an insulated box. Then the wires are extended. This solution will allow the box with the trigger to be mounted on the base rather than on the stand. The cartridge is put on the shaft and carefully fixed. When all actions are completed, the machine can be considered ready. Among its main characteristics, compactness, lightness and simplicity should be highlighted, which makes its use convenient.
We make a stand for a drill with our own hands using a technology that does not necessarily involve disassembling the tool.
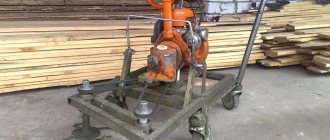
Drilling machine using asynchronous motor
Sometimes the working engine is borrowed from old household appliances, after which all that remains is to purchase a cartridge. Those craftsmen who often use a drill in their work use special stands. This process simplifies drilling and makes machining of workpieces as precise as possible.
If you wish, you can make a drilling machine yourself, after which it will take one of the important places in any workshop. This idea came to me when I looked at the shock absorber in a spare parts store. The rod is a perfectly ground and polished, hardened rod with a machined end and a thread cut on it.
In order not to buy shock absorbers, I went to a garage service and took two old rear shock absorbers from a VAZ from them. Then I simply sawed off the rods from the housings with a grinder.
There is still a slight play, since the shock absorber rods have a slight play on the seals, but in general, for the purposes for which it was created, it is quite suitable. Yes, this is far from industrial equipment, but it is still much more convenient and more accurate to drill on it than holding a drill in your hands. Is the structure rigid or still loose? Ainur Khairetdinov because on one shock absorber this structure would spin around its axis.
Then the question arose of how and what to make the base and support from. Milling from duralumin sheet is a bit expensive. I also didn’t want to cook from a steel corner.
Therefore, the choice fell on channel number 10 and a rectangular pipe. The channel became a good frame, since it weighs quite a lot, and the pipe became the support. The material had been found and now it was necessary to find a drive.
There were many options here. At first I wanted to use a micro drill, but I didn’t like the large axial play. Then I thought about buying a screwdriver and disassembling it to make one out of it, but they also have some play, and I wanted the shaft to sit rigidly. After thinking a little, the choice fell on a homemade spindle and motor. Transmitting torque via a drive belt has become the best option.
But the most interesting thing overtook me a little later. I was shocked at the prices for turning. The spindle body, shaft, pulleys, guide bushings and bearing housings were clearly included in the cost of the lathe. So I decided to buy a lathe and turned everything myself.
Homemade jack stand
Stands made on the basis of a jack are characterized by high strength and good fixation of the height of the tool. Before starting the manufacture of the device, it is necessary to prepare the welding machine. To make your own stand for a drill or screwdriver from a jack you will need:
- Metal rectangular base;
- Metal pipe;
- Pipe sleeve;
- Pin with metric thread with a diameter of 16 centimeters;
- Nuts suitable for thread diameter;
- Disk;
- The handle with which the tool will be moved;
DIY drill stand
First you need to make a vice for the tool. After which they must be welded to the bushing. On the other side you need to attach a nut. In order for the sleeve and nut to move without problems, the tube and pin must be positioned at a sufficient distance from each other. The pipe is carefully fixed, and the pin is inserted into pre-prepared grooves, which allow it to rotate relative to its axis. The handle is attached to the edge of the disk, and the middle of the base is connected to the pin.
After the main work is completed, a durable fabric or rubber material can be used to cover the edges and joints of the pieces.
Return mechanism
The main control mechanism of the machine is called the return mechanism. It regulates the operation of the carriage and is responsible for returning it to its original position. It consists of two parts: a spring and a handle. There are two ways to create such a mechanism.
The first method involves using a pair of springs under the carriage. These springs are fixed in the grooves, and the handle is mounted to the end side of the stand.
do-it-yourself drill stand drawings
In the second case, the spring is attached near the handle. Metal plates are installed on both end sides of the machine (two per side). Holes are made in the two front plates into which an axle with a diameter of 1 centimeter is inserted. It can be made from a regular bolt. The spring is placed between the second pair of plates and secured with pins on the handle. In order for the design to work correctly, a slot is made at the junction of the pin and the spring.
In both cases the system works the same. After pressing the control handle, the springs are compressed and the tool tilts. After the handle is released, the springs tighten and return the drill to its place.
Horizontal drilling machine
Typically, machines involve drilling holes with a drill in a vertical position. But sometimes it is necessary to make holes in a long part. Even with expensive store-bought stands, you won’t be able to drill vertically efficiently; there will always be errors. To avoid this, you can make a machine for horizontal drilling.
horizontal drilling machine
First you need to prepare a circular saw, a screwdriver or drill and a standard set of tools, including screwdrivers, a hammer, a chisel, etc. You can use ordinary chipboard panels as the material for manufacturing. Supplies you will need:
- Impeller nut;
- self-tapping screws;
- guides;
- lever;
- sleeve;
- bolts.
First you need a frame. Chipboard is used as the base, and the edging is made from wooden blocks. From the same plywood it is necessary to assemble a table that can change its height using screws. The table needs to be thoroughly polished. By rotating the handle, you can raise the table to the desired height. Next, draw a bright line running in the direction of the drill. This will help you drill holes more accurately. The guides are installed in such a way that they can be moved apart depending on the size of the tool, and then secured with screws. For the drill you need to make a support to which the structure is attached. To make the part move better in the machine, you can attach pieces of laminate at the points of contact with the structure.
Equipment for additional functions
To use a drill stand as a milling machine, you need to use the horizontal version of the bed presented in the previous paragraph. To such a machine you need to add a rotating plate. This is where the tool will be located. Then a hole is made in the stand stand into which the carriage with drill will be inserted.
Next, holes are drilled on the rotating plate at the most popular angles. Connect the rotating plate and the stand exactly along the holes. Bolts are used for connection. You also need to make three holes on the stand post into which pins will be inserted to install the rotating plate.
To use such a machine, you need to rotate the plate into the desired position, secure it with pins and start working.
Conclusion
Do-it-yourself drill stands have a number of advantages over purchased ones. Not only do they cost much less, but they are loaded with features. Making such a device will not be difficult even for inexperienced craftsmen. And if you have questions, you can always use the detailed instructions for creating a drilling machine with your own hands.
Summary
Article Name
DIY stand for drill - detailed instructions, drawings, video
Description
✅Article on how to make a stand for a drill yourself ➜—✅ Homemade drill stand made of wood for a drill with your own hands ➜—✅ Drawings ➜— ✅ Video
Author
Sarychev Alexander Viktorovich - forensic construction and technical expert, candidate of technical sciences
Publisher Name
Wikipedia of construction tools
Publisher Logo
- Related Posts
- Do-it-yourself drilling machine from a drill - detailed instructions, drawings
- Do-it-yourself lathe from a drill
- Metal cutter for drill - review, instructions for use
« Previous entry
Do-it-yourself desktop drilling machine: diagrams and drawings
Only a miniature drilling machine can solve this problem, but it is quite expensive. There is only one way out - a universal stand for a drill. You can do it with your own hands. Using available materials for the machine, you can make blind and through holes, cut threads and drill a perpendicular hole in a thin workpiece. If you decide to make a tabletop drilling machine with your own hands, you should definitely consider diagrams of such devices.
From them you can understand what elements are included in the unit. The tool is usually mounted on vertical, secure stands and can be moved freely up and down. The stand is installed vertically and mounted on a massive plate in the lower part, which is called the frame. In order to ensure safe operation of the tool, it is better to supplement the design with a protective screen and a lock against accidental activation. When creating a stand yourself, you must take care of safety measures; they include the need to prevent it from falling into the hands of children.
Post navigation
It is important to equip the equipment with soft pads that will dampen vibration and are located in the places where the tool is attached. It is important to exclude poor assembly, because then a slight tremor will occur, which will contribute to a disruption of the centering and a shift in the center of gravity.
Before making a machine from a drill with your own hands, you should definitely consider the drawings in order to borrow one of them or make it yourself. Fastening of wood structures is carried out with self-tapping screws. Corners are used for this. The tool attachment point can be made collapsible, equipped with removable clamps, or the tool can be firmly built in.
One of the important parts of the device is the movable skid unit. The drill and drill will move along it during operation. When making a homemade stand for a drill, furniture ones are often used for runners.
The above-mentioned stand is used to secure the drill, which can be converted into a stationary attachment. If you wish, you can modify other tools such as a screwdriver and hammer drill in this way. If you make the device yourself, you can attach units of almost any size to it.
The stands allow you to make precise holes and process products made from different materials, such as wood or plastic. If we are talking about a factory design, then the kit usually includes a release mechanism, which is necessary for quick fixation. This makes working on the machine safe.
Standard devices are small in size and weight, which indicates that they can be used in everyday life. Typically, racks are collapsible, and some models can be modified with your own hands.
Such manipulations involve changing the landing dimensions and drilling depth. But such devices do not replace a drilling machine. This will only be possible if a powerful electric motor is installed. You can, of course, purchase ready-made equipment, but such racks usually face problems with backlash, due to which the accuracy of the work leaves much to be desired. You can eliminate such a defect yourself; to do this, tighten the nuts or use gaskets.
Hello Guest! Login or register. As promised, I created a topic about the drilling machine that I sculpt. I started doing it at the end of April. In the garage there was a steel profile 60x40x3, somehow wound at work, as well as the rest of the material.
If you decide to make a rack for the drawings you should first consider. One of them can be prepared independently. However, you should first read the reviews of home craftsmen and specialists.
Such devices, in their opinion, are good because they are affordable. Equipment can be created from scrap materials. Moreover, it can combine several functions. But such machines also have their drawbacks. For example, during the assembly process you may encounter problems with the formation of backlashes that make processing inaccurate.
Consumers emphasize that due to the use of a tripod, it is not possible to drill the workpiece at an angle. Some models may require expensive parts to assemble, which sometimes forces home craftsmen to abandon this idea. Having decided to make a stand for a drill with your own hands, you need to prepare a drawing. Perhaps one of those presented in the article will suit you. The task is quite labor-intensive and will take a lot of time.
But this approach is more profitable compared to purchasing a new device. These materials will form the basis of a rectangular surface, in which several holes will need to be made to attach the product to the desktop.
Aluminum pipes will act as guides. You can take an aluminum profile or steel products. A guide, the height of which is 0.5 m, is fixed on the surface. To do this, a sheet of metal should be welded. To make the whole structure simpler, you should use a pair of guides. The drill must move in the required direction.
For this, clamps are used that will act as limiters. When making a rack for the drawings, you should first consider it. Perhaps they will help you understand how to avoid mistakes. Material is placed under the clamps, and then everything is fixed on a chipboard platform.