Level - device features, scope of application
A level at a construction site is an indispensable device. With its help, you can find the level of location of certain points relative to a specific base. Before any construction begins, site planning is carried out, which involves eliminating unevenness. The easiest way to do this is to use a level. You cannot do without this device when performing many other works - when arranging a foundation, pouring floors, installing formwork.
Area of application of the level
Design features
Level design
The main structural element of the level is called the telescope. It is equipped with a lens system that can magnify the image twenty times or more. This element is mounted on a special stand – a tribrach. It has three lifting screws, with which the device can be adjusted exactly to the level. To facilitate this process, there is a bubble level on the stand.
The design of the unit also includes a tripod. It is better to choose aluminum options, which are lightweight and durable. Some devices have a dial with which you can measure or construct angles.
The telescope contains a flywheel. With it you can adjust the sharpness of the image. To adjust the device to the visual acuity of a particular person, a regulator is used on the eyepiece.
Additional equipment and inventory
Basic controls of the level
To work with a level, you need to purchase not only the device itself with a tripod, but also some additional equipment. You need to have a special ruler with divisions and numbers printed on its surface, which will make it easier to take the appropriate measurements. The scale is presented in the form of red and black stripes, 1 cm wide.
On the bar there are numbers in increments of 10 cm. The measured value is decimeters, and all numbers are written in two-digit form. 60 cm is designated as 06, 120 cm - 12, etc. For ease of use, each of the five stripes is united by a vertical line. Therefore, the entire bar is covered with peculiar letters E - in the usual and mirror form.
Some old models of levels reverse the image, so all the numbers on the staff are in the same unusual form. Each level must be accompanied by a passport and instructions for use. The documentation for the device indicates the date of the last verification, which guarantees its operating efficiency.
Other equipment included as standard for each model:
- protective case for storing the telescope;
- maintenance key;
- a plumb line for installing the device strictly at the specified point;
- soft cloth for cleaning lenses.
Accessories for laser levels
Design and classification of standard levels
According to their design, standard levels are classified into:
- optical, or optical-mechanical;
- laser;
- digital.
We recommend: Homemade and manual machines and devices for sharpening knives. How to make a sharpener with your own hands?
Optical (optical-mechanical)
The operating principle of optical or optical-mechanical levels is based on the passage of a light beam through a telescope rotating in a horizontal plane. All settings are done manually. A measuring stick with numerical values is used for measurement. Optical levels are divided according to the degree of accuracy into technical, precise, and high-precision .
They work together - one person holds the staff, the second takes readings.
The kit consists of three items: a measuring tool, a tripod or tribrach and a measuring rod. The scale of the staff is double-sided. The divisions are marked in red and black, on different sides in centimeters and millimeters.
Laser
Laser levels are distinguished by a visible beam of light emitted by an LED in the device body.
Based on the principle of operation, they are divided into 2 categories:
- positional, the beam passes through a prism;
- rotating, the beam is based on a lens.
Rotary levels are considered professional tools ; they have a 360-degree operating angle, a long range and expanded functionality.
The tool's horizontal self-leveling mode simplifies pre-setting.
The case is protected from dust and moisture. Using a beam receiver increases the operating range. professional-class and household-use devices .
Additional functions are the projection of vertical and horizontal lines onto the surface and the construction of angles. To improve visibility and preserve vision, they wear safety glasses . If remote control is supported, it is permissible to work alone.
We recommend reading: Working with a laser level on a construction site
Digital
optical-mechanical or laser-type instruments that display, store and analyze information in digital form.
Digital devices have a processor and memory , a high accuracy class, and allow you to work without a partner. The rack divisions are marked with a barcode for automatic reading by the device.
The disadvantages are the high cost and sensitivity of the devices to mechanical damage.
Step-by-step instructions for working with the level
How to use a level without the necessary experience? Beginners should follow simple instructions while working.
Step 1 – Tripod Installation
We install the tripod taking into account the following recommendations:
- the fastening screws on the legs are relaxed as much as possible;
- the supports of the device extend to the required length;
- the tripod is set in the desired position, taking into account the horizontal level;
- screws on the tripod are secured on all sides.
Level tripods
Step 2 - installation of the level
The leveling tube is secured to a mounted tripod using several mounting screws. Using level sensors (by rotating them) a strictly horizontal position of the device is achieved. It is necessary that the bubbles on the scale be in the area of the indicated marks.
First, it is advisable to accurately set the first of them. Only after this do they proceed to adjusting the second screw, focusing on the previous one. Only such a step-by-step adjustment of the level will help achieve good results in your work. The optical axis of the device must be strictly horizontal.
Level installation
Step 3 – focusing the optical assembly
After installing the level in the desired position, they proceed to adjusting its telescope, focusing on the operator’s visual acuity. To do this, you need to move the device to a well-lit object, and turn the regulator until the marking grid is displayed as clearly as possible.
The same work must be done on other objects that are illuminated less well. Focus adjustments are carried out as long as necessary.
Level and its optical design
Operating rules
Working with the level is not particularly difficult. We offer you the simplest algorithm for using these measuring instruments, which will allow you, even without any special experience, to obtain the most accurate data and determine even the slightest deviations from the horizontal.
- It is necessary to correctly install the tripod, for which you loosen the fastening screws located on the legs, install the level horizontally on a stationary plane, and the measuring device should be located at chest level. Fasten the screws and fix the legs.
- A telescope is installed on a tripod and secured with a mounting screw.
- The level is brought to a horizontal position, for which three adjustment screws are rotated and the air bubble is placed in the central position on the round screen in the viewfinder.
- The optics are being focused and adjusted. The eyepiece should be adjusted to the operator's vision. To do this, the device is pointed at a large illuminated object, after which, by rotating the ring on the eyepiece, a clear image is achieved.
- To work, you will need two geodetic slats, which can be 3 or 5 meters long. The slats are marked in millimeters on one side and in centimeters on the other. They can be made telescopic from plastic or aluminum and folding from wood.
- Height alignment. The surveying rod is installed as close as possible to the point that needs to be measured and leveled. In the eyepiece it will be possible to observe the center line of the reticle, the data from which is recorded on paper or electronic media. Next, similar measurements are taken with other points, the area along which the alignment will be determined is determined, and based on the calculations obtained, it will be possible to ensure the most accurate and perfectly straight line.
- Centerline alignment will give you the most accurate data possible. It is necessary to choose a place where all the points are visible, through which you need to build a perfectly straight horizontal line. The level is installed in such a way that the nearest point is at least 5 meters away. The measuring rod is placed at the front of the device, and the second measuring rod is installed at the rear. The rear staff will be needed for marking, and the main staff at the front will allow you to calculate the height. The instrument is initially aimed at the rear staff, the values are recorded along the lines, after which the main staff is focused and data is recorded on the red side.
Modern laser and electronic devices can significantly simplify calculations. All information and all data are calculated automatically and then provided to the user in a readable form. Each of us can handle the use of such electronic and laser devices, even if he does not have the relevant work experience.
Levels are fairly easy- to-use devices that allow you to obtain geodetic data and determine the ideal geometry and horizontal plane. The use of such devices is not difficult, especially when used for measuring laser and electronic levels.
How to determine the excess of points?
Working with an optical level involves determining the difference in height of several points on the surface. To do this, you need to have a special measuring rod and an assistant who will transfer it from one place to another.
To perform the work, you must adhere to the following instructions:
Calculation of point elevations using elevation
- Select the first point at which the rail is installed in a vertical position.
- In order for the bar to stand as level as possible, it is necessary to adjust its position, focusing on the reticle on the device.
- The level is pointed at the staff. By rotating the eyepiece, maximum image clarity is achieved.
- The values of the measuring rod where the horizontal line of the reticle is located are written down in a notebook.
- The bar is moved to another point and all the work is carried out first according to a similar scheme.
- The level is positioned motionless. Therefore, the higher the measured value on the staff, the lower the specific point is.
Rules for transferring marks to the surface
Scheme for transferring marks to the installation horizon
A level at a construction site is an indispensable thing, since it can be used to determine the depth of digging a pit in each specific case. Let's consider a situation where it is necessary to obtain a recess with the bottom at a level of -2.000 relative to the floor of the building. To do this, the excavator operator must indicate his mark.
To perform this work correctly, set the rail at a point that corresponds to the floor of the building - at the design zero. At a construction site, such benchmarks are usually set up by a surveyor.
Let us assume that at this point it was possible to measure the value of 153. At the location of the future pit, a peg is installed and a rod is attached to it. Take the value that came out, for example, 168. A difference of 15 cm is set aside from the bottom of the peg upward. Next to it you can hammer another column. Its top should correspond to the mark made, which will provide the excavator with a more reliable reference point.
Types of levels, their capabilities and price
By design, the level can be:
Optic
It is used for various geodetic works, during the construction and repair of roads.
Designed to determine the difference in height between points, as well as the distance between them.
Determination of angles of inclination and height differences is carried out using a graduated scale printed on the glass.
To correctly install the device relative to the horizon, a bubble level is used.
To dampen vibrations, as well as to ensure stability, such levels are equipped with a magnetic damper or an air compensator.
The cost starts from 8 thousand rubles.
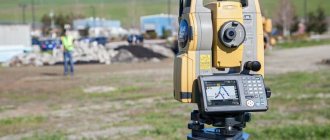
Digital (electronic)
A modern geodetic instrument that takes readings with high accuracy using a special staff.
The design simultaneously combines an optical level, an electronic storage device, as well as built-in software that processes data.
The electronic level works quickly and eliminates operator errors.
To take measurements, you need to focus on the staff, and when you press a button, the device will display all the necessary values on the screen.
The cost of the simplest models starts from 80 thousand rubles.
Laser
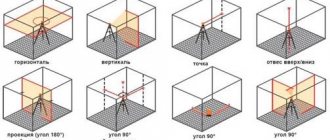
Allows you to construct vertical, horizontal and inclined planes with high accuracy.
Some devices have a plumb line function, which allows you to measure angles of 45° and 90°.
Another name for this type of level is a laser construction level, due to its scope of application.
Laser levels, in turn, are divided into the following classes:
Positional (linear)
The most common type of level.
Through lenses and prisms, the light flux is refracted, and as a result, static lines are built, oriented in space with high accuracy.
Such plane builders have an opening angle of up to 110° - 130°.
They are used mainly indoors.
The cost starts from 2 thousand rubles.
More professional models will cost 7–8 thousand rubles.
Rotary
It is used mainly on open construction sites, as it has a long range, which is reflected in its cost.
The level forms a point due to the beam, which, through the rapid rotational movement of the mechanism, outlines the plane.
Cost – from 7 thousand rubles.
In sunny weather, the line outlined by the moving beam is often impossible to see.
For this reason, models with a radiation receiver, which is a separate electronic device, are used.
When the laser is pointed at the photocell of such a receiver, the device emits an audio or visual signal.
Spot
Emits a direct light beam, which, when intersecting with any object, forms a point on it.
The price of professional models starts from 6 thousand rubles.
A laser level that has the ability to project beams in all three planes is called a 3D level.
According to the method of setting the tool (type of alignment), laser levels are divided into:
• Manual – adjustment is performed by the operator using ordinary bubble-type levels located on the housing. Precise positioning is performed by screw verniers.
According to the method of setting the tool (type of alignment), laser levels are divided into:
• Manual – adjustment is performed by the operator using ordinary bubble-type levels located on the housing. Precise positioning is performed by screw verniers.
• Self-leveling - adjustments are made through various built-in mechanisms.
Another name is automatic level.
Thus, the electronic leveling system independently compensates for up to 15% of the error in deviation from the horizon by analyzing information from special sensors and subsequent adjustment by servos.
The pendulum compensation mechanically compensates for deviations of up to 5% using a built-in permanent magnet.
• Combined – uses several alignment methods simultaneously.
There are two types of laser levels based on the color of the beam:
• With green beam.
Used for outdoor work as the beam wavelength is 532 nm.
This color is not only better perceived by the eye, but is also capable of constructing planes at a distance of up to 1 km.
In bright sunlight, the beam is often impossible to see.
• With a red beam – used for indoor work.
The wavelength of 635 nm, depending on the specific model, provides a range of 10 – 500 m.
The laser device requires a power source to operate.
Most often it is a built-in or removable battery that requires periodic recharging.
Small devices that can fit in a pocket use disposable batteries to operate.
Most rarely you can find network options, the functioning of which requires their connection to a household electrical network.
Hydrostatic leveling is another accurate method of measuring elevation differences, used primarily in construction.
It requires a hydraulic level - a long transparent hose filled with liquid.
The measuring process is based on Pascal's law of communicating vessels and allows one to estimate the heights of objects that are not in direct visibility.
Instrument maintenance rules
It is necessary to work with the level carefully, which is explained by the sensitivity of this device to any damage.
After each work performed, it is recommended to wipe the eyepiece and lenses with soft flannel, which is usually provided by the manufacturer as part of the standard package for each model. The slightest contamination on the surface of the optical system leads to inaccurate measurements, which negatively affects the results of the work performed.
To ensure high accuracy of the equipment, it is regularly calibrated. It is done once every three years, about which a corresponding note is made in the passport for the device.
This should be left to professionals, but in some cases you can do it yourself. A regular sheet of paper is used, which is placed at a known distance from the marking strip. The optical system of the level is adjusted until the measured values coincide with the actual ones.
Video on the topic: Level - getting started
Publications on the topic
DIY laser level repair rules
Scope of application and technical parameters of the welding machine VD 306
Features of using a knitting gun for reinforcement