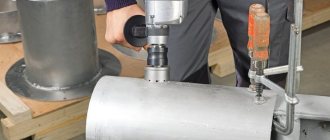
Often, when performing various repair or construction work, a power tool such as a hammer drill is used. Thanks to the use of this tool, you can quickly, without much difficulty, make holes even in the most durable surface. It is also often used during the dismantling of various surfaces (concrete, tiles, etc.).
It should be noted that any power tool is subject to stress during operation and may become faulty. Quite often, people who work with hammer drills are faced with the problem of removing the drill from the chuck of such a power tool. In order to pull out a stuck drill, you will have to make a lot of effort and show skill.
Reasons for drill jamming in a hammer drill
When using a hammer drill, the drill may jam, making it very difficult to remove it from the chuck. Basically, this problem can occur in 2 cases:
- The drill jammed directly in the adapter chuck. As a rule, such an adapter is used during drilling mode, when there is a need to use an ordinary drill.
- The drill becomes jammed directly in the clamping jaws of the power tool.
In the first case, the drill gets jammed in the adapter chuck, which is used together with the hammer drill, due to the need to use the drilling mode without impact. Before use, such an adapter must be inserted into the clamp of the power tool, and only then place the drill in it.
After completing all the work, a situation may arise when removing the drill from the clamping element becomes problematic. Therefore, in this case, it is recommended to use special compounds to safely dismantle the used drill. For example, WD-40 is perfect for these purposes.
After application, this composition, in a short period of time, will be able to relax the clamp to such an extent that the drill can be removed without much effort. As an alternative to WD-40, you can use ordinary kerosene. It needs to be applied to the mechanism, then wait 10 minutes and try to dismantle the drill, loosening it a little and tapping the chuck.
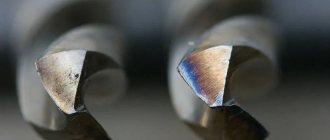
Quite often, when using a drill directly in a power tool chuck (without adapters), jamming can occur, which makes it sometimes very difficult to remove. As a rule, this is due to the fact that the drill is made of low-quality material.
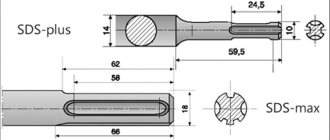
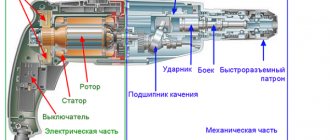
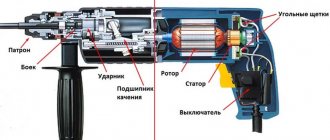
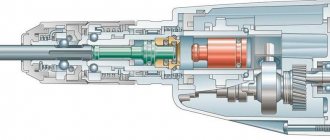
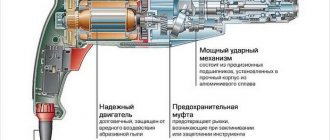
During operation of the hammer drill, a rotational - impact or simply impact mode is used. As a result of this, all the energy is transferred to the drill from a special striker, which delivers successive blows to its shank. The drill, in turn, is equipped with special grooves, which, after installation, are firmly fixed with a clamping element.
As a rule, low-quality shanks are made of soft alloys that are not subject to additional heat treatment. As a result, they are not able to withstand long-term heavy loads and become unusable, after which they jam.
Features in the repair of a barrel perforator
All described procedures for assembling and disassembling rotary hammer devices are also valid for the barrel variety. But there are several aspects that need to be taken into account when repairing it. Placing the motor vertically at right angles to the impact mechanism somewhat changes the disassembly order. So, to gain access to the gearbox and piston, you need to remove the plastic cover located in the upper part of the tool casing. This makes it easier to repair the mechanical part of the device if the shock function is suddenly lost.
Access to the electrical part of such a hammer drill is achieved after removing the lower casing. And replacing the brushes is made easier because there are holes along the edges of the glass through which they can simply be removed.
Electrical faults: the motor does not rotate, the brushes on the commutator spark and other types of breakdowns
The following signs indicate dilemmas with the electronic part of the hammer drill:
- the motor does not spin when turned on;
- the brushes on the commutator spark intensely;
- the body smells of burnt insulation;
- Acrid smoke comes out of the tool during operation.
In order to find out and remove the cause of all these phenomena, the hammer drill needs to be disassembled.
Failures in the mechanical part: the crown does not pull out of the barrel, the drill does not chisel, the drill does not rotate, and others
The mechanical category of defects includes malfunctions that appear while the engine is running:
- the drill does not chisel;
- the drill does not rotate;
- the crown cannot be pulled out of the barrel (jammed);
- the chisel does not stay in the chuck (it pops out);
- extraneous sounds are heard from inside the mechanism, grinding, vibration.
The brushes sparkle
Sparking of brushes is a fairly common phenomenon when working with equipment in conditions of excessive dustiness. Typically, sparking is a consequence of the deterioration of the material of the brushes themselves. Replacing the latter with new ones will help improve the situation; sparks will no longer fly out.
If not, the reason must be found in the stator or rotor windings. It is entirely possible that the huge amount of dust penetrating the engine has led to abrasion of the protective varnish covering the copper conductors. And this entails a short circuit. The presence of an interturn short circuit is checked using electrical devices (multimeter).
In addition, it should be taken into account that dust may adhere to the lubricant of the bearing located next to the collector. To prevent this, the collector is degreased using a swab dipped in alcohol or solvent.
The hammer drill does not spin and does not drill
If the chuck does not spin when you press the start button in drilling mode, the reason can be found in advance by the sound. If the electric motor hums but does not spin the chuck, most likely something is preventing the rotor from spinning inside the gearbox. What happened to the engine will have to be found out by disassembling the mechanical part of the tool.
READ How to Disassemble Makita Hr2450 Rotary Hammer Video
If the engine does not hum when turned on, it is more likely that the motor has broken down. Having opened the cover of the device, you need to find what exactly led to this phenomenon. This could be an open circuit in the power supply, a broken start button, or a short circuit in the coil windings. Using the tester, a specific cause is determined and repairs are made accordingly.
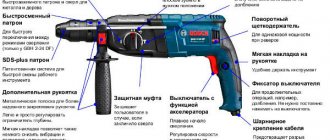
The hammer drill does not hold the chuck
From time to time, a situation occurs when a cartridge along with the equipment flies off on a working rotary hammer. This occurs due to wear of the chuck body mount at the end of the raster sleeve, which is a retaining ring. If it breaks, the fixation is broken and during the push the rubber boot flies off, followed by the spring and balls.
You can return the cartridge to normal operation by installing a new locking ring. This is done quickly and does not require any additional equipment other than an ordinary screwdriver.
The hammer drill does not hit
If the hammer drill does not start hitting when switching to impact mode, but the drill is still spinning, it is more likely that the floating bearing is damaged. The solution to the problem will be to replace it with a new one.
The second probable reason is a malfunction of the impact mechanism. Often, when overloaded during work, the metal striker splits, this first leads to a weakening of the impact, and then to its complete absence. The firing pin needs to be changed.
The third possible reason is wear or breakdown of the piston group of the hammer drill. The liner and piston should be replaced.
The drill does not stay in the chuck and flies out
Incontinence of the hammer drill equipment can occur during long-term operation. The drill or chisel inserted into the chuck does not hold and flies out during operation. With such equipment it is not only impossible to continue chiselling, it is also very unsafe - a flying chisel can cause injury.
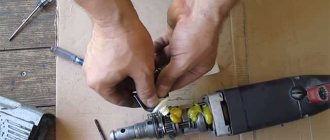
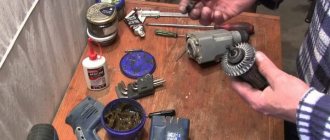
The reason for equipment incontinence lies in wear or breakage of the cartridge. The cartridge needs to be disassembled and found out what the problem is. Perhaps the balls were deformed, wear appeared on the restrictor ring, or the retaining spring sank. Usually, after replacing the damaged part, the cartridge starts working normally again.
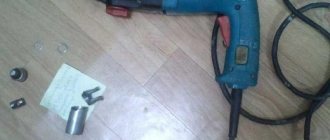
Ways to get a drill out of a hammer drill
When performing complex work, riveting of the opposite side of the drill, which is installed in the hammer drill chuck, may occur. As a result, it is unlikely that you will be able to freely remove the drill from the power tool. Therefore, in order to remove the deformed shank from the chuck in this case, it is necessary:
- In the first case, you can clamp the drill in a vice. Then take the power tool in your hands, gradually shaking it from side to side, and pull it towards you. As a result, the deformed shank should be released from the clamping mechanism of the power tool.
- The second method involves using two vices. The hammer drill, wrapped with rubber gaskets so as not to damage the integrity of the plastic case, is clamped in a large vice. After this, you need to clamp the drill in a small vice and use a hammer to loosen it from side to side with weak blows. The blows must be applied in the direction of the drill exiting the clamping mechanism.
In the case when it is impossible to remove the drill from the clamping mechanism of the hammer drill while turning it, you need to dismantle the parts of the chuck. Then you need to try to turn the drill in the opposite direction by 90 degrees. In this way, you can quickly remove a deformed drill, however, it is worth noting that after such dismantling you will have to change the components of the clamping element, since they will most likely become unusable.
When removing a stuck drill, it is recommended to use a penetrating solution, which will loosen the grip of the clamping mechanism. WD-40 is perfect for these purposes.
Drill / drill stuck in the wall - what to do
Forums and vlogs offer a lot of ways to remove a stuck drill. Once on a stone, it is usually possible to free the rig by simply turning on the reverse. But more often than not, the drill gets stuck after flying into a large cross-section of reinforcing rod. It jams so that the tool cannot cope and does not turn it, and pulling is also useless.
In order not to destroy the cartridge, it is better to release the nozzle and leave it “bare”. Next, start trying to free yourself:
If the drill is stuck in the ceiling, wrap a chain around it and hang a heavy load, lift it to chest level and quickly release it (it is important to have time to jump to the side so as not to get injured from the drill and/or the load). The method is quite risky. Clamp the tip in a vice, apply a lever and pull, swinging and trying to turn
This method is best done with two people.
The best option is to stumble upon the reinforcement and not try to take it forcefully. When you encounter an obstacle, immediately remove the drill and go through the hole with a magnetic screwdriver. If there are chips left on it, you have a problem with the reinforcement. Tilt the hammer slightly to go around the rod diagonally up or down. A slight slope will not weaken the anchor fastening, which is most often used in concrete.
Another option is to break through the reinforcement, but this can only be done with thin rods, otherwise there is a high risk of getting a crack and weakening the concrete floor.
To drill through rebar:
Put the hammer down and take a drill with a metal drill (high quality steel is important). Gradually drill through the reinforcement first with a thinner (4 mm) tip, then with a larger one and finish with number 8.
There are no hopeless situations if you have ingenuity and desire. Act confidently, but carefully, and the drill or drill will come out of the chuck and the repair will continue without problems.
Tips for avoiding jams
To avoid problems associated with the drill jamming in the hammer drill chuck, it is recommended to use only high-quality attachments that are produced by well-known, popular brands. In addition, when working with different materials, it is necessary to correctly and correctly select the appropriate working attachments. Before long-term use of the attachment for drilling a durable surface, it is recommended to first check its quality.
To do this, using a nozzle, you need to make several holes in the working surface, and then remove it from the chuck. If, after the completed manipulations, it easily passes through the shank and is dismantled, then, most likely, such a nozzle is made of high-quality material and its deformation should not occur during the work.