Service center ElectroService
send a request
Kemerovo, st. Tukhachevskogo, 40view on map
Phone: +7 (3842) 767497, 767493
- Repair of tools and construction equipment: rotary hammers, power tools, drills, gas-powered tools, generators and power plants, welding machines
Authorized service center ENKOR
Our service center repairs gasoline and electrical equipment. We are authorized for a fairly large list of brands and provide warranty, post-warranty repairs and maintenance...
Additionally: delivery of the hammer drill to/from the service center, on-site repair of the hammer drill at home or in the office, replacement of consumables, installation of the hammer drill (connection, configuration), sale of spare parts
Service center Master-SBT
Novosibirsk, Dzerzhinsky Ave., 1/2view on map
Birch Grove
- Repair of rotary hammers, power tools, drills, jigsaws, grinders, generators and power plants
Authorized service center ENKOR
Service center Fairway
Sevastopol, st. Nikolay Muzyki, 29-Bview on map
- Repair of tools and construction equipment: rotary hammers, power tools, drills, jigsaws, grinders, gas powered tools
Authorized service center ENKOR
Service center Enkor-Service
send a request
Rostov-on-Don, Orbitalnaya, 82bview on map
Telephone
- Repair of tools and construction equipment: hammer drills, power tools, drills, jigsaws, grinders
Authorized service center ENCOR
Additionally: replacement of consumables, sale of spare parts
Service center Toolkit
send a request
Novocherkassk, st. Gagarina, 33view on map
- Repair of tools and construction equipment: hammer drills, power tools, drills, jigsaws, grinders
Authorized service center ENKOR
Service center Steen-Service
Samara, st. Gastello, 35 View on map
- Repair of tools and construction equipment: rotary hammers, power tools, drills, jigsaws, grinders, gasoline tools, generators and power plants, welding machines, compressors
Authorized service center ENCOR
Warranty and post-warranty maintenance of equipment and tools: Faip high-pressure washers, Endress power plants, Sial heat guns, Novus fastening tools, thermal blowers and thermo...
Service center Steen-Service
Samara, Kirova Ave. 24a, building 3view on map
Yungorodok
- Repair of tools and construction equipment: rotary hammers, power tools, drills, jigsaws, grinders, gasoline tools, generators and power plants, welding machines, compressors
Authorized service center ENCOR
Warranty and post-warranty maintenance of equipment and tools: Faip high-pressure washers, Endress power plants, Sial heat guns, Novus fastening tools, thermal blowers and thermo...
Service center Lumberjack
Kazan, st. Gabdulla Tukay, 125, building 3view on map
Cloth settlement
- Repair of tools and construction equipment: rotary hammers, power tools, drills, jigsaws, grinders, gas powered tools, welding machines, compressors
Authorized service center ENKOR
We provide high-quality and fast repairs of your electrical and gasoline units. We sell discounted equipment and spare parts. We sharpen chains. We rent tools. ...
TREC Service Center
send a request
Nalchik, Akhokhova str., 190view on map
- Repair of tools and construction equipment: rotary hammers, power tools, drills, jigsaws, grinders, gas powered tools
Authorized service center ENKOR
Service center Elektroinstrument-Service
send a request
Petropavlovsk-Kamchatsky, st. Tushkanova, 14, office. 106view on map
- Repair of tools and construction equipment: hammer drills, power tools, drills, jigsaws, grinders
Authorized service center ENCOR
The main malfunctions of a rotary hammer and their external signs
All unit malfunctions can be divided into 2 groups: mechanical and electrical.
Mechanical breakdowns
If any mechanical malfunction appears in the hammer drill, its presence can be determined by ear (noise increases, a grinding sound appears).
You may also experience increased vibration or an unpleasant odor emanating from the unit body.
So, mechanical failures include the following:
- failure of the device operating mode switch;
- worn rubber bands of the striker and striker;
- failure of the impact mechanism;
- failure of the unit barrel due to wear;
- breakage of gear teeth;
- the chuck breaks, causing the drill to fly out.
Electrical faults
Malfunctions associated with the electrical part of the hammer drill may also be accompanied by an unpleasant odor from the device body and sparking. You may also notice that the engine gets hot and hums quickly without turning over, or that it emits smoke.
Electrical failures of the device include the following:
- the device does not turn on;
- breakage of the start button;
- brush wear;
- collector clogged;
- violation of electrical contacts;
- burnout of the stator or rotor winding of an electric motor.
Features of repair of rotary hammers of various brands. The main distinctive features of the models
Rotary hammer Caliber
This model is famous for its short-lived collector. It often overheats and produces a pungent plastic smell. Breakdowns happen quite often. Strong vibrations, noise. It is distinguished by its large mass.
Hammer Sparky
You often have to change the brushes. The design has minor flaws in terms of ease of use. The on/off button burns out easily. when it jams. Bearings need to be changed frequently. Occasionally the gearbox fails. Grease constantly leaks, severe overheating is observed in the “jackhammer” mode, especially during intensive work.
Hammer Metabo
Overheating of the tool in drill mode. There are malfunctions in the speed controller. Large mass of the tool. There is a high probability of the cartridge jamming if dust gets in. Demanding on voltage.
Hammer hammer Hilti
It is distinguished by its large mass. Convenient design. Reliable, but sometimes the bearing in the cartridge gets stuck.
Rotary hammer Sturn
Short-lived in work. Fast heating during operation. High probability of failure of the mode switch.
Hammer Anchor
It is distinguished by its large mass. Overheats during constant operation. Intensive wear of the conductive path in the regulator board, low speeds often disappear.
Rotary hammer Einhell
Very high probability of breakdowns. Poor switching of the side handle, frequent overheating of the tool even at subzero temperatures. The fragility of the brushes. Sometimes grease starts to leak. Poor chuck clamping means the presence of play in the drill fastening.
Perforator Zubr
Poor tool lubrication. Occasionally, a malfunction occurs in the “crushing” mode. Unstable handle fastening. Uneven operation of the engine after a short period of operation. Rapid wear of brushes.
Hammer Kress
Unreliable reverse mechanism. Motor breakdowns occur. The mode switch is stuck.
Rotary hammer AEG
Brushes fail. Unreliable fastening of the gearbox in the tool. There is radial runout of the raster bushing. The lance rotates during crushing. Frequent overheating.
Rotary hammer DWT
Sometimes the stator fails.
Hammer Hurricane
This model is characterized by poor lubrication of rubbing elements. The rubber protective cover of the start button often breaks.
For long service life of the tool, you should always carry out a technical inspection before use so as not to miss any defect. Always keep the tool clean after finishing work. You can clean it from dust with a vacuum cleaner. Be sure to familiarize yourself with the operating standards of the device written in its technical passport. Store in a warm and dry place. If you do not use the hammer drill for a long time, it is advisable to place it in an airtight package. Avoid getting moisture and condensation on the device body.
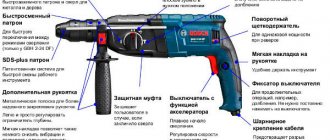
Algorithm for disassembling a hammer drill
To eliminate mechanical and electrical faults (with the exception of a broken electrical plug), disassembling the unit body is indispensable. The most popular brands among craftsmen, both home and professional, are Bosch, Makita, Interskol, and Energomash hammer drills. The design of units from different manufacturers is approximately the same, therefore the methods for disassembling the devices will be similar. But you should not completely disassemble the device, since it will be difficult to put it back together. The photo below shows what a completely disassembled hammer drill looks like.
Removing the cartridge
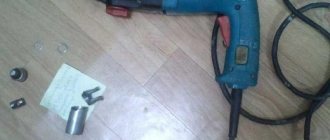
Disassembling the unit for troubleshooting should be carried out carefully, inspecting each removed part. To make assembly easier, it is better to photograph the disassembly process. If you do not find any external defects on the device, then it is recommended to start disassembling it with the cartridge.
- First, remove the boot (1), made of rubber.
- Carefully, so as not to lose it, use a screwdriver to remove the retaining ring (2) and then the plastic boot (3).
- At the next stage, it is important not to lose the small ball that is located under the washer (4). Remove the washer (4), plate (5) and spring (6), as well as the ball (7). It is when these parts wear out that the drill falls out of the chuck. Some cartridge models may have additional balls and washers.
We disassemble the case
If disassembling the unit housing is required, you must first remove the operating mode switch.
- Place the switch in the “Blow” position. Usually a hammer is drawn in this place on the body. If this mode is not available, set the switch to the “Punch + Drilling” position.
- Next, you should press the button located on the switch handle and turn it slightly below the hammer icon until a characteristic click is heard.
- After this, you need to pry the switch with a screwdriver and, pulling it towards yourself, remove it. In some models of units, this switch can be screwed to the housing.
Disassembling the electrical part of the hammer drill
To get to the electrical part of the device, if you suspect that this is where there may be a breakdown, you must perform the following steps.
- Unscrew the screws holding the back cover and remove it.
- Unscrew the fasteners holding the network cable.
- Next, you should remove the wires from the fastenings and remove the start button.
- Remove all wires attached to the stator.
- Remove the brushes by unscrewing the mounting bolts.
- Separate the housings of the electrical and mechanical parts of the device by unscrewing the corresponding bolts. Use a flathead screwdriver to separate.
- Remove the rotor from the gearbox. If you need to replace bearings, use a special puller.
- Remove the air intake located in the housing of the electric part of the hammer drill.
- Disconnect the stator from the housing. To make it easier to come out of the casing, it is recommended to pull the stator by lightly tapping the casing with a wooden object.
If you need to disassemble a barrel perforator with a vertical electric drive, first remove the handle, and then unscrew the bolts holding the motor.
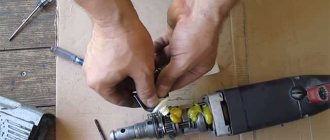
Replacing motor brushes
The main sign that it is time to change the brushes is the formation of increased sparking in the area of the electric motor commutator, rapid heating of the brush holders, and a burning smell. When the brushes are not worn out, the spark can only be seen under them. Otherwise, the spark is visible throughout the entire circle of the collector.
The presence of a spark around the commutator circle with unworn brushes is a sign of bearing wear, rotor or stator insulation failure, commutator plate burnout, stator or rotor burnout.
Another sign that the stator has burned out is the presence of sparks under only one electrode. If you have a tester, you can use it to check the stator and rotor: measure the resistance on the rotor and stator one by one. If it is the same on both windings, then everything is fine with the stator. If you notice clear signs of problems with the rotor or stator in your hammer drill, you will have to take the device to a service center for repair. As for the brushes, you can change them yourself.
To get to the place where the brushes are installed, you will need to disassemble the housing in which the motor is installed, or simply remove the back cover. Opening the lid, you will see brushes secured in special holders. The photo below shows what these parts look like.
Brushes that are installed on rotary hammer motors come in 3 types.
- Graphite ones are durable, but since they are very hard, their rubbing into the collector is not ideal, which negatively affects the latter.
- Carbon - easily rubs into the commutator, providing good contact, but wears out quickly.
- Carbon-graphite is an ideal option, since they are a mixture of 2 components that complement each other.
It is very important not to wait until the engine sparks and then change the brushes. Replacement is needed after they are worn to 1/3 of the nominal value (8 mm). Even if one brush is worn less than the other, both still need to be replaced.
Pay attention to the condition of the spring in new brushes and the fastening of the contact. If the spring falls off while the engine is running, it will suffer significant damage. Also, if the spring is weak, then it will not be able to provide good contact.
Before changing the brushes, be sure to thoroughly clean the rotor and stator from any remaining graphite or coal dust. These parts can be cleaned using technical or medical alcohol.
Next, you should secure the electrodes in the holders and rub them into the collector. To do this, place a piece of fine-grained sandpaper on the commutator and grind the electrode in with rotational movements in different directions. The grinding continues until the contact area of the electrode is slightly rounded. This will ensure a better fit to the collector plates and, accordingly, better contact.
Rules to follow
During operation, the hammer drill heats up quickly. In order to maintain the functionality of the tool for a long time, it is necessary to take a break of at least 10 minutes after 20-30 minutes of work.
In the process of work, when turning the tool idle, you need to remove crumbs and dust, clean the hole being punched in order to make the tool easier to work with. When drilling holes with a large cross-section, first drill with a thin drill, then with a medium one, making the hole in three steps. Long through passages must be drilled first with short nozzles, gradually replacing them with longer ones.
After work, it is necessary to put the punch and used nozzles in order. Tools must be cleaned of dust and placed dry in a container.
Diagram of the impact mechanism, its malfunctions and repairs
The impact mechanisms of rotary hammers differ in their design, depending on which family the devices belong to. Therefore, the repair of these mechanisms will take place according to different principles.
Barrel perforators
Rotary hammers with a vertical engine usually have an impact unit based on a crank mechanism (CSM). Below is a diagram of this type of impact mechanism.
The following photo shows a section of the device, where you can see the location of the crankshaft.
The impact mechanism of a unit with a vertical motor may have the following malfunctions. The connecting rod mechanism has a separate bearing that is mounted on the cam of the wheel with an eccentric, but sometimes it can be located at the base of the connecting rod. In some models of rotary hammers, a plain bearing (instead of a rolling bearing) may be installed at this location, which requires constant lubrication. If it is not there, or it is already old, then this unit will wear out. During repairs, you will have to completely replace the connecting rod and eccentric barrel.
Another common problem is the firing pin breaking. This malfunction can be calculated if you notice that there is no longer any impact on your hammer drill. To get to the firing pin, you will need to completely disassemble the barrel of the device. It is done as follows.
- Disconnect the barrel from the hammer body, remove the cartridge (see description above). Tap the barrel on the table so that the piston falls out. Take a rubber mallet and knock the barrel out of the housing.
- Remove the retaining ring holding the bearing.
- Remove the bearing itself and lightly tap the table to remove the balls.
- After removing the 3 balls, you can pull out the raster sleeve.
- Also, as in the previous case, remove the balls located on the bushing, just do not confuse them with those that were removed earlier (these balls are smaller in diameter). After removing the balls, you need to insert a screwdriver into the sleeve and push out the firing pin.
In this case, the firing pin is intact. But if it is broken, then replace it with a new one. You should also pay attention to the rubber seals and seals in the barrel body. If they are worn out, they must be replaced.
Pistol type hammer drills
The design of the impact mechanism in a pistol-type unit is slightly different from the same-purpose mechanism installed in a barrel-type unit.
Its main difference is that the piston is driven not by a connecting rod, but by a swinging (“drunk”) bearing. Therefore, the most common breakdown of this unit is the wear of a “drunk” bearing that needs to be replaced.
The next photo shows a destroyed “drunk” bearing, which is the reason why the hammer drill stopped hammering.
The swing bearing is removed using a flat screwdriver, which you need to pick up the bracket and remove it. After this, the bearing is easily separated from the gearbox housing.
When replacing a collapsed bearing, you should thoroughly rinse the gearbox, since it is in its housing that fragments of the broken part may remain.
After cleaning and installing a new bearing, apply a thick layer of lubricant to this block.
Also, the reason that the device does not hit can be a broken firing pin. To get it out, you need to remove the retaining ring that is visible in the hole.
Take a small screwdriver, pick up the ring with it, and move it to the right (towards the gear).
Do the same steps on the other side of the part. Next, insert a screwdriver into the hole in the part and push through the removed internal parts of the mechanism.
After this action, you can easily get the locking ring and the housing in which the broken striker is located.
If you disassemble this case, you will see the “culprit” of the malfunction, due to which the hammer drill does not hammer.
When assembling the impact mechanism, be sure to generously apply lubricant to all parts.
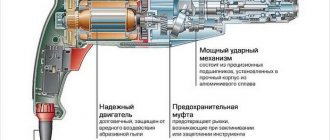
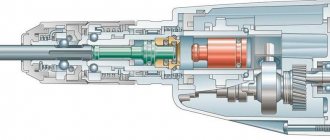
The device of the hammer drill and its mechanism
Unlike a drill, as well as an impact drill, a hammer drill has an enhanced impact function, which puts it an order of magnitude higher in situations where it is necessary to apply significant mechanical force to the materials being processed.
This is achieved by the design features of the hammer drill. The device is equipped with an independent mechanism for generating a powerful pneumatic push of the working tool, and this ability frees the master from the use of physical effort when drilling and chiseling concrete and stone.
Impact mechanism of a hammer drill in section
The rotational motion of the electric motor is converted into translational vibration of the impact mechanism by creating compression between the pistons. This movement is transmitted to the drummer. The striker, made of high-strength steel, in turn, sends the energy of compressed air directly to the working tool - a drill, chisel or shovel. This design of the unit makes it possible to increase the impact power to a huge destructive force - 20 kJ.
Rotary hammer with a vertical engine (“barrel”)
Depending on the location of the engine, drill-type and barrel-type hammer drills are distinguished.
- The first type of device is similar to a drill, in which the motor is located in the same axis with the drill.
- In rotary hammers of the second type, the motor is installed perpendicular to the drilling axis.
Barrel hammer drills are larger in size, but at the same time have a more advanced cooling system, which allows you to operate the tool for a long time without stopping. Devices in the form of a drill are much more compact; they are convenient when working in cramped circumstances when access to the object is limited.
Other mechanical breakdowns and their elimination
In addition to breakdowns associated with the impact mechanism, other mechanical breakdowns may also occur in the hammer drill.
Mode switch
There are times when the unit mode switch fails. Basically, this occurs due to dust clogging of this unit. To repair the switch, you will need to disconnect it from the body (see how to do this above) and clean it from dirt. If you find any damage to the plastic parts of the switch, it will have to be replaced.
Helical gears
The reason that the device stopped working normally, namely, stopped drilling and chiseling, may lie in worn-out teeth on the rotor shaft.
If this happens, the teeth on the intermediate helical gear will also be worn.
This problem occurs when the tool is jammed or the clutch is malfunctioning. The breakdown is eliminated by replacing the intermediate gear and engine rotor.
The drill does not stay in the chuck
The reason that the hammer drill does not hold the drill lies in the breakage of the chuck and the wear of its constituent parts:
- deformation of the balls occurred;
- the restrictor ring is worn out;
- The retaining spring gave way.
You will need to disassemble the cartridge and replace problematic parts.
Drill stuck in hammer drill
The reasons that the drill is stuck in the chuck of the device may be the following.
- Before installing the equipment, you did not apply lubricant to its shank. You will need to move the sealing rubber of the cartridge and inject WD-40 into the place where the tool fits.
- Dust got under the balls. Perform the same operation as in the paragraph above.
- If you used a regular drill inserted into an adapter in a hammer drill, then also treat it with WD-40 liquid, wait a couple of minutes, and, lightly tapping the clamp surface with a hammer, loosen the equipment in different directions. Typically, after these steps, the clamping jaws open and allow the drill to be removed.
- The tool shank came loose. You will need to first add WD-40 and try to remove the drill. If nothing works, then you need to disassemble the cartridge and knock out the equipment. You can also use tips on how to remove a tool stuck in the device from this video.
Goals and objectives of tool lubrication
Often the cause of tool failure is the absence, deficiency or inappropriate lubrication. Abrasive wear is reduced if all gaps and cavities are covered with a layer of antifreeze, and cleaning is carried out in a timely manner.
The type of gear lubricant differs from the composition for the shanks. Each manufacturer recommends using a specific hammer drill lubricant specified in the instructions at the required frequency.
There are general recommendations that apply to all rotary hammers. Gearboxes must receive oil of liquid consistency, poured into a special hole. For all units, you can undoubtedly use Bosh and Makita lubricant intended for gearboxes, which is what they do in service centers.
Incorrectly selected or overfilled lubricant can lead to overheating of the gearbox.
To lubricate the shanks of the working equipment before inserting it into the chuck, a lubricant of a thicker consistency from the same manufacturers is used. In this case, the attachment point for the shank in the chuck and the firing pin are protected from wear. Filling all gaps with lubricant protects the assembly from dust.
It is necessary to lubricate the places indicated in the instructions. And it is certainly harmful to add lubricant to the clutch. In case of sudden detection of a lack of lubricant in the gearbox, you can use the domestic composition, Litol-24 Lux, but lubricant is not suitable for battery-powered hammer drills, even temporarily.