A rotary hammer is very often used to process materials, the drilling or chiseling of which produces a huge amount of dust. These conditions contribute to the wear of the tool and its aggregate parts.
It is with the aim of reducing the negative impact on the hammer drill that a dust collector was created. If we talk about factory devices, they are active and passive. Active ones have their own drive, but the cost of the tool increases, and significantly.
Passive ones take power from the engine.
Everyone decides for themselves whether to install dust collectors or not. Some people use a vacuum cleaner, but this is not always convenient; you have to hold the hammer drill with one hand. There are many other homemade devices, which we will discuss below.
Homemade dust collectors
Often the cut off bottom of a plastic bottle is used.
If we look at the design of the rotary hammer, we will notice that its engine is equipped with a fan for cooling during operation. This device can be used to make a dust collector on a hammer drill.
To do this, you can take a hose and a plastic polypropylene corner for a 20 mm pipe and drill a hole in it for a drill. Then you need to take a container for dust and make a hole in it for the suction device of the hammer drill.
Dust goes into the box when drilling.
Factory type dust extractor
A factory-type dust removal system can be included or sold separately - it all depends on the wishes of the buyer. The undoubted advantages include replaceable filters, the ability not to violate the integrity of the instrument, and ease of use. There is one significant drawback - the device is powered by the main motor of the hammer drill.
Self-contained dust removal system
An independent means, albeit primitive, includes a vacuum cleaner hose. It is quite easy to use and does not require any financial costs. The hose can be placed next to the hole. But there are disadvantages to this method. Drilling with heavy hammer drills will require assistance, and some dust will still penetrate into the room.
Important! Recently, so-called vacuum dust collectors have appeared. They are made of durable casing and last for a long time.
To summarize, it is better to choose, of course, factory dust collectors, since they are convenient, compact and do not require additional work on manufacturing and installation.
This is an option for those who prefer not to skimp on technical means. For those who prefer to put their engineering skills into practice, you can use homemade options.
True, they will not get rid of dust 100%, but this is a less expensive method, although more labor-intensive.
Everyone chooses their own instrument and its technical modification. The main thing is that this contributes to comfort and ease of the work process.
Source: https://pro-instrument.com/ruchnoj/pyilesborniki-dlya-perforatora-delaem-sami.html
Self-contained dust removal system
An independent means, albeit primitive, includes a vacuum cleaner hose. It is quite easy to use and does not require any financial costs. The hose can be placed next to the hole. But there are disadvantages to this method. Drilling with heavy hammer drills will require assistance, and some dust will still penetrate into the room.
Hole in the ceiling without dust and noise
And if dust gets into the drill chuck, the chuck can jam so much that you can’t even reach the drill.
As a rule, after 10-20 holes in the ceiling, which have to be made, for example, when attaching a suspended ceiling frame, the drill chuck should be washed with solvent or white spirit, and the hammer drill chuck should be cleaned of debris and old grease. I’m not a fan of washing or cleaning the chuck, so I always try to use a dust collector when I’m drilling a ceiling.
Unlike some other power tools, such as a sander or electric planer, dust collectors are not included in the kit of drills and rotary hammers, so you have to make a dust collector yourself.
For the dust collector of a drill or hammer drill, almost anything in which you can make a hole for a drill is suitable. For example, you can cut a children's rubber ball with a diameter of 4-7 cm in half and get 2 dust collectors.
But if children don’t run around with balls, then there must be housewives who always have plastic lids for mayonnaise jars in stock, and if there is no such good thing, then you can always use a polyurethane foam lid as a dust collector; during repairs such covers usually appear in the apartment. And if things are really bad and there is nothing of the above in the apartment, then there will always be a plastic bottle and toilet paper in the house.
Since you don’t have to drill holes in the ceiling every day, sometimes it’s faster to make a new dust collector than to look for old ones in the debris of the tools. As an example, here is a video of drilling a ceiling:
In this case, a polyurethane foam cover was used. A hole was made in the lid with a diameter 1 mm smaller than the diameter of the drill. The dust collector was then placed on the drill.
The polyurethane foam covers have technological holes, and to prevent cement dust from falling through these cracks when drilling the ceiling, the space between the drill and the side walls of the cover is filled with napkins or toilet paper.
Selecting modes and switching them correctly
A hammer drill can drill like a regular drill or with a hammer. It can work like a jackhammer and rotate drills in the opposite direction (reverse function). For this purpose, there are special switches on the case.
Problem. There are two common mistakes. Sometimes users simply do not move the switch to the specified position to activate a particular mode. And sometimes craftsmen do this while the tool spindle is still in motion. In both cases, the mode switching mechanism is subject to increased wear.
Solution. The presence of a locking button on the switch significantly simplifies control of switching. But if this is not provided, then you will have to pay special attention to this process.
Important: in some models there is one intermediate position between the impact and impact with drilling modes. It makes it possible to change the position of the chisel to a more comfortable one before starting work.
How to drill holes without dust and debris
Tired of cleaning up dust and dirt after every drilled hole in your apartment? Thanks to our “life hacks” you will be able to drill holes without dust and debris!
In this article, we will offer several options that will help you drill a hole without dust.
We use a vacuum cleaner
It might seem like a simple device, but it really works. The idea is simple: while drilling with a drill, you need to keep the vacuum cleaner hose turned on directly next to the hole (it is better to remove the nozzle).
As a result, all soap and debris from the hole will be sucked into the vacuum cleaner without polluting your apartment.
If you are doing a renovation and you need to drill a lot of holes, you can buy a special dust collector attachment for a drill, or make it yourself using improvised materials.
Envelope on the wall
If the hole is being drilled in a vertical wall, a great option would be to tape a paper envelope directly under the hole. In this case, all the dust from the hole will fall not onto the floor, but into this envelope. The envelope is made and attached to the wall using regular tape.
This is the simplest option. Such an envelope will not collect all the dust, but 80-90% will be retained on the envelope.
Envelope on a drill
This option is more suitable if the hole is drilled in the ceiling. It is enough to wrap the base of the drill with paper, thus creating something like a “bag” and secure it with tape.
Source: https://vashavannaya.ru/kak-sverlit-otverstiya-bez-pyli-i-musora.htm
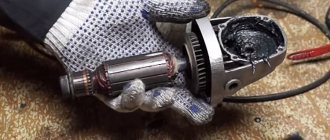
How to make your own protection for a hammer drill from construction dust
Each of us who has used a hammer drill at least once knows how much dirt and debris is generated during its operation. In addition to the harmful effects on human health, dust can easily damage the tool itself. To protect it from contamination, many devices have already been invented, most of which are made by hand from scrap materials.
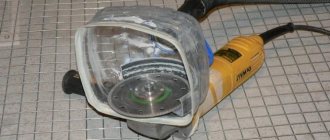
If the hammer drill will be used for a short time (within a few minutes), it is protected from dust by simply wrapping the body with stretch film. It should be taken into account that the ventilation holes in the housing will be blocked and when the tool heats up, work should be stopped. In some cases, the film is simply cut in the engine ventilation areas. At the end of the work, remove the film and then wipe the punch with a damp cloth.
Many homemade products are made by craftsmen from plastic bottles. The dust collector for the hammer drill was no exception. For drilling walls and other similar surfaces, it is made in the form of an inclined funnel. First, from a dry and clean bottle with a capacity of 1-2 liters, cut off the upper third at an angle of 45 degrees. Its edges are covered with electrical tape. Drilling or gating is carried out through a hole in the upper part of the funnel. In this case, all the dust will settle at the bottom and will not get into the body of the instrument. To increase the effectiveness of the device, it can be connected to a vacuum cleaner.
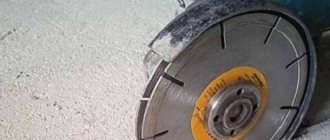
Don't throw away the bottom of the plastic bottle either. It will provide effective protection when working on the ceiling. First, cut off the bottom of the container with walls about 5 cm high. A hole is made in its middle, equal in diameter to a drill or perforator blade. When working, an assistant presses the dust collector to the ceiling. All debris will accumulate in its cavity, which will effectively protect the instrument from dirt. A similar device is also made from a plastic disposable plate or cup.
Another simple and effective way to protect your hammer drill from dust involves using a regular two-layer dishwashing sponge. Turning it over with the foam part up, markings are made on the surface in the form of a circle. Its diameter is determined by the size of the hammer drill chuck. Having determined the center of the circle, a hole is made in it for the drill. The edges of the foam rubber are cut with a stationery knife, after which it is removed to a hard layer of sponge. Before use, the device is moistened with water and wrung out. During operation, all dust will accumulate on its surface.
How to drill into a concrete wall without dust and debris?
Many owners know how much cleaning there is due to dust and debris when drilling concrete or brick walls. How much do you have to move furniture, wash floors, wipe dust in a living space after drilling holes in the walls to install interior items such as shelves, lamps, paintings, etc.
One day my friend showed me an interesting way. For which I am very grateful to him. How to drill into a concrete wall without dust and debris? Maybe someone already knows this method or uses other devices, but I’ll tell you and show you anyway. So, everything in order.
Mark the space for the hole on the wall.
We make a small envelope-pocket device. To do this, take a sheet of A4 paper.
Fold a sheet of paper in the manner shown in the photos below.
Take masking tape.
We glue the tape so that we get an envelope in the form of an open pocket.
We glue the envelope on the wall as close as possible to the future hole.
We take a hammer drill with a drill of the required diameter. To better guarantee the cleanliness of the drilling, we take a household vacuum cleaner. After removing the brush attachment, apply the vacuum cleaner hose to the drilling site. Turn on the vacuum cleaner, preferably at full power. And drill a hole with a hammer drill.
You can call someone at home for help. But if there are no assistants, then in one hand you have a vacuum cleaner hose, and in the other hand a hammer drill. If the vacuum cleaner is powerful enough and the drilling diameter is small, then the envelope remains almost empty at the end of the job. Unfortunately noisy, but no dust or debris.
Take a dowel-nail. And hammer it into the resulting hole.
Attention! You need to peel off the envelope carefully and slowly, without sudden movements, otherwise you can damage the wallpaper.
Regards, Alexey.
Source: https://kladkan.ru/sverlim_stenu.shtml
How to drill without dust
24.09.201625.09.2016
To an inexperienced master, such an assumption may seem like a joke; in fact, drilling without obligatory debris is quite possible.
Many are afraid of the upcoming process because of the expected consequences, because then they have to spend a long time cleaning and washing the floors throughout the apartment, since the dust spreads quite quickly. We will talk about effective drilling methods that are suitable for apartments or houses.
What is remarkable about these methods is that no annoying debris is generated during the work, which means there will be less cleaning work.
Drilling without dust
Experienced builders are not afraid of work when they need to drill a hole in the wall without dust and carefully. We will share our secrets with you. There are several such methods, but the most common are four methods:
- using a vacuum cleaner;
- using an envelope on the wall;
- using a drill collar;
- using a hammer drill with a vacuum dust collector.
Vacuum cleaner
The easiest way to drill a hole without dust is to use a vacuum cleaner. No matter how strange the method may seem, in practice it works perfectly. The success of the process depends on the vacuum cleaner, the hose of which is brought directly to the drill. During operation, the vacuum cleaner that is turned on will pick up small construction waste. The only negative is the contamination of the unit itself.
Envelope on the wall
If you need to prepare a hole on a vertical wall, you can use a special paper device, which is secured with masking tape to the wall, just below the intended hole. Construction waste will fall into it and will not be sprayed throughout the apartment.
Envelope on a drill
This option can only be used if you need to prepare a hole in the ceiling.
- You need to make a small collar or funnel from a sheet of paper;
- Its size must be calculated in such a way that when drilling, the edges of the envelope touch the surface of the ceiling, but do not limit the movement of the drill;
- Using ordinary tape, it is necessary to secure the paper blank to the drill chuck, but taking into account the fact that the paper should not interfere with the operation of the drill. The end result should be a cone-shaped collar mounted on a drill;
- It remains to test the effectiveness of this method in practice. When drilling, all debris will fall into the funnel, which will prevent it from spreading throughout the room.
Rotary hammer with vacuum dust collector
The method is considered the most modern and effective when drilling any surfaces. There is no need to worry about the spread of construction waste, since a vacuum dust collector does this better than other methods.
Drilling without dust
To protect your eyes from dust and ensure cleanliness while working with a drill or hammer drill on concrete walls, many simple devices are invented. One of the simplest is to stick a paper bag to the wall with tape. We suggest that you familiarize yourself with a more complex dust-free drilling device that requires time and resources to manufacture. However, for craftsmen who often have to work with a drill, this can be a good help. Working with a dust-free hammer drill will not annoy your household or customers. There is only one inconvenience with this dust collector - you have to hold it in your hand while working. This problem is solved in an industrial dust collector, which you can read about in another article.
Drilling concrete without dust. Homemade dust collector of the 7th category master. For removing and collecting dust when drilling concrete. Suitable for wall drilling only. Works flawlessly. I don't do it to order.
Browse products for inventors. Link to the store.
DIY electronics in a Chinese store.
Discussion
No comments
An idea worth a penny, a show-off worth a million. With the same success, you can make a video about making a toothpick: buy a CNC machine, plant bamboo in an ecologically clean area, grow it, cut it down, grind it, etc. It's easier to buy a 3D printer and print anything.
Dmitry Boyko
If I were you, I would bring this device to life, but not hold it with my hand. For example, a type of retractable ruler has a dust collector at one end, and a spring at the other (on a drill) that presses it against the wall. The stroke of this pin and spring must be equal to the length of the drill. I think you understand what I mean.
Vasiliy Persov
It’s a good idea, but I only understood the principle at the end of the video, like in a detective story from Hollywood. Before that, I watched how a lathe works, and I remembered my youth. This idea can be executed more simply; not everyone has a machine in the bushes. Respect to the author.
Igor Petruk A year ago Looks like Kulibin was found, for me too. Yes, this device can be made from a plastic bottle much cheaper than his. I still could not understand his work on the lathe; I was still waiting for the end of his work. Well, well, it’s as if everyone has lathes and knows how to work on them
Sergey Popov
Cool and correct. For global repairs, all this is not really necessary, but going to orders like this, you can’t think of anything better for your reputation! Eternal like, Alexandrovich!!!
Igor Smirnov
I haven't read all the comments, so don't judge harshly if they've already been said. If you put a zip-lock bag (with a lock) on the outlet tube, you can shake out its contents without removing the bag from the tube.
Do-it-yourself dust collector for a vacuum cleaner: how to make
To clean premises, you must have the appropriate tools in your arsenal. One popular device is a vacuum cleaner. A situation often occurs when its dust collector becomes unusable. But you don’t have to buy it - you can make this vacuum cleaner part yourself!
Types of dust collectors
There are two types of dust collectors in vacuum cleaners:
- Disposable. Designed to collect small debris, after which the container is sent to a landfill.
- Reusable. These bags suck up all the debris, but there is no need to throw them away - they can be used a large number of times.
The advantage of disposable containers is that a person does not come into contact with the rags, and they hold the garbage inside much more firmly than reusable ones. In addition, they are hygienic.
Reusable bags are used for a long time, and there is no need to constantly spend money. But such dust collectors need to be washed periodically.
If wet garbage has been collected, the reusable bag can become a source of pathogenic bacteria.
an eternal vacuum cleaner, or rules for caring for household appliances.
When cleaning the dust collector, all the dust is sent into the respiratory organs of the cleaner, so you should wear a protective mask.
Materials for making a bag
A DIY dust collector is suitable for any type of vacuum cleaner. The following materials are used to make a fabric bag:
- synthetic fabric consisting of many layers;
- non-woven fabric;
- satin
Hand-sewn bags from satin fabric are durable in use. They can be used for a long time: they will not be damaged.
Synthetic dust collectors replaced satin ones a couple of years ago. Such models perfectly pass through the air mass that is created during operation of the vacuum cleaner. But synthetic fabric is much more expensive and not as durable compared to satin.
Non-woven bags have become the most popular. Several layers of fabric are taken and sewn into one layer. These containers collect any debris, even construction debris, and are not damaged during operation of the unit.
Recently, many manufacturers have begun to include reusable non-woven dust collectors with their vacuum cleaners.
The process of creating a homemade bag
In addition to fabrics, you can use various papers. In order to make a container with your own hands, you will need:
- 1 meter of agricultural covering material or a piece of any fabric. This material can be purchased at a store that sells various tools for gardeners, or at sewing shops.
- Cardboard no more than 2 mm thick. This paper can be purchased at an artist supply store.
- A jar of glue, scissors, a stapler and staples.
In order to get a two-layer dust collector for a vacuum cleaner, you need to fold the material in half. Next, fold the edges and fasten them with a stapler. Turn out the resulting bag. On cardboard paper, draw two circles 6-9 mm larger than the diameter provided in your vacuum cleaner. Cut out the shapes along the contour and coat both circles on one side with glue.
Place one of the circles inside the dust collector in its central part. Glue the second circle on the outside. Using scissors, cut inside to create a star. For strength, staple the cardboard. The dust collector is ready to use! Making a vacuum cleaner bag with your own hands will take you about 10 minutes and will help save your family budget.
How to insert a dust bag into a vacuum cleaner.