A miter box is an irreplaceable tool during construction work, which is very convenient to use. It is used for precise cutting of boards and other materials at any desired angle. When producing a wooden frame, trimming casings and other works, such a tool is indispensable. It allows you to make a perfectly even angle. That's why many people try to do it themselves.
Introduction
When cutting, everything must be precise, so as not to cut off excess and not to redo the work. But not everyone can make a perfect cut by eye, fortunately in the 21st century this is not necessary. Craftsmen have long been using a miter box for skirting boards, which helps to cut materials at the desired, and most importantly, even angle.
The device makes the job easier, and you don’t need a special set of skills to use it .
There are several types of tools with different sets of features.
Adviсe
Despite the fact that gluing ceiling skirting boards is not so difficult, there are tips that are worth listening to:
- The walls must be clean and free of dust. Any dirt will reduce the adhesive properties of the base.
- It is better to make the underside of the planks rough, since a smooth surface has poor adhesion to the surface.
It is important to choose high-quality glue with good fixation, especially for heavy baguettes. Also, you should not use glue with a solvent for polystyrene foam baseboards; such a composition can ruin the material. After gluing the ceiling plinths, drafts must not be allowed into the room for 24 hours; the glue must set well.. The cost of services from a professional craftsman ranges from 150 to 360 rubles
per linear meter. But if you know how to cut a corner without mistakes and glue the ceiling skirting boards on your own, then you can save from 3 to 7 thousand rubles on just one room
The cost of services from a professional master ranges from 150 to 360 rubles. per linear meter. But if you know how to cut a corner without mistakes and glue the ceiling skirting boards on your own, then you can save from 3 to 7 thousand rubles on just one room.
Post Views: Statistics
Kinds
In construction markets and in specialized stores you can find different types of miter boxes. They can differ in a number of ways, each of which affects the functionality and final cost. The simplicity of the design allows it to be produced from different materials, expensive and cheap. Mainly used for production:
- wood;
- iron;
- plastic;
- polyurethane.
A miter box for skirting boards can be made entirely of one material or combine several. Here you need to take into account the type of construction. Because here there is a variation:
- simple miter box;
- swivel mechanism;
- electrical appliance.
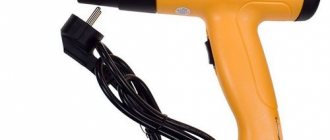
Each of them has advantages and disadvantages. The simple design is similar to troughs with through slots for cutting at an angle of 45 and 90 degrees. The second type is more functional, allows you to fix the position of the cut at different angles, and also includes a saw mechanism with a replaceable blade. The electric wort is similar to the previous analogue, it can also have a turning point, but together with the hand saw it is equipped with an electric one.
Wooden
It is difficult to purchase this type of miter box today, even though it was the first prototype of all other analogues. Wooden models are good because, in comparison with metal ones, when a saw hits the body of the device, the teeth are not damaged, but the body itself is damaged.
Therefore, you need to be especially vigilant and careful when handling, or use a special saw for skirting boards. Due to impracticality, companies currently do not produce this type. But it is noticeably cheaper than others, especially if you do it yourself.
Plastic
Wooden ones were quickly replaced by plastic options, made of plastic and special polymers. If the previous type had the main disadvantage of rapid wear, then here this problem is even more acute.
The design is developed very quickly and becomes unusable. Therefore, you need to monitor the tools in order to notice the moment of breakdown and not use an unusable tool. And among the advantages we can highlight:
- low cost;
- wide model and size range;
- low weight of the product.
Metal
Not every craftsman uses this type because of the prices, but metal products last much longer than their analogues. Because the equipment is difficult to damage during operation. Even in the steel body of the miter box, you can saw structures made not only of wood or plastic, but also of iron.
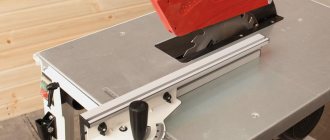
How to cut ceiling plinth
When starting a renovation, not everyone knows what a miter box is. You can glue fillets to the wall without this tool, but it greatly simplifies the process. Using a miter box, corners are cut out on long ceiling panels. The device has oblique recesses into which a hacksaw is placed for cutting. A miter box for ceiling plinths is a universal tool. It can also be used for other types of finishing work.
To ensure that the plinth fits snugly, it is placed vertically, in a raised state and supported during cutting. PHOTO: diy.sndimg.com
There are tricks that will help you trim the workpiece correctly. To prevent gaps from forming between the baseboards, they are first applied to the ceiling and measured. For beginners who have never used construction tools before, it is recommended to leave an extra 5-7 mm, which can be easily removed with sandpaper.
If the joint turns out to be ugly, it can be hidden under special decorative corners.
From foam plastic
Before using the miter box, ceiling plinths are measured and placed on the work surface. Foam baseboards are easy to cut with regular sandpaper, since they are made of soft material.
However, before cutting off the corner of the ceiling plinth, you should check the quality of the joints on one or two plinths before cutting off all the material available.
Some types of skirting boards are also soft, but are made of a different material rather than foam. Before starting work, you should study the composition on the label PHOTO: statelykitsch.com
The movements of the file must be clear and even, this is the only way to cut the ideal angle on the product PHOTO: i.pinimg.com
PVC
The question of how to properly cut a ceiling plinth worries those who decide to do the repairs themselves. To prevent the ceiling from looking cheap, it is recommended to purchase a construction tool - a miter box. It is suitable for cutting PVC skirting boards and other materials.
The main rule is that you need to properly process the internal oblique cut so that an uneven joint does not form between the two parts. The outer seam is also sanded, after which the two parts are joined and only then glued.
Related article:
Principle of use
In essence, the miter box for skirting boards is quite simple to use, however, the fact that the work is carried out with dangerous, sharp objects obliges the user to read the instructions.
If this is a simple design, then the handling rules will be noticeably shorter than the technical documentation supplied with electric models. The structure itself must be placed on a flat, stable surface to prevent mistakes during cutting. You also need to prepare the following things:
- hacksaw, saw blade, disk (depending on the type of structure);
- correction knife for working with soft materials;
- measuring instrument (tape measure, ruler, measuring angle), pencil for notes;
- a grinding machine or “sandpaper” to clean the cuts from unevenness.
In order for the work to proceed without problems and defects in the end, you need to take care of the saw, namely, its compliance with the material of the object being cut. Often many problems arise due to incorrect selection of the tooth pitch on the tool. You can also take care of clamps that can provide reliable stability during the work process.
The principle of operation itself is quite simple. Take a plinth or other object, measure it, mark the location of the cut, then place it in the opening and secure it (if possible). The saw is placed in the required hole and sawed to the required location. Position the object so that the saw is on the side of the working hand, this will make cutting most comfortable
Necessary materials
The set of tools for making a corner ceiling joint without using a miter box is not so large, and in principle does not differ from a set with a miter box. Almost every home has these tools:
- pencil;
- roulette;
- ruler;
- construction knife with replaceable blades;
- hacksaw;
- ceiling plinth.
The pencil can be used either as a regular stationery pencil with a hardness of HB, or as a construction pencil, if you have one in stock. You can buy this pencil in all construction stores; it costs quite cheap, ranging from 50-100 rubles, depending on the manufacturer.
You will need a tape measure and a ruler for accurate measurements and drawing straight lines; everyone has them in the house. Please note that without a ruler you will not be able to draw straight lines for cutting corners using the first method.
A construction or office knife with replaceable blades is an indispensable assistant in the home. Its cost, like a construction pencil, is low, and it is always in stock; it will give you the opportunity to cut off the necessary sections easily and evenly, cut a corner, or cut off thin plates when adjusting a joint. Some skirting boards are made of a material that is recommended to be cut only with a knife and not with a hacksaw due to the softness of the material.
Ceiling plinth must be chosen for both aesthetic and practical reasons. It should fit harmoniously into your design, cover the joints of the ceiling and walls, and hide defects and irregularities. When choosing a baguette, you need to take into account the material from which it is made - this affects the choice of cutting tool and adhesive for installation, as well as the type of coating on which the plinth will be glued.
Cutting rules
The main rule is to correctly determine the side of cut. A common mistake is incorrect fastening, as a result of which the wrong side is cut or at the wrong angle. To avoid such incidents, stock up on a measuring device and a pencil with which you will mark the desired side or angle.
Fix the material, rest it against the wall with its end so that the fixation is maximum and there are no errors. In the case when not a simple design is used, but professional equipment, then you can adjust the angle not limited to 45, 90 degrees. You can begin work only after you are sure that the material is fixed correctly and securely.
And the cutting rules are as follows:
- Measuring, marking;
- Fix the material, the marks should coincide with the cut in the tool, it is best to place it so that the saw is on the side of the working hand;
- Clamp the end additionally, if necessary, take a saw and cut;
- Do this with other parts;
- Sand any uneven surfaces with a grinder or sandpaper.
The rules may change when using electrical, mechanical devices and other modification devices (clamps, clamps, extensions, attachments, etc.).
How to cut the inner corner of a ceiling plinth
After adding decorative elements, the wall in the apartment looks stylish and expensive. In order not to disturb the harmony of the interior, you need to figure out how to cut the skirting boards for the ceiling so that crooked joints do not form between them. The work of a finisher is painstaking and requires care.
In city apartments, internal corners are most often found; they can be decorated using a miter box. The corner on the plinth is cut off from the front side. It is recommended to use a new hacksaw for an accurate and even cut.
It is also important to choose the right material. Skirting boards that are too soft will bend or crumble.
Before cutting the plinth for the ceiling in the corners, fillets are applied for fitting and a cut line is marked. Glue is applied only after successful joining of two workpieces.
The process is simple: first of all, the walls are leveled. An angle of 45 degrees is cut on both skirting boards, after which the parts are glued using special glue. Things are more complicated with curved walls. To make the skirting boards look beautiful, they need to be tried on after each cut and, if necessary, sharpened.
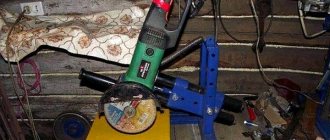
DIY miter box
Professional miter boxes cost a lot of money, and given the rare use in everyday life, this is a dubious waste of money. In this case, the choice should fall on simple troughs, which cost less and are easier to use. But basic models are not always suitable for work in terms of size and cut angle.
In this case, you can make a miter box yourself , taking into account your tasks. Making such a tool is very simple and quick, the main thing is to properly prepare for assembly. The following components are needed:
- saw for wood, metal, it is better if it is a hacksaw with replaceable blades;
- clamps, vices, clamps;
- sanding, correction paper, needle file, grinder with a narrow tape;
- set of confirmants, hexagons;
- drill or screwdriver with a set of drills;
- measuring instruments: rulers, protractors, corner;
- pencil, marker.
All items must be placed on a table prepared for assembly. First you need to assemble the box, namely the bottom and walls. Here you need to think in advance about the parameters of the plinth or other object, because this determines the height of the sides and the width of the bottom.
Craftsmen with extensive experience can make not just a box, but a miter box with sliding thresholds and replaceable sides. This model is very difficult to make, but the end result is a very effective and durable model. But here again we are talking about the frequency of use, if you need a miter box for a couple of times, then there is no point in bothering, but if it is for frequent use, then it is easier to buy a professional analogue.
The height of the side is usually 30 or 50 millimeters, depending on the width of the product. The length can be adjusted as convenient, but more often it is 10 - 30 centimeters. This parameter affects the stability and the number of possible cutting angles (not only 45, 90 degrees ). The width of the bottom is usually no more than 15 - 20 centimeters. Having selected the necessary boards, you need to follow a clear sequence of actions:
- The bottom and sides need to be sanded, especially the corners with the ends. Make sure the parts fit together.
- Measure the location of the sides and the places of cuts using a ruler, protractor or corner.
- Secure the sides to the bottom, taking into account that in the places where the cuts are made the sides will be very vulnerable. The sides are attached not to the bottom, but to the sides. For fastening, it is best to use a hexagon with confirmants; this is the most effective fastening for this. To make it more convenient, with less damage to parts, use a drill.
- Make cuts according to the marks so that there are even cuts at 90, 45 degrees, there should be two second holes.
- The width of the openings should be slightly larger than the saw you will be using. And the depth should be to the very foundation, but do not overdo it so that the structure does not lose its reliability.
You can make a collapsible model, but for this use screws or self-tapping screws. You can also make such a structure from metal, but for this it is better to use a ready-made welded iron box and the appropriate tools for working with metal. This design will last much longer, but will be more difficult and expensive to create.
Video on how to make a miter box with your own hands
Approximately
If you have enough experience, you don’t need a miter box or markings. In this case, the master simply places the skirting boards on the wall, estimates the size of the angle, and makes the cut by eye. But this method is only permissible with a lot of experience, when the finisher has a good eye and a very precise hand. If this is not the case, this method is highly not recommended: you can ruin two parts of the plinth at once without achieving the correct fit.
This video will show you how to cut corners on ceiling plinths.
Hand Right IMPORTANT: Eye fitting is more suitable for plastic and foam elements than for wooden ones. They are easy to cut with a knife right in place - and with a strong hand and a faithful eye, everything will fit perfectly. The tree must be cut - and the cost of a mistake is extremely high.