What is a hair dryer
A construction hair dryer is a professional tool that produces hot air. The temperature maximum can reach 650 degrees. The device is equipped with attachments that help perform a number of specific operations:
- Heating and removing old paintwork.
- Heating and soldering of various plastic parts.
- Melting frozen compounds.
- Welding the film.
- Drying the surface after painting.
- Removing glue, linoleum and similar materials from the heated surface.
- Soldering metal parts.
- Bending plastic pipes.
A construction hairdryer, factory-made or made independently, is indispensable when carrying out construction and repair work.
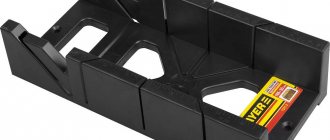
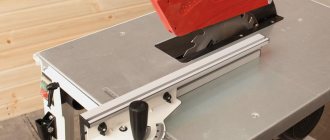
With open pistol grip
Covered handle protects your hand from hot air
Features of hot air guns
A hot air gun can be classified as a device for soldering low-melting materials using a heated air jet. In addition to the main function of soldering materials, such a device can be used for heat treatment of the surface of materials for another purpose, for example, to remove paint or warm up a product, for example, a pipe during bending.
The device of a typical hot air gun.
The hot air gun consists of a body with increased heat resistance, a heating element and a device for pumping air flow. The air in the device heats up to 650-700ºС. To ensure such heating, the power of the heating element must be more than 1.6 kW. An important element of industrial hair dryers is temperature control, usually in steps, 300 and 500ºС. The temperature that is achieved on the surface of the materials being soldered is also regulated by the distance from the device nozzle to the workpiece. Most hot air guns are set so that when the nozzle moves 7-8 cm away from the workpiece, the air flow reduces the temperature by half.
Hot air guns are widely used for removing old paint from the surface of materials, especially wooden surfaces. In this case, you need a maximum air flow temperature of at least 500ºС. With this heating, the paint softens and peels off the wood. Recently, artificial aging of wooden coverings has found demand. A heat hair dryer copes well with this task at a temperature of 500ºC and the device nozzle is 1 cm or more away from the surface. Hot air (at the lower control stage) is used when drying coatings.
Design and design drawings
The design of a technical hair dryer differs little from household models used for drying hair. The main components of this unit are the housing, the heating element and the device with which the hot air is redirected to a given location.
Unlike other thermal appliances, there is no open flame in a hair dryer. This reduces the fire hazard of the device and eliminates the need to burn fuel. The device contains the following structural parts:
- Electric motor.
- A heating element.
- Fan.
Hot air comes out of the narrow nozzle of the unit, due to which a powerful directed jet is formed. The volume of air that the device produces per unit of time is its performance.
All major details shown
Modern construction hair dryers, developed in industrial production, have several additional functions. Their number varies depending on the specific model:
- Controlling the force of hot air passing through the nozzle.
- Temperature adjustment. As you know, a regular household hair dryer produces up to 60 degrees. In powerful technical devices, this figure can reach 650–700 degrees, but such ultra-high temperatures are not always required.
- Select the mode in which the device will operate.
Diagram of a hair dryer using the example of a Makita product
Many modern models have built-in LED indicators showing the heating temperature of the air stream. This allows you to control the operation of the device. The construction hair dryer is also equipped with a number of attachments, many of which can be made independently. They change the shape of the air stream depending on where the unit is used.
Secrets of soldering auto plastic
Many motorcyclists and motorists have to deal with the fact that the plastic parts of their vehicles (most often bumpers) receive some damage and lose their former appearance.
But instead of buying a new spare part, you can restore the old one yourself by soldering. Soldering plastic is not that difficult.
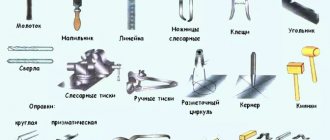
Necessary tool
In this case, the following soldering tools can be used:
- an ordinary 100-watt soldering iron;
- hair dryer (also called a heat gun);
- Soldering Station.
The capabilities and operating principle of a conventional soldering iron are familiar to almost every home craftsman. Such a soldering apparatus may have a straight or curved tip.
The hot-melt gun solders plastic by supplying heated air. The heating temperature ranges from +80 to +600 ℃, it can be continuously adjusted.
As a rule, models of soldering guns are equipped with a large number of attachments that make this tool as convenient and efficient as possible.
The nozzles help direct the air to the desired area and create the required angle of inclination. High-quality hair dryers for soldering plastic have a power of at least 1600 watts.
The soldering station combines a regular soldering iron and a hot-melt gun for plastic. Such a unit is capable of solving many problems. Temperature adjustment and a huge number of attachments allow you to carefully solder plastic, as well as other materials.
Types of plastics
In order to successfully repair a car element, it is worth determining in advance what kind of plastic it is made of. All plastics can be divided into hard and soft. In particular, fiberglass plastics that do not have any markings are considered soft.
Hard types of plastics can have different markings, for example, ABS, GF30, PAG6. The markings are visible if you look from the back of the vehicle part. Polypropylene (PP marking) is considered the most durable.
Quite often, vehicle owners require soldering of ABS plastic, since it is from this material that the bumpers of cars of many well-known brands are made.
Use of a soldering iron
Let's assume that the plastic bumper of a car is seriously damaged and needs to be repaired by soldering. How to do it?
To make it easier to solder the structure, it must be removed from the car. It also doesn’t hurt to look at the labeling in advance. Most likely, the part will be made of ABS plastic.
Then you should clean the surface of the bumper from dirt, remove paint and varnish residues. Additionally, the entire plastic part must be degreased. Next, you need to connect all the fragments of the bumper together.
For such a connection, it is important to use clamps or staples. But this must be done carefully so that they do not penetrate through the car plastic.
Soldering plastic with a standard soldering iron should begin from the inside of the car bumper . To do this, one of its edges is securely fixed, and special plastic electrodes are laid along the future seam (although the name “electrodes” in this case is very arbitrary).
At the next stage, a soldering iron for soldering plastic melts the electrode material, and it fills all the recesses of the crack. This operation must be repeated as many times as stitches need to be made, that is, it all depends on the initial number of defects and damage.
Now you need to wait for the molten mass (characteristic bubbles appear on it) to cool a little - this will take about five minutes. Then you need to smooth out the seams on the plastic.
In principle, any blunt object can be used for this procedure. In hard-to-reach places, the surface can be smoothed and leveled with gloved hands. Complete hardening of the seams will occur in a few hours. At this point, the soldering of the auto plastic can be considered complete.
Using a hair dryer
Soldering automotive plastic is done a little differently if a heat gun (hair dryer) is used. Here you will need special welding rods (essentially, this is solder for soldering plastic).
You can purchase them in specialized stores or even make them yourself. The main thing is that they are similar to the material being welded. One of the ends of the rod is sharpened and then inserted into the corresponding hole in the nozzle of the heat gun.
The hair dryer should be moved slowly along the crack being repaired; the filler rod should be inclined towards the workpiece at an angle of approximately 45°. If a plastic part has shattered into separate pieces, then soldering it with a hairdryer is carried out in two passes.
First, the pieces or fragments are fastened together with short stitches (seams). And only after this the final reliable soldering is made. When the material has cooled, the surface of the part is puttied and sanded, preparing for painting.
To repair the plastic of a motorcycle, all kinds of elements of its external design, you can use soldering using approximately the same technology as in the case of repairing a car bumper. Moreover, motorcycle panels are usually made of the same ABS plastic.
Reinforcing mesh
Also, home craftsmen can use in their work such a device as a reinforcing mesh for soldering hard plastic.
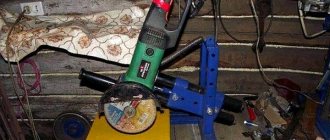
Tools and materials
Many amateurs with some knowledge in the field of electrical engineering can make a hair dryer themselves. Such a unit can hardly be called professional, but it is quite suitable for cleaning a door from dried paint.
Most often, a homemade hair dryer is based on a conventional device for drying hair. The body must be made of ceramic. All plastic parts are removed from it. If this procedure is not done, the wires may short out during operation with further melting of plastic particles and failure of the electronics. For the same reason, the use of a plastic case is not allowed: plastic does not withstand high temperatures.
Other materials you will need:
- Spiral nichrome wire needed to create a heating element.
- Metal plates. These are used to create the blades necessary for the operation of the ventilation system.
- Electrical cable. The wire cross-section is more than 4 millimeters, otherwise overload is possible.
- Rubber pipe. This small detail will provide thermal protection to the handle of a homemade hair dryer.
- Metal tip that forms an air stream.
How to make a hair dryer with your own hands
To make a construction electrical appliance from a regular hair dryer, it is necessary to modernize the device.
- First of all, you need to disassemble the case.
- After disassembling a household electrical appliance, it is necessary to remove all plastic parts that can melt under high temperatures. They can be replaced with products made of textolite and ebonite.
- The spent heating element is also removed. Instead, a ceramic part is installed on which a nichrome spiral is wound. The operating temperature of the device depends on the number of its turns. The denser they are, the more degrees the output will be. There are some features here:
- Nichrome turns should not touch each other. Otherwise, a short circuit may occur during operation.
- In home-made household appliances, you should not lay the coils too tightly: the electrician may not be able to withstand it.
- The easiest way is to make a heating element from the body of a powerful halogen lamp and a nichrome spiral. Lamp glass can withstand very high temperatures without any damage. The twisted wire is placed in a glass case.
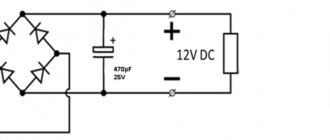
- The ends of the nichrome wire are screwed to the transformer wire and insulated. The hairdryer is first switched to fan mode. Working with a soldering iron is excluded: the material from which the spiral is made cannot be soldered.
All plastic parts are removed
- The finished heating element is wrapped in foil. Reflected radiation is created, increasing the power of the electrical appliance. In addition, heat loss from the heating element is minimized.
- As an alternative to the lamp body, you can use fiberglass wound over a nichrome spiral. A durable steel tube is placed on top, through which hot air will escape out.
- The heating element is placed in the body of a hair dryer and connected to a transformer. The device must be positioned exactly in the center. It is first wrapped in several layers of asbestos thread, which evenly increases its diameter.
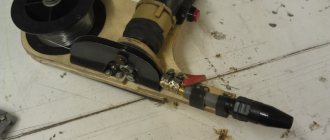
A part from an old computer will do
- A pre-prepared rubber tube is placed on the handle of the hair dryer. This prevents hand burns from touching hot ceramics. For this purpose, you can use an old corrugation from a vacuum cleaner, rubberized on the inside and made of fabric on the outside. This material will reliably protect the worker.
Creation video
Safety during production and operation
A construction hair dryer is a rather complex electrical appliance. Its production and further operation require compliance with a number of safety regulations:
- It is unacceptable to use an electrical appliance, especially a homemade one, in conjunction with gas equipment. It is used with special care in the kitchen area. Improper use and sparking may result in an explosion.
- When carrying out any work with a construction hairdryer, it is necessary to prepare fire extinguishing means in advance.
- Do not place a hot electrical appliance on an unprotected surface: there is a risk of damaging the coating.
- If you plan to use a hair dryer to work with paint, you should equip an additional source of ventilation. Otherwise, the volatile components of the paint will spread through the air and have a negative impact on health.
- The finished construction hair dryer must be checked in operation. Initially, the device is turned on at a safe distance. Only when you are convinced of its normal operation (red-hot nichrome spiral, air intake and output), can you try it on a low-value product.
When working with any construction hair dryers, you need to remember one rule: first of all, the air supply is turned on, then the heat. Switching off occurs in the reverse order, otherwise overheating and melting of parts is possible.
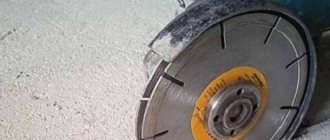
Nozzle shapes
The area of use of a construction hair dryer is determined by the shapes of the nozzles that are available. They are called nozzles, injectors or nozzles. Each product is intended for specific work:
- Flat nozzles are designed to remove remnants of old paint, wallpaper, and deformation of plastic sheets.
- Round nozzles allow you to process copper pipe.
- A reflector nozzle with a rounded bend is used for bending polymer pipes.
- Using special crevice nozzles, you can overlap PVC sheets.
- Side nozzles with built-in glass protection allow you to clean the window frame without overheating the glass.
- The cutting nozzle is made in the form of a flattened pipe. It is used for cutting foam plastic.
- Mirror nozzles are used for welding plastic parts.
Examples in the photo
Used for heat treatment of individual layers of fabric or film
Used in processing linoleum
It can be used to bend polymer pipes
Used for welding polymers, banners, cleaning walls from paint
Used for heat shrinking of packages, pipes, etc.
Most parts can be made yourself
Nozzles for a hair dryer
When this tool is sold, the set comes with several attachments. Their other name is nozzles or nozzles. Often this is not enough for work. Devices can be purchased separately. Variety expands the possibilities of using a hair dryer by changing the strength and shape of the air flow.
Here are the most commonly used attachments:
- a focusing round is necessary for non-contact soldering of copper tubes. Welding plastic tape allows you to seal cracks in various structures and glue furniture veneer;
- flat - it is used to remove old paint or putty, remnants of finishing materials;
- reflex heats plastic pipes before bending them;
- slot and spline nozzles are needed for soldering products made from PVC materials;
- cutting is necessary for cutting out various shapes from foam plastic;
- The welded mirror is used in resistance welding of plastic materials and preparation of product joints;
- Using a welding nozzle, synthetic welding cables are connected.
The nozzle is selected depending on the intended use of the hair dryer.
Nozzle for soldering plastic on a hair dryer
Repairing plastic products is much easier than metal ones. This does not require high temperature or the use of transformers. It is enough to use a hair dryer and choose the right additional elements.
For soldering plastic products, a special flat V-shaped nozzle is suitable. It is equipped with a welding rod that serves as solder. The solder material must be of the same composition as the material being welded.
Nozzle for hair dryer - welding tip
The welding tip consists of two tubes welded at an angle. One of the tubes supplies hot air to the work area, the second - softened welding rod and solder. Its composition is identical to the material of the part being welded.
Hot air gun nozzle
The nozzle is a tube of variable cross-section, tapering towards the outlet. Due to this, the speed and pressure of the escaping hot air increases. Can be used for heating PVC pipes before bending, gluing protective and adhesive tape or veneer, and welding parts.
Hair dryer attachment for welding linoleum
To weld linoleum, use a nozzle equipped with a holder for a polymer cord, with the help of which welding occurs. Having inserted the cord into the device, turn it on and wait for the cord to begin to melt. We begin welding by moving the tip along the seam.
The connection of linoleum sheets can also be done using a thin nozzle with a diameter of 5 mm. To do this, we place the polymer cord in the seam between the panels manually. We direct a stream of hot air to the contact point, moving along it. Melting, the cord will glue the canvases together.
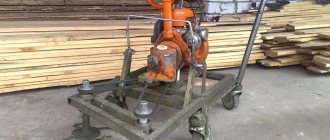
DIY nozzles for a hair dryer
For this you can use various metal tubes. The diameter of such a pipe must correspond to the diameter of the hair dryer nozzle and fit onto it. One end serves as a nozzle for a hair dryer, from the other we make the shape we need. The simplest is flat or slotted. To do this, just use a hammer to flatten the pipe to the desired size.
To get a nozzle attachment, you need to make 4 longitudinal cuts on the pipe and cut right triangles along them. The size of the transverse leg depends on the required nozzle diameter. By bending the resulting petals inward, we get a tip of a smaller diameter. We weld the petals together, clean the seams and get the desired addition.
You can also make a V-shaped tip with a solder rod holder yourself. To do this, you need to use three tubes of different diameters. One of them should be put on the hair dryer nozzle. The other two are welded together at an angle and welded to the main tube. With sufficient skill, you can get a product no worse than a factory one.