Design of a laser level
The laser type level belongs to the category of optical measuring instruments that require an appropriate approach to use and storage. Failure to comply with storage and operating conditions leads to damage to the level. Before repairing a laser level, you should understand its structure.
The instrument in question appears to have a simple design, but some of its individual parts have a complex structure, which causes difficulties in self-repair at home. However, knowledge of the design of this measuring device will help simplify repair work.
The main element of the level is the light source, along which the corresponding constructions of horizontal and vertical planes are made. LEDs are used as a light emitter, the illumination of which is enhanced through the use of a lens system. An LED can fail only due to a malfunction of the electronic chip. The lenses can only break, in which case they will need to be replaced.
Outside the device there is a housing, which usually has a high degree of protection from moisture and dust. The housing is usually made of impact-resistant plastic. The housing design has a connector where replaceable batteries are installed or batteries are stored. To carry out precise measuring work, the device has a special installation system. This system allows you to position the level evenly and make the appropriate measurements.
Levels come in different varieties, which depends not only on the manufacturers. They are classified into simple or household and professional:
- Household device models are only capable of creating a beam that is directed parallel to the body
- Professional - they are capable of projecting laser beams in different planes and around the entire circle at 360 degrees. Such devices additionally use an electric drive that rotates the laser LED in a circle.
The more complex the design of the instrument, the more difficult it is to repair the level. To repair the device yourself, you should find out the main types of breakdowns that occur at laser levels.
DIY laser level repair
Complex laser equipment must be repaired by a professional using special equipment. But you can actually do some things yourself. Minor damage may occur due to a shake or fall; if handled carelessly, the tripod or mounts may break.
Laser level repair
If there is an inaccuracy in the readings, you can try to correct it. To do this, the housing is removed and a tendril is located inside the structure - it is used to adjust the laser head. It is adjusted using a regular bubble level.
In addition to the antenna, the correctness of the reading depends on the setting of the internal weight. It is located at the bottom of the structure. To get to it, you need to unscrew the plastic bolt. Under it there will be a screw with the letter “A” - this is a load. When it rotates, the position of the emitted rays is adjusted.
You can repair the case yourself - replace the glass or install a new tripod.
Defects in laser levels and how to fix them yourself
When purchasing a measuring instrument, the question arises about which device to choose for repair. After all, in order to prevent level breakdowns, it is necessary to decide at the purchase stage which tool is suitable for performing certain jobs. If you buy a level for indoor work and use it outdoors, it will not last long. In addition, you should not choose cheap models if you have high hopes for the device. If Chinese cheap fakes are used frequently, they will quickly fail.
However, not only cheap levels break, but also expensive ones that require appropriate repairs. When you need to repair a level yourself, we will find out in detail:
- When, when the device is turned on, the laser beam is not rectilinear, but curved in the shape of an arc
- If the LED that creates vertical and horizontal projections does not light up
- If the control buttons are faulty
- In case of defects on the body caused by mechanical impact
- If the electric drive does not rotate when starting
- The laser beam becomes dim and barely noticeable
If the device has been dropped on the ground or damaged by heavy tools or building materials, even if it shows no signs of malfunction, it should still be diagnosed. The position adjustment system, and especially the self-adjusting mechanism, can also fail.
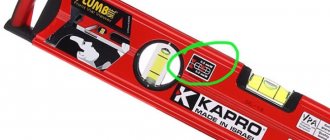
Bubble level - setting.
| Setting up the bubble level is easy. Not all levels have adjustments at all. This is an unprofessional tool. Professional - customizable. I use this type of level. This is Vectron, it has adjustable windage and elevation and has the most sane adjustment system on the entire instrument market. |
| Here is one option: On the table in the workshop. You can just do it on a table, or on any flat surface, but to make everything very clear, I do this: I screw two screws into the board - the size of the level. So that they are at the edges. |
| I put a level on them and see what it shows. |
Read also: Mustache antenna for digital TV
Level verification: what is it and why is it necessary?
Often device failures are hidden, that is, the level projects planes correctly, but at the same time they are distorted and inaccurate. Such a malfunction is not detected immediately, and you can perform a large amount of work, and only then discover that the laser level is “lying.” To prevent these types of malfunctions, verification should be performed regularly. In this case, you will not need to take the tool to a workshop or service center for verification, since you can complete the task yourself.
How to check a laser level yourself? First you need to turn it on, and then perform a number of the following simple manipulations:
- Place the level closer to the wall in the room and project the beam onto the opposite side
- Unfold the device and make a mark on the wall near which the level is located
- Move the device closer to the opposite wall and align the laser beam with the mark
- Once the laser beam is aligned with the mark on the nearest wall, you should turn it and check whether the projected line coincides with the marking on the opposite wall
The device is considered accurate if the beam falls exactly on the mark. A slight deviation is allowed, which may indicate an instrument error. The error depends not only on the cost of the level, but also on the range of measurements taken. The further the device is from the surface on which the beam is projected, the greater the inaccuracy value.
Read also: How to properly assemble a baby pump
Why is a laser level inaccurate?
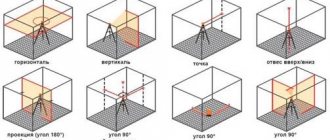
Schemes for the arrangement of axes when checking the level: A-B – diagrams for the arrangement of the axes when checking the level; G – level positions during the third verification.
The reason for repairs may be violation of storage conditions, shaking during transportation. To check the operating condition of the device, the readings taken are evaluated using several values:
- vertical line (referred to as y);
- horizontal line (called x);
- the plane is tilted.
You can check the horizontal beam in a simple way. This will require a room with a large area. Each wall should be about 20 m. Place the device against one wall, then turn it on. A projection will appear on the wall bordering the level. Put a mark on it. It will mark the starting point.
Then, turning the device 180°, perform similar actions on the opposite side. This will be a continuation of the beam.
Important! Do not move the tool during operation. You should move it so that all the points that you marked before coincide with the central one.
The final mark should be on the third wall. It is placed according to the same principle as the second one. The repair procedure should be repeated 2 times. This way you can eliminate errors and further problems with the tool.
Diagram of a laser level device.
Note the difference between the readings. If it is within the normal range, then the device is working properly. Otherwise, repairs will be required. Carefully disassemble the structure. Inside you will find a small tendril. He is responsible for the tilt of the head. If there is a displacement during the fall, the level will show inaccurate data. Therefore it should be corrected. Some craftsmen advise removing it, arguing that the laser level can be used in any plane.
In a similar way, you can check along a vertical line. The only difference is the position of the device. By rotating it 90°, you get a projection in a different plane.
If the data obtained indicates the presence of a deviation, you will need to take the measures indicated above.
How realistic is it to repair a laser level?
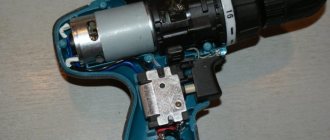
When a grinder or drill breaks down, the first thing the master does is rush to disassemble the tool himself and repair it. Few people think about taking such levels to specialized service centers. As soon as a level breaks, few people think about repairing it themselves. This is due to the fact that the device has a complex design (at first glance). If you understand the structure of the tool, then no problems with repairs will arise.
Most experts do not recommend repairing devices yourself. However, there is nothing wrong with trying to find the cause of the problem and fix it. In addition, most breakdowns can be eliminated even without disassembling the tool.
- The batteries or battery are low. If the level does not turn on, then the first thing you should do is make sure that the power supplies are working. If these are batteries, then they need to be replaced, and if they are a battery, then put them on charge
- Malfunction of contacts or their oxidation - if you do not use the device for a long time, and at the same time leave the batteries in it for a long time, they may “leak”. As a result, the design of the device will suffer. To prevent this kind of breakdown, it is necessary to remove the batteries from the instrument during storage. If these are lithium-ion batteries, then they must be stored exclusively in charged form.
- Failure of the charger - if the level is powered by a built-in battery, then the charging unit may fail. You can find out about such a breakdown by the absence of a charge indication when the plug is plugged into the socket.
- Horizontal or vertical projection does not work - in this case, it is necessary to disassemble the device body and perform diagnostics. Failures in the electrical circuit can only be determined by knowledgeable and experienced specialists. In addition, specialized equipment will be needed for testing. However, often the cause of projection inoperability is a loose wiring. Having a soldering iron, you should solder the wires in place in order to eventually restore the functionality of the laser projection meter
- Blurred or poorly visible laser projection - in this case, it is necessary to disassemble the housing and check the cleanliness of the glass. The glass usually gets clogged, so it needs to be cleaned. If the cause is not glass, then you need to change the LEDs or check the microcircuit
- The buttons do not work - if it jams, sticks or does not turn on at all, it must be replaced. To replace the button, there is also no need to take the device to a specialist. You should disassemble it, diagnose the breakdown, and, if possible, fix it.
- Malfunction of the pointer - the cause is a violation of the integrity of the weight. To fix the damage, you need to disassemble the tool and adjust the pointer
From the above, we can say that you can repair the level yourself, without the help of specialists. The main thing here is accuracy and caution. If after disassembly it is not possible to identify the cause of the breakdown, then you should assemble the level and take it for repair. There are specialized centers for this.
How to set up a laser level yourself
- 01-12-2014
- 19
- 491
If you start building a house without measuring instruments, the result will be sad. The house will stand at an angle and not for very long. This was well known in ancient times, so builders always checked the planes, their horizontality, and verified their verticality, achieving zero error. They had instruments appropriate for that time. Of course, these were very primitive devices.
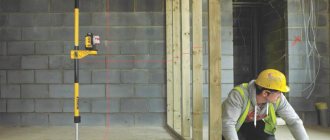
The laser level can also be used indoors.
Today, builders can use a special laser level, or level. This device works with a laser beam, measurements are carried out quickly with great accuracy. But, like all devices, it needs to be adjusted, so every builder should know how to adjust a laser level. But before we touch on configuration issues, you need to know the types of these devices and their design.
How does a laser level work?
To operate, the device uses the finest laser beam. To make it appear, a special diode design is created. Such laser radiation was initially used only for military purposes. Gradually, the equipment began to be used in medicine, and subsequently the laser level was created for construction organizations.
Laser level operation.
The body of the device is made mainly of plastic. It is equipped with special rubber inserts that prevent moisture from entering the device. This may affect the accuracy of the instrument. A laser level is a very expensive device, so it must be protected from the ingress of any materials, of which there is a lot at a construction site, for example, cement and sand. This device requires reliable housing protection.
You can use a laser level at home, on a construction site and in an apartment. These devices are produced today for a variety of purposes, so you can find the right laser level based on the tasks that it will help solve.
Return to contents
Laser level device.
- The device shows very accurate measurement data. The error is no more than 1 mm.
- The point that the laser beam shows is clearly visible. This is much more convenient than the marks that are used in levels. You can work with this point or line immediately, without making additional markings. Construction equipment can start working immediately.
- The device takes measurements at tremendous speed, it does not require preliminary preparation, you just need to take it out of the case.
- Once placed in a horizontal position, the device does not require further maintenance. He will carry out all measurements independently and with great speed.
- No special training is required to operate the device. Anyone can work with it.
- One person is enough to take measurements. The device does not require a team of maintenance personnel.
Basically, a laser level is an improved descendant of previously used devices, such as theodolite, tape measure, etc. With this device you can check any surface where special precision is required. To choose the most suitable device, you need to know their classification and names.
Return to contents
These devices use several prisms and diodes, so the manufacturers gave them the name multi-prism. There are also simpler devices where only one beam lights up. Its direction can be vertical or tend to horizontal. This is not enough. Typically there are two such beams in the device:
The classic laser level has a scanning angle of 120°.
- Vertical.
- Horizontal.
The result is a laser cross. Devices of complex design have several crosshairs at once. There are even devices that can turn into a plumb line. These devices can be configured so that the beam goes down or is directed up.
The classic laser level has a scanning angle of 120°. More powerful devices form an angle of 160°. Depending on the angle value, an increased number of additional crosses is achieved. Sometimes the rays connect into one plane, then the angle is 360°.
The laser level kit includes:
- level;
- case;
- glasses that allow you to see the laser beam;
- remote control;
- flat targets;
- tripod;
- Charger;
- magnets for attaching the device;
- geodetic rod;
- receiver that intercepts rays.
Using highly accurate zero-error tools, you can calibrate the laser level and adjust it to reduce the error to zero. When an apartment is being renovated, there will not be particularly long distances, so a laser beam is quite enough.
Return to contents
The general setting involves adjusting the vertical direction of the laser beam, which is carried out using a plumb line. When an arched line is detected, you need to open the beam formers, then use the screws to obtain a straight beam of light. After obtaining an ideal laser line, marks are made on the plumb line of all the details related to the adjustment made.
Then you need to check the horizon.
If you pull a plumb line along the edges of the line, you can see the arc of the glow.
It gets fixed first. Of course, if the previous settings allowed us to get an ideal horizon, then all the work was done perfectly. If the horizon turns out to be deviated, additional adjustments must be made, however, it is forbidden to use the adjusting screws of the pendulum, since the adjusted vertical may be lost.
The horizontality can only be adjusted by small movements of the block containing the laser. First you need to slightly unscrew the fixing screws and move the block with a thin object, using it as a lever. After achieving the required result, all rotating parts must be placed on glue. In this case, there is no need to use the fixing screws, since sliding pressure will appear on the block during tightening. As a result, the settings may be lost. However, in any case, the fixing screws must be tightly tightened.
The next step is to adjust the horizon into the distance. Set up counter measurements. They should be visible from two angles at the same time. There should be a distance between them not exceeding 5 m. To obtain such marks, you can use a hydraulic level.
When there are no such angles in the building, any things at hand can be used for adjustment, for example, stepladders, which usually stand near the wall. To adjust, use the pendulum screw. When it rotates, the axis of the pendulum shifts, and accordingly, the angle of inclination of the laser light beam into the distance begins to shift.
Of course, you can create marks using a hydraulic level. However, firstly, you need to have the device, and secondly, it must be filled with water. It needs to be calibrated and checked to see how correctly the marks are positioned, and for this you will need an assistant. Such work requires a lot of time; it is much easier to make ordinary counter measurements, which will immediately show the existing error.
After all operations have been completed, the pendulum screw is fixed with glue. This allows you to save the settings when the device is transported or large mechanical stress occurs.
moiinstrumenty.ru
Where to repair a laser level
Having understood the question of whether it is possible to repair the level yourself, we can conclude that if it is not possible to restore the functionality of the instrument, then there is no need to rush to buy a new one. A failed laser level can be restored by contacting specialized centers. Such centers are located not only in large cities of Russia, but also in smaller ones. There are specialized centers for repairing laser levels in the following Russian cities:
- Moscow
- Ekaterinburg
- Novosibirsk
- Rostov
- Nizhny Novgorod
- Ufa
- Samara
- Krasnodar
- Chelyabinsk
- Falcon
- Voronezh
- Irkutsk
- Krasnoyarsk
No matter what big city you live in, in order to repair a laser level, you must first try to find the breakdown yourself, and only then look for the addresses of service centers. These centers perform not only repairs, but also adjustment and verification of the measuring device. How much repairs cost at a service center depends on many factors:
- Location - the remoteness of the settlement from the city indicates the need for costs for shipping parts and components, which is an additional expense
- Laser level model - repairing cheap models is correspondingly inexpensive, but to repair levels from brands such as Bosch, DeWalt, Hitachi and others, you will need the appropriate components
- Type of fault - if it is a minor breakdown, then the cost of such repairs will be insignificant
To avoid being deceived, you should choose only specialized service centers and workshops. It’s not difficult to find out about these, since there are many reviews about these or other workshops on the Internet. If you know the addresses of good level repair shops in Russia, Ukraine and Belarus, then you can share the addresses directly on the site.
Instructions on how to repair a laser level with a step-by-step description
If you are faced with a situation where the laser level has stopped working, then you need to immediately begin repairing it. First, we assess the extent of the breakdown, and only if it turns out that the cause is internal, then we proceed to disassemble the case. All levels are dismountable, for which you need to unscrew a certain number of screws to remove the cover. If the projection stops working at the level, the repair will look like this:
- To repair a laser level you need to remove the housing
- Now you can diagnose the problem. If one of the projections does not work, then you need to look at the serviceability of the contacts. In the example, a malfunction of one contact was detected, due to which one plane does not work
- You can fix the damage by soldering the wires in their place. If it breaks off, then you need to find a similar wire (without insulation) and with the appropriate cross-section, and solder it in place of the damaged one
- In the end, all that remains is to assemble the tool and check its functionality. When assembling, you need to be careful not to snag the wires and again not break their integrity.
Read also: Making a dovetail spike
After assembly, it is necessary to install the power supplies in place and check the functionality of the tool.
The tool works properly. As you can see, the repair does not take much time, effort, and does not require special knowledge. If the laser level breaks down, then you must first identify the cause of the breakdown, and only then restore the functionality of the device. Only in exceptional cases is it recommended to seek the help of specialists, and in 60% of cases you can repair it yourself. Below is a detailed video description of the process of repairing a laser level with your own hands.
As a result, it should be noted that a good specialist in a service center is not one who has exorbitant prices for repairs. A good technician will handle the repair quickly, and his services will not cost as much as a new level.
Laser level repairs are carried out when various malfunctions occur in the operation of the device. A laser level is called a level and is used in construction and repair work.
A laser level is indispensable in construction and repair, and malfunctions in its operation will affect the accuracy of the work.
The use of laser levels allows you to very accurately measure the horizontal and vertical when carrying out work.
The level is used by almost every construction professional. If this tool fails or defects appear in its operation, repairs are required. However, we must remember that the device has a complex design, and not every breakdown or defect can be eliminated on its own.
Practical recommendations
The general setting involves adjusting the vertical direction of the laser beam, which is carried out using a plumb line. When an arched line is detected, you need to open the beam formers, then use the screws to obtain a straight beam of light. After obtaining an ideal laser line, marks are made on the plumb line of all the details related to the adjustment made.
Then you need to check the horizon.
If you pull a plumb line along the edges of the line, you can see the arc of the glow.
It gets fixed first. Of course, if the previous settings allowed us to get an ideal horizon, then all the work was done perfectly. If the horizon turns out to be deviated, additional adjustments must be made, however, it is forbidden to use the adjusting screws of the pendulum, since the adjusted vertical may be lost.
The horizontality can only be adjusted by small movements of the block containing the laser. First you need to slightly unscrew the fixing screws and move the block with a thin object, using it as a lever. After achieving the required result, all rotating parts must be placed on glue. In this case, there is no need to use the fixing screws, since sliding pressure will appear on the block during tightening. As a result, the settings may be lost. However, in any case, the fixing screws must be tightly tightened.
The next step is to adjust the horizon into the distance. Set up counter measurements. They should be visible from two angles at the same time. There should be a distance between them not exceeding 5 m. To obtain such marks, you can use a hydraulic level.
When there are no such angles in the building, any things at hand can be used for adjustment, for example, stepladders, which usually stand near the wall. To adjust, use the pendulum screw. When it rotates, the axis of the pendulum shifts, and accordingly, the angle of inclination of the laser light beam into the distance begins to shift.
Of course, you can create marks using a hydraulic level. However, firstly, you need to have the device, and secondly, it must be filled with water. It needs to be calibrated and checked to see how correctly the marks are positioned, and for this you will need an assistant. Such work requires a lot of time; it is much easier to make ordinary counter measurements, which will immediately show the existing error.
Read also: What is the name of the device for measuring distance
After all operations have been completed, the pendulum screw is fixed with glue. This allows you to save the settings when the device is transported or large mechanical stress occurs.
The use of a laser level when renovating an apartment greatly speeds up the entire work process and we can say that all professional renovation teams have it. At the same time, the presence of an expensive level of a master does not at all indicate the level of his qualifications - the simple crooked Fedya, having shown the customer a tool for 20K, will still fill the screed or make a suspended ceiling only due to his abilities. The majority of teams, without much concern, use inexpensive laser levels, while fully relying on the accuracy of Chinese junk. And almost all craftsmen, after purchasing a laser level, never check it for accuracy, and all errors in setting the level begin to come to light during the work process, when all the jambs of the work done come out. Crooked partitions, blocked openings, screeds poured into a slope, crookedly pasted wallpaper will immediately show the narrow-mindedness of such crooked hands. And there is no particular difference between an expensive and a cheap level in terms of trust in accuracy - the entire final adjustment of any laser level is mechanical and very clearly depends on the assembler in production.
Using the most high-precision tools with zero deviations at any distance (water level and plumb line), you can check your laser level without any problems and, if possible, adjust it almost perfectly (0.00 mm at 15 meters). When renovating an apartment, a greater distance is usually not required, and the laser emission line itself begins to blur at long distances.
If there is no water level, you can check the laser level by ordinary counter measurements at a preferably large distance (6-10 meters), which will provide a more accurate detection of the error.
With a plumb line, everything is simpler: having attached it to the ceiling, you will immediately see how the vertical of the level shines - along the plumb line or with an offset.
And now that all the initial information in three main areas is known, you can begin to configure the Chinese laser level and make it a real tool with almost zero tolerances.
Remove the device from the tripod and unscrew the 3 screws in the stand.
Remove the locking ring on the rotary axis of the tool and unscrew the 4 screws at the base.
There is a magnet fixed inside the stand, which is simply useless there - because... The pendulum itself is made of aluminum alloy, and the screw screwed on from below is made of brass. Quickly calming the pendulum with such materials simply does not work, which of course is a plus in this case. A super strong neodymium magnet would in any case prevent the pendulum from aligning properly and would also be part of the cause of the error. Instead of removing the magnet, it is advisable to simply increase the weight of the pendulum, which will make its alignment more stable, but will of course result in a longer settling time.
Next, unscrew 4 more screws on the body itself.
We remove the front part and see the pendulum itself and laser blocks with glass tubes that form a line from the laser point.
In general, two through screws in the pendulum are the entire center for setting up the laser level. One adjusts the accuracy of the beam into the distance, the other vertical or horizontal - it’s up to you to decide what you need. Simply adjusting the vertical and horizontal at the same time will not work - when examining several such specimens, it was discovered that the inserted blocks, which are fixed with two screws, do not allow the lines of the cross to be scanned at an angle of exactly 90 degrees.
The setup itself is done in this form, with the front part removed. The half-disassembled instrument is installed back on the tripod, with parts of the base better secured so that the level does not accidentally fall while dragging for adjustment.
The entire setup begins with adjusting the vertical beam of the laser beam using a screw in the pendulum. In this case, if the line has an arc, then you will have to pick out the glue that fixes the beam formers and adjust the screws to achieve a straight line of glow along the entire length of the plumb line. Immediately after setting the ideal display of the laser beam on the plumb line, it is necessary to fix with glue all the details related to the adjustment.
The next step is to check the horizon using counter measurements or using hydraulic level marks, and if you additionally pull the cord from the edges of the line, you can also determine the arc shape of the glow, which is corrected first. Of course, if the horizon turned out perfect after previous manipulations, then you can simply rejoice. If not, then you can start adjusting it, during which the screws in the pendulum can no longer be touched because this will disrupt the newly configured vertical.
And therefore, adjusting the horizon is possible only by small movements of the entire block in which the laser is located. Before this, it is necessary to slightly loosen the fixing screws and carry out the shift itself with an awl, acting as a lever. After obtaining the desired result, it is also necessary to fix all the parts that were spinning with glue, but it is not advisable to touch the fixing screws, because when they are tightened and, accordingly, a sliding load is placed on the block itself, which they fix, all the adjustments made may disappear. Of course, it’s worth trying to tighten the fixing screws, and if you succeeded without knocking it down, then after congratulating yourself once again, you can proceed to the last stage - adjusting the horizon into the distance.
This adjustment can be made simply by taking counter measurements at two simultaneously visible corners of the walls at a distance of 5-6 meters from each other or using hydraulic level marks. If there are no such corners in the room, then you can use almost any thing to set it up: stepladders, or something leaning against the wall. All adjustments are made by a screw in the pendulum, which, when unscrewed or tightened, changes the center of mass of the pendulum and, accordingly, the angle of inclination of the laser luminescence line into the distance. Of course, you can use a hydraulic level to create marks, but you will still need to find it, fill it with water, check the correctness of the marks, and you will need an assistant. This sequence takes a lot of time, unlike simple counter measurements, in which the error is immediately shown. Once all tightening is completed, the screw on the pendulum must also be fixed with glue, which will maintain the setting during a wide variety of impacts during operation or transportation.
After this adjustment, the error of the laser level at the distance you specify will be practically zero. The accuracy of the water level and the plumb line will make the PG almost a standard of accuracy and you can easily wipe out critics or bullies with expensive laser levels