Makita screwdriver device
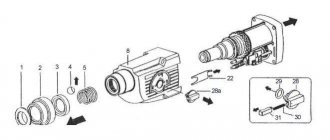
The Makita screwdriver is a fairly simple design that consists of several main parts:
- battery;
- engine;
- gearbox;
- mode switch.
Some models may add additional devices, but the basic components remain the same.
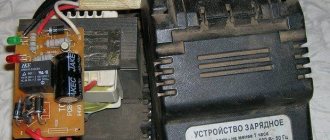
The battery is a completely detachable part, which is recharged from time to time at a special station. It is rarely considered. as a direct component of the tool. Although it is the battery that very often fails.
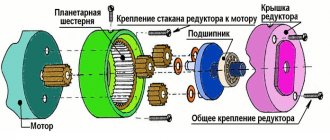
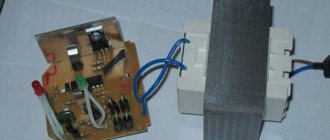
The inside of the Makita screwdriver is quite simple. From the battery connection point, the wires go to the speed switch, as well as the start button itself, from which contacts go to the engine. The front part of the engine is inserted into a gearbox consisting of a whole set of gears of different configurations. The composition of the set depends on the number of speeds or operating modes of the screwdriver. Modes are switched using a special controller, which is brought out.
In a gearbox, gears with external teeth work in close connection with the housing itself, in which the teeth are located on the inside. And if in some parts the teeth are made of metal, then the plastic body itself includes plastic teeth. It is not surprising that such a design wears out and fails over time.
Brushes for Makita screwdriver
The brushes used for the screwdriver have a graphite base. Their cost today varies between 2–5 USD. e. They are located in the electric motor housing and consist of two graphite cubes mounted on metal plates. With intensive work, they wear out and wear out.
When doing DIY repairs, you can sharpen them with a file from brushes from another tool, for example, a car starter. After recessing, they should be inserted into the brush holder and put in place, assembling the engine.
How to disassemble a Makita screwdriver
In order to disassemble a Makita screwdriver, you must first disconnect the battery. Then all the screws in the tool body that hold the two halves together are unscrewed. After this, the case is removed, and all external components are revealed to the master: motor, gearbox and switch. It is also worth noting that such models often have special plates installed that are responsible for switching modes. If you don't disassemble it very carefully, you may simply not notice the small plate. After disassembly, you can immediately begin repairing the relevant part.
Disassemble the battery with a spatula or utility knife
For those who are not used to working with a mallet and want the process of disassembling the battery to look quieter and gentler, you can suggest using a small metal spatula or a utility knife. The main thing is that they do not have sharp edges, like a large screwdriver, which can easily damage the plastic.
First, you should completely go around the perimeter of the entire block with a knife to loosen the seam, and only after that you can begin to “pick” the flexible plastic with a small screwdriver. The method is no less painstaking than the first, and if a person is not experienced enough, damage may remain on the plastic case. However, if you work as carefully as possible, it is possible to avoid “losses” in this case as well.
If, when disassembling the battery pack, you still experience cracks or other damage, you should not be upset, because this type of plastic lends itself perfectly to gluing with dichloroethane.
How to repair a Makita screwdriver
One of the most common problems with a Makita screwdriver is problems with the operation of the first speed. At the same time, at second speed everything functions perfectly. This problem is associated with a malfunction of the tool’s gearbox, which prevents the first speed from being used effectively. Let's look at how to get rid of this problem and repair a screwdriver.
Disassembling the gearbox
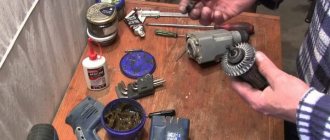
The first step is to disassemble the tool itself and separate the gearbox. Now it is important to remove all unnecessary details at this stage. To do this, simply pour out all the gears from the gearbox. It is worth noting that if there is no information about the exact location of each part, it is better to disassemble it sequentially and carefully.
Record and mark the location of the gears. This is necessary for high-quality assembly of the gearbox after repair work. You can also use training videos or articles.
Screwing in bolts instead of teeth
Once all the gears are removed from the gearbox, the inside of the device will be revealed to the eye. Given the specifics of the problem, most likely the technician will see that all the plastic teeth on the inside have been ground off. This happens when the device is used for a long time, or when the rules of use are grossly violated. Plastic teeth are quite soft, so that under the influence of temperatures and constant mechanical load they simply grind down. This leads to the fact that the main gear has nothing to grab onto and it begins to spin.
To repair and restore functionality, it is necessary to restore the teeth. In this case, there is no need to restore all the teeth, but it is enough to install two iron ones.
To achieve what you want, you will need a drill, small bolts and a drill. It is advisable to use a diamond-coated drill, as it will allow you to effectively grind off the excess part of the bolt in a relatively short time.
Work order:
- At the location of the plastic tooth, a hole is drilled in the side wall of the gearbox. It is necessary to use a drill bit with a slightly smaller diameter than the diameter of the bolt. This way you can screw it in with force and ensure reliable fastening.
- It is necessary to drill two holes diagonally to ensure reliable retention of the gearbox and stable operation of the tool. Thus, the load will be distributed over two teeth.
- When drilling, it is advisable to point the drill slightly downward so that the bolt does not stick up later. Otherwise, you will have to process it with a drill much longer.
- Now you need to firmly screw the bolts into the holes.
After all these manipulations, the tooth blanks will be ready. Now you need to properly process them and give them the appropriate shape. This is done using a drill.
Using a drill
Using a drill, the bolts are processed from the sides and, if necessary, shortened in length. It is necessary to give the bolts the shape of a real tooth and provide for the installation of the crown without interference.
Important! It is not recommended to overheat the bolt while using the drill. Otherwise, it may become very hot and melt the surrounding plastic. The gear housing will become deformed, which will lead to more serious problems. So you need to take breaks while working. To allow the bolt to cool.
Once the teeth are ready, the gear ring can be inserted back. If everything is done correctly, it will insert without any interference. Two teeth are usually enough to restore the gearbox to working order, so screwing in more bolts is not logical.
Electrical circuit repair
Problems with electronics are expressed in the inability to turn on the tool, failure to switch the reverse mode, problems when adjusting the number of revolutions.
How to disassemble the battery of a Makita screwdriver
When diagnosing an electronic part, you must have certain skills in working with electrical networks and circuits. And then you will be able to repair the Hitach instrument, Bison or any other.
If the tool does not respond to the “Start” button, then begin troubleshooting with the battery.
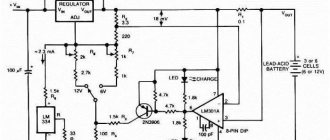
First you need to try to charge the battery in a charger. Then measure the battery voltage using a multimeter. The voltage value must exactly match the declared battery rating. If the indicator is much lower, then you need to determine which element is faulty: the charger or the battery.
The charger is also checked by the tester. A multimeter is connected to the terminals of the charger and the voltage is measured at idle. The voltage value should be several values higher (up to two volts) than the rated voltage written on the device body. If there is no voltage, the charger is definitely faulty.
It makes sense to change battery cells if you have an extra non-functional battery. Then the missing elements can be pulled out of it. Purchasing new cells is unjustified, because their price is comparable to the cost of a new battery.
Repairing the charger requires more advanced knowledge of electronics.
If the batteries and charger are normal, the tool should be carefully disassembled .
When disassembling, you need to remember how the parts were assembled so that you can reassemble them correctly later.
It is best to sketch out a diagram of the location of components, contacts, screws, and springs before starting repairs and diagnostics.
Visually inspect the contacts. Are any of them darkened? If you find dark or dirty contacts, you need to clean them with sandpaper. Special attention should be paid to the quality of soldering.
There are two wires running from the start button to the battery terminals. With the battery inserted, the voltage at the button inputs is measured. If there is voltage, the power supply is removed and the inputs to the battery are short-circuited. The resistance at the push-button input is measured. The option when the resistance indicator is close to zero means that the button is ok.
If the button works, then the problem is in other components of the circuit or in the brushes. If the multimeter shows a break, then the button needs to be repaired or replaced. Most often, the button turns out to be damaged, since it is the most actively used.
READ Detailed Operation Manual for Makita Plm4621 Self-Propelled Lawn Mower
When the reverse is not working, the procedure follows a similar pattern. The tester probes touch the button input and the motor contact. After which the switch handle is brought into active action. If there is no resistance, then the problem is in the reverse contacts. If the arrow of the device deviates, then the reverse is working.
There is no speed control, but the electric motor still shows maximum speed? This means that either the button or the regulating transistor is not working.
If, after checking the entire electrical circuit, no problems are found, but the screwdriver does not work, then there is a possibility that the malfunction is related to the brushes. The brushes wear out during intensive use of the tool. When the length is reduced by forty percent, the brushes require replacement. It is possible to solder them, but the solder should only be refractory.
After eliminating the above problems, the operation of the device is checked. If performance is not restored, then the electric motor needs to be checked.
Measuring voltage
Before measuring the voltage of the elements, prepare a simple pencil with which you will write down the U value given by each battery in the bundle. Since in most cases, “hot” screwdrivers are equipped with nickel-cadmium batteries packed in thick layers of cardboard, it is important to ensure that the batteries are accessible from both sides.
Now all that remains is to turn on the voltmeter (or multimeter) and start measuring. When taking measurements, we hold each battery for five seconds and see if the voltage drops (usually it is normally about 1.2 volts for each battery separately). We record the indicators with a pencil. You cannot keep the probes on batteries for a long time, because the resistance increases, and they may simply burn out.
Practice shows that as soon as one element of the entire bunch fails, it negatively affects the operation of all batteries. If the voltage indicator on any “bank” is 1 volt or less, it has already exhausted its resource. In order to finally verify this, you should check the self-discharge level of each battery in the bundle.
Repeated measurements are taken after 15 minutes. When taking measurements, be sure to compare the primary U indicators with the repeated ones. If it turns out that there are batteries whose voltage, after initial measurements, dropped sharply during repeated measurements, it means that their self-discharge is high, and it is these elements that have completely become unusable.
After the unusable elements have been “calculated,” we disconnect them from the rest using a scalpel, and in their place we put good batteries from a spare battery. So we remake the entire block, assembling two complete ones.
Electric motor diagnostics
To do this, the motor is disconnected from the button and the resistance value of the motor is measured. When the device is “silent”, it means that the winding has broken. It is necessary to change the motor or rewind the winding.
To make sure the armature is working, measure the resistance on two adjacent collector plates. It is necessary to ring all the plates sequentially, around the entire circumference. If there are two plates whose resistance is significantly higher than zero, the armature is faulty. Needs replacement or repair.
How to repair a screwdriver battery
Battery-powered screwdrivers are also very susceptible to battery wear. This happens over time even with proper use. If you do not follow the operating instructions, the battery will stop holding a charge very quickly. And in this situation, there are two options: purchase a new battery or try to repair the Makita screwdriver battery yourself.
The second option will require spending some time and effort, and also requires the presence of special elements.
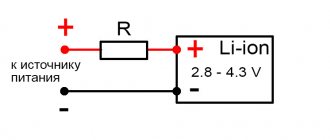
The screwdriver battery is a set of a number of special power cans, which are soldered to the charging controller and form an integral structure.
Corresponding nutrients can be found in power banks or laptops. There are also some such banks there. Laptops usually use 6 cans, and power banks use 4. But the number may be different and depends on the battery capacity.
If the master has extra elements of such lithium batteries, then they can be used to repair the screwdriver battery.
Disassembling the battery
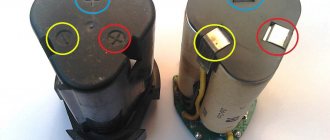
First of all, it is necessary to disassemble the Makita screwdriver battery. To do this, it is disconnected from the screwdriver, and then all the screws are unscrewed from it. The battery case opens and you can see the design of the cell itself. There will be 10 cans, soldered together and soldered to the power controller.
It is necessary to disconnect the banks from the board. For this, a drill with a special attachment is used.
Disconnecting cans from the board
Using a drill with a disk attachment, the cans are sawed off from the board. The connections of each contact to the controller are sequentially removed, and the elements are also disconnected from the common frame.
This must be done quite carefully so as not to damage the board itself, but forcefully enough to completely disconnect.
Soldering new cans
Immediately after freeing the frame and board from the old batteries, new ones can be attached to them. Before soldering, it is recommended to thoroughly clean the surfaces on the cans and on the board itself from remnants of previous soldering. This will allow you to achieve better contact for a long time.
Now all new cans from other devices are placed in the appropriate places on the frame and in turn soldered to the power controller. It is recommended to do this using a thick nozzle on a soldering iron, since you will need quite a lot of solder. The contact must be very reliable and have a large contact area.
After sequential assembly, it is recommended to wrap the entire structure in special paper and place it back into the case. The battery is then reassembled and closed with a cover that is secured with screws.
Before use, the battery must be recharged at a special station to full capacity, and only then connected to a screwdriver for testing. If everything is done correctly, the battery will become operational again.
Replacement banks can be taken from other batteries or purchased separately. The cost for them is quite decent, but still manual replacement will cost much less than buying a new battery.
Makita quick release chuck
This chuck is used to clamp bits with a cylindrical shank. This cartridge is easy to install. It is installed literally with one movement of the hand. Used for drills with a diameter of one to ten millimeters. This is a movable structural element in the tool, so it breaks frequently. To disassemble it, you need to read the tips described at the beginning of the article on disassembling the cartridge using a hex key and a Phillips screwdriver. The price of this product is about 20 USD. e.
The material in this article turned out to be voluminous. Here we described all possible problems that arise during the operation of screwdrivers, told how to eliminate them on your own, and separately talked about the various structural elements that form the basis of any screwdriver. The article contains diagrams of the gearbox and the general design of the screwdriver. We hope that the information will be useful to you.
Source
How to determine the method of attachment to a screwdriver
The fastening method is easy to figure out if you carefully examine the details. The cartridge of the Morse taper variety will have the following inscription: 1-6 B10. This means that in the chuck it is permissible to strengthen attachments with a shank diameter of 1-6 mm, and B10. this is a measure of the size of the Morse cone.
The cartridge, secured with a thread lock, is marked:
- Metric thread (Russian products). 1.0-11 M12x1.25
- Inch thread (foreign creation). 2-13 mm ½-20 UNF
READ At what angle to cut the skirting board