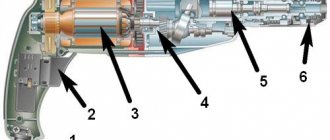
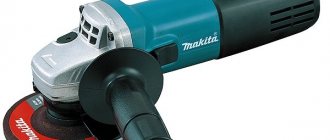
Main modules used
- The body is usually made of special impact-resistant plastic.
- Powerful electric motor.
- High quality gearbox.
- Smooth start.
- Engine switch.
- SJS system. The presence of the system allows the tool to work smoothly without jumping. In addition, it turns off the coffee grinder if the disc jams and minimizes vibration. This saves the operator from serious injury.
- Protective covering.
- Additional handle. With it, you can hold the coffee grinder while working. This handle can be installed in different positions, providing versatility to the tool.
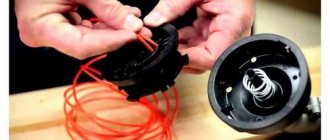
Choosing the right lubricant
Manufacturers of this Sparky brand use grease lubricants for their tools. But it is also permissible to use other specially designed lubricants for grinding machine gearboxes.
A good lubricant can even be made at home.
Most importantly, the base should be oil that adheres well to the metal surface and is quite difficult to tear off at high speed. A good base would be a lubricant designed for joints in joints on cars.
Use a syringe and add oil to it. Stir until you get a consistency similar to thick sour cream.
It is necessary to place as much lubricant in the gear housing as will fit in half the volume of the gearbox.
Lubricant should only be applied after you have thoroughly removed the old lubricant.
Helpful tip: to finally and completely remove the previous grease, use a hairdryer. With its help, the old grease heats up well and is easy to remove from all hard-to-reach places.
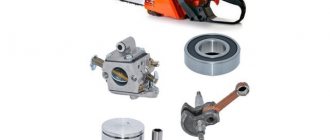
What you might need for work
The process of disassembling a coffee grinder requires several tools:
- Spanners;
- Screwdriver;
- Pliers;
- Vise;
- Hammer;
- Oil;
- Rags;
- Gas key.
The difficulty of disassembling the grinding machine is due to the fact that the parts have very close contact. This allows you to cope with the highest loads. The parts do not move during operation, and oscillatory movements do not occur. Of course, the technician will do everything possible to disassemble it, but you can try to do everything yourself with extreme caution.
Tools required for work: round nose pliers, ruler, calipers, pliers, electric drill, steel brush, megger.
Before disassembling the coffee grinder, you need to prepare your work area by removing all unnecessary parts from the workbench. A clean table will ensure that you don't accidentally lose any parts.
At the first stage, the bolt holding the body is unscrewed. It is very easy to remove, there are no particularly tight seams. Then you need to unscrew the screw and remove the plastic plate. The outer cover should be positioned towards the cord.
Basically, all models of grinding machines have different devices. However, the common part is the electric motor, which includes:
- Anchor;
- Stator;
- Collector;
- Brush.
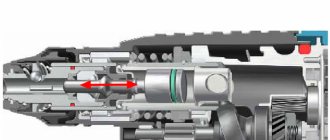
Another essential part of the shredder is the gearbox, which is designed to control power and speed. An electric motor is installed in the housing along with a gearbox.
Gear reducer
Four bolts hold it in place. They must be unscrewed and the gearbox must be removed from the grinder body with extreme care. Disassembling the gearbox is necessary to clean it and replace worn parts. This is one of the most important components of the shredder, which experiences enormous loads during operation.
This includes:
- Housing;
- Big gear;
- Controlled transfer;
- The bearing must be lubricated to reduce friction.
To remove the rotor from the gearbox housing, unscrew the nut holding the rotor. Remove the rotor using a special puller. This operation is associated with some difficulties, so if you do not have special skills, it is better to leave this work to professionals. You can't do without a stripper.
It must be said that such detailed disassembly is not required to simply remove dirt. All you need to do is replace a worn bearing or a rotor that has become unusable.
This operation requires some effort. The anchor should be removed from the housing very carefully, as it breaks easily.
When a strong spark occurs during operation, the body heats up greatly, you just need to purchase an armature to clean the commutator. The device will be ready for use again.
We are preparing the necessary set of tools for repairing an angle grinder
For high-quality repairs and replacement of bearings in a grinding machine, you need to stock up on the necessary tools. They must only be of high quality; there are no special requirements.
Since the grinder has several bearings that will likely need to be replaced and removed before doing so, you need to have a special puller for such parts. You can do without it, but don’t count on quality repairs.
Repairing grinders has an electrical and mechanical component.
For electrical repairs, you will need a special tester.
Make sure you have screwdrivers of different sizes. You will also need all sorts of wrenches.
Auxiliary materials include lubricant intended for gearboxes and bearings, rags, any cloths for wiping, and detergents.
How to properly disassemble a gearbox: recommendations
When a transmission fails completely, it must be completely disassembled to replace parts and thoroughly cleaned. To carry out the work, you need to prepare a bench press. All work is performed in a certain technological sequence:
- The bolt holding the gearbox housing is unscrewed with a wrench.
- The rotor body is secured in a vice with great care.
- By making gentle blows with a hammer, the body is removed.
- The rotor position is convenient for removing the bearing. The bowls are clamped again.
READ Replacing the anchor Interskol angle grinder 125 900 Interskol
By placing a wooden block, the bearing is knocked out. Remove the gear from the gearbox axle:
- Wrap the rotor in cloth and secure with a vice.
- The gear is also wrapped in rags with a wrench, turn it counterclockwise.
How to remove the spindle: tips
The spindle axis works in conjunction with the main gearbox, which consists of:
- Housing;
- Bearing;
- Rubber cuffs
To disassemble the spindle body, you first need to remove the main gear, which uses special tools.
After removing the gear, the housing is installed in a vice. After placing the wooden block, hitting it with a hammer, carefully remove the spindle on which the bearing is installed. The bearing is removed as described above.
The gearbox should be removed regularly, especially if the tool has been used extensively. After disassembly they change the fat. Litol-24 is used most often. I have to say that the oil should be changed continuously over a period of time. This extends the life of the transmission for many years by reducing wear on its components.
Source
Angle grinders (angle grinders, grinders) of the German brand Bosch are distinguished by high quality, reliability and durability. The main competitive advantage of Bosch angle grinders is the widespread use of innovative technologies in the production of the product.
But German quality cannot withstand Russian negligence. Incorrect use of the tool, untimely replacement of oil, carbon brushes, bearings leads to tool failure.
Repairing Bosch angle grinders can be done in two ways: taking the grinder to a service center or repairing the Bosch grinder yourself.
The first option is more expensive and not always of high quality. The second option can only be implemented if the consumer has a strong desire to figure everything out on their own.
The Bosch grinder diagram will help you carry out repairs yourself.
Bosch choppers are conventionally divided into low-power ones up to 1000 W, and powerful ones over 1000 W are marked GWS 7-125, GWS 20-230 or others.
Decrypted
The first number 20 or more indicates power greater than 1000 watts. The second number 230 confirms that this is the maximum diameter of the cutting wheel.
The first number up to 20 indicates the power of the tool up to 1000 W, and the second indicates the maximum diameter of the cutting disc up to 125 mm.
DIY repair instructions for angle grinders
Angle grinders (angle grinders), popularly called grinders, are a popular and reliable tool. But everything breaks down someday. Repairing an angle grinder with your own hands is not difficult if you have instructions in front of you that tell you the step-by-step procedure for repairing an angle grinder. Below you will find answers to any questions about repairing the gearbox, rotor, stator, and carbon brushes of angle grinders.
Angle grinders are especially popular among home craftsmen. The possibility of changing the working parts allows for cutting, grinding, and polishing operations.
The presence of a soft start device makes the operation of the tool safe and convenient. Repairing an angle grinder is simple and can be done independently. For those who decide to repair an angle grinder on their own, you will need a diagram of an angle grinder of the required type, tools, lubricants and these instructions.
Any repair of an angle grinder with your own hands begins with an investigation of emerging faults. The device of the grinder is quite simple. The rotating rotor transmits torque through a helical gear to the shaft (spindle) of the working body. The required working tool is installed on the spindle, be it a cutting stone, a grinding or polishing wheel, and the required technological operation is performed.
By the way, about the shape of the tooth. On low-power grinders, spur gears are installed. Helical gears are used in grinders with a power of over 1000 W.
Angle grinders, like any tool, break over time. The reasons for malfunctions of the angle grinder can be different. They appear not only from improper use of the tool, but also from untimely replacement of carbon brushes and lubricants.
READ Hand Circular Saw Bosch Professional Video
Regardless of the angle grinder model, faults appear in the same units for all. Malfunctions of grinders are conventionally divided into mechanical and electrical. For novice repairmen, faults are divided into simple and complex.
Finding a broken power wire
One of the most common breakdowns of an angle grinder is the inability to turn on the tool or spontaneous stopping during operation. The cause of malfunctions of this kind is a break in the power cable, pos. 27, at the entry point. The malfunction is eliminated by replacing the cable or discarding the failed section. The fault can be easily found using a tester.
If you don’t have a tester at hand, but have a screwdriver with a neon indicator light, then the fault can be found by connecting the power wires to the phase one by one.
Stator repair
The failure of the stator is indicated by spontaneous spinning of the machine shaft; the angle grinder begins to gain maximum speed. Such a malfunction indicates the appearance of an interturn short circuit in the stator winding.
Some faults can only be fixed by specialists. Extending the uninterrupted operation of the stator can only be done by timely cleaning, lubrication and replacement of carbon brushes and bearings.
Typically, the stator fails quite rarely. This is caused by frequent overheating of the tool during operation. The malfunction is manifested by strong heating of the grinder body and the appearance of a smell of burnt insulation.
There can be either an open circuit or a short circuit in the stator. Without disassembling the stator, these faults can be easily found using the IK-32 device.
Malfunctions are eliminated by replacing the stator. For those who like to make things with their own hands, we can recommend rewinding a failed stator with your own hands. There is nothing complicated about this.
The stator is easy to remove, but different models of angle grinders have their own way.
- remove the grinder gearbox;
- remove the rotor by first removing the fastening bar;
- remove the plastic stator protection;
- Unscrew the screws securing the stator in the housing;
- remove the handle cover and disconnect the power wires to the stator;
- remove the stator by tapping the housing with a wooden hammer or block.
Repair of plain bearings
The weak point of any angle grinder is the bearings. And although there are few of them in the design, only three, they are the ones that most often lead to mechanical failures. Bearings are negatively affected by:
- high rotation speed;
- work at extreme conditions;
- insufficient amount of lubricant;
- ingress of dust or dirt;
- untimely replacement or destruction of carbon brushes.
The design of any angle grinder allows for quick and easy replacement of any bearing.
Malfunctions of the angle grinder associated with wear or destruction of the sliding bearing on the gearbox shaft are characterized by the appearance of an unpleasant extraneous sound.
Destruction of the sliding bearing is detected by checking the play of the working tool installation shaft. Determined by rocking the shaft in different directions when installing the working tool.
When installing the working tool again, check the shaft play by rocking its end in different directions. There should be no or minimal play.
The appearance of play indicates the need to replace the plain bearing.
Bearing repair involves removing it from the housing and removing it from the gearbox shaft.
It is better to remove the bearing from the shaft using a puller. It is best to remove the inner race of a damaged bearing using a tap of the required diameter, previously screwed into the race.
The bearings are removed from the rotor using a puller or the traditional method.
Keys or strips of metal are inserted into the vice, the bearings are placed on the keys and, using a soft metal attachment and a hammer weighing at least 400 g, are knocked out from the shaft axis.
Design features of the Bosch angle grinder
The design feature of the Bosch grinder is represented in the gearbox as a thrust bearing for the screw securing the pinion pinion. In Bosch rotary hammers, the drive gear is mounted on the spindle shaft by pressing.
Low-power Bosch grinders, which have spur gears mounted on the gearboxes, have a guard installed. This design allows you to restore the contact characteristics of gears by reducing the thickness of the gasket. Helical gears with high tool rotation speeds wear much less than spindles.
Need a repair tool
To repair a Bosch grinder, do not do without a tool. Give a warning right away if you have a screwdriver, this will greatly speed up the process of disassembling and assembling the tool.
But you can do this with a screwdriver set, preferably one with a ratcheting mechanism. You can't do without an open-end wrench, which you use to unscrew the nut that secures the drive screw gear.
It is better to have a special puller for removing bearings.
Electrical diagnostics can be performed using a tester or short circuit detection device.
This is especially useful because it allows you to determine whether the rotor or stator is faulty without removing the assembly.
The Bosch grinder diagram will help you do the repair yourself, and these instructions will help you adequately deal with any problem.
Sparky grinder repair tool
To carry out high-quality repairs on a Sparky angle grinder of any modification, you cannot do without high-quality and necessary tools. There are no special requirements for the instrument.
Since the Sparky angle grinder uses bearings, it is advisable to use pullers to remove them. A Russian craftsman can do without pullers, but he will not be able to perform high-quality repairs.
Repair of Sparky angle grinders is conventionally divided into repair of electrical and mechanical parts.
To repair the electrical part, you will need a tester. If you have the opportunity to buy or rent a device for determining short-circuited turns, we recommend using a simple IK-2 probe. Such a device allows you to find open or short-circuited turns without dismantling electrical parts. It is indispensable when repairing the rotor and stator of an angle grinder.
Prepare screwdrivers of various sizes. You can't do without wrenches.
Auxiliary materials you will need are lubricant for gearboxes and bearings, rags or cleaning material, and washing liquid. At home, it is recommended to use a mixture of kerosene and gasoline.
If you plan to repair the rotor or stator of an angle grinder, you will need varnish or paint to impregnate the windings.
Repairing an angle grinder with your own hands must be done in a prepared, well-lit workplace.
Disassemble your Bosch sander
The owner of a power tool needs knowledge of his device and the ability to disassemble it.
Knowing how to disassemble a grinder allows you to perform tasks such as changing the oil, replacing bearings and carbon brushes.
Disconnect the gearbox housing pos. 821 from the stator housing pos. 888, it is necessary to disassemble (remove) the body of the handle of the grinding machine, pos. 24.
This operation must be performed to remove the carbon brushes pos. 810 that hold the rotary commutator.
At the second stage, unscrew 4 (four) screws pos. 61, which fix the gearbox housing and stator.
After pulling out the rotor along with the gearbox, begin disassembling the gearbox.
Repair of a Bosch grinding machine begins with disassembling the gearbox, pos. 821. Disassembling the gearbox begins with unscrewing 4 (four) screws pos. 60. Typically, the screws are screwed into the sealant at the factory. It will take some effort.
READ Cutting tiles using a 45 grinder
Just take note! For low power Bosch grinders, spindles are used in the gearbox. For grinders with a power of more than 1000 W, helical gears are used in the gearboxes.
How to remove a driven gear
By removing the gearbox cover, you can obtain a helical gearbox, pos. 26.
To remove the gear you will need to use a press or puller. But using a stripper is difficult, as it requires the use of special thin sponges.
Before removing the helical gear, check the gear backlash, tooth integrity, contact point.
The reference position 50 is pressed against the spindle shaft, pos. 26. If the bearing has a large gap, it is noisy when turning, the oil has dried out, it is advisable to replace it.
To remove the bearing, remove the gear, tighten the ring and remove the bearing. If the bearing remains in the gear housing during removal of the rotor shaft assembly, the bearing is removed using a hammer and a soft point.
How to remove the drive mechanism of a Bosch grinder
Gear drive pos. 27 is removed from the rotor shaft in the following sequence:
- Take the rotor by the hand and open it with a wrench pos. 45 counterclockwise;
- Remove washer pos. 59.;
- Remove the gear screw, key 27.
Visually check the integrity of the gear teeth and contact points.
If the gears are very worn (licked) or have jagged teeth, they need to be replaced. And gear replacement is always done in pairs.
Bosch low-power shredders use a needle bearing as a support bearing in the gearbox.
Repair bosch usm yourself, strictly follow the instructions. If you need to remove a needle bearing from its housing, quick thinking is a must. It can be disassembled only when destroyed.
To get a destroyed race, you can use a proven method.
A valve with a diameter slightly larger than the inner diameter of the destroyed needle bearing cage. The valve is secured in the screwdriver chuck and carefully screwed into the clamp at low speed. When the valve reaches the bottom of the gear housing, it will begin to lift the clamp.
In addition to the spindle shaft needle bearing, Bosch grinders also use two bearings mounted on the rotor shaft.
How to remove bearings from a Bosch grinder rotor
Remove the bearings from the rotor position. 803 Bosch sharpener, it is recommended to use pullers.
Bearing pos. 15 next to the collector can be easily removed, but to remove bearing pos. 14 from the impeller this is complicated by the fact that a number of preparatory operations are required.
Bearing pos. 15 is closed with a soft rubber bushing. This rubber protective pos. 33 also covers the bearing pos. 14.
To disassemble the bearing pos. 14, unscrew the nut pos. 45, remove the gearbox pos. 17 and plastic protection pos. 33. Using a puller, you can easily remove the bearing from the rotor shaft.
What if there is no stripper? A vice, two metal straps and a hammer with a soft metal extension will help.
Disassembling a Bosch sander
How to disassemble a Bosch grinder
Angle grinders were made in Bulgaria in the past. That’s why the angle grinder began to be called the grinder. Now there are many companies producing angle grinders of different models. Alas, the main elements are similar. Having familiarized yourself with the device, possible breakdowns and diagnostics of the tool, you can repair an angle grinder of any modification on your own.
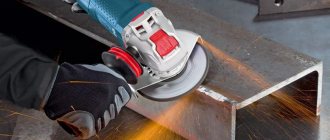
The grinder is designed for grinding and cutting various materials.
The main elements of an angle grinder
The grinder consists of the following parts:
- The thin gearbox housing made of duralumin alloy dissipates heat better.
- Carbon brushes.
- Handle attachment.
- Electric soft start system. Prevents a jerk when turning on and reduces starting loads on the engine.
- Quick-release protective cover.
- Ball bearings.
- Electric motor.
- Grinder switch.
Offers a large selection of bearing products - https://termopolis.com.ua/
Main breakdowns and prerequisites:
- It glows, sparkles and twitches. Prerequisites: violation of armature winding insulation, wear of brushes, commutator, clogging of brush holders. Even after changing the brushes, the angle grinder
sparks and jerks if the brush holders are clogged. - Popping sound. Brushes or interturn short circuit in any of the windings.
- Crunchy sound. The reason is the bearings.
- Mechanical rumble and strong tapping. Gearbox malfunction.
- The grinder
has finished working and won’t turn on. If the disk manually turns tightly or does not turn, the reason is in the gearbox. If it spins easily, check the electronic circuits. If the chains work, check the motor and brushes. - The spindle lock button is broken. The reason is pressing on it during the rotation of the disk, as it is also called, in the jamming of the disk.
- The angle grinder works in fits and starts. Check the engine for interturn short circuit.
- Vibrates. The reason is mechanical. Check bearings, rotor shaft and gearbox.
- Heats up. If it gets hot in the motor area, then the reason is worn out brushes, as it is also called, a small short circuit in the turns of the windings. If the gearbox housing heats up, the lubricant has dried out or the gears have worn out.
- The power does not develop or decreases. The reason is in the electronics or the engine. Check the soft start control board and speed controller, brushes and commutator.
- Smokes. The reason is the tool overheating. Check the motor windings for melted insulation.
- It hums and doesn't even spin. Check the motor bearings and gearbox.
To search for defects, the angle grinder must be disassembled .
- Remove the nut that holds the drive disk.
Unscrew the bolts securing the protective casing.
Unscrew all the bolts of the angle grinder body that secure the body to the gearbox.
Remove the upper part of the rear housing. Unscrew the cord mounting bolts. Remove the wires and button from their grooves. In some models, for example, in DWT, the rear housing is not disassembled into parts, but is completely removed.
- Disconnect the motor wires.
- Remove the brushes.
- Disconnect the gear housing from the angle grinder body. The motor anchor is removed along with the child.
Remove the gearbox bolts located around the housing mount.
To disconnect the armature from the duralumin housing, unscrew the nut located in the gearbox housing.
Assemble the tool in reverse order.
During operation, the disk can be tightened so tightly with the nut that it begins to crumble. It is impossible to unscrew the nut with a wrench. And it is not necessary to do this, because there is an option to break the angle grinder. First, break the disc all the way to the nut. Later, find an iron plate slightly thinner than the working disk. Use it to grind off the remaining disk under the nut. It can simply be unscrewed with a key or by hand. To avoid bringing the tool to this task, place a washer under the nut.
For some angle grinders, for example, Bosh, the casing is not bolted on, but snapped into place. To remove it, you need to turn the cutout of the casing perpendicular to the angle grinder. To put it on, turn until it clicks.
The stator is checked with a multimeter.
- Interturn closure. Set the resistance mode to 200 Ohms. Connect the probes of the device to the ends of one winding. One means a break, and zero means a short circuit between the turns. If it indicates a resistance of more than 1.5 ohms, then inspect the second winding. Both windings have approximately the same resistance.
- Breakdown to ground or short circuit of the winding with the iron stator housing. Set the multimeter to the highest resistance setting. Connect one probe to the end of the winding, the other probe to the iron stator housing. One indicates the absence of a breakdown.
READ Replacing the Grinder Gear Bearing
Content
How to repair a Bosch angle grinder \ Power has dropped \ Sparks a lot \ Tool repair \ GWS 850 ce
First, visually inspect the commutator and winding. There will be visible damage: black marks, bent winding turns, raised, worn, or in other words burnt commutator plates. After inspection, proceed to check with a tester.
- Set the resistance to 200 ohms. Connect the probes of the device to the 2 adjacent collector plates. If the resistance is uniform between all adjacent plates, it means the winding is working. If the resistance is less than 1 ohm and very close to zero, short circuits between the turns occur. If the resistance is two or more times higher than average, it means there is a break in the winding turns.
The determination of breakdown to ground is made if the passage does not have a winding break. Set the device scale to the highest resistance. Depending on the tester, you will like it more from 2.7 MOhm to 200 MOhm. Connect one probe to the shaft, and the other to each plate in turn. If there are no defects, the resistance should be set to zero. Do the same with the rotor. Connect one probe to the steel rotor body, and move the other along the plates.
Put the tester in ringing mode.
Insert one probe into the output of the button, and the other into the return input.
Click the button. A sound signal indicates the serviceability of this part of the button.
Do the same actions with the other input and output of the button.
Connect one probe to the plug contact, the other to the button inputs. There must be a sound signal in one of the two positions. Do the same with the other contact of the plug.
If the power button and power cord work, but the engine does not turn on, check the soft start control board. Unscrew the screw that secures the control board. Carefully remove it. Call our client remains elements. If the grinder has a speed controller, then you will like it connected alternately with the power button and have one board with a soft start. But it contains a separate board. It is checked in the same way as a soft start.
- Read the summary. Read the description and assembly diagram of the grinder.
- Unplug the instrument.
- Prepare a work area on a table with good lighting.
- Record on paper the order of disassembling the instrument differently from the photo in order to reassemble it correctly after repair.
If you are unsure of your own abilities, then it is better to take the tool to a workshop.
Damaged cord and button are replaced. On the button, unscrew the bolts securing the incoming and outgoing wires. Disconnect it from the circuit and install a new one.
If only the triac on the control board has failed, then a new one must be installed in its place. Lubricate the iron part of the element with thermal paste in advance. If other elements of the board are burned out, then replace it one hundred percent.
Brushes need to be inspected from time to time. If one is worn by 40%, replace both. Also clean the brush holders.
READ How to Connect a Regulator to a Grinder
For high-quality winding of coils, enamel wire and electrical cardboard are required.
Remove the winding and old insulation from the housing. Take a close look at the grooves. When the coils burn, the insulation is burned and a short circuit occurs to the housing. There are deposits left here that must be removed with a needle file or diamond bur. The deposits will interfere with the new winding. It may tear.
The winding is impregnated with varnish. To disconnect the wires and count them, you need to burn out the insulation. Heat the winding with a factory-made hairdryer or any burner.
Angle grinder BOSCH PWS 700-125 /REVIEW/Climbing into the gearbox
Use a match or lighter to burn any wires so that the enamel completely falls out. Take a micrometer and measure the thickness. Record the diameter of the wire and the number of turns.
Take any wire and make a loop out of it so that it fits in the grooves of the stator. Select a cylinder for winding the turns to match the diameter of this loop. For example, an aerosol can. If its diameter is not enough, then wrap the can with paper.
Wind both windings from enamel wire. Secure the frontal parts with glass tape or thick thread. The thread should not tear or melt. Place heat shrink tape over the free ends.
Make sleeves from electrical cardboard and stick them into the grooves. Place windings on them.
Check the resistance in the windings with a tester. If everything is fine, continue.
To prevent the wires from vibrating or rubbing against each other during operation, they need to be impregnated with at least some oil-based varnish. Place the starter heated in the oven vertically and use a syringe to squeeze the varnish onto the winding. When the varnish begins to flow out from below, turn the stator over and impregnate it additionally.
When the varnish is dry, start connecting the windings. Connect the two ends of the different windings together and connect to the nearest brush. Connect the other two connected ends to the start button. Also connect the wire from the 2nd brush to the button.
If the balancing is off, the anchor must be replaced. The winding and commutator are subject to repair. Small short circuits are eliminated. If a significant part of the winding is damaged, there is an option to rewind it.
A poorly developed collector can be corrected by grooving. If the records have worn down to the plastic base or are partially burnt out, then restoration is done by soldering or galvanic build-up.
Very damaged collector
If the collector was one hundred percent worn out, then after soldering it will last for less than the next month of active use. And not completely damaged plates after such repairs can withstand several replacements of brushes and do not even get desoldered. It is necessary to cut the copper plates to size and solder them with a huge amount of solder. Grind off the excess with ratfil and sand it.
When electroplated, reduced copper is very hard. The service life of the collector is like a new one.
One hundred percent refurbished manifold
Galvanic extension is an option to return both a completely erased collector and partially damaged plates. The restored collector needs to be sharpened and the plates divided using a drill or a hacksaw blade.
To rewind the anchor correctly, you need to disassemble
and remove the characteristics for the template:
- Winding direction.
- How many grooves and slats.
- Number of conductors in the slot.
- The winding pitch, in other words, how many grooves there are between the grooves of one section. For example, if the conductors leave the first slot and enter the 6th, then step = 5.
- The number of conductors that fit into one groove equals the number of coils in one section.
- Wire thickness.
For example, 80 conductors in a slot, 12 lamellas and 24 slots. 12 sections of 4 coils. Winding takes place in two circles, so we divide the 80 conductors in the groove by 2.7, and another by 3.5, because there are 2 coils. We get 20 turns of one coil.
- Solder the beginning of the wire to lamella 1 and pass it through the 1st and 6th grooves. We make 20 turns. The 1st coil of the first section is ready.
- We solder the wire onto lamellas 2 and repeat winding through the same grooves. The second coil of the first section is ready.
- We solder the wire onto lamellas 3. Pass a turn through the 2nd and seventh groove. We wind the first coil of the 2nd section and solder the wire onto the lamellas 4.
- We fix the second coil of the 2nd section on lamella 5.
READ How to Install a Disk on a Grinder Video
How to remove the old one and wind the new winding:
Bosch GWS 22-230 JH (Brain grinder 230) Which grinder to choose \ Large grinder with soft start
Use a hacksaw or wire cutters to remove the frontal parts of the winding.
Carefully, without damaging the slot insulators, knock out the rods of the remaining parts of the winding using a hammer and an iron chisel.
Use a file to remove any remaining impregnation. Count the conductors in the groove and determine the wire diameter. Draw a diagram. Cut cardboard sleeves for insulation and stick them into the grooves.
After winding, weld the section leads to the collector plates. Check the winding with a tester.
Impregnate the winding with epoxy.
Bearings fall apart or become jammed over time. They need to be changed.
- Disassemble the grinder, remove the armature from the stator.
- The armature is inserted into the gearbox housing by a bearing. If the housing cannot be removed, secure the rotor in a vice and tap the gearbox housing with a wooden block.
The gearbox has to be disassembled not only for repairs, but also for preventative cleaning and lubrication.
- Unscrew the bolts and disassemble the gearbox housing. You may see stained grease that needs to be removed.
the ancient lubricant will flow out with its use. Clean the parts with a rag or toilet paper. Wash the body and parts with kerosene.
Apply the latest lubricant recommended by the manufacturer in the instructions for the tool.
If the button has fallen off, then you cannot work with such an angle grinder.
Because the spindle can spontaneously fall onto the gear and block it during operation.
The fixation block consists of a spindle with a rubber ring, a spring and a plastic button.
- To change the button, disassemble the gearbox.
- Remove the spindle from the housing.
- Place the spring on the button from the inside.
- Insert the spindle into the gear housing from the inside, and the button from the outside. Press until you hear a click.
- Assemble the gearbox.
To make the grinder work for a long time, follow the rules:
- Check the integrity of the insulation of the wire and plug. Don't remove your protection.
Lubricate and clean the entire tool.
After turning off the grinder, wait until the circle stops rotating, then place it on the ground. When the engine stops, the tool, through the ventilation holes, sucks in together with the air flow particles of earth and other hard fractions that hit the motor windings. For some reason, a break or short circuit occurs.
is 180 mm, do not put more than 200 mm there. The more it’s not just a circle, the lower the revolutions are. You will have to remove the protection, and the speed will be exceeded. Vibrations and vibrations will increase. And so the circle will fall apart. This is fraught not only with serious injuries. The gearbox bearing breaks and the gears wear out.
If you use an angle grinder intensively, it means you are a good master. It is very easy for you to understand the structure of the tool and repair it yourself. First, find the fault and determine which components need to be checked. Repair the angle grinder carefully, without haste, so that a small breakdown does not turn into a major one.
Source
Possible electrical problems
Malfunctions in the electrical part of a Bosch sander can be divided into simple and complex.
Simple malfunctions in the electrical part of the Bosch coffee grinder
If you turn on the grinder and it refuses to work, start looking for a broken power cord. The most common wire break occurs at the entrance to the grinder or plug. Do not twist; this will cause a short circuit in the tool.
To determine this problem, open the shredder handle covers. On Bosch sanders up to 1000 W, the cover is secured with one screw at the end. For Bosch sanders with power over 1000 W, the handle cover is secured with several screws.
Use the tester to call the power circuits from the input plug pos. 5, to the switch. With the entire circuit complete, start checking the operation of the switch. Bosch shredders use simple switches operated by a switch lever.
But the electrical contacts of the switch burn out and cause the chopper to break down. It is not recommended to restore the contacts of the plastic switch; it is necessary to replace it with a new one.
If the switch is not damaged, use a tester to check for continuity from each plug connector to each carbon brush. For complete chains, the chopper must be turned on. If it does not rotate, the problem is mechanical. Gears may jam or bearings may break.
Engine check
If your Bulgarian Bosch is gaining momentum, the spark begins to heat up regardless of you, you need to pay attention to the integrity of the rotor and stator windings.
A spontaneous set of ear revolutions indicates a malfunction of the stator windings. The integrity of the windings is checked by a tester, and a short circuit between the turns is checked by a special device.
How to determine whether a rotor is faulty
Rotor repair. A complex process accessible to skilled craftsmen.
Rotor failure is indicated by a drop in engine speed and the appearance of a long shiny mark on one of the brushes. This is the first sign of a short circuit in the turns of the armature winding.
READ How to Disassemble a Hammer Gearbox
It is advisable to repair the rotor in special workshops. And you can rewind it yourself if you decide to fix your Bosch sander yourself.
The dark color of the rotor winding and burnt commutator plates indicate a short circuit in the rotor circuits. The malfunction can only be eliminated by replacing a new rotor.
Stator repair
Repair of Bosch angle grinders includes stator restoration. The main symptom of stator failure is an involuntary increase in chopper speed that cannot be reduced by adjustments. The burned stator winding changes color and becomes darker. The stator core also darkens from high temperatures.
The stator is easier to rewind, although certain rules and sequences must be followed.
If you have removed the stator housing cover, carefully check the condition of the carbon brushes and rotor commutator blades.
The length of carbon brushes must be at least 8 mm. By the way, Bosch grinders use carbon brushes with “shot”. A device that prevents the grinder from operating at a minimum carbon brush length.
The collector strips must be free of deposits and wear. Sludge is easily removed with cotton wool soaked in alcohol.
Stator overheating and rotor short circuit
Speed control errors
Speed controllers are installed in Bosch series grinding machines, especially at low power. The speed controller can be accessed by opening the stator housing handle, which is held on one end of a screw.
The speed range of the controller can be set using a potentiometer hidden on the control panel.
The defective regulator is quite easy to remove, since it is mounted only on the rail.
Osmosis regulator repair. A complex process, the implementation of which requires not only special knowledge, but also tools and equipment.
If the cruise control does not work, but you do not have a new one, unplug the power cord and install a jumper.
Red indicates that the jumper is set when the cruise control fails.
Possible electrical faults
Malfunctions of the electrical part of a Bosch angle grinder can be divided into simple and complex.
Simple malfunctions of the electrical part of the Bosch angle grinder
If you turn on the angle grinder and it refuses to work, start looking for the problem with a broken power supply wire. Most often, a wire break appears at the entry point into the angle grinder or into the plug. Avoid twisting, as this will cause a short circuit in the tool.
To determine such a malfunction, it is necessary to open the covers of the grinder handle. In Bosch angle grinders up to 1000 W, the lid is secured with one screw at the end. For Bosch angle grinders over 1000 W, the handle cover is secured with several screws.
Using a tester, test the power circuit from the input plug pos. 5 to the switch. If the circuit is intact, proceed to check the operation of the switch. Bosch angle grinders use simple switches controlled by a power lever.
But the electrical contacts of the switch burn out and cause the grinder to fail. It is not practical to restore the contacts of the plastic switch; it must be replaced with a new one.
If the switch is intact, use a tester to check the presence of a circuit from each pin of the plug to each carbon brush. If the circuits are intact, the angle grinder should turn on. If it does not rotate, then there is a mechanical fault. Gears may jam or bearings may be damaged.
Checking the electric motor
If your Bosch grinder picks up speed regardless of you, starts to get very hot and sparks, you need to pay attention to the integrity of the rotor and stator windings.
An involuntary increase in engine speed indicates a malfunction of the stator windings. The integrity of the windings is checked with a tester, and a short circuit between the turns is checked with a special device.
How to determine whether a rotor is faulty
Rotor repair is a complex technological process accessible to skilled craftsmen.
Mechanical damage
The Bosch angle grinder is designed for cutting, grinding, polishing. Operating a tool in dust under high loads has a particularly negative effect on the durability of the gearbox, namely its gears.
In addition to gear tooth wear, mechanical failures include bearing and housing failure. It is not difficult to repair a Bosch grinder in terms of replacing faulty bearings and rebuilding the housing, if desired and necessary.
Assembly and grinding machine
Assembling a grinding machine begins with checking all parts, assemblies, bearings, and gears.
Pre-prepare the workplace in proper and good lighting, place tools, oils, napkins.
What oil to use for a Bosch grinder
A Bosch ear repair won't be of good quality if you don't change the oil while it's running. To properly lubricate the components of a Bosch grinder, it is recommended to use lubricants offered by the tool manufacturer. But their high price forces them to look for another way, and there is one.
Domestic lubricant manufacturers have developed special lubricants for gearboxes and grinding units.
They are not inferior in quality to foreign oils, but are much cheaper. The only downside is that our lubricants need to be changed more often.
Rotor assembly
Assembling the rotor consists of installing bearings on it and installing the impeller. The lubricated bearings are pressed against the shaft by a wooden extension. The bearing near the collector is covered with rubber protection. This is the general algorithm for assembling the rotor shaft.
Some models of Bosch grinding machines have their own characteristics.
Gear
Assembling the gearbox begins with installing the rotor shaft into its housing. Once the shaft is inserted into the housing, the drive, washer, and locknut are placed on the shaft. The gearbox housing with the inserted shaft must be located in the stator housing.
Insert the commutator bearing into the socket, press the gear housing against the stator housing. Check the ease of rotation of the rotor in the bearings.
The spindle assembly with installed bearing and gear is installed in the gear housing cover.
All that remains is to insert the cover into place and check the quality of rotation of the spindle shaft. If the shaft rotates easily by hand, it is possible to tighten the screws securing the rotor housing cover. The screws are pre-lubricated with sealant.
This is a general algorithm for composing programs. For some models, Bosch grinding gear repair is slightly different.
Conclusions:
- Knowing the general layout of Bosch grinders, you can safely begin disassembling the lubrication tool;
- The ability to repair Bosch grinding machines with your own hands will extend the life of the tool, replace the oil and carbon brushes yourself;
- By adhering to the operating mode and technological maintenance of the tool, you will continue its uninterrupted operation for many years.
Source
Do-it-yourself Bosch grinder disassembly
For the owner of a power tool, knowledge of its structure and the ability to disassemble it is a mandatory task.
Knowing the procedure for disassembling an angle grinder allows you to independently carry out work such as changing grease, changing bearings and carbon brushes.
To disconnect the gearbox housing pos. 821 from the stator housing pos. 888, you need to disassemble (remove) the body of the grinder handle pos. 24.
This operation must be performed to remove the carbon brushes pos. 810 holding the rotor commutator.
At the second stage, unscrew 4 (four) screws, pos. 61, securing the gearbox and stator housings.
Having pulled out the rotor together with the gearbox, begin disassembling the gearbox.
Repair of a Bosch angle grinder begins with disassembling the gearbox pos. 821. Disassembling the gearbox begins with unscrewing 4 (four) screws, pos. 60. As a rule, the screws are screwed in with sealant at the factory. You will have to make some effort.
Let's note it right away! Low-power Bosch angle grinders use spur gears in the gearbox. Grinders with a power of over 1000 W use helical gears in their gearboxes.
How to remove the driven gear
By removing the gearbox cover, you can get the helical gear assembly, pos. 26.
To remove the gear, you need to use a press or puller. But using a puller is difficult because it requires the use of special thin jaws.
Before removing the helical gear, check the backlash of the gear connection, the integrity of the teeth, and the contact patch.
A bearing, pos. 50, is pressed onto the spindle shaft, pos. 26. If the bearing has a lot of play, is noisy when turning, or the lubricant has dried out, it is preferable to replace it.
To remove the bearing, you need to remove the gear, retaining ring and dismantle the bearing. If, when dismantling the rotor shaft assembly, the bearing remains in the gearbox housing, dismantling the bearing is carried out using a hammer and a soft tool.
How to remove the drive gear of a Bosch angle grinder
The drive gear pos. 27 is removed from the rotor shaft in the following sequence:
- Hold the rotor with your hand and, using an open-end wrench, unscrew the nut pos. 45 counterclockwise;
- remove the washer pos. 59.;
- pull out the drive helical gear pos.27.
Visually check the integrity of the gear teeth and contact patch.
If the gears are heavily worn (licked), or there are chipped teeth, they must be replaced. Moreover, gears are always replaced in pairs.
Low-power Bosch angle grinders use a needle bearing as a support bearing in the gearbox.
Repair your Bosch earmachine guns with your own hands, strictly follow the included instructions. If you need to remove a needle bearing from its housing, some quick thinking is required. Its dismantling is carried out only when destroyed.
To remove a damaged bearing race, you can use a proven method.
Select a tap with a diameter slightly larger than the inner diameter of the damaged needle bearing race
The tap is secured in the screwdriver chuck and carefully screwed into the holder at low speeds. When the tap reaches the bottom of the gear housing, it will begin to lift the cage
In addition to the needle bearing of the spindle shaft, Bosch angle grinders use two more bearings mounted on the rotor shaft.
How to remove bearings from the rotor of a Bosch angle grinder
To remove bearings from the rotor pos. 803 of a Bosch angle grinder, it is recommended to use pullers.
Bearing pos. 15 near the manifold can be easily removed, but removing bearing pos. 14 from the impeller side is complicated by the fact that a number of preparatory operations must be performed.
Bearing pos. 15 is closed with a soft rubber seat. A similar rubber protection, pos. 33, also covers the bearing, pos. 14.
To dismantle the bearing pos. 14, you need to unscrew the nut pos. 45, remove the spur gear pos. 17 and the plastic protection pos. 33. Using a puller, you can easily remove the bearing from the rotor shaft.
What if there is no puller? A vice, two metal strips and a hammer with a soft metal attachment will come to the rescue.
Disassembling a Bosch grinder