Replacing an angle grinder bearing at home
03/13/2019 mr.Podshipnik 0 Comment
HOME »
- Power tools » Replacing grinder bearings
»
From this article you can learn how to replace the bearing of an angle grinder yourself.
A very common household tool is an angle grinder, technically correctly called an angle grinder. Sometimes breakdowns occur as a result of excessive load, or parts fail due to prolonged use.
What are the reasons why an angle grinder fails?
The grinder has a mechanism that bears the heaviest load - the rotor. It is also called an anchor. The damage it suffers is varied. These include temperature loads, electromagnetic, and, of course, mechanical problems.
As a result, do not be surprised that the angle grinder does not work precisely because the rotor is faulty. The armature winding overheats and burns out, this will cause a short circuit. So many owners of this tool often carry out all repair work themselves.
A worn commutator causes increased vibration in parts such as brushes. They burn, causing the mechanism to spark strongly. The main function of such brushes is to transmit current to the commutator.
The bearings in the rotor wear out very often. If you do not carry out timely diagnostics and prevention of bearings, they are completely destroyed. If during operation of the angle grinder you hear a noise that was not there before, be sure to check the condition of the bearings.
The stator is a stationary component in an electric motor; it contains a winding. The angle grinder very rarely breaks directly because of the stator.
The gearbox is responsible for rotating the gear. It needs to be cleaned and lubricated on time.
Most often, brushes are changed in a grinding machine, because the basis for their manufacture is graphite. Replacing these parts is not difficult.
Possible electrical faults
Malfunctions of the electrical part of a Bosch angle grinder can be divided into simple and complex.
Simple malfunctions of the electrical part of the Bosch angle grinder
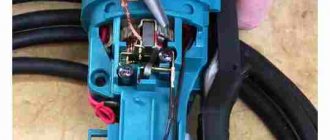
If you turn on the angle grinder and it refuses to work, start looking for the problem with a broken power supply wire. Most often, a wire break appears at the entry point into the angle grinder or into the plug. Avoid twisting, as this will cause a short circuit in the tool.
To determine such a malfunction, it is necessary to open the covers of the grinder handle. In Bosch angle grinders up to 1000 W, the lid is secured with one screw at the end. For Bosch angle grinders over 1000 W, the handle cover is secured with several screws.
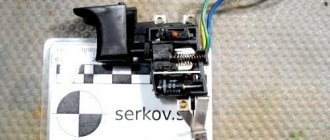
Using a tester, test the power circuit from the input plug pos. 5 to the switch. If the circuit is intact, proceed to check the operation of the switch. Bosch angle grinders use simple switches controlled by a power lever.
But the electrical contacts of the switch burn out and cause the grinder to fail. It is not practical to restore the contacts of the plastic switch; it must be replaced with a new one.
If the switch is intact, use a tester to check the presence of a circuit from each pin of the plug to each carbon brush. If the circuits are intact, the angle grinder should turn on. If it does not rotate, then there is a mechanical fault. Gears may jam or bearings may be damaged.
Checking the electric motor
If your Bosch grinder picks up speed regardless of you, starts to get very hot and sparks, you need to pay attention to the integrity of the rotor and stator windings.
An involuntary increase in engine speed indicates a malfunction of the stator windings. The integrity of the windings is checked with a tester, and a short circuit between the turns is checked with a special device.
How to determine whether a rotor is faulty
Rotor repair is a complex technological process accessible to skilled craftsmen.
A rotor malfunction is indicated by a drop in engine speed and the appearance of a long sparkling trail on one of the brushes. This is the first sign of a short circuit in the armature winding turns.
It is preferable to carry out rotor repairs in special workshops. Or you can rewind it yourself if you decide to repair the Bosch angle grinder yourself.
The dark color of the rotor winding and burnt commutator lamellas indicate a short circuit in the rotor circuits. The malfunction can only be eliminated by replacing it with a new rotor.
Stator repair
Repair of a Bosch angle grinder includes restoration of the stator. The main sign of stator failure is a spontaneous increase in the speed of a working angle grinder, which cannot be reduced by adjustments. The burnt stator winding changes color and becomes darker. The stator core also darkens due to high temperature.
It is easier to rewind the stator, although here you must follow certain rules and sequence.
If you have removed the stator housing cover, carefully inspect the condition of the carbon brushes and lamellas of the rotor commutator.
The length of carbon brushes should not be less than 8 mm. By the way, Bosch angle grinders use carbon brushes with a “shot”, a device that stops the operation of the angle grinder when the carbon brush is at a minimum length.
The collector lamellas should not show signs of carbon deposits or wear. Carbon deposits are easily removed with cotton wool soaked in alcohol.
Stator overheating and rotor short circuit
Speed controller malfunctions
Bosch series angle grinders, especially low-power ones, have speed controllers. Access to the speed controller is achieved by opening the handle of the stator housing, which is held on by one end screw.
The speed range of the regulator can be set using a potentiometer hidden in the handle panel.
The faulty regulator is quite easy to remove, since it is attached only to the guide.
Repairing an angle grinder speed controller is a complex process, the implementation of which requires not only special knowledge, but also tools and equipment.
If the speed controller is faulty and there is no new one, then disconnect the supply wires and install a jumper.
The jumper that is installed when the speed controller fails is shown in red.
Tools necessary for repairing and replacing defective parts
For high-quality and effective repair of an angle grinder, you will need the simplest tools that almost every thrifty owner has.
Having a screwdriver will make disassembling the angle grinder much easier. But, in its absence, you can easily get by with just different screwdrivers. It is desirable that they have a ratcheting mechanism.
To remove the nut that secures the drive helical gear, you will need a wrench called an open-end wrench.
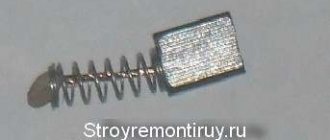
To dismantle the bearing, you cannot do without a special puller.
Perform diagnostics of the electrical component of the device being repaired using a tester. There is also a special device that detects short circuit of turns. This device is very convenient, since you can diagnose a breakdown in the stator or rotor without having to remove the unit.
Be sure to have a diagram of the grinding machine. Knowing the location of the main components will greatly facilitate the disassembly of the mechanism, repair, or replacement of unusable parts.
What repairs can a user make to an angle grinder with his own hands?
Although the grinder is not a particularly complex tool, the user cannot perform repair work on all components.
Along with simply replacing the bearings or gears of the gearbox, there are malfunctions that cannot be made without special equipment or devices.
- To press out the driven gear you will need a press. It will not be possible to wind the rotor without tools.
- Such malfunctions include rotor failure. For the average consumer, such a malfunction ends with a trip to the service center.
- Advanced users can revive a burnt out rotor with certain skills and concepts. But sometimes it’s easier to buy a new one than to rewind.
For most users, repairing an angle grinder with your own hands is limited to a certain range of faults.
How to disassemble an angle grinder and remove bearings. Step by step steps
After disassembling this device, you can replace broken bearings, re-lubricate all parts, dismantle damaged brushes and install new ones.
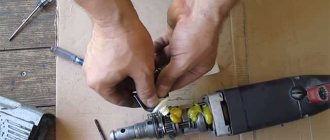
In order to separate the rotor and stator housings, it is necessary to first remove the handle housing in the machine. This is done so that it is possible to remove the carbon brushes. They hold the rotary manifold.
The second step is to unscrew the four screws that secure both housings - rotor and stator.
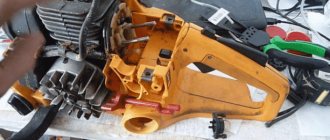
Take out the gearbox along with the starter and start disassembling it. There are also screws on the gearbox that need to be removed. There are four of them in total. This procedure will require some effort on your part, since the factory assembly involves the use of sealant.
Grinders of different models have different types of gears. In low-power models, spur gears are used. With a power of more than a thousand watts - the use of helical gears.
Once you remove the gear cover, you will be able to remove the assembly that houses the helical gear. To remove it, use a press or puller.
To do this, you will have to use special thin tubes. For this reason, it will be inconvenient to use the puller.
Before removing the gear, it is necessary to check the play in the gear connection. Also check that all teeth are intact. And the contact patch is checked.
If you have identified the following signs in a bearing that is located on the spindle shaft:
- when you scroll it, a characteristic noise is heard;
- noticed the appearance of backlash;
- no lubrication.
If all these signs are present, it is necessary to replace the old part with a new one. To do this, the bearing must be removed. How to do it?
First of all, remove the gear along with the retaining ring. After this, you can easily remove the worn element. When you remove the rotor shaft assembly, the bearing may remain in the gearbox, inside the housing. In this case, use a hammer with a soft tip on top.
To remove the drive gear in an angle grinder, do the following:
- clamp the rotor, unscrew the nut with an open-end wrench;
- the washer is removed;
- Now take out the gear itself.
After checking the appearance of the gear, decide whether this part needs to be replaced. Keep in mind that both gears need to be changed at the same time.
Low-power angle grinders are equipped with a needle bearing, which serves as a support bearing.
Dismantle this part only when it is completely destroyed. There is a proven way to remove a destroyed clip.
1.Choose a tap diameter larger than the inner diameter of the cage.
2.Place and secure it into the screwdriver chuck. Gradually, at low speeds, tighten it into the cage. When the tap hits the housing bottom in the gearbox, the cage will rise.
The rotor shaft has two more bearings, in addition to needle bearings. To remove them from the rotor, I would recommend using a puller.
The bearing attached to the manifold is fairly easy to remove. The impeller is also equipped with a bearing, which will take a little more time and skill to remove. Both bearings are covered for protection with special rubber caps.
To remove and replace these parts, the nuts are unscrewed, the spur gear is removed, as well as the plastic protection. You can now freely remove the bearing from the rotor shaft using a puller.
If you don't have a puller in your tool kit, there is one method, take note of it. Remove the bearing with a vice along with two metal strips and a hammer with a special metal attachment.
Replacing bearings on an angle grinder. Replacement of bearings angular polishers.
Replacement considered
all
bearings
in
the grinder
, with disassembly and reassembly I tried to maximize the income
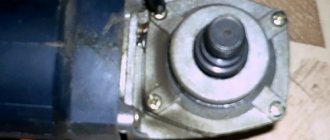
The grinder gearbox is easy to disassemble. To disconnect the gearbox housing, pos. 3, from the stator housing, pos. 37, the carbon brushes must be released.
Unscrew the four screws, item 1, securing the gearbox housing and stator housing. Separate the gearbox housing and the stator housing. The gearbox housing will be disconnected together with the rotor, pos. 8.
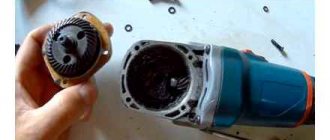
To remove the gearbox cover pos. 23, you need to unscrew the four screws pos. 24. The driven helical gear pos. 33 is fixed on the spindle shaft pos. 26 using a key pos. 25 and is driven off with a puller. Bearing pos. 21 is removed with a puller.
Assembling the tool with new parts
After disassembling the instrument and necessary replacement of all damaged parts, we will reassemble it. Make sure you have all the tools, lubricants, and clean rags on hand for finishing touches.
All previous grease must be removed and replaced with fresh grease. Use lubricants from trusted manufacturers, buy them in specialized stores.
First of all, you need to assemble the rotor. You need to press in the bearings and install the impeller. Before doing this, carefully lubricate the bearings. Using a wooden tool, press them onto the top of the shaft.
Cover the collector bearing with rubber protection. This is the same diagram of how to assemble a rotor shaft.
Next, we reassemble the gearbox. We begin this process by installing the gearbox on the rotor shaft housing. When the shaft is already inside the housing, place the drive gear on it, then the washer and fixing nut.
Now install the gear housing, together with the shaft located in it, inside the stator housing. It is necessary to press both housings after the commutator bearing is already in the seat. Next, check whether the rotor rotates easily on the bearings.
The final step is to place the lid back where it was. Check how the spindle shaft rotates. If you determine that the rotation is easy even with the movement of your hands, you can start tightening the screws. They secure the cover to the body. Before doing this, lubricate all screws using sealant.
How to change
Regardless of the models of grinding machines, the method of replacing bearings is not much different from each other. Associated correction technology with design features that each brand has.
Bosch
The following video describes replacing gearbox bearings for one of the Bosch models , which has a lot of play on the spindle. Here, the main effector that creates the extrusion/extrusion forces is conventional presses . The use of various stretchers in the form of pipes of the appropriate size and other similar parts allows you to transfer forces to the right place by moving the jaws of the vice. Some operations are ongoing. Using stretch marks and light hammer blows.
READ How to Remove a Bearing from a Grinder Anchor
The design feature is the following plastic flange . To press/press the flange bearing, the author removed the plastic that was interfering with the process using a knife and a torch. Perhaps, if you have lathe skills, just cut this material on a lathe.
Makita
One Makita model describes the process of replacing a bearing without special tools , any means available. Used hardwood blocks are used as base surfaces , which can withstand the load when performing various technological operations using force.
The tool used is appropriate thickness of metal sheets and socket heads (suitable pipes can be used) when knocking out the bearings. The center holes of the shaft provide the basis for a pointed rod (in the video it's a modified old screwdriver) that releases the shaft itself. The only tool for industrial production is a ring stripper , although without it you can figure out how to remove them using improvised means.
Interskol
Some designs of bearing units are made without any obstacles . So, for example, in the following video, the spherical bearing of the gear housing cover of the Interskol model is assembled into a supporting structure with a washer , secured using threaded connections. For a better fit to the plane of the body, the surface of the washer is coated with glue.
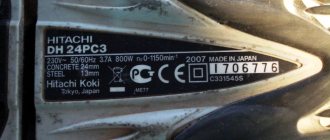
Hitachi
Some designs of bearing assemblies, at first glance, exclude the replacement of the bearing itself , the entrance to such an assembly. However, the author of the following video has found a way to do this in one of the Hitachi models and thus save a decent amount of money using the proposed method.
To secure the bearing assembly in the drill, a crown appeared on the bracket, one of its outer diameters fits tightly to the inner surface of which. Using a working drill, the plastic is removed with a sharp object the size of the outer ring of the bearing. Thus, nothing prevents you from removing the bearing with a hammer and an extension.
Next, when installing a new bearing, a ring is inserted instead of the used plastic (in the video, this is most likely made of caprolon or other similar material). Since the ring in the video has a wall thickness that does not allow the gear to be assembled to specifications, its internal diameter is refined to the desired size using a chisel.
Sparkling
In the following video, one of the Sparky sander models malfunctioned. To determine the cause of the malfunction, the author completely disassembled the grinder , washed and cleaned all parts. The details of the disassembly process did not stop in this video. This technological operation can be viewed in the article under the link “How to disassemble a gearbox.”
Disassembling an angle grinder for prevention
I would recommend disassembling your sander not only for repairs and replacement of worn parts, but also for regular maintenance. This will significantly extend the operating time of the electrical device. Any mechanism works longer and better if it is properly cared for. The Bulgarian is no exception.
Disassemble the tool as described in this article. Only now you are doing this not for repairs, but in order to thoroughly clean and lubricate such a necessary tool in the household.
The most ideal option for cleaning is to use compressed air and a blower attachment in compressors. You will have to take into account that the angle grinder is cooled through the distance in the middle of the armature and stator.
Excessive amount of construction dust, various particles on the engine. All this needs to be cleaned from time to time.
And if you have already disassembled the angle grinder for prevention, apply fresh lubricant to the parts, as described earlier.
As you can see, maintaining and repairing an angle grinder is not such a difficult task!