Tools
A hammer drill is an indispensable assistant for any type of repair work. But, like everything under this sun, it is not eternal. Sooner or later you have to deal with its maintenance and repair. And the more carefully you treat it, the longer it will last.
For example, your hammer drill has lost power. What could this mean? Is the instrument expected to be repaired or has “its time come”? In most cases, there’s nothing wrong, most likely, it’s just time to replace the brushes in the hammer drill.
When is replacement necessary?
Typically, the service life of brushes in household rotary hammers is designed, according to the manufacturer, for 70 - 120 hours of operation. But it is unlikely that the owner of a hammer drill will keep track of the time the tool is used. In this regard, it is worth noting the convenience of such a function as a brush wear indicator for a Makita . In addition, there is a tool with an automatic shutdown system when wear is exceeded.
But even if you don’t have such a top-end model, there are signs by which you can determine increased wear on the brushes. These include:
- — increased sparking in the collector area;
- — a significant loss of power of the hammer drill, the engine does not develop speed at full power.
If something like this is observed, it’s time to look at the condition of the brushes and commutator.
Note. Usually, for long-term use of the tool, the brushes need to be replaced when their height decreases from the nominal height by 1/3 (about 8mm).
If, after removing the brushes from the brush holder, you observe wear, both brushes must be changed, even if the wear is not uniform. When replacing brushes, it is strongly recommended to clean the commutator of graphite dust and carbon deposits. The collector can be cleaned with gasoline (preferably for lighters, its quality is higher) or ethyl alcohol. When replacing the brush, be sure to grind it into the commutator - this will reduce the electric arc (sparking), which will have a beneficial effect on both the commutator and engine power. Grinding is carried out with soft sandpaper attached to the commutator. When the armature rotates, the sandpaper smoothes out the roughness of the new brushes.
Another important nuance when replacing brushes is the degree of hardness of both the brushes and the commutator. If you put soft (carbon) brushes on a hard commutator, it will quickly wear off. Therefore, it is important to use branded brushes from the tool manufacturer for replacement.
When replacing, you should also pay attention to the brush holder assembly itself. It consists of a profile, a clamping device and a contact group. At the same time, pay attention to the condition of the spring of the clamping device; if you suspect serviceability and reliability, it is better to replace it with a new one. Fortunately, it is not expensive. For example, if the spring is weakened, it will not fit tightly enough to the commutator, which will cause increased sparking. And this in turn leads to premature wear of the collector plates. And if it comes off, it will have time to do a lot of damage to the electric motor to properly repair the instrument.
By the way, if only one brush
– the stator may have burned out. This is easy to determine; it is important to have a device to measure resistance. The stator has two windings, with an average resistance of 4 ohms each. If the resistance of both windings is the same, the stator is intact.
The replacement process itself is not worth describing, it is easy and the design of most rotary hammers allows for quick and easy replacement of brushes like a Bosch rotary hammer or any other, as can be seen in the video at the end of the review. Look for a special window on the case; it is usually closed with a plastic cover.
Replacing brushes: do it yourself or at a service center?
The easiest option is to take it to a specialist service center, such as replacing Hitachi hammer drill brushes, but not the cheapest.
Advantages of replacement at a service center:
- — quality, if in an authorized service center;
- — original brushes, also if the center is authorized;
- — maintaining the warranty on the tool if its period has not expired;
- — as a rule, a full inspection of all “vital” components of the instrument is carried out, including cleaning and lubrication.
There are also disadvantages: you will have to wait and if this is not warranty work, you will have to pay. In addition, the service is not always close…
There is another way - with your own hands. For example, replacing the brushes of a Skil hammer drill is not difficult, but...
Note. “Attempts to repair the instrument yourself, outside of an authorized service center. Unconditional signs include: broken warranty seals, creases on the splined parts of fastening screws, body parts, etc.” excerpt from the instructions for the hammer drill.
READ Which is Better Makita Or Bosch
If the tool is under warranty, it is better to take it to a service center. You can do everything right, but who can guarantee that nothing in the hammer drill will fail? And you will have to repair it at your own expense. But, this is just a warning, in order not to open the tool before the end of the warranty period; usually in high-quality models with moderate use, the brushes require replacement after the expiration of the period.
What are the advantages of replacing it yourself:
- — speed, the tool is at hand and ready to work;
- - cheaper, you save on the services of masters;
- — You don’t wait for the tool to break, its condition is always under control, you just need to look inside;
- — increasing the level of skill, including the maintenance of power tools.
The disadvantages, perhaps, include the following:
- — there are no guarantees of work performed;
- — there may be a problem with original spare parts;
- - fear of ruining something, and this is the loss of nerve cells.
In fact, replacing brushes is an easy and quick procedure, and, as a rule, brushes for a hammer drill come with the tool.
How to repair a cordless screwdriver
Cordless screwdrivers are also very sensitive to battery wear. This happens over time, even with proper use. If you do not follow the operating instructions, the battery will stop charging very quickly. And in this situation, there are two ways: buy a new battery or try to fix the Makita screwdriver battery with your own hands.
READ Is it possible to cut tempered glass?
The second option will require a certain amount of time and effort, and special elements are also required.
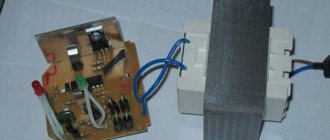
The battery screwdriver is a set of several special food cans that are soldered to the charge controller and have a solid structure.
Suitable nutrients can be found in food banks or notebooks. There are such banks in some quantities. Laptops typically use 6 cans, and cans. 4. But their number may vary and depends on the battery capacity.
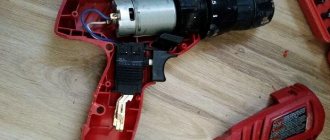
Disassembling the battery
First of all, you need to disassemble the Makita screwdriver battery. To do this, disconnect it from the screwdriver, and then unscrew all the screws from it. The battery compartment will open and you will be able to see the design of the cell itself. There will be 10 soldered cans soldered to the power controller.
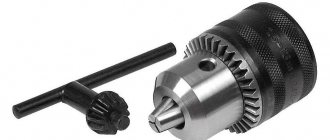
It is necessary to disconnect the cans from the board. For this, a drill with a special attachment is used.
Disconnecting cans from the board
Using a drill with a disc attachment, the cans are cut from the board. The connections of each contact to the controller are removed sequentially, and the elements are disconnected from the common frame.
This should be done fairly carefully so as not to damage the board itself, but it is quite difficult to turn it off completely.
Soldering new cans
Immediately after freeing the frame and board from the old batteries, you can attach new ones to them. Before soldering, it is recommended to thoroughly clean the surfaces on the cans and the board from remnants of previous soldering. This will ensure better long-term contacts.
Now all new cans from other devices are placed in appropriate places on the frame and, in turn, are soldered to the power controller. It is recommended to do this using a thick soldering iron tip, as a lot of solder is required. The contact must be very reliable and have a large contact area.
After sequential assembly, it is recommended to wrap the entire structure in special paper and put it back in the case. The battery is then assembled and sealed with a screw cap.
Before use, the battery must be charged at a special station to full capacity and only then connected to a screwdriver for testing. If everything is done correctly, the battery will start working again.
Replacement cells can be obtained from other batteries or purchased separately. The cost for them is quite decent, but still manual replacement will be much cheaper than buying a new battery.
Procedure for identifying electrical faults
Makita HR 2470 disease \ Rotary hammer 2470 stopped turning on \ Contacts burned \ maintenance tool
Determining the integrity of the electrical part of the Makita rotary hammer. In order to repair a Makita 2450 or Makita 2470 rotary hammer with your own hands, you need to arm yourself with devices and tools. Any tester, a set of screwdrivers, keys, a hammer, or a wooden adapter will do. It's good to have a screwdriver with a built-in phase indicator.
You need to take the tester, connect to the ends of the hammer drill plug and press the hammer drill switch. If the tester shows some resistance, then the power supply circuit of the hammer drill is intact.
If the tester shows infinity, then the integrity of the circuit is broken and it is necessary to remove the back cover to check the connecting cable and electric brushes of the hammer drill.
The back cover (usually black) of the hammer drill can be easily removed; you just need to unscrew three screws using a screwdriver or screwdriver.
Remove the cover and use a screwdriver to disconnect the ends of the wires from the electric brushes. Using a tester or a homemade device, popularly called an “arkashka,” determine the integrity of the supply wires and the correct operation of the switch.
A few words about a simple control device called “arkashka”.
Replacing brushes on Makita HR2450
How is the replacement performed?
Below we will present a simple algorithm that must be followed when replacing graphite or carbon brushes in a washing machine motor.
- Before starting work, you must make sure that the machine is turned off and the plug is not inserted into the socket;
- Next, you need to remove the back panel to remove the motor from the housing. This is done very simply, with just one tool that can unscrew the screws. It can be either a screwdriver or a screwdriver;
- When the panel is removed, you can immediately see the engine, but before you get to it, you need to remove the drive belt, which is located between the drum and the motor;
- The next step is to disconnect the motor connector and ground connector, after which you need to unscrew the two bolts that act as fastening the motor to the drum. Sometimes it can be very difficult to remove the engine yourself. In some cases, a flat-head screwdriver can help, which can be used to pry up the motor, thereby making it easier to remove. After removing the engine from the pins, it can be placed on the bottom of the machine, then tilt it slightly, thereby allowing the engine to easily come out of the housing;
- On the motor itself there are usually two carbon or graphite brushes. If the brushes for the engine are burnt out, the commutator will be black. In this situation, replacing the brushes is extremely necessary, since they are all worn out and remain on the commutator;
- To remove the old brushes, you need to unscrew the two bolts that are located directly above them. As a rule, after removal you will only be able to see the remains of the carbon brushes - a small piece of graphite or coal;
Before purchasing a particular set of spare parts, you need to pay attention to the manufacturer and the quality of the material from which they are made. You also need to be very careful about installation, since the service life directly depends on this.
Photo report - replacing the brushes of the Sparky BPR 241CE rotary hammer (Sparky) with your own hands.
After five years of impeccable service, my Sparky began to malfunction.
How to repair a Makita screwdriver |
One of the most common problems with Makita screwdriver. these are speed problems. Thus, at the second speed everything works fine. This problem is due to a faulty transmission that prevents first gear from being used effectively. Think about how to get rid of this problem and fix the screwdriver.
READ How to Cut Porcelain Tile with a Glass Cutter
Gearbox disassembly
First step. disassemble the tool itself and separate the gearbox. Now it is important to remove all unnecessary parts at this stage. To do this, simply pour all the gears out of the gearbox. It is worth noting that if there is no information about the exact location of each part, it is better to disassemble it sequentially and accurately.
Record and mark the location of the transfer. This is necessary for high-quality assembly of the gearbox after repair work. You can also use educational videos or articles.
Screwing instead of teeth
Once all the gears are removed from the gearbox, the inside of the device will be exposed to the eye. Given the specifics of the problem, the technician will most likely see that all the plastic teeth inside have been disconnected. This happens when the device is used for a long time or when the rules of use are grossly violated. Plastic teeth are soft enough, so under the influence of temperature and constant mechanical loads they are simply ground. This leads to the fact that there is nothing to catch in the main gear and it begins to scroll.
To restore and restore functionality, teeth must be restored. In this case, you do not need to restore all the teeth, but simply install two irons.
To achieve what you want you will need a drill, small bolts and a drill. It is recommended to use a diamond coated drill bit as this effectively drains the excess bolt in a relatively short time.
Operating procedure:
- A hole is drilled in the side wall of the gearbox at the location of the plastic tooth. It is necessary to use a drill bit with a slightly smaller diameter than the diameter of the bolt. So it will be possible to twist the forces and ensure a secure fastening.
- It is necessary to drill two holes diagonally to ensure reliable retention of the gearbox and stable operation of the tool. This way the load will be divided between two teeth.
- When drilling, it is recommended to guide the drill so that the bolt does not protrude. Otherwise, processing this exercise will take much longer.
- Now you need to screw the screws into the holes.
Using a drill
The bolts are machined on the side and, if necessary, shortened in length. It is necessary to shape the bolts into the shape of a real tooth and ensure that the crown can be installed without obstructions.
Important! It is not recommended to overheat the bolt when working with a drill. Otherwise, it may become very hot and melt the surrounding plastic. The transmission housing is deformed, which will lead to more serious problems. Therefore, you need to take breaks while working. Cool the bolt.
Once the teeth are ready, the crown can be reinserted. If done correctly, it will insert without any interference. Two teeth are usually enough to rebuild a transmission, so it is not practical to install more bolts.
Let's repair together. Makita HR 2450. Beginning.
The device consists of an LED or flashlight bulb, a AA battery and two pieces of wire. The entire electrical circuit of the control device consists of parts connected in series. Connect the battery to one end of the LED or light bulb, and attach wires to the free ends of the LED and battery. You will get a universal device for checking the integrity of electrical circuits.
Typical malfunctions of the Makita 2450 and 2470 rotary hammers Common malfunctions in the electrical part of the Makita 2450 and Makita 2470 rotary hammers:
- fracture of the supply cable at the entry point into the hammer drill;
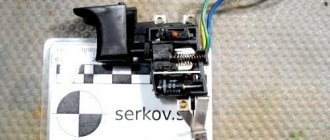
- failure of the switch button TG813TLB-1, art. 650508-0, pos. 68.;
- wear of electric carbon brushes SV-419, art. 191962-4, pos. 65;
- wear of reverse switch contacts;
- wear of rotor bearings: bearing 609LLU, art. 210060-6, pos. 51; bearing 607LLU, art. 211021-9, pos. 56;
- rotor short circuit 220-240 V, art. 515668-8, pos. 54;
- failure of the stator winding 220-240 V for HR2450, art. 633488-5, pos. 59.
The TG813TLB-1 switch, art. 650508-0, is used as a start button; pos. 68.
The brushes are replaced when they are completely worn out or have poor contact. This malfunction is detected by strong heating of the points where the electric brushes are installed.
Failure to turn on the hammer drill may be caused by abrasion of the contacts on the reverse switch. This type of problem can be fixed very simply.
Rotary hammers always work in extreme conditions. The operating life of rotary hammers depends not only on the correct operating conditions, but also on the reliability of the parts included in the product. But no matter how hard you try, over time the hammer drills begin to fail.
To properly repair a rotary hammer
, you need to familiarize yourself with its structure.
Do-it-yourself repair of a Makita 2470 and 2450 hammer drill can be done by a person who has the skills of a mechanic and knows the basics of electrical engineering. Remember! Follow safety rules and turn off the hammer drill
from the network during parsing.
Makita rotary hammers are assembled according to almost the same design and from the same parts. Repairing them is no different. For ease of repair, below is an assembly diagram and a catalog of parts for Makita rotary hammers.
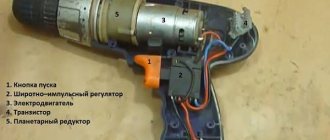
The Makita 2450 and 2470 rotary hammer circuit consists of a mechanical and electrical part.
The mechanical part ensures the transmission of torque to the drill bit, simultaneously creating a translational movement that creates an impact. The mechanical part consists of a rotation drive and an impact mechanism.
The electrical circuit of the Makita rotary hammer ensures the conversion of electrical energy into kinetic energy through the rotation of the rotor. The electrical part includes an electric motor, a power button with a speed controller, a reverse switch, and connecting wires.
The main malfunctions of a makita rotary hammer. Malfunctions of rotary hammers are divided into electrical and mechanical.
In this article we will look at all the faults in the electrical part of the Makita 2470 and 2450 rotary hammers and how to eliminate them:
READ Drilling machine design, hole drilling technology
Electrical malfunctions of Makita
2450 and
Makita 2470 Electrical faults manifest themselves in the fact that when the hammer drill is connected to the mains voltage, the tool does not turn on.
The connection diagram for a Makita hammer drill to the network is simple. The electrical circuit of the Makita 2450 rotary hammer is a series connection of an electric motor, a start button and wires.
The makita 2470 rotary hammer circuit is similar.
Through the connecting cord pos. 72, the 220 V supply voltage is supplied through the switch pos. 68 and the electric brushes through the brush holder pos. 66 to the lamellas of the electric motor rotor pos. 54. and through the contacts of the reverse switch pos. 60 to the stator winding pos. 59. The most common malfunction is the lack of contacts in the connections.
How to determine the integrity of the stator without disassembling the hammer drill
To determine the integrity of the stator, you need to ring its windings, measure the winding resistance and insulation resistance.
Stator and rotor continuity diagram
To measure the winding resistance of a Makita hammer drill, you need to connect one end of the tester to the freed brush holder, and the other to one of the ends of the electric plug. If the device does not show anything, change the other end of the plug. If the resistance is infinity, there is a break in the stator and it requires replacement or repair. Don’t forget, you can’t do without a circuit diagram of a Makita 2450,2470 rotary hammer.
Simple connection diagram for a commutator motor
If some kind of resistance is shown, it is important to measure its exact value. As a rule, the resistance of the stator winding of a Makita 2450 hammer drill at a temperature of +20ºС is within 25 Ohms.
To understand in more detail why the armature commutator sparks and which brushes are better? The video will help you figure it out; at the end of the video review there are important tips on choosing brushes
Video: how to sharpen an anchor and select brushes
How to remove the stator of a Makita 2450 and 2470 rotary hammer for accurate diagnosis and repair
To remove the stator pos. 59, you need to remove the brushes and unscrew the four screws securing the cover of the mechanical unit. They screw into the end of the lid. By pulling the black housing and the green one in different directions, you will release the housing with the stator. The stator is mounted in a green housing.
To remove it, you need to remove the plastic gasket pos. 58 and tap on the end of the body with a wooden mallet or block. The stator will stick out on its own, all that remains is to pull it out, blow it off and check it completely.
And here is the stator
If you have a short circuit tester, you can immediately check the stator for a short circuit. The device is called IK-32. Procedure for checking stator windings For an accurate check, disconnect the two stator windings from each other via an electrical circuit. Check the resistance of each winding, they should be exactly the same. If there is a difference in resistance, the winding with lower resistance most likely has an interturn short circuit.
Checking the stator of the Makita 2470 and 2450 rotary hammer with your own hands. Diagnostics of the armature and stator using a short-circuit device and homemade equipment.
Video: Diagnostics of the armature and stator with a Short Circuit Indicator. Checking the armature. Checking the stator.
How to correctly determine the malfunction of the rotor stator of a Makita hammer drill and select brushes
If the carbon brushes delaminate, this indicates that they were of poor quality. Therefore, before purchasing one or another model of brushes, you need to make sure of their decent quality. Otherwise, you will have to purchase new ones soon, since their service life will be short.
Repairing the contact between the stator and the reverse switch
To remove the stator, you need to disconnect the gear housing (black) from the stator housing (green).
Remember! In the mechanical part of the rotor, the bearing is pressed with a special ring. Don't lose it when disassembling.
The green housing houses the stator. Looking into the middle, you will see two self-tapping screws 4x60, art. 266334-3, pos. 57, securing the stator to the housing. Unscrew them, remove the plastic stator protection for HR2450, art. 419201-3, pos. 58., free the stator. When you remove the stator, you will see the contacts on the stator and the reverse switch panel.
Thoroughly clean the contacts with sandpaper and treat with solvent or alcohol. Before assembly, bend the contacts so that they fit tightly into each other. Lubricate the contacts with a thin layer of technical Vaseline.
Reassembling the electrical part of the hammer drill is carried out in the reverse order.
It often happens that the machine stops rotating the drum. One reason for this may be wear on the brush. This article will tell you how to change
DIY brushes for electric motors of washing machines. If the automation works normally and at the same time regularly fills water, but the drum does not work properly or rotates very weakly and makes strange sounds, then in this case, you can be one hundred percent sure that the problem lies in the wear of the carbon brushes. An error code may also appear on the display, which indicates that the motor is not operating properly, as well as the need for an electric brush.
To perform the replacement, you only need a Phillips screwdriver and a set of new brushes. Particular attention should be paid to the fact that it is best to use the original kit for installation, since such brushes will work well without damaging the motor and other parts. In addition, they do not have to be sharpened or filed to fit the size of a specific engine. The carbon or graphite brushes themselves can simply wear out or peel off.
Diagnostics
Don’t rush to disassemble the screwdriver when the chuck no longer turns when you press the start button. Start with the usual. Replace the battery in advance with a serviceable and fully charged one. If no changes occur, remove the battery, unscrew the screws from the case and disassemble it. Using a multimeter, determine the resistance between the brushes. If the wear is NOT higher than acceptable, they will have good contact with the commutator, and the device will show a resistance close to 0. If the readings are more like an open circuit than a short circuit, tap the brush holders with the handle of a screwdriver and turn the motor rotor a couple of times by hand. If the tester shows no change, it will indicate that contact has not been restored and the instrument requires repair. Doing such a check is easier than disassembling a motor, especially one that is NOT serviceable. It should be noted that the symptoms of armature winding breakage and brush wear are similar. But the windings are broken. This is a very rare event, but wear and tear is much more common.
Each half performs specific functions.
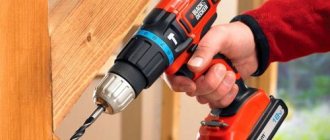
rotary hammer is a serious tool with which you can perform regular and impact drilling, as well as crushing. The design is equipped with a special dust protection system, the device is distinguished by the presence of anti-vibration, so the application process is quite comfortable.
It is easy to disassemble the hammer drill yourself
Disassembly
The disassembly process is simple, it is important to follow the entire sequence step by step, so that later you can correctly return everything to its place:
- Remove the quick release distributor.
- Unscrew the screws connecting the gearbox body of the mechanical section.
- Remove the black cover by first pressing on the front of the shaft.
- Remove the mechanical part from the green side - to do this, first unscrew the three connecting screws that hold the cover. After this, remove the cover, remove the carbon brushes and release the brush holder springs.
- After the mechanical unit is released, it is required to disconnect the rotor, which is fixed in it and is pulled out with a slight rocking.
When this process is completed, the disassembly of the mechanical block of the shock assembly continues: you need to remove a couple of bolts located in the housing. Then the intermediate shaft must be disassembled. To do this, the following parts are pulled out sequentially according to the diagram:
- ring, bearing,
- gear with straight teeth,
- friction bearing,
- flat washer,
- bearing 606,
- retaining ring S-707,
- compression coil,
- clutch.
The next step is to disassemble the shaft of the chiselling barrel, which is pulled out of the body, and the cylinder itself is taken out of it. The next steps are to remove the piston connector, flat washers and firing pin. If desired, you can disassemble the shaft itself; the process is also recommended to be carried out sequentially, carefully placing all the parts on the table.
Afterwards, the electrical part is disassembled, in which the stator, switch, rotor, carbon brushes and holder for them are removed.
Important! Before disassembling the Makita hr 24 50 hammer drill, experts recommend preparing additional tools that may be required during the procedure.
Before disassembling, it is recommended to carefully examine the product
Troubleshooting
Makita produces tools that are highly reliable. However, in some cases problems arise, so you need to know how to deal with it:
- The chuck does not turn. A similar situation is possible in case of damage to the engine or motor. You will need to disassemble the product and inspect it carefully. Sometimes the reasons may be a broken start button or shorted coils.
- Doesn't hold the drill in the chuck. In most cases, the problem lies in old parts or a damaged cartridge. It is recommended to disassemble the device and look for a solution to the problem. Sometimes it is enough to replace some parts with new ones.
- Replacing the anchor. In this case, the procedure is carried out in several stages. First, open the cover at the back, remove the brushes, and disconnect the gear housing. After cleaning the parts from dirt, replace the armature with a new one, after which rubber shock absorbers and a new air intake plate are put on. Assembling the hammer drill .
- The tool does not chisel. Often the cause is a broken floating bearing or a split striker. In both cases, parts will need to be replaced.
- Replacing the start button. A damaged start button requires replacement. To do this, you will have to disassemble the device - remove the cover, disconnect the contacts, remove the old button and replace it with a new element. Then put everything back together in reverse order.
- Overheating during use. A similar situation occurs when the device is used incorrectly. If unpleasant odors occur, it is recommended to disassemble the device and check everything.
READ How to Remove Floor Tiles Without a Hammer Drill
If necessary, parts are replaced with new ones
Brushes
Electric motor brushes. These are contacts through which current is supplied to the rotor windings. Because the rotor is designed to rotate, it is impossible to supply current to its windings through a fixed wire connection. For this purpose, a commutator-brush unit (CSU) is used. The collector consists of copper plates mounted on an isolated section of the armature shaft. The leads of the rotor windings are connected to them. The brushes are attached flush to the commutator. When the rotor rotates, they slide along the commutator plates. Current flows alternately through these sliding contacts in the armature windings. The alternating magnetic field arising from this is the force that turns the rotor.
Knowing how the unit that supplies the armature windings works, it is not difficult to figure out that its parts must wear out. The rotor is difficult to manufacture and expensive. Therefore, in order to protect its commutator from wear, the material for the production of brushes is deliberately chosen to be the least resistant to abrasion. Otherwise, it would be necessary to replace not the brushes, but the anchor. Another necessary property of brushes should be excellent electrical conductivity. A mixture of copper powder and graphite meets these conditions better than others. Electric motors with the lowest power or higher operating voltage than a screwdriver can be equipped with graphite brushes. But graphite is not suitable for a screwdriver engine with low operating voltage and high currents due to its very high electronic resistance.
READ How to Remove the Makita 2470 Rotary Hammer Mode Switch
Other mechanical breakdowns and their elimination
In addition to breakdowns associated with the impact mechanism, other mechanical breakdowns may also occur in the hammer drill.
Mechanical breakdowns
If any mechanical malfunction appears in the hammer drill, its presence can be determined by ear (noise increases, a grinding sound appears).
You may also experience increased vibration or an unpleasant odor emanating from the unit body.
So, mechanical failures include the following:
- failure of the device operating mode switch;
- worn rubber bands of the striker and striker;
- failure of the impact mechanism;
- failure of the unit barrel due to wear;
- breakage of gear teeth;
- the chuck breaks, causing the drill to fly out.
Replacing motor brushes
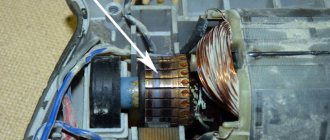
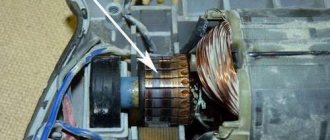
The main sign that it is time to change the brushes is the formation of increased sparking in the area of the electric motor commutator, rapid heating of the brush holders, and a burning smell. When the brushes are not worn out, the spark can only be seen under them. Otherwise, the spark is visible throughout the entire circle of the collector.
The presence of a spark around the commutator circle with unworn brushes is a sign of bearing wear, rotor or stator insulation failure, commutator plate burnout, stator or rotor burnout.
Another sign that the stator has burned out is the presence of sparks under only one electrode. If you have a tester, you can use it to check the stator and rotor: measure the resistance on the rotor and stator one by one. If it is the same on both windings, then everything is fine with the stator. If you notice clear signs of problems with the rotor or stator in your hammer drill, you will have to take the device to a service center for repair. As for the brushes, you can change yourself.
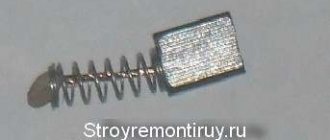
To get to the place where the brushes are installed, you will need to disassemble the housing in which the motor is installed, or simply remove the back cover. Opening the lid, you will see brushes secured in special holders. The photo below shows what these parts look like.
Brushes that are installed on rotary hammer motors come in 3 types.
- Graphite ones are durable, but since they are very hard, their rubbing into the collector is not ideal, which negatively affects the latter.
- Carbon - easily rubs into the commutator, providing good contact, but wears out quickly.
- Carbon-graphite is an ideal option, since they are a mixture of 2 components that complement each other.
It is very important not to wait until the engine sparks and then change the brushes. Replacement is needed after they are worn to 1/3 of the nominal value (8 mm). Even if one brush is worn less than the other, both still need to be replaced.
Pay attention to the condition of the spring in new brushes and the fastening of the contact. If the spring falls off while the engine is running, it will suffer significant damage. Also, if the spring is weak, then it will not be able to provide good contact.
Required before changing
brushes, you need to thoroughly clean the rotor and stator from any remaining graphite or coal dust. These parts can be cleaned using technical or medical alcohol.
Next, you should secure the electrodes in the holders and rub them into the collector. To do this, place a piece of fine-grained sandpaper on the commutator and grind the electrode in with rotational movements in different directions. The grinding continues until the contact area of the electrode is slightly rounded. This will ensure a better fit to the collector plates and, accordingly, better contact.
Replacement
On a serviced engine everything is very simple
- Let's disassemble the case
- Pull out the worn out set
- Install a new one
- Assemble the body
The maintenance-free motor is distinguished by rolling of the rear ends of the holders. Often the lid on the inside of which they are located, inserted into the body, is secured by rolling. Here the process is somewhat more difficult.
- Using pliers, bend the flaring that holds the lid
- There are 3 points equidistant from each other on the perimeter of the tent cover and body
- Pull out the lid
- Using soldering fat, solder and a powerful soldering iron heresy marked points
- After cutting the stranded wires, replace the worn brushes with new ones.
- Solder the wires coming from them to the holders. After this, so as not to break the copper. graphite contacts when installing the cover, alternately push them into the holders and secure each in this position with a thread, tie it with a bow
- Left the ends of the threads outside, install the lid in the case
- Return the contact to the control panel by untying and pulling out the threads
- Solder the cover to the motor body
Do-it-yourself disassembly and repair of a rotary hammer
A rotary hammer, like any electric tool, requires careful treatment, proper operation and timely preventive maintenance. If these standards are neglected, the device may fail without exhausting its service life. In case of some malfunctions, you can repair a hammer drill yourself, but to eliminate breakdowns associated with the electrical part of the engine, you will need the help of a specialist.
Disassembling the electrical part of the hammer drill
To get to the electrical part of the device, if you suspect that this is where there may be a breakdown, you must perform the following steps.
- Unscrew the screws holding the back cover and remove it.
- Unscrew the fasteners holding the network cable.
- Next, you should remove the wires from the fastenings and remove the start button.
- Remove all wires attached to the stator.
- Remove the brushes by unscrewing the mounting bolts.
- Separate the housings of the electrical and mechanical parts of the device by unscrewing the corresponding bolts. Use a flathead screwdriver to separate.
- Remove the rotor from the gearbox. If you need to replace bearings, use a special puller.
- Remove the air intake located in the housing of the electric part of the hammer drill.
- Disconnect the stator from the housing. To make it easier to come out of the casing, it is recommended to pull the stator by lightly tapping the casing with a wooden object.
If you need to disassemble a barrel perforator
, with a vertical electric drive, the handle is first removed, and then the bolts holding the engine are unscrewed.
Electrical faults
Malfunctions associated with the electrical part of the hammer drill may also be accompanied by an unpleasant odor from the device body and sparking. You may also notice that the engine gets hot and hums quickly without turning over, or that it emits smoke.
Electrical failures of the device include the following:
- the device does not turn on;
- breakage of the start button;
- brush wear;
- collector clogged;
- violation of electrical contacts;
- burnout of the stator or rotor winding of an electric motor.
Helical gears
The reason that the device stopped working normally, namely, stopped drilling and chiseling, may lie in worn-out teeth on the rotor shaft.
If this happens, the teeth on the intermediate helical gear will also be worn.
This problem occurs when the tool is jammed or the clutch is malfunctioning. The breakdown is eliminated by replacing the intermediate gear and engine rotor.
Algorithm for disassembling a hammer drill
To eliminate mechanical and electrical faults (with the exception of a broken electrical plug), disassembling the unit body is indispensable. The most popular brands among craftsmen, both home and professional, are Bosch, Makita, Interskol, and Energomash hammer drills. The design of units from different manufacturers is approximately the same, therefore the methods for disassembling the devices will be similar. But you should not completely disassemble the device, since it will be difficult to put it back together. The photo below shows what a completely disassembled hammer drill looks like.
Sources:
https://stroyvolga.ru/%D0%BA%D0%B0%D0%BA-%D0%BF%D0%BE%D0%BC%D0%B5%D0%BD%D1%8F%D1%82% D1%8C-%D1%89%D0%B5%D1%82%D0%BA%D0%B8-%D0%BD%D0%B0-%D0%BF%D0%B5%D1%80%D1%84 %D0%BE%D1%80%D0%B0%D1%82%D0%BE%D1%80%D0%B5-%D0%BC/ https://domzastroika.ru/instrumenty/remont-perforatora-makita. html https://tehnika.expert/dlya-remonta/perforator/razborka-i-remont-svoimi-rukami.html