Mains power supply for a screwdriver - 2 main options
The converted tool has one drawback: it is tied to an outlet. But for indoor work this is not so significant. But there are more advantages. Now you don’t have to worry about recharging the battery, there will be no downtime. The current strength remains stable all the time and does not depend on the discharge of the battery, which means constant torque.
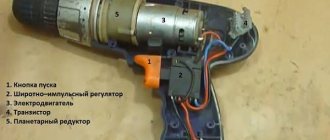
Disassembling a screwdriver
Before you go looking for a power supply (hereinafter referred to as PSU), study the screwdriver parameters that are indicated on the case or in the passport. Pay attention to the tension. A 12-volt tool is more common; finding a power supply for it is not difficult. If the tension is greater, the search may take longer. It is necessary to find out the current consumption, which is not indicated in the technical specifications. The purchased unit must produce an average current value (between the battery capacity and the standard charger). Data can be found from the labeling.
There are two main options for converting a 220-volt cordless screwdriver. The first is to use an external power supply. Any rectifier capable of delivering the required DC voltage will do. Even if it is big and bulky, there is no problem. After all, you don’t have to carry it around the room. The block is installed near the outlet, and the cord to the instrument is made of the required length.
power unit
Remember that as the voltage decreases, the current increases if the power remains the same. This means that the cross-section of the low-voltage cord must be larger than that from a 220 V network.
The second option is that the power supply is mounted in a battery-powered case. The only obstacle when choosing this method may be the size of the transformer. Mobility is maintained, the radius of use depends on the length of the power cord. It is important to remember that the instrument is supplied with 220 V power, so the cord must be reliable, and the input itself must be made carefully and carefully insulated.
Options on how to do it + (Video)
If the power supply has also become unusable, then do not be upset, since there are other options for how to power the screwdriver:
PC power supply
The power supply for the screwdriver can be provided by a PC unit, which is much easier to find than a new battery for the device. The advantage of a PC power supply is the fact that it is possible to obtain different current values at the output, which is considered very important.
The design of the PC power supply includes a cooler that provides cooling for the transformer and its component elements, so you can immediately note that this type of power supply is durable, and in the next few years you will forget about problems with a screwdriver.
Old inverter welding
You can power a screwdriver using an old inverter welding machine, but this will require some knowledge of electrical engineering theory. After all, in this case it is necessary to add a secondary coil of the transformer, which will make it possible to obtain at the output a completely suitable current for powering the electric motor of the device. Therefore, before connecting the screwdriver to the welding machine, it is necessary to measure the current and voltage at the output, which must correspond to the values of the device.
Car battery
The last option is a car battery that can be connected to a screwdriver and used in places where it is impossible to get 220 Volt power. The disadvantage of such a device is that you won’t be able to work with a screwdriver for a long time, since the car’s power source quickly discharges. Therefore, if the standard UPS of a screwdriver refuses to function, which happens very often, then there is no need to rush to get rid of the device; just spend a few hours and the device will work even better than with a battery.
What external units can be used - an old computer or a laptop charger?
Available power supplies can be used as an external source:
- charger for car batteries;
- PSU from an old computer;
- laptop charging;
- homemade power supply.
Converting a screwdriver to a mains-powered one
You can buy an old charger inexpensively on the market. Nowadays, pulse chargers are mainly used, and old devices are often sold as unnecessary. This type of charger, with the ability to manually adjust voltage and current, is ideal for any screwdriver, regardless of its operating voltage. The whole modification consists of connecting a low-voltage cord to the output contacts of the charger.
The computer power supply is purchased from older models; it must have a power off button. It will not be needed, but this is exactly the version of the AT format that is needed. On the radio market, a unit with a power of 300–350 watts is selected, which will ensure reliable operation of low- and medium-power screwdrivers. All technical characteristics are indicated on the sticker on the case. The unit has a cooling fan and overload protection. To convert a computer power supply with your own hands to an external one for a screwdriver, we perform simple operations:
- disassemble the body;
- on the large square connector we find a green wire and any black one;
- We connect both wires to each other and insulate them;
- on the other smaller connector, remove all the wires, leaving yellow and black;
- We solder a low voltage cable cord to them.
To maintain polarity, you should know: the yellow wire is positive, the black wire is negative. The tool operates with a voltage of up to 14 Volts from a computer power supply.
Most laptop chargers have characteristics that allow them to be used as a power source for a screwdriver. Chargers with an output voltage of 12–19 Volts are suitable. The only changes that will need to be made are to the output plug. It should be cut off, strip the wires and solder a cable of the required length to them.
Persons who have an understanding of electrical engineering can make a homemade power supply. Its circuit is quite simple and includes a step-down transformer, a diode rectifier and two capacitors. All parts can be bought or taken from old radio equipment. A transformer from a tube TV with a 24–30 V output is suitable. A rectifying diode bridge is required. The capacitors used are not in short supply, from old technology: one is 0.1 µF and the other is electrolytic at 4700 µF.
Attention! The structure must be enclosed in a housing. To protect against short circuits, it is necessary to install fuses at the input and output.
Assembly of the working structure
For ease of use and connection, I brought the cord from the power supply into the battery case. I took a 3.5 meter long cord that was available. I removed all the battery cells from the battery and installed an LC filter. Now, if I somehow get a working battery, I can always put it on a screwdriver and put the power supply away as a reserve. I didn’t throw the batteries out of the battery, I have an idea where to use them, but that’s a topic for another review.
Since the cord connecting the unit to the screwdriver has a certain resistance and inductance, you can try to close the terminals of the L1 coil with a jumper. In theory, this could increase power by a tiny amount.
Read also: Composition and purpose of the preliminary design
The screwdriver feels great with a cord, but to be honest, it seemed a little weak to me when braking by hand. But trial tightening of the self-tapping screws dispelled my doubts: self-tapping screws 35 mm long can easily be screwed into 20 mm plywood. This means that a screwdriver will cover most repair needs.
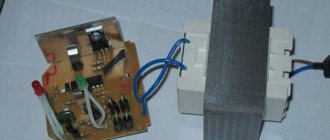
I cut off all the output wires from the block, leaving the green starting wire; I soldered its end to the common conductor of the board, where all the black ones are soldered. It's best to carefully desolder all the wires, but my soldering iron was too weak for this and had to be cut. I soldered two short, hard copper wires to the common contact and +12 (where the yellow ones are soldered) and connected them through the terminal block to the cord to the Shura.
This is where we will finish this review, we have achieved what we wanted - the screwdriver works perfectly with a computer power supply. In the future, I plan to make a high-quality plywood case without cracks for the power supply board - tests have shown that the heatsinks on the board do not heat up at all and you don’t have to worry about overheating of the elements in a closed case.
How to place a power supply in a case - 3 different possibilities
The mains power supply for the screwdriver can be placed in the battery case or in the handle. Possible options:
- any power supply unit suitable in terms of characteristics and size;
- Chinese 24 V power supply;
- homemade.
A power supply with the required parameters is selected on the radio market. At home, you should carefully remove it from the case and place it in your screwdriver, securely fastening all the components. If the wires are short, lengthen them so that they do not touch metal parts. Place the transformer and the board separately. For better cooling, install additional radiators on microcircuits. It would also be a good idea to have holes in the housing to allow air to circulate and heat to be removed during operation.
Converting a cordless screwdriver to a corded one
In a radio parts store we buy a 24 V power supply, current 9 A. Screwdrivers operate on 12 or 18 Volts, so the task is to reduce the voltage to the required level. To perform such work, minimal knowledge of radio engineering is required. The output voltage is maintained by resistor R10 with a nominal value of 2320 Ohms. Instead, you should install a 10 kOhm trimmer resistor. How to configure the power supply is described below:
- remove the constant resistor;
- set the resistance of the trimming resistor to 2300 Ohms on the device;
- solder the tuning resistor in place of the constant one;
- With the power supply turned on, adjust the voltage.
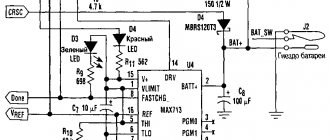
The design of a homemade power supply will be based on a 60 W Feron or Taschibra electronic transformer. You can buy them at an electrical supply store and they are designed for halogen lamps. They do not require any modification. By diverting the secondary winding from the midpoint, it was possible to use two Schottky diodes instead of the usual four. The operation of the power supply is controlled by the HL1 LED. The diagram shows all the necessary details.
Transformer T1 winds itself. A non-scarce ferrite ring NM2000 with dimensions 28×16×9 is used. Before winding, the corners are cleaned with a file, and the ring is wrapped with FUM tape. The completed unit is mounted on an aluminum plate 3 mm thick or more, placed in the battery housing. It also serves as a common wire.
How to carry out installation correctly - is a counterweight needed?
Operational reliability and safety depend on the reliability of the installation of the electrical part. A soft multi-core cable is used as a network and low-voltage cable. If the device is external, the ends of the cable should be connected to its terminals. We treat copper wiring and brass contacts with soldering acid, after which they are easily soldered. In practice, special clamps called “crocodiles” are often used. In the screwdriver itself, you cannot do without soldering; the “crocodiles” do not hold so tightly that the contacts do not separate during operation.
Manufacturing a battery-based power supply
The ideal option is to use an old battery case. It is disassembled and the entire internal part is removed. This releases harmful substances; care should be taken to protect the respiratory tract and skin. The body is washed with soda solution, running water and dried. On the inside of the contacts, solder the ends of the cable, observing polarity. In order not to guess, we temporarily connect the cable, turn on the screwdriver and see in which direction the spindle rotates, mark the wires. We make a hole in the bottom of the case and pass the wires through. Inside the housing, the cord should be securely fixed by wrapping insulating tape around it. This thickening will prevent the wiring from stretching and breaking. Then we solder the ends to the contacts.
We place a counterweight inside the body. The best material would be compressed rubber. It has the necessary characteristics: high density, insulating properties. To prevent the rubber from dangling inside, we cut it out with a slight overlap. To place the counterweight in the housing, we bend the material slightly and place it so that it will not oscillate and will serve as additional insulation. Perhaps the counterweight may seem unnecessary to some, but it is not. The design of the screwdriver ensures that the center of gravity is in the handle. This loads the arm, but relieves the hand. When batteries are removed from the case, the center of gravity shifts, increasing the load on the hand. Work becomes uncomfortable and difficult. A homemade counterweight restores the center of gravity close to the factory one.
Homemade power supply
When working with a soldering iron, you need to check the connection to the network of the battery elements and the homemade unit; if there is a connection, you must turn off all power sources for safe operation.
The modification work is carried out step by step; to obtain the result you will need a little experience in soldering and mounting boards:
- Dismantling and dismantling the housing of the old battery;
- In accordance with the diagram, install the elements on the circuit board, solder the contacts and connections.
- After soldering, check the output voltage with a multimeter.
- Assemble the circuit board onto the battery case.
- Connect the appropriate wires to the low voltage outputs of the instrument.
- Check operation by connecting the converted device to the network.
Read also: How to properly cut pipes with a grinder
How to use a corded screwdriver - simple rules
You have seen how easy it is to convert a cordless screwdriver into a corded one. The practice of craftsmen suggested simple and useful tips for operation:
- after 20 minutes of work, you should give the screwdriver a five-minute rest;
- fix the electrical cable on your hand so that it does not interfere with your work;
- The power supply should be regularly cleaned of dust;
- do not use extension cords to connect the power supply to the network;
- The power supply must be grounded;
- It is prohibited to use corded screwdrivers when working at heights.
Compliance with these rules will extend the life of the updated instrument. Mobility has been lost a little, but the unit does not require recharging and works smoothly and confidently.