It happens that the screwdriver starts to work poorly or refuses to do it at all. The cause may be the battery. Manufacturers equip these power tools with 12-volt, 14-volt, 14.4-volt, and 18-volt nickel-cadmium batteries. The necessary voltage is created thanks to the sequential assembly of several elements. If they are replaced with lithium ones, the tool can be used longer, and the design will become lighter. The only thing you need to know is how to convert a screwdriver to lithium correctly.
Converting a screwdriver to a lithium battery
Many models, including Makita, Hitachi, Interskol, are equipped with universal mechanisms, which means charging is designed to power batteries of different types: Li-Ion and Ni-Mh .
The characteristics of the replaced elements and the new ones must match each other. If this is not followed, a fault or break will occur in the circuit.
The indicator will signal that this has happened. In the event of a break or overload, the green and red lights will immediately flash.
A non-universal charger, like the power supply, needs to be redone. The process depends on the manufacturer and type of memory, you will have to :
- completely desolder the board elements;
- install a capacitor, resistors;
- adjust installed parts.
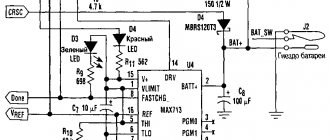
There is a universal way to remake the charger when using a BMS (DC-DC StepDown) board. It stabilizes the input voltage and current. There are tuning resistors on the board. The module is soldered into the charger circuit using the old charging terminals, and the P+ and P- .
If you convert a screwdriver to lithium, you can extend its service life
What you need to know before remodeling
Before converting a screwdriver to lithium ion, you need to know exactly the voltage produced by the old unit. These indicators are indicated on a sticker affixed to the battery. In the absence of information, the battery is disassembled, the voltage value is determined by the number of installed elements.
Li-ion batteries have the following positive properties :
- low self-discharge;
- high specific capacity;
- no memory effect.
They also have their own characteristics. They cannot be heated above 45 degrees , they are afraid of temperature changes, deep discharge, and overcharging. The capacity of appliances decreases in the cold. Once the nickel-cadmium batteries are replaced with lithium-ion ones, you don’t have to wait for the battery to run out, but charge it at any time.
You cannot use different types of batteries, as well as old ones from a laptop. In the assembly, all batteries must have the smallest range of capacity and characteristics . The latter must be compared with the values of the indicated voltage and discharge current. For example, to assemble a 14-volt battery power supply, you need to install a controller with a similar voltage level, and be sure to install a protective board. Otherwise, the lithium-ion cell will overheat during operation and a fire will occur.
1 Li-ion battery completely replaces 3 nickel-cadmium batteries.
Battery types
Based on design features, batteries are distinguished in the form of sliders and clips.
Screwdriver battery in the form of a slider
But these are minor differences compared to battery types. Both the slider and the clip are used in different types of batteries.
Screwdriver battery in the form of a clip
There are three types of batteries for screwdrivers:
- Nickel - cadmium (Ni-Cd).
- Nickel - metal hydride (Ni-Mh).
- Lithium - ion (Li-Ion).
Lithium polymer batteries (Li-Pol) are not produced for screwdrivers. Their main areas of application: smartphones, cell phones, tablets, laptops, radio-controlled devices, electric vehicles.
Nickel - cadmium batteries are the cheapest, charge quickly, and have more than a thousand charging cycles. The batteries are resistant to operation at low temperatures. But they have a memory effect. That is, they can be charged only after they are completely discharged, otherwise the capacity will drop. They have a high self-discharge current. They are made from toxic materials and are difficult to dispose of. These batteries are in greatest demand.
Nickel - metal hydride batteries are more expensive, non-toxic, and have a low memory effect. The self-discharge current is higher than nickel-cadmium. The capacity is higher, the charge cycle is more than five hundred. These batteries are less resistant to high discharge rates. They are less suitable for maximizing the power of the tool. They need to be constantly recharged.
Lithium ion batteries are more expensive, more powerful, and charge quickly. They have no memory effect. Low self-discharge current. The voltage of the battery cells is higher, so their number is smaller. Consequently, the dimensions and weight of such batteries are smaller than those of nickel ones. But they cannot be completely discharged, otherwise after several such cycles you will have to buy a new one. To improve the quality of lithium-ion batteries, manufacturers install a microcircuit in the case of the battery or screwdriver that controls the operation of the battery. A multi-level multi-stage protection is formed:
- From high temperature.
- From full discharge. These batteries are afraid of being completely discharged and cannot recover if the discharge is below the permissible norm.
- From short circuit.
- From overcharging, as an explosion may occur.
- From overload currents.
A control board installed in the battery case is more efficient. When the battery is kept separate from the screwdriver and is not in use, the microcircuit monitors its condition and, in case of any problems, opens the circuit. The battery is completely protected.
Read also: Cable cross-sectional thickness table
Review of lithium-ion battery with chip
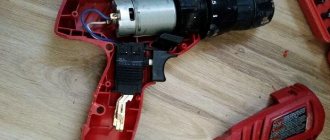
The process of dismantling the battery case
Before the screwdriver is converted to lithium batteries, it is disassembled. The tool body can be connected using :
- glue;
- locking rivet devices;
- screws.
The most difficult to remake is a model with a glued body. It is carefully disassembled along the joining seams, tapping it with a hammer with a soft plastic head. If you accidentally damage the halves of the box, it will be difficult to assemble, and in the future it will be problematic to work. The case is easily disassembled, connected by latches and self-tapping jumper screws .
Assembling the finished battery
First, they clean all parts of the case and think about where to place the new charging unit. The converted battery will be much smaller in size than the original one, so it must be well secured inside the case. If this is not done, then due to vibration during operation of the tool, the unit will fail after a short period of time. For fastening, you can use Moment glue or sealant . Wires are soldered to the assembled block. When working, follow the connection diagram. Wires with a cross section of 4 mm2 are soldered to the batteries. To prevent the parts from touching each other, use heat shrink tubing. The terminal block with soldered wires is installed in its original place. If there are no grooves for it in the housing, it needs to be secured. The assembly is connected to “plus” and “minus”.
Assembling the protective board involves connecting all parts of the battery pack. Be sure to check the reliability of the placement .
Battery cells can be connected in different ways
Battery cell connection methods
The block that accumulates energy can be assembled in different ways. There are three types of assembly :
- soldering;
- spot welding;
- cassette.
You need to solder as quickly as possible, so you need a powerful soldering iron of about 100 W. Lithium batteries are afraid of overheating, so they should not be heated for a long time; high temperatures will cause damage. If you lack experience, you should resort to the services of a professional.
The technique of connecting elements into a block using spot welding is considered the best. A master who has a special welding machine can do the job better.
Special cassettes are considered not a very reliable method . The resulting contacts have significant contact resistance, which will quickly begin to deteriorate at high current.
The elements are connected in series, then the voltage is summed, but the capacitance value does not change. Batteries connected in series do not all fail at the same time, so in some cases, from two batteries of a screwdriver, you can restore one working battery by selecting serviceable ones. But we must keep in mind that it will not last long. Therefore, experts advise resorting to such repairs in rare cases.
Battery restoration by replacing several elements
Restoring a screwdriver battery by replacing several elements can be successful for all types of batteries. It also does not pose any risk to them, as does manipulation with distilled water, provided that care is taken during soldering.
Read also: Tachometer in a car, what is it?
First, the output voltage of each “can” is measured using a multimeter, which in total should be 12-14 V. Accordingly, the voltage of one “can” should be 1.2-1.4 V. The U indicators are compared with each other, the most weak elements. Read more about how to check a screwdriver battery with a multimeter →
After this, the battery is inserted into the screwdriver and works until the moment when the power begins to noticeably decrease. The voltage readings are taken again, and those “cans” whose voltage difference is 0.5-0.7 V compared to the “stronger” ones should be desoldered, disposed of and replaced with new ones, similar to the old ones, having previously ordered them from the online store.
It is recommended to solder the battery chain using spot welding, but if this is not available, there is nothing left to do but use a regular soldering iron and do everything as quickly and accurately as possible, in order, if possible, to prevent the battery from overheating.
The “original” battery connecting plates should not be lost; they must be soldered back without reversing the polarity. In addition, all elements of the chain must have the same capacity.
After soldering is completed, insert the battery back into the screwdriver and carry out 2-3 complete charge-discharge cycles to equalize the energy potential of all batteries. In order for the updated battery to last longer, it should carry out such training 2-3 times a month. How to quickly and completely discharge a screwdriver battery →
But is this replacement any good?
Having a screwdriver with a lithium-ion battery, the user has the opportunity to recharge the batteries after a short period of work without reducing their capacity. This type of element has a large number of charge and discharge cycles. Once they have exhausted their resource, they can be easily replaced. Compared to nickel-cadmium, Li-ion charges much faster. The first is approximately 13-15 hours, the second – 1-3 hours. With the same capacity and output voltage, lithium batteries weigh less.
There are also disadvantages. The cost of lithium-ion is much higher. Their performance is negatively affected by both overcharging and overdischarging . It is advisable to charge with a device that, as soon as a certain voltage is reached, will reduce the current supplied to the batteries. It is impossible to use such a screwdriver outdoors in cool weather, because at sub-zero temperatures the charge and elements lose their functionality.
Lithium banks are longer than cadmium ones , although 2 times less of them are needed. In addition to the cans, a small electronic board (charge-discharge controller) must be placed in the design of the battery pack.
It is necessary to remake the battery and charger, because after the rework you will need to increase the output voltage. To avoid doing this work, you can purchase a universal charger.
How to properly repair it yourself.
Be patient and start repairing.
Let's disassemble the battery.
Disassemble the battery carefully. Do not use force to avoid damaging the housing.
- Remove the battery from the screwdriver. If the buttons are stuck and cannot be removed, unscrew the screws of the tool body and remove the top half. One of the buttons has become free. Pull the battery towards you, moving it slightly in different directions, and it will also come off. When you take the battery apart, position the buttons so that they press easily into their grooves.
- The battery case consists of two parts and can be dismounted or non-removable. In the first case, unscrew all the screws and separate both parts.
Collapsible battery case
Disassembling the battery using a knife
Video: How to disassemble a screwdriver battery
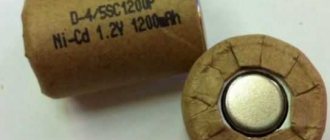
Inside there are several elements soldered in series. This cassette provides the necessary voltage and current characteristics for the battery. Some nickel batteries have a temperature sensor attached to the cells.
Nickel battery temperature sensor attached to cells
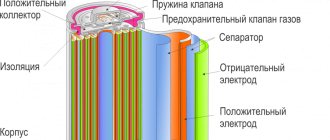
In lithium-ion batteries, everything is more complicated. There is a control board, and the elements are covered in a protective case or film.
Lithium ion battery
How to increase battery capacity.
A new battery must be fully charged before use. The average ambient temperature is from 10 to 40 degrees. The chargers have indicator lights. When they show that the battery is charged, you must immediately turn off the process.
- New nickel-cadmium batteries must be rocked before first use. Fully discharge and charge three times. The capacity will become maximum. If the instructions for the device say that the build-up should include a greater number of charge cycles, then follow these recommendations. During operation, fully discharge the battery before charging.
- Nickel metal hydride batteries have less memory effect, so they can be cycled once before first use.
- Lithium-ion batteries do not need to be pumped. They simply need to be charged to full power.
To discharge the battery, a load in the form of a 12-volt lamp is used. It is connected with crocodile clips to the terminals. If the battery is disassembled, then to the terminals of the serial battery circuit. The discharge process will take less than an hour.
Video: How to drain your battery
The second way to properly discharge is to use a “smart” charger like imax b6, which is very convenient for charging batteries. In it you can configure the current and voltage parameters for charging and discharging the battery. Set the automatic cycling mode to boost the battery. That is, you do not need to constantly monitor the capacity and voltage. The device will do this for you. Up to 5 cycles are provided. Moreover, at the end you will be able to see the current and voltage values after each cycle and analyze the result.
imax b6 charger
Video: Review of the imax b6 charger
Diagnostics.
Once fully charged, disassemble the battery. Inspect the elements for swelling and oxidation. Use a multimeter or tester to measure the voltage of all elements. Voltage limits for different batteries:
- For nickel-cadmium 1.2 - 1.4 volts.
- For nickel-metal hydride 1.2 - 1.4 volts.
- For lithium-ion 3.6 - 3.8 volts.
Battery cans are wrapped in paper casing. The voltage is plotted on each element. If all banks have normal voltage, discharge the battery to half capacity. Measure the voltage again. Those elements whose voltage has decreased by 0.5 - 0.7 volts compared to the average must be restored or replaced. They say about such banks that they “leak”.
Video: How to check the battery condition
Why isn't it charging?
If the charger is normal, check the contacts between the battery and the charger. The charger's contacts may have become bent. Because of this, the battery does not charge. Disassemble the device and bend the terminals. The second reason may be a faulty or unsoldered temperature sensor. It needs to be soldered or replaced with a new one.
Charges and discharges quickly.
When the contacts of the battery, charger and tool become oxidized and dirty, the battery quickly charges and discharges. Clean contacts periodically.
Electrolyte boiling away.
Electrolyte boiling occurs due to accelerated charging and overcharging. If the cells are not swollen and show operating voltage after a full charge, they can be restored without replacement. It is necessary to replenish the empty volume with distilled water.
- After identifying the defective cans, cut the connecting metal tape. Unsolder the elements.
- Take a punch no more than 1 millimeter thick. Where the minus is on the can, make a hole in the body.
- Pump out up to 1 cubic centimeter of air and pour in the same amount of water.
- Seal the elements with epoxy resin and connect them to the circuit.
If this method does not help, then replace the jars with new ones.
Video: Adding distilled water
Replacing and soldering batteries.
When you have carried out diagnostics and identified defective cans, you need to purchase replacements. New elements must match exactly in size and technical characteristics.
- Cut or unsolder the old elements from the plates.
- Put new ones in their place. For connection, use the same plates or copper conductors of the same cross-section.
- To prevent the cans from overheating, do the soldering quickly. Observe the polarity of the series circuit. Connect plus with minus, and minus with plus.
Soldering batteries
Video: Replacing elements in the battery
How to convert a screwdriver to use a lithium-ion battery.
Many owners of a screwdriver with a nickel-cadmium battery have encountered the problem that when they need to use it, the battery is always low. And constant charging kills it due to the memory effect. Therefore, such a battery is converted to lithium-ion.
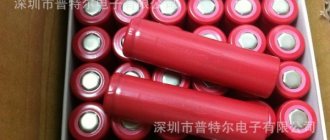
The source of lithium batteries can be an old laptop battery or you can buy new ones. Laptops and new banks are unprotected. You cannot use them without protection, because you will not be able to charge them and control the discharge. And when recharged, they will die safely. It is allowed to connect absolutely identical batteries in parallel, then they will work as one unit. Purchase a battery protection module for series-connected batteries that monitors and takes care of each cell individually. Monitors voltage and current, provides short circuit protection. Such modules are available for one, two, three and four batteries.
I once bought myself an inexpensive screwdriver. Like this:
It was purchased for household purposes; I didn’t want to buy a really cheap one, but I didn’t see much point in a more expensive and branded one. Actually, there was a choice - to buy a Favorite with 1500 mAh or 2000. The difference in price is 500 rubles. Well, you can see from the photo what I chose. There are no complaints about the operation of the tool; it’s an ordinary tool for the money. But out of boredom today I decided to figure out how many cells there are, how they are located and whether the inscription on the case is correct.
Read also: Loading sheet metal fixtures
Simple calculations (14.4: 3.6 = 4) showed that there are four 2000 mAh batteries. Three cylinders, in the form of standard batteries, are visible through the ventilation:
So. Three is not four. Okay, they are arranged in two layers. But then it should be six. I figured out how I could connect six batteries to get the above characteristics, but I couldn’t figure it out, it’s not my specialty. But my hands itched, I decided to unscrew:
Four batteries. I wasn’t surprised at all, it’s a standard cell with which you can charge an 18-volt battery. Here's what's written on the batteries:
1500 mAh. I wonder what is written on the screwdriver batteries, like in this picture?
Actually, that’s the answer to the title - just stick a piece of paper with the required capacity. It’s useless to present it to the seller, of course, and I don’t want to. I couldn’t find the manufacturer’s website, only suppliers who had confusion on their website with prices and stickers. Moral of the story - open the tool right in the store. Joke. There is no morality, it's just offensive. Perhaps it’s my own fault, but I’m not an expert in such matters, I don’t know any other ways to make sure other than what’s described
Features of choosing lithium batteries
When choosing Li-ion cells, you need to pay attention to the number of available discharge and charge cycles . The latest models are endowed with the ability to discharge up to 600 times. When choosing, you need to consider that the higher the capacity, the longer the tool can work. If you install a higher power battery on a weaker model, the screwdriver will fail faster. A 12V battery on a tool that is rated for 18V will limit its power, so the voltage reading on the drive must exactly match the value on the screwdriver.
Scheme for converting a screwdriver to lithium
Some useful tips
These modern batteries, due to their large capacity, slowly consume their charge. With proper use they will last at least 10 years .
An advantage of equipping a screwdriver with a lithium battery may be the ability to relatively quickly fill them with energy. This type of cell tolerates storage and operation well in a not fully charged state.
They are very sensitive to the charging process . The voltage should always be as low as possible, otherwise the lithium-ion battery will quickly fail.
You need to know how to store lithium batteries for a screwdriver, this will help:
- extend battery life;
- minimize capacity losses;
- effectively use their capabilities.
For storage, they are taken out and placed in a dry, cool place where the temperature is maintained from +1 to +25 degrees . Do not allow batteries to freeze. You can put it in a bag and in the refrigerator, but not in the freezer. The lithium battery is stored in a charged state with a state of charge of 40%. In this case, during self-discharge the voltage will not drop below 2.5 V/cell. If stored at a voltage below the threshold value of 2.5 V for 3 months or more, the capacity will drop and it will be impossible to restore, the elements will rust.
How to Increase the Battery Capacity of a Screwdriver
How to return the battery
screwdriver and its
capacity
?
Is it possible to restore the battery of a screwdriver?
A screwdriver is a necessary tool in the household, but the time comes and its source of energy. the battery stops working. Models are constantly changing and sometimes it is not possible to find the right battery. At the same time, you can completely restore it or extend its service life by 2-3 years. This article explains how to repair a screwdriver battery.
Content
Disassembling the battery
When deciding whether it is possible to restore a screwdriver battery , you must first of all figure out how to remove the elements from it. The battery is housed in a plastic case made of two halves. First you need to unscrew the connecting screws. If the connection is made with glue, you will have to tinker with a screwdriver or chisel. You should disassemble it carefully so that you can seal the case again later.
Inside there are elements connected in series. Some designs use a parallel-series connection.
Replacing elements
When deciding how to restore a screwdriver battery, you must first of all identify faulty banks that are spoiling its operation. If the battery is dead, you need to charge it and then check the voltage on all elements. It should not differ from the nominal value by no more than 10%.
The repair is how to restore the battery capacity of a screwdriver
generally. It is affected by the serviceability of each element. It must have a given capacity, which means the ability to power the load connected to it. Sometimes it is better to replace failed elements that quickly discharge. They can be detected by corrosion or the presence of characteristic traces of electrolyte on the surface. One or two elements can be a serious hindrance to the operation of the entire line.
If the battery is used for more than 3 years, then most of the elements may be faulty. In this case, it is better to replace them all. It is important that they are suitable in voltage and size. The cost of batteries assembled separately is lower than new ones assembled.
The serviceability of each bank is checked by the value of internal resistance, which should be about 0.06 Ohm. To do this, connect a load to it (a 5-10 Ohm resistor) and at the same time determine the current and voltage. It is convenient to use low-voltage incandescent lamps. Measurements are made with two different resistances, respectively 30% and 70% of the permissible load. The 2nd is subtracted from the 1st voltage, and the 1st from the 2nd current. Then the subtraction results are divided and, in accordance with Ohm's law, we find the internal resistance of the battery.
READ How to Correctly Charge a Makita Screwdriver Battery
The battery is often sold complete with a spare. Of the two, you can collect one and still have jars left in stock. It is advisable to use them somewhere as power sources, for example, for a flashlight with a car lamp.
After diagnostics, the elements that have passed the test are assembled into a line. The selected set must be soldered in the same order. The can body has negative polarity, and the middle bus has positive polarity. Then, without assembling the battery, you should connect the charger to it. In this case, it is necessary to control the temperature of the elements. If they are working properly, then there should not be severe overheating. After the charging time has expired, as well as after a day, the voltage on each element should be measured. If any battery drains by more than 10%, it must be replaced with a new one. After the battery passes the test, its case can be finally assembled. The fastening screws are screwed into place according to the dimensions, and acetate acrylate (“Super Glue”) is used as glue. With proper selection of elements, the battery will serve like new. After charging, it should be subjected to intensive training, putting maximum load on the screwdriver until it runs out of charge. Such cycles should be repeated 2 more times, and then 1 time per quarter.
Restoring cans
Batteries that do not pass the test should not be thrown away in a hurry. The main reason for their failure is the evaporation of water through the rubber seal located between the body and the middle tire. When it is completely “zero”, the battery is briefly charged by pulsed voltage supply of 12 V through a resistance of 40-50 Ohms. At the same time, care should be taken to ensure that the housing does not overheat. If after this there is still no voltage on it, the jar can be thrown away.
We increase the capacity of the Li-ion battery for the screwdriver.
I will bring any product from China to order, please contact me. [email protected] Group in contact.
Screwdriver repair, increasing the capacity of Li-ion batteries
Links to products: Budget soldering iron lithium batteries (Li-ion).
To restore the electrolyte, some craftsmen drill mini-holes for the syringe needle in the side recess of all batteries. The jars are then filled with distilled water. Afterwards, the batteries should sit for 24 hours. The battery is then “trained”, charged and the voltage on each element is checked. The holes are sealed with silicone.
READ How to Remove the Bit from a Screwdriver
How to restore a screwdriver battery
The batteries inside all look similar. They consist of cans soldered in series. The result is the total battery voltage at the output contacts. The following types of elements are used:
- Ni-Cd (nickel-cadmium, U=1.2 V).
- Ni-MH (nickel metal hydrite, U=1.2 V).
- Li-Ion (lithium-ion, U=3.6V).
Interskol screwdriver battery
The Interskol screwdriver is one of the most popular due to its versatility. In addition to its main function, it can also serve as a drill.
The batteries in it can be any of the common ones. Nickel-cadmium and metal hydrite are used more often as they are cheaper and quite powerful. For them to work reliably, they must be fully discharged and charged to fully utilize the charge. Otherwise, the service life of the equipment is significantly reduced. The reversible loss of cell capacity due to incomplete discharge and charging is called the memory effect.
Lithium-ion batteries do not have this disadvantage, but are much more expensive. During operation, when every minute counts, a small recharge is often required to maintain the required power of the screwdriver. Here, such batteries are indispensable, since their capacity can be quickly restored.
The buyer chooses the Interskol screwdriver battery independently, depending on preferences, capabilities and the required work. In most cases, nickel-cadmium batteries are used.
How to restore the battery of an Interskol screwdriver if it has not been used for a long time? During operation, you must try to ensure that the voltage does not drop to zero. For a 1.2 V can, the discharge is up to 0.9 V. If it is completely discharged during long-term storage, the charger may not “see” it. It is necessary to “push” the battery with another, more powerful current source so that a small voltage appears on it. After this, you can connect it to a standard charger.
Restoring the Makita screwdriver battery
Before you restore the battery
Makita screwdriver, first you need to disassemble its body. It consists of 2 halves connected with glue. If you gently tap the battery case with a rubber hammer, the glue will come off. In some places there may be problems with disassembly. Additional hand tools may be needed there. Next, you should separate the halves of the housing, holding the terminals with a screwdriver.
In terms of performance characteristics, the Makita drill/driver is close to a corded tool. Autonomous power supply is provided by 2 replaceable Li-Ion batteries. Computer charging technology allows them to be restored in just 22 minutes. At the same time, battery life is significantly increased.
READ How to Cut Plywood at Home
Faulty banks must be replaced with similar new models. If they are difficult to find on sale, you will have to assemble one from two batteries. Factory welding can be contact welding, but during repairs you will have to create a connection by soldering.
How to restore a Bosch screwdriver battery
Bosch screwdrivers are perfect for non-professional use. They contain batteries with Ni-Cd cells. They can withstand high load currents, but quickly self-discharge (in 3-4 weeks). They must be restored at least once a month to prevent them from breaking down. In addition, during operation, the elements become unbalanced and capacity is lost over time.
One of the restoration methods is to disassemble the case and “train” each element separately. If this doesn't help much, some of them will have to be replaced. Then the battery will last for a long time.
Hitachi screwdriver battery restoration
How to restore a screwdriver
Hitachi?
Both Ni-Cd batteries need to be charged, after which they should be disassembled and the voltage on each bank should be measured with a load of 1.5 ohms. Elements showing lower voltage can be thrown away, and whole ones can be assembled into one high-quality battery. Just 1 or 2 banks can spoil the impression of a battery. How to restore the battery of a Hitachi screwdriver, as well as all other models, depends, first of all, on the type of elements installed in them.
Aeg screwdriver battery restoration
The screwdriver comes with 2 Li-Ion batteries. If one of them does not charge, this does not mean that it is faulty. It is quite possible that it is too discharged. To do this, you can try to “train” the battery by applying a pulse voltage to it, and then put it on charge. The easiest way is to connect it to a charged battery for a few seconds.
After it to restore the battery of an Aeg screwdriver using the above method, its case should be disassembled and each battery checked.
Battery Maintenance Recommendations
- If the battery has not been used, once a month it should be discharged to an acceptable load and charged again.
- It is advisable to buy a screwdriver with two batteries included.
- Screwdrivers must be stored and used in conditions that prevent ingress of moisture.
Conclusion
Source