A disk tool for cutting wood is always useful during construction. A circular saw is convenient because it allows you to quickly cut material with minimal effort and time. As for the quality of the cut, we can say that it is ideal, but only when the saw is in good working order and well sharpened. Otherwise, working with such a tool is even dangerous, so you should sharpen the circular saw.
It is not difficult to determine the need for sharpening: a blunt tool cuts the workpiece poorly, which is immediately noticeable. There are two options here: either take the blade to a workshop, which is not always profitable in terms of time and money, or sharpen the circular saw with your own hands. This may seem difficult at first glance. But if you delve into the essence of the saw in more detail, it will not be difficult to service the tool at home.
When to sharpen a circular saw
There are very definite signs by which one can judge the condition of the instrument. Saw sharpening is necessary when the following clearly appears:
- During operation, smoke appears, a specific smell of burnt wood, the casing covering the saw teeth begins to heat up quickly.
- When moving the tool along the workpiece, you need to apply significant effort, as if pushing the saw forward.
- After cutting the material and visually inspecting the sawn edge, black deposits or many chips, fiber burrs, and chipped areas are visible.
- When you carefully examine the saw teeth through a magnifying glass, you can see that the cutting parts have rounded edges rather than sharp ones.
All this requires immediate cessation of work, otherwise there is a high risk of damage to the material and wear of the circular saw to a state where sharpening will no longer help it.
Basic sharpening angles for circular saws
The tooth of a circular saw, which is usually made of carbide metal, has a complex structure.
It has three cutting edges as standard, so you need to sharpen the teeth in such a way as to sharpen these edges. But the main thing when sharpening is to observe the angles at which the tooth planes diverge from the edges, and the angles of attack between the tooth plane and the workpiece. The last point is important to maintain the characteristics of the saw blade. The front edge, the one that first cuts into the workpiece as the saw moves, forms the main cutting edge with the rear edge. The angle at which the rake edge meets the material is called the rake angle Y (angle of attack). The angle between the back edge and the front edge is the sharpening angle. If you subtract the rake angle and the point angle from 90 degrees, you get the back angle.
In practice, it is important to maintain these angles for each type of blade when sharpening. It is according to the front angle that saws are divided into types:
- Longitudinal cutting, where the rake angle should not go beyond 15–25 degrees.
- Transverse cutting, where it is permissible to sharpen the front edge of the tooth at an angle of 5–10 degrees.
- Universal discs that can handle both longitudinal and transverse cuts quite easily; their rake angle should be maintained around 15 degrees.
The bevel angle of the rear and front planes is also important: the sharper it is, the easier it is for the saw to enter the material, but wear occurs faster.
Follow the rules! When sawing hardwood, saws must be sharpened so that the point angle and bevel angle are as small as possible (within acceptable limits). This increases the service life of the disc until the next sharpening.
Differences in insert teeth
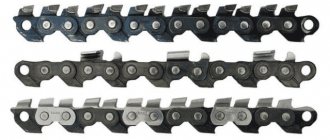
The tooth of hard alloys has four main planes for work: front, back and lateral (auxiliary). When the planes intersect with each other, cutting edges are formed: the main one and a pair of auxiliary ones.
The shape of the teeth is as follows:
- Direct. The use of this form will be justified when longitudinal cutting is required, which is quick in time and not required in quality.
– Oblique or beveled. The angle of inclination of the rear shape can be right or left, they alternate with each other. This configuration is the most common. Sharpening blades of different sizes are used to work with different materials in any direction.
– Trapezoidal. This tooth dulls its edges more slowly than a beveled tooth. Alternate it with the straight one. In this case, the rough cut was a longer trapezoidal cut, and the finishing cut was a short straight cut.
– Conical. This form of teeth performs a rough cut on the lower edge of the boards, while protecting the upper edge from chipping. Basically, the front edge of such an element is flat. But if you make it concave, then it is possible to use this device for cross cutting in a finishing version.
Read also: Cable depth in the ground
Types of circular saw tooth settings
Before sharpening the circular saw, you need to check whether the teeth are set.
To do this, measure the width of the tooth with a caliper, and then make a small cut in a piece of hardwood and measure its width. If the circulation disc is set apart, then the cut should be wider than the tooth. Otherwise, the saw teeth must be set apart before sharpening operations. The complexity of the setting process is due to the need to move the teeth to the side at the same distance. This can be achieved by using a factory-made device for wiring circular saws. Each tooth should be started from the middle of its size. For wood materials of different densities, the degree of teeth set should be different, but without going into details, we can say that the teeth are set wider for sawing soft wood than for hard wood.
There are three main wiring methods:
- Stripping type wiring. This method boils down to the fact that after two teeth the tooth remains in its place without change, the rest are deflected in different directions. This saw preparation is good for working with solid wood.
- A variant of the classic setting, when the saw teeth alternately move to the right and then to the left. This universal method can be used for almost all types of saws.
- The so-called wavy layout, the distinctive feature of which is that the teeth are not set at a strictly defined distance from the center, but at different distances with a deviation of 0.3–0.7 millimeters.
General rules for sharpening a circular saw
To sharpen the disks for a circular saw, you need to prevent them from wearing out too much, namely, the radius of rounding of the cutter should not be more than 0.2 mm. The following basic rules are followed:
- The main edges are processed first, of which the front faces wear out the most.
- In extreme cases, if the side edges are heavily worn, they are corrected.
- No more than 0.15 millimeters of the thickness of the saw metal is removed at a time.
- When finishing edges with an electric tool, overheating of the metal is not allowed, in which case its properties will deteriorate.
- To ensure the maximum service life of the saw, when it can be sharpened up to 30 times, you should sharpen both edges: the front and back, removing the same amount of metal.
- Sharpening circular saws with tools not intended for this purpose, such as a grinder and a metal cutting disc, is not allowed.
After the basic sharpening operations, you can refine the teeth with fine sandpaper. The quality of tool sharpening is checked under working conditions. If everything is in order, the cutting of the material will be clean, smooth, without visible defects or blackening.
Application of the machine
The simplest machine for working at home is a motor with an abrasive. The wheels can be diamond, CBN or silicon carbide.
It is difficult to keep the blade in a certain position relative to the abrasive. You need to use the tools. This can be a horizontal stand or a fixing device, where the upper plane must coincide with the axis of the abrasive.
The tooth to be sharpened is located on the plane so as to be perpendicular to the blade. After turning on the engine, the blade is brought to the circle and pressed against it with a tooth. The layer of metal being removed is regulated by the pressing force. Having finished working with one tooth, the next one is approached using the same method. And so on in a circle until the end.
For the purpose of universalization, the stand is being modernized. The front part is made movable, and a pair of bolts are screwed into the rear. With their help you can adjust the tilt of the canvas. It becomes possible to sharpen the front and back planes of an oblique tooth.
The problem of maintaining the same front and rear sharpening angles remains. To do this, it is necessary to fix the blade relative to the center of the abrasive wheel. To do this, the disk is inserted into a special mandrel, and a groove is made in the stand for it. The required sharpening angle is maintained by moving the mandrel along the groove. If the diameter of the disks is different, then it must be possible to move the engine or stand with a groove.
Another way is to install stops that will fix the desired position of the disk.
How can you sharpen a circular saw?
Sharpening discs is impossible without the use of a special tool. For these purposes you can use:
- Special wheels for sharpening saws, made on the basis of diamond abrasives.
- A regular file for sharpening a saw, but you also need to have a vice to secure the saw and a wooden block used as a guide.
- Processing on professional equipment is the fastest and highest quality method of sharpening, but requires large material costs to purchase the tool.
Do-it-yourself saw sharpening at home
Attention! To sharpen circular saws with your own hands, it is advisable to have certain skills in sharpening tools. If you don’t have any, at least practice on sandpaper, sharpening a regular knife.
When working with a disk, the main thing is not to damage the cutting surface, and this can easily happen if the hand trembles and the feed angle is disrupted. To avoid negative consequences, you should study sharpening methods, and then everything will work out correctly. There is a manual method for restoring the cutting elements of a circular saw and a method using sharpening equipment.
Manual method
You can sharpen the teeth yourself by hand using a file to achieve high quality results if they do not have a bevel, that is, the surface of the front edge is perpendicular to the surface of the blade. The process looks like this:
- A block with a cross section of about 50x50 mm and a length of 100 mm is prepared from dense wood. The sides of the bar must be strictly perpendicular to each other.
- Mark with a marker any tooth that will be reported and the first to be processed.
- The saw blade is clamped in a vice together with the beam so that the front edge of the element being processed is flush and in the same plane with the surface of the beam (the beam in this case acts as a guide for the file).
- A thin file (its thickness should allow it to fit freely into the cavity between adjacent teeth) is applied to the surface of the tooth being processed and at the same time to the block and sharpening is carried out using methodical movements back and forth.
- In this way, each tooth is gradually sharpened, monitoring the condition of the timber and, when working out its surface, slightly shifting the plane.
Use of machines
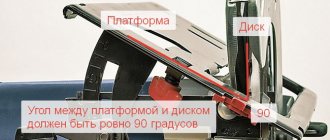
Using a special machine, circular saws are sharpened very easily and quickly. The main thing is that there is no need to monitor the angle of the disk feed. Once it has been set, the operator only has to move the teeth into the processing area and lightly press the tooth plane against the rotating diamond disk.
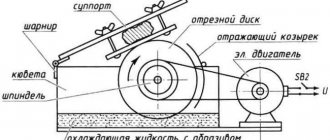
This equipment can be used to sharpen carbide-tipped circular saws and conventional circular saws. The simplest machine for sharpening operations of circular saws has the following structural elements:
- An electric drive with a grinding disc fastening system is a stationary part of the equipment.
- The stand, which moves along the guides, is responsible for feeding the saw blade into the processing area.
- A saw blade clamp on a stand, which is designed to hold the blade in a constant position when it is fed to the sharpening disk.
Pay special attention! Discs with different types of teeth require an individual approach to sharpening. When the front edge is beveled, it is fed into the processing area at an angle to the horizontal, for which one edge of the stand is raised accordingly.
If you have additional questions on the topic of sharpening saws or you have your own experience in carrying out such operations, respond in the comments! Your comments are important to us!
Option 1 - making a simple sharpening machine from a sharpener
The first option for manufacturing the simplest sharpening equipment has the following form:
- On the workbench there is an emery machine, on the shaft of which there is a diamond-coated circle
- A fixed base is made from chipboard. This base simultaneously acts as a guide along which the moving frame will move
- At the next stage, a movable frame is made from chipboard or plywood, the walls of which should be directed downwards and act as a moving mechanism
- A disc clamp of the appropriate diameter is placed on the outside of the movable frame, and a groove is also made
- The result is a finished sharpening machine for saw blades
The manufacture of such a device requires a minimum of time and costs, and the effectiveness of its use is 100%. Details in the video:
