Rallying in a quarter
A quarter splice
produces a tighter joint than a butt splice. Longitudinal side cuts (quarters) are made in the boards to be joined using a hand router, electric planer or circular saw. The depth and width of the quarter should be equal to half the thickness of the board. This type of connection leaves no cracks or gaps. Quarter bonding is useful for cladding external and internal surfaces. For example, to hide unevenness or defects in walls, insulation and flooring.
1. For an example of cutting a quarter with a circular saw, take 3 identical boards (photo 1).
2. At the beginning of work, mark 1/4 of their width on the boards on both sides. Prepare the circular saw. To do this, adjust the reach of the saw blade so that the cutting depth is equal to half the thickness of the board (photo 2).
3. For the required distance (half the thickness of the board) of the cut from the edge of the board, we adjust the parallel stop of the saw (photo 3).
4. We secure the workpiece on the work table with clamps and make a longitudinal cut with a circular saw (photo 4).
5. After this, we make longitudinal cuts on the back sides of the board (photo 5).
6. Again, secure the workpiece with clamps on the work table (photo 6.1) and make transverse cuts equal to half the thickness of the board (photo 6.2-6.4).
7. In this way we make 2 more blanks (photo 7).
8. Place the workpiece on 2 perpendicular boards (photo 8).
9. We nail the prepared blanks to their base (photo 9.1, 9.2).
10. When nailing the next workpiece, press it tightly against the previous one and fix it with nails using a hammer (photo 10).
11. The quarter joint is ready (photo 11).
Source: otdelka-profi.ru
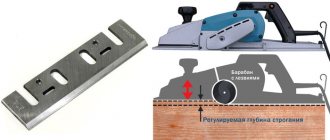
Seam using an electric plane: step-by-step instructions
Step #1
First, the workpiece is placed on a carpentry bench and secured as tightly as possible with clamps. The fastener should be on the opposite side of the processing area.
Step #2
After this, the instrument is prepared. Set the angle stop at the required distance from the part. This way it will provide the required planing width and a 90° angle between the tool and the edge of the part.
Step #3
A depth stop is screwed onto the right side of the power tool.
Step #4
The cutting tool of the device should be installed as close as possible to the right edge of the sole.
Step #5
When everything is ready, turn on the electric planer and select the fold, pass by pass. Setting the maximum planing depth in one pass is not advisable. This point must be coordinated with the recommendations of the tool manufacturer.
Step #6
After the depth stop rests on the wood, work is stopped. The fold is ready.
If necessary, chamfer the edges of the part. This will help prevent the edges of the corner surfaces from splitting. For ease of chamfering, slots of different sizes are provided on the base of the power tool.
After reading the article, the reader will be able to learn about the purpose and use of rebates in carpentry, and will be able to make a selection of quarters with an electric planer independently.
Tags: timber, choose, quarter
« Previous entry
What tools do you use?
Methods for making grooves, tongues and grooves vary depending on the arsenal of tools you have at your disposal and whether the finished joint will be visible after the project is finally assembled. (The attached table will help you compare the advantages and disadvantages of these methods.) Remember that some connections can be hidden behind the facade frames, and a more or less even groove can be made even better using special cutters (see the section “Cutters for cleaning grooves will remove flaws in the sawing machine” ).
Having much in common, these samples nevertheless differ depending on their location in the wooden blank. The fold forms an L-shaped depression along the edge or end. The groove has two shoulders (walls) and is located transverse to the direction of the fibers. The tongue also has two walls, but it is located along the grain.
FIVE WAYS TO SELECT GROOTS, RABBLES AND READINGS
| TOOL | RESULT ASSESSMENT | PRICE | OTHER APPLICATIONS | |
| Stackable groove disc | Advantages: cuts cleaner than most conventional blades; precise thickness adjustment using spacers | Disadvantages: leaves triangular grooves in the corners of the sample; When working across the grain, a support board is required to prevent chipping | $80-$250 | Formation of tenons, box joints, half-tree joints, etc. |
| Adjustable groove disc | Advantages: simple and quick setup; affordable price | Disadvantages: uneven sampling bottom; When working across the grain, a support board is required to prevent chipping | $50-$80 | Formation of tenons, half-tree joints, etc., but with low quality requirements |
| Combination saw blade with 40 or 50 teeth | Advantages: allows you to do without a groove disk; when working across the grain, it makes clean folds | Disadvantages: the need to make several passes, which is time-consuming and often leads to errors; tooth marks require cleaning; When working across the grain, a support board is required to prevent chipping | $10-$80 | Rip and cross cuts in normal sawing operations |
| Straight cutter | Advantages: makes clean and rectangular selections; excellent accuracy when the cutter diameter matches the width of the tongue or groove | Disadvantages: deep samples are made in several passes; When working across the grain, a support board is required to prevent chipping | $5-$20 for one cutter or $30-$100 for a set of 6-9 cutters | Selecting nests, milling according to a template, leveling rough surfaces |
| Seam cutter | Advantages: makes clean folds when routing by hand and on a router table; Setup is faster and easier than a straight cutter | Disadvantages: deep folds are made in several passes; when working across the grain, a support board is required to prevent chipping; may tear veneer edges from coated surfaces | $10-$40 for one cutter or $20-$60 for a set with multiple bearings | Not intended for other operations |
Lumber processing options
Let's figure out how to choose a quarter on the board with your own hands. We buy grade 2 board and process it in a convenient way. How can you do something like this:
- electric planer;
- circular;
- manual milling cutter;
- Bulgarian
After purchasing the required amount of lumber, the easiest way to select quarters in a board is to use a circular saw or power planer. All that remains is to give a neat shape to the edges of the product.
First, you need to make a cut from the end of the board, with a depth of half the height, and then in the center of the end. Then we set the width of the working part of the board and saw another fragment. Here the depth should be 1.5 times greater than half the height to make it more convenient to remove the sawn-off part. In this way, you can create a finished product with your own hands that is twice as expensive as the original one.
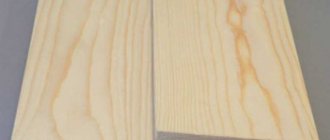
Despite the production from second-grade raw materials, the quarter has excellent characteristics:
- strength;
- thermal insulation properties;
- visual appeal;
- possibility of decorative use;
It is possible to use this material for external cladding.
A circular saw
Such a saw, used when processing boards, can simplify the process and reduce its duration. If the equipment is powerful and reliable with sharp knives, setting the required parameters will not be difficult.
The work scheme is not fundamentally different from the previous ones, the only difference is that wood processing is carried out with a circular saw.
Electric planer
They are convenient for cutting boards and giving them shape. The process of obtaining a quarter board is no different from working with other equipment, but a plane is better because of its convenient operation. This device provides an open view of the working surface of the board.
In the absence of a circular saw and a plane, a grinder with a wood disc or a hand router on which a cylindrical cutter has been previously installed will be suitable for work. But both options are characterized by low productivity, that is, they are unlikely to be suitable for processing large volumes of material due to their low speed.
Read also: Russian-made T-shaped shaving machine
With these tools, inexpensive lumber can be easily transformed into quality products suitable for finishing buildings both inside and out.
Selecting a quarter in a wooden piece is one of the most common operations in carpentry and carpentry. Why is this done and how is it discussed below.
Wood, like any material, has specific properties that need to be taken into account. This obvious fact, however, is often ignored by novice masters. The result is a spoiled mood, time spent on rework, and often spoiled material.
One of the characteristic properties of wood is that when humidity changes, the linear dimensions of the wooden part change. When wood dries, it contracts and expands when humidity increases. In addition, over time, resins evaporate from wood. Because of this, the wooden part gradually decreases in linear dimensions regardless of changes in humidity. They say about this phenomenon: the tree is drying out . These effects are especially noticeable in softwood, from which the most popular lumber is produced.
In construction and dacha farming, spruce and pine boards are most often used. These types of wood change size the most as they dry.
What does drying out lead to?
A typical case: you made a shed at your dacha to store household equipment and for other needs. They did it for themselves, so they pulled together the boards from which the walls were made, carefully, without the slightest crack. Two or three months pass; the boards dry out and the entire wall glows with cracks. In winter, snow blows through them; in summer, the wind blows dust inside the barn.
To prevent this from happening, you need to use quarter boards for wall cladding. A wall covered with such boards will never have through gaps. With their quarters, neighboring boards overlap each other and when they dry out, through cracks no longer appear.
Unfortunately, lumber is very rarely sold with a quarter finished. Therefore, an amateur craftsman should know the ways in which boards can be modified if necessary.
Making planks with grooves at home
Often you have to make furniture or make repairs at home, using the simplest methods and what is at hand.
If you need to make a groove in the board with your own hands, be patient and have the necessary tools:
- A circular saw. The most practical tool, but, unfortunately, not everyone has it.
- A regular hacksaw for wood. It will take longer to work with it, but this accessory can be found in every home.
- Electric drill. It is also quite accessible, but before making a groove in a board with a drill, it is advisable to practice on an unnecessary block, practicing the skill.
Making a groove with a circular saw.
The optimal materials are wooden boards, bars and the like. The price of raw materials is minimal; in extreme cases, what is available on the farm is used. The most successful solution is a through, single open straight end connection.
The joint will be strong and reliable:
- It is recommended to make tenons with a thickness of ¼ of the thickness of the plank and a groove of the same size.
- The height and length of the groove must correspond to the dimensions of the plank.
- Prepare a pencil and ruler for marking.
- Decide on the coordinates of the cut and mark it.
- The cut should be made along a line inside the side that will then be separated.
- For a circular saw, the instructions recommend a blade width of 2-4 mm.
- Sawing in the middle of the marked line removes 1-2 mm of excess, since two grooves are made on each plank.
- If you need to join two parts at a 90º angle, cut the pieces at 45º at the ends.
- For an end-to-end open miter connection (single straight), mark the cut locations on the oblique cuts of the planks.
- Before removing the groove from the board, double-check that the cut is correct on all sides.
- For an angular single connection that is not through the eye, an eye is made instead of a groove. In this case, the width of the tenon is left unchanged, and the length will be 0.3-0.8 of the width of the board being attached.
- Since the circular saw rounds the edges of the eye, leaving the shape of the tenon unchanged, it is advisable to refine the corners by turning them with a rasp.
The photo shows a groove being cut out with a drill.
The method is quite labor-intensive, but it can be called an alternative to the one described above. If you were unable to get a hand router, prepare a drill and chisel, ruler and pencil.
- Select a drill with a diameter corresponding to the width of the future groove.
- To guess the depth of the groove, you can make a mark on the drill itself (for example, draw it with bright paint).
- Draw two parallel lines along the block at the required distance from each other.
- Having secured the workpiece in a vice, drill a furrow, carefully monitoring the vertical position of the drill and maintaining the depth.
- When finished, remove all excess with a sharp chisel and sand with emery cloth.
Making a transverse groove with a hacksaw.
Well-done markings will help a lot here.
Select a hacksaw blade that is smooth and durable:
- To avoid mistakes, draw two lines along the length of the board, on opposite sides. The distance from the top plane to them will be the depth.
- Securely secure the block and begin sawing.
- It is important to monitor, checking the lines, how far the canvas fits into the wood.
- If the tool is skewed, you can ruin everything, so periodically watch the hacksaw’s entry into the material from the side angles.
- With a wide groove and a thin blade, it is more effective to make two cuts, again along the inner sides of the cut.
- All excess is carefully removed with a chisel and cleaned.
You can select a quarter using several methods using different tools. For example:
- electric plane,
- milling cutter,
- hand circular saw,
- stationary circular saw.
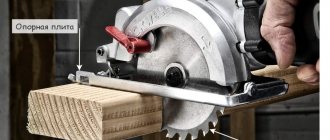
The last method - selecting a quarter using a circular saw - is the most convenient and productive. Let's consider it.
- We adjust the reach of the saw blade so that the cutting depth is equal to half the thickness of the board being processed. The easiest way to do this is right on the spot. To do this, place the board on the side of the saw blade, as shown in the photo, and adjust the reach of the blade.
- We install a parallel stop on the machine so that the width of the cut is also equal to half the thickness of the board. We take into account the thickness of the disk itself. This completes the machine setup.
- We make longitudinal cuts on opposite sides of the board.
- We make cuts from the ends of the board. A quarter is ready. As a by-product we get glazing bead)).
As mentioned, a stationary circular saw is very convenient for selecting quarters. (There is a separate article on our website about the types of circular saws and the features of their choice.) But it is not always in the master’s arsenal, and sometimes it is physically impossible to use it.
If you need to cut quarters out of thick, long boards, you can use a hand-held circular saw. The manufacturing principle and sequence of operations are the same. The difference is that in this case the board being processed and the tool change places. The board is fixed motionless, and the master moves the circular saw with a parallel stop along it manually.
Material for wood cutters
Milling cutters are made from high-speed steel (more affordable), from carbide (expensive) and with carbide brazed plates. The durability of carbide blades exceeds that of high-speed steel blades by almost 25 times. These cutters can also be used for processing materials with a high adhesive content (for example, chipboard and MDF boards), difficult-to-cut wood (for example, teak), plastic and aluminum. However, when processing soft wood, the best results are obtained with high-speed steel cutters, the blades of which can be sharpened.
A worthy alternative to these two types of cutters are cutters with removable, rotating, non-sharpenable carbide plates, which, in comparison with cutters with sharpened plates, are more economical (suffice it to say that sharpening a cutter sometimes costs almost twice as much as its cost). Removing and putting the cutting plates in a different position is a very simple matter.
The advantage of cutters with removable and rotating plates is that their working diameter remains constant. When sharpening the blades, it gradually decreases.
There are cutters with removable rotary plates: grooved (08.010 and 012 mm), for milling around the perimeter - 016 mm, fitting, for chamfering and quartering. Due to the high peripheral speed, large-diameter cutters are used only on stationary milling devices. Of course, the range of cutters is constantly expanding, and thanks to this, the technological capabilities of home craftsmen can also expand.
These are not all cutters for a hand router. There are many of them and we will try to tell you about them all.
Please advise which tool to use to select a quarter in the boards. The work is not regular, as needed. The boards are supposed to be used for cladding.
VG wrote: Please advise which tool to choose a quarter in boards
a manual circular saw in two passes, a stationary circular saw, if you place two discs through a washer, then in one pass. with a plane in 4-6 passes (not all models choose a quarter, the depth at a time is 2 mm.) with a groove cutter and a hand router. -1 pass. (the disadvantage of the cutter is that it is almost impossible to sharpen; it sits quickly.) with a disk cutter on a universal machine. and by hand with a plane
here's a cutter for you" > on a circular saw in one pass.
Thanks for the detailed answer. There is a manual circular saw and an electric planer. It is not very clear how to pass the thickness with a circular saw (if in two passes). For example, if the board is 20. Circular cutter, for production in one pass - suitable for manual or not? I've never seen anything like this in a store. Is it interesting that they sell it in St. Petersburg? Another question about the router (I’m thinking about buying it or not). If they choose a quarter, how many meters (approximately) will the cutter last? In general, does it make sense to buy it for this and work like: making skirting boards, tongue and groove floorboards, etc. for small volumes - 20-30 m?
VG wrote: Circular cutter, for manufacturing in one pass - is it suitable for manual or not?
I haven’t tried it, but the gearbox should pull.
VG wrote: If they choose a quarter, how many meters (approximately) will the cutter be enough?
50 meters should be enough, then the edge needs to be corrected
VG wrote: approximate) In general, it makes sense to buy it for this and work like: making plinths, tongue-and-groove floorboards
absolutely not . Even a two-kilowatt cutter won’t handle such cutters; the diameter of the cutters needs to be large. here is a tenon groove for them to choose well
VG wrote: it is very clear how to go through the thickness with a circular saw (if in two passes). For example, if the board is 20.
It’s been written a hundred times already, the first pass of all the boards on a plane. Then you adjust the circular saw by a couple of mm, the board on the edge so that the circular saw on the 20mm edge does not fall over, collect several boards in a pack with clamps or attach an even block to the board. But that's what I personally do. First pass » > Second pass » >
Read also: How to cut a hole with a jigsaw
Personally, I choose a quarter with a Dioldov milling cutter and simply pee with delight.
Alexey wrote: I choose a quarter with a Dioldov milling cutter
Why don’t you use groove cutters?
For quarter and tongue and groove do you need a powerful router or is a simpler and lighter one enough?
VG wrote: For quarter and tongue and groove do you need a powerful router or is a simpler and lighter one enough?
Quite simpler and more powerful. because precision accuracy is not required. Just make sure that the side support is properly made, and not a piece of broken hardware.
alex_k wrote: with a plane in 4-6 passes (not all models choose a quarter, the depth is 2 mm at a time.)
In addition to the fact that not all planes select a quarter, there is also a limitation on the maximum depth of the quarter for the planes that select it. But the sampling depth can reach up to 4 mm in one pass.
alex_k wrote: Quite simpler and more powerful. because precision accuracy is not required. just make sure that the side support is properly made, and not a piece of broken hardware
Can you suggest any models of milling cutters that fit this definition? I'm still swimming in this topic. I've searched the forum, but there's no clarity yet.
So no one can tell? I want to buy a router next week, but I still haven’t decided.
For those who are undecided, I wrote in Russian - we buy the cheapest milling cutter that is on sale - Diold for 1.1 kW for 1100 rubles. and choose as many quarters as you like. I picked out a quarter for them in a door frame, in a window frame. I chose a quarter in 40mm boards for two door panels. I chose grooves with a cross section of 50*25 mm in 50 mm boards. Tyam didn’t have enough time to use this router for grooves when making the socket, but as soon as he mastered the tool, the first thing he did was those 50*25 grooves that I wrote about above. In the process of reading the forum, I thought that the router is something for frames and lace profego,, girlish,, At the moment, I’m sure that the router is a carpentry tool that can do EVERYTHING / perhaps with Bosch it’s different - just frills / Groove cutters - I’m just learning, and Expensive, a set of cutters is twice as expensive as a router.
Inlay
Cutting thin, flush inlays requires shallow cuts and precision, making a router the ideal tool for the job. Inlaying requires shallow digging into the wood to seat the pieces flush with the surface. You can do the job with other routers, but an edge router is best suited for this task. Its small size and much lighter weight are an advantage over other models, as they provide better accuracy when inserting inlay elements.
Source: hobbywood.ru