Rebating with an electric planer: all the pros and cons
There are different opinions about the advisability of sampling a quarter with an electric planer.
Some consider this a waste of time, arguing that it is better and faster to make a fold using a circular saw or milling machine. Others say that the quality of the work will be better after the planer. Both are right. However, in order to make technological sampling on machines, it is necessary to have them available. Therefore, making steps with an electric planer, although a painstaking task, has the right to life. It should be remembered that not every electric-powered plane is designed for making folds.
When purchasing a tool you need to pay attention to this. One more thing. If a person is not engaged in carpentry business and lives in an apartment, then he is unlikely to have to choose a quarter power tool. For those living in a private house, this option may come in handy, and more than once.
Sampling a quarter using an electric planer
Carpentry specialists often have to perform such an action as removing a quarter with an electric planer. A quarter is a notch that runs the entire length of the edge of the piece. If you make a fold in two parts, then they can be connected to each other with an overlay.
To select a quarter, you will need a plane with this function, a workbench, a vice, a pencil and a long ruler.
Seam using an electric plane: step-by-step instructions
Step #1
First, the workpiece is placed on a carpentry bench and secured as tightly as possible with clamps. The fastener should be on the opposite side of the processing area.
Step #2
After this, the instrument is prepared. Set the angle stop at the required distance from the part. This way it will provide the required planing width and a 90° angle between the tool and the edge of the part.
Step #3
A depth stop is screwed onto the right side of the power tool.
Step #4
The cutting tool of the device should be installed as close as possible to the right edge of the sole.
Step #5
When everything is ready, turn on the electric planer and select the fold, pass by pass. Setting the maximum planing depth in one pass is not advisable. This point must be coordinated with the recommendations of the tool manufacturer.
Basic operating techniques
So, having firmly secured the block, you should stand so that you can move freely at the same time as the tool advances. Excessive body tension needs to be relieved. Sleeves and hems of clothing should not interfere with the movements of the hands holding the plane tightly.
Working posture when working with an electric planer.
First you need to turn it on, holding it in the air above the workpiece. And only when the tool has been running for a few seconds so that the knives reach maximum speed, can you carefully bring them to the end of the workpiece and begin the first pass. It is important that the sole of the working plane is always parallel to the surface being planed.
The tool should move smoothly and evenly across the workpiece. At the same time, you need to make sure that the shavings do not get under its sole! Do not allow sudden movements, jerks, increase speed or stop. In any of these options, there is no way to make the surface completely flat, without pits and other defects.
When planing planes, press the tool handles with the same force. Moreover, at the beginning of each pass, press a little harder on the front handle, and at the end of the movement - on the rear handle, otherwise blockages are inevitable.
When planing a quarter, the position of the hands is different. With one hand you should move the plane forward, and with the other you should press the side stop against the edge of the workpiece. At what speed is it better to advance the tool? There is no need to rush here; it is quite enough to walk 1.5-2 m in a minute.
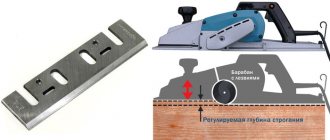
It is extremely important that the tool follows exactly the intended path. As you deepen, the side stop fades into the background, and after a few passes the edge of the fold already becomes the guide. The cutting depth is limited by the parts of the plane that protrude from the side. But on one side they are specially raised so that a sufficiently deep quarter can be made.
Preparing for work
If you are working with a tool for the first time, or it was recently purchased from a store, you need to perform a preliminary check. It is forbidden to start work without preparation, as this may cause breakdown of the electric planer or damage to the lumber.
First you need to carefully study the operating instructions for the electric planer. Then preliminary preparation is carried out, during which you should check:
- The location of the forefoot;
- Free press the power button;
- Location of knives;
- Possibility of free rotation of the drum with knives located on it;
- Presence of possible defects in the case, cord, plug.
The functionality of the device is usually checked immediately at the time of purchase in the presence of a consultant.
To check the rotation of the drum, you need to twist it a little.
To evaluate the functioning of the power button, press it several times.
The integrity of the entire device is checked by external inspection. If no external or internal defects are found, you are allowed to turn on the electric planer for a test run.
Before you start working with prepared lumber, you need to practice on smaller unnecessary parts. This will help you evaluate the principle of operation of the tool and adapt to the speed of its operation. In the future, such training will allow you to get better results at the end of the work.
If it seems that the plane is vibrating during operation, or during a test run, waves appear on wooden workpieces, you need to turn off the power. You will have to sharpen the knives on the drum, or buy new ones.
Setting up the front of the plate
To adjust the tool, you should first inspect the slope of the front of the plate by unplugging the tool from the outlet.
To do this, you can use a ruler or a piece of glass that matches the size.
The sequence of actions looks like this:
- The front part of the sole (the one that moves) is set to a position that allows for a minimum depth during planing. This is done using the adjustment knob.
- The tool is installed on a workbench or regular table upside down.
- The drum rotates until one of the knives is above its axis.
- A ruler or glass is placed on the sole of the instrument. At this moment they should be parallel to each other.
If the ruler lies stable and level, then the position of the sole is set correctly. Otherwise, this defect will have to be eliminated. This is done according to the following scheme:
- First, the adjustment handle and the movable side of the sole are removed;
- Then the resulting cavity is cleaned manually from dust and chips;
- The mechanism is completely lubricated;
- The stove is placed in its usual place;
- A handle is installed behind it;
- The location of the sole is again checked using a ruler or glass.
The adjustment process can be considered complete if the ruler is on the same plane as the sole. If this is not the case, you will have to repeat the entire sequence of actions again.
Checking the installation of knives
Using an electric planer, both rough processing of wood products and finishing work are done, after which sanding is not necessary. That is why you need to be able to correctly install and adjust the knives, because the depth of planing allows you to achieve the required surface cleanliness.
Electric planers are designed in such a way that the depth of planing on them can be adjusted by switching the handle. The adjustment step varies up to tenths of a millimeter. Therefore, when purchasing a plane, you need to pay special attention to this characteristic; it is one of the most necessary when planing. It should be selected based on the tasks that you plan to perform with the plane.
Important! Before you start working with the surface of the lumber, you need to make a couple of test passes on the bars, which you won’t mind throwing away. After this, you should pay attention to the defects that appear, if they are present.
The most common defects are indentations or beveled parts of the part. The cause of both situations may be errors in setting the drum knives. To fix the problem, you should contact the service department or a self-taught technician who has already dealt with the setup. If this cannot be done, you can try to make the adjustment yourself.
To do this, loosen the fastening of the knives to the drum using a hex wrench, as written in the instructions supplied with the device. After which the knives are installed in the correct position very carefully. For straight planes the protrusion should be about 0.5 mm, and for more rounded planes it is from 1 mm. A ruler can be used to determine correct position and alignment. After completing the adjustment, all bolts are tightened tightly. Then you should rotate the drum and see if the knives touch the body of the plane.
Working positions
Certain types of electric planers are supplied with a support-stand. This allows you to work with lumber in two ways:
- When positioned permanently (that is, when the tool is fixed stationary on a workbench or table);
- As portable equipment.
A tool that is firmly and tightly secured is a true planer. To process a wooden workpiece, it needs to be moved along the plane, pressing it quite firmly against the tool. It is very convenient to use an assistant to process long boards. You can handle small workpieces yourself.
Reference! If the electric planer is used as portable equipment, then it itself will have to be moved along the surface requiring processing. This tool is especially convenient for working on long boards.
Alternative methods
As mentioned, a stationary circular saw is very convenient for selecting quarters. (There is a separate article on our website about the types of circular saws and the features of their choice.) But it is not always in the master’s arsenal, and sometimes it is physically impossible to use it.
If you need to cut quarters out of thick, long boards, you can use a hand-held circular saw. The manufacturing principle and sequence of operations are the same. The difference is that in this case the board being processed and the tool change places. The board is fixed motionless, and the master moves the circular saw with a parallel stop along it manually.
If you don’t have a circular saw or a hand-held circular saw at hand, you can use a grinder with a wood blade or a hand router with a suitable cylindrical cutter. Both methods are very slow and are not suitable for large volumes of work. In addition, choosing a quarter with an angle grinder is inconvenient, dangerous and turns out uneven.
Another way is to use an electric plane. However, most modern plane models are not suitable for this due to their design features. Watch the video that shows just this method of choosing a quarter.