An indispensable tool for any carpenter is an electric planer. This device is very convenient to use. With its help, you can quickly give any wooden workpiece a neat appearance and an almost ideal smoothness of the surface. However, in order to truly master this tool, you need to know some of the subtleties of its use.
Preparing for work
First of all, it is important to choose the right clothes. It’s definitely better not to neglect this. The fact is that wide clothing can cause an accident when working with an electric planer. It is better to choose a form in which the sleeves do not hang from the arms, but rather very short.
Before using the power tool, you should check:
- presence of damage to the knives, power cable, and housing;
- reliability of fixation of cutting elements;
- cleanliness of mechanisms.
If the length of the device’s power cord is too short, use an extension cord and avoid pulling on the wire.
It is best to work with well-dried wood, since raw material is difficult to process. The electric planer can be used in two positions – static and portable.
In a static position, the device is fixed on a rigid, stable surface. At the same time, it is easier to work with small parts that are driven individually across the working area of the device. To make large boards smooth, it is more convenient to use a portable method. The workpiece must be securely fixed and not sag under the weight of the device.
Included with electric planer
When you install a separate side stop on the electric planer (it is usually supplied as a kit), you can perform folding . The stop, fixing the tool at a certain distance, must touch the workpiece.
Important: If the surface being processed with a plane is uneven, it means you are using dull knives or have released them incorrectly (see at the beginning of the article).
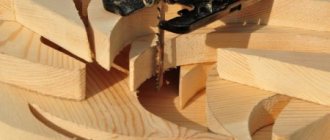
Folding boards
Folding a board
The depth of folding depends on the number of passes with a plane over the workpiece. The more passes, the deeper the rebate.
After planing, remove the knives from the electric planer, wash them with kerosene and place them in a separate box until next time.
Selecting a quarter using an electric planer
Most modern electric planers have a quarter selection function. For this purpose, the tool is equipped with special stops to control the direction of the plane and the cutting depth. This is done quite simply in accordance with the points:
- The boundaries of the sample are marked on the workpiece with a marker.
- The plane is turned on and driven through the wood. First, apply light pressure to the front of the device, and when the sole is completely on the material, the force should be equalized.
- The work is performed in several passes. It all depends on the required sampling depth.
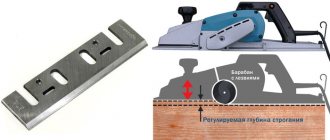
Electric planer device
The knife drum is located inside the body of the electric planer on the base plate. The base plate consists of a rear fixed part and a front movable part. The front height can be adjusted. It is this adjustment that is responsible for the depth of wood removal during planing. As a rule, the depth can be set up to 4 millimeters. The adjustment is carried out using a handle that doubles as a stop. To change the height, you need to rotate the handle along its axis.
In a still from the video: The structure of an electric planer from left to right: Moving part, blade drum, stationary part.
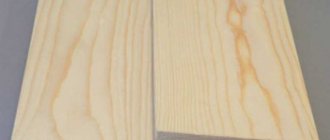
Planing the surface of lumber
Before you start planing the surface with a jigsaw. The workpiece should be securely fastened to the workbench without any play or distortion. Otherwise, the part may fly out during work and injure the carpenter.
The cutting part of the plane should not touch the surface being processed before starting!
The switched on device should be carefully brought to the lumber without distorting in different directions. At the beginning, the pressure of the hand should be more concentrated on the front of the tool, and when the passage is completed, the pressure is slightly transferred to the back.
The speed of passage when planing should not be too fast. Material about two meters long is processed for one minute per run. If you rush too much, you will end up with indentations and bumps on the surface.
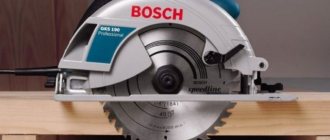
Hand electric plane
Electric planer knives
The first electric plane was released by Makita. Today it is difficult for a master to imagine life without this incredibly useful tool.
How to adjust an electric planer
Adjustment of electric plane knives should be carried out according to the situation using a special adjustment mechanism, which is located on the front handle of the electric plane. By rotating this handle, we achieve the required amount of release of the knives (0-2 mm); they should be positioned evenly, parallel to the bed. Excessive release makes work difficult and puts additional stress on the plane motor.
Sharpening electric planer knives
Sharpening the knives of an electric planer is carried out similarly to a mechanical one. The main difference in sharpening between an electric planer and a mechanical planer is the number of knives. There are two of them here.
Knife sharpening
Guys, you know what...
In an electric planer, knives should be changed strictly in pairs, using one set. This will help avoid the appearance of imbalance. And it will not only spoil the quality of planing of the workpiece, but can also damage the power tool.
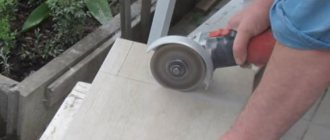
Chamfering workpieces
An electric plane can also be used to quickly and easily chamfer a piece of wood. For this purpose, the device has a special V-shaped groove.
The plane is installed with a notch on the corner of the part and is driven along the length of the workpiece without changing the angle of inclination. Subsequent passes can be made without using the notch on the sole.
An electric plane is indispensable for professional or amateur woodworking. This tool will greatly simplify the processing of lumber and turn the work into a real pleasure.
Types of electric planers
All electric planers can be divided into the following types:
- Professional
. It all depends on the power of the tool. High-quality professional models have a power of 850-1100 W. They also differ in quality: they have a cast sole, are high-speed, can maintain a constant rotation speed, and the thickness of the layer they cut is more than 4 mm. The only drawback is the heavy weight (up to 9 kg). - Household (amateur)
. These have a power of 450-600 W. They feature a cheap stamped sole, a removable layer of up to 2.5 mm, and are suitable for short-term work. Such models also have advantages: light weight (up to 4 kg), economical energy consumption, average cost. - Manual
. Used to treat small surfaces. The small electric planer is convenient to hold and operate. No electrical connection required. - Stationary
. They are heavy, require a table for mounting (or other surface) and electricity.
Stationary electric planer
There are models that are an inverted plane and are more reminiscent of a woodworking machine. The stationary electric planer has special fastenings that allow it to be fixed firmly on the table surface. Processing with such a tool gives high-quality results. An electric planer with a stationary installation is suitable for small parts, because it is easier to hold in your hands than a massive tool. There are models that are attached with a special clamp, or are equipped with a stand.
Manual electric planer
A manual electric plane is used to process the surfaces of heavy parts. Such tools must have a soft, comfortable handle for precise guidance of the tool to the left and right of the part. Many models have two-sided chip removal: you can choose the side that is convenient for you. A manual electric planer is safer, since the knives are at the bottom during operation and it is difficult to damage your hands.
Proper knife sharpening
In order for the plane to process the surface well, its knife must be sharpened from time to time. It doesn’t matter what type of wood it is – soft or hard: a dull knife will not cut any wood well. But if you are processing hard or knotty wood, then the knife will have to be sharpened more often.
Before sharpening, disassemble the plane. This requires attention, because then you have to assemble it in the same sequence. First, unscrew the pressure plate with the centering lever, then remove the knife with the lining (chip breaker) attached to it. To separate both parts, you need to loosen the screw holding them together and turn the knife 90 degrees. To sharpen you will need a whetstone, onto which you should apply a thin layer of vegetable oil. If you are using a sanding template, set it to the correct angle for sharpening the knife, secure the knife in the template and move it along the block.
Sharpening angle
Sharpening the knife of a plane without a template requires a steady hand: it is not easy to move the knife with a bevel along the stone at an exact 30-degree angle. But only in this case, the chamfer - the lower beveled edge of the knife - will adhere to the block with its entire plane, which is necessary for proper sharpening.
The bevel of the knife should be moved along the stone until a burr appears along the entire length of the cutting edge. Then the knife is placed flat with its front edge on the block and moved along the block with straight or circular movements with light pressure until the burr disappears. As a result, the knife will be sharp again, and the angle between the chamfer and the front edge of the knife will remain unchanged.
To make grinding more precise, after processing the knife blade on a coarse-grained stone, the procedure is repeated on a fine-grained abrasive stone.
Modifications of hand planes
There are many varieties and modifications of planes, which always arouse healthy interest. The designs of planes have the following modifications: • jointer • end-face • chisel • tongue and groove • folding planer • additional planer.
jointer is a plane with a double cutter. The jointer is intended for final woodworking, therefore it is used when it is necessary to level a plane of significant size. The tool block is equipped with a handle located after the cutting knife, and in the front part of the block there is a plug for loosening the cutter. During the initial passage of the surface with a jointer, chips are formed, consisting of individual pieces. Repeated passes create continuous chips, which indicates the evenness of the working surface.
The end plane is equipped with an element for adjusting the extension of the knife. The design of the plane has a stamped base with a working part width of up to 40 mm. The side monolithic walls are located perpendicular to the base of the plane. The cutter of the end plane is set at an angle of 21 degrees. The adjustment wheel allows you to set the planing depth.
A type of planer is a zenzubel , commonly called a “selector”. Thanks to the position of the cutter at right angles to the base, the chisel allows you to select rectangular cuts, folds and quarters on the workpiece. Work with a plane begins by marking the quarter, carefully moving the tool and obtaining a small ledge. In general, it is recommended to select a quarter with a rebate, and carry out final finishing with a zenzubel. By the way, the design of the plane allows you to reinstall the cutter on both sides of the base.
The tongue and groove tool is designed for cutting on the edge or wooden plane of a tongue and groove in a workpiece. Let us recall that the tongue is a rectangular narrow groove located from the edge at a given distance. Structurally, a plane of this type allows you to select a tongue to a considerable depth. The depth of the groove can reach 12 mm, the adjustment of the immersion of the cutter into the wood is adjusted using a stop.
An additional block is used as a guide. The cutter width of a standard tongue and groove tool is up to 6 mm; the grooves can be located at a distance from the edge of the part up to 100 mm.
additional planer is characterized by three working planes, namely bottom, left and right. The distance between the front part and the tool cutter is minimal.
shavings are considered the most popular . A planer is a type of hand plane designed to create smoothly curved surfaces that are not straight, but convex-concave. The miniature design of the chip consists of two handles and a centrally located knife.