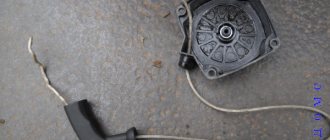
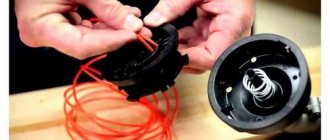
video instructions. I came to the dacha to mow the grass, started mowing, caught a stone and the coil on the trimmer broke, because of the coil it took a long time to return to the city, and it was expensive, since you would burn more gasoline than it costs, so I found a temporary solution. Repairing a trimmer with your own hands means eliminating all problems that you can repair a trimmer with your own hands if it starts and runs at idle. The main sign is that the ignition coil has failed and requires repair. More videos: How to remove and install the reel on a lawn mower! Manual petrol mower. Replacing line in reel. Replacing the coil in a Chinese trimmer. How to disassemble the trimmer coil.
DIY trimmer coil repair
A trimmer, be it gasoline or electric, is the only correct solution for cutting grass in hard-to-reach places that a wheeled lawn mower cannot handle. Trimmers use metal knives or a special fishing line as a cutting tool, which is threaded into the trimmer reel. But, unfortunately, trimmer heads become unusable over time during use. Some problems can be fixed with your own hands, while others will require a complete replacement of the mowing head.
Similar video
DIY hip roof installation video
Do-it-yourself pressure testing of a heating system in a private house video
Replacing thresholds on a VAZ 2106 with your own hands video
How to start a petrol trimmer video
DIY ceiling plinth sticker video
DIY crack in bumper repair video
Adjusting the carburetor of the Shtil 250 chainsaw with your own hands video
How to change fishing line in a trimmer and which one is better to choose
Since we discussed the choice of a trimmer in the previous article, now we will tell you how to correctly fill the trimmer with fishing line, and which one is better to choose based on the operating criteria.
After you have purchased a trimmer and started using it intensively, at some point the question of replacing the fishing line will arise, since this is the most wearing element in the tool, then intense use of the trimmer will lead to frequent replacement of consumables.
How to Change the Coil to a Stil Trimmer
Trimmer
, whether gasoline or electronic, is the only correct solution for cutting grass in inaccessible places that a wheeled lawn mower cannot handle. Trimmers use iron knives or a special fishing line as a cutting tool, which is threaded into the trimmer reel. However, unfortunately, trimmer heads become unusable over time during use. Of course, some faults can be fixed at home, but in some cases a complete replacement of the mowing head will be useful.
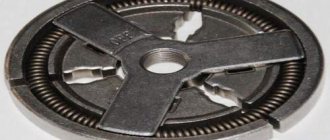
Mowing heads for trimmers come in a variety of designs, both conventional and complex. The figure below shows an disassembled automatic trimmer head from a Husqvarna brush cutter.
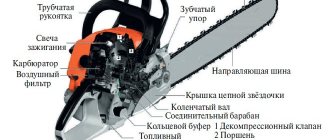
lawn mowers and electric trimmers, such as Stihl, Patriot, Champion, Bosch, Huter and others. The design of the mowing head is quite common. It includes the following parts:
- mowing head base;
- button for automatic cord feeding;
- bobbin ( reel
) where the fishing line is threaded; - spring;
- eyes - the fishing line goes out through them;
- trimmer head cover;
- fishing line (cord).
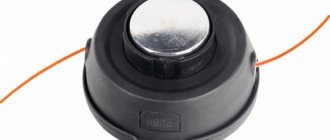
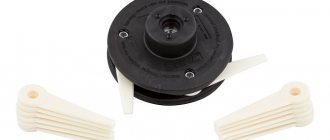
There are also more conventional trimmer heads, shown in the following photo.
These attachments do not allow you to change the length of the fishing line automatically (after pressing a button). If the cord breaks, you have to stop the mower and change it manually.
Users of electric trimmers and lawn mowers often encounter problems with the automatic mowing head. Coil malfunctions include the following:
- the line does not extend automatically;
- the cord spontaneously comes out of the reel.
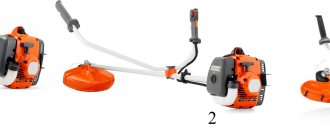
STIHL brush cutters, threading the string into the mowing head AutoCut 25 2
If, when you lightly hit the trimmer coil button on the ground, the line does not lengthen, then the reasons for this are the following.
Option 1 - snacking came out, i.e. clamping the cord between the turns. This problem usually occurs if the user wound the fishing line onto the reel unevenly, with crossed turns, or wound it with insufficient tension. In the latter case, when the mowing head rotates at high speeds under the influence of centrifugal force, the cord begins to tighten, and as a result, the line is clamped between turns. To eliminate the difficulty, you will have to disassemble the reel on a trimmer and rewind the cord correctly, in other words, in even turns with good tension.
Option 3.2 - very short ends protrude from the head. The fishing line may not come out when it hits the ground if its ends protruding from the head are not long enough (not long). Then the centrifugal force is not enough for the fishing line to stretch. Therefore, you need to pause the unit (turn off the engine or disconnect the electric trimmer from the network) and pull out the fishing line manually, having previously pressed the button.
Option 3 - the fishing line is soldered inside the mowing head. This causes the reel to stop and not rotate when the button is pressed. Basically, this happens for several reasons: poor quality of the cord, overheating of the reel during prolonged operation of the unit, impact of the fishing line on hard objects.
- In the beginning, you will prefer cords from third-party manufacturers made from low-quality and fusible materials that do not withstand mechanical and temperature loads. Therefore, preference should be given to “branded” fishing lines.
- If, despite this, you have acquired a fishing line of unknown properties, and it often gets soldered during operation, then you can follow the example of some users who, after threading the cord into the reel, moisten it with either silicone grease (from a can) or mineral oil. This procedure greatly reduces the possibility of soldering turns of fishing line to each other.
- Also, the fishing line can become soldered if, during mowing, it hits a hard object (stone, fence, dry branch, etc.). Upon completion of this, it stretches a little and is pulled back into the head at high speed. The cord heats up due to friction, and its turns stick together. The only thing they can do to fix this problem is to open the trimmer reel and rewind the line.
Replacing the stihl fs 38 trimer bearing
There are situations when a trimmer user notices a very rapid consumption of fishing line. Despite all this, he never hit the ground with the button to lengthen the fishing line. The prerequisite for the fact that the line spontaneously lengthens when it is cut on a special knife on the casing of the device is the absence of a spring in the mowing head. Often, novice mower users, trying to load fishing line into the reel, forget to install the pressing spring in the head, or completely lose it when opening the lid, and in the near future, do not even suspect its existence.
Also, the line is extended without using buttons if the spring has weakened. If checking the spring has confirmed this fact, then you need to slip several washers under it to strengthen its pressing characteristics.
Owners of trimmers, mostly new ones, become confused, bordering on panic, when the need arises to change the cutting tool or line in the reel. Often, when trying to unscrew the mowing head, users simply render it unusable, not suspecting that it is unscrewed in the opposite direction . To prevent this from happening, if you need to change the tool, it is recommended that you study in detail the step-by-step instructions given below.
- While threading the fishing line into the reel, turn off the motor of the brush cutter or turn off the power to the electric trimmer to avoid injuries that occur when the cutting tool is accidentally started to rotate.
- Unscrew the attachment attached to the gearbox shaft. To do this, you need to fix the shaft by aligning the holes on the washer on the axis and inserting an iron rod or screwdriver there.
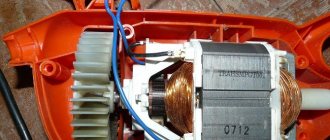
Petrol tool ignition system
- Take a piece of plywood on another PCB and draw a circle with a diameter of about 14 cm.
- Cut the disk using a jigsaw, or a hacksaw for metal.
- Drill a hole in the center of the disk that fits the diameter of the gearbox shaft. You also need to think ahead of time before installing the disk on the shaft, and put a washer on this address.
- You can screw small corners on the sides of the disk, as it is also called, and make 1-2 holes on the reverse sides. They will serve to thread their fishing line.
- To secure the fishing line, of course, screw several self-tapping screws into the plywood.
This homemade mowing attachment is secured to the shaft with a nut. It is impossible to tighten or unscrew the nut without fixing the shaft. To change the cord, you need to loosen the screws, insert a piece of fishing line of the required length and press it down again.
Also, of course, the mowing attachment for attaching the fishing line to its surface is made from an iron sheet. You can understand how to do this from the following video.
Installing new line on the trimmer reel
Equipping a reel with new fishing line is actually done in the reverse order. The procedure looks something like the following, regardless of the mower model:
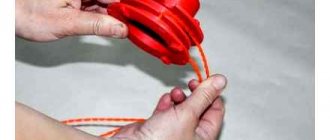
Step one: fastening and styling
Fold the end of the fishing line in half. Place the workpiece over the spool on each side of each half of the winding area. Wrap both halves completely around the winding drum. Pull the line through the loop.
The procedure for preparing the line engagement in the area of both winding sections of the drum. The loops are placed in specially made cutouts, after which the fishing line is wound in each zone
It is enough to pull the line tightly and place the knot in the groove made on each side of the winding drum.
Step two: winding the cutting material in sections
The next step is to wrap the line around the reel, being careful. It is necessary that each half is filled with its “own” winding, evenly, without intersections. Usually on the body of the winding drum you can see arrows indicating the direction of winding. This point should be kept in mind when filling the reel with fishing line.
Step three: assembly of the head assembly
Pull the ends of the line through a pair of oval slots on the reel. Replace both washers and the spring (if any in the design) with the new elements included in the package. Bend both ends of the fishing line at right angles.
The final technical touch to the process of replacing the fishing line on the trimmer is to place a cover on the head and then fix it by applying pressure and turning it slightly.
Pass each end through the hole in the base of the winding drum. Place the coil in the inner area of the head with emphasis on the spring. Place the lid, align it with the base and lightly press down with a slight counterclockwise rotation, and place the lid on the locking tabs. This completes the replacement procedure.
Making your own bobbins
Quite often the trimmer is operated far from places where you can purchase spare parts for the mowing head if it breaks down. In this case, instead of a broken mechanism, you can install a self-made coil that is simple in design. To do this you will need a sheet of plywood (textolite, metal, etc.), eyes, screws or screws . The process includes several stages.
- A disk with a diameter corresponding to the failed spool is cut out of a plywood sheet.
- A hole is drilled in the center of the disk, matching the diameter of the trimmer shaft.
- Small eyes are attached to opposite sides of the disk, which will serve for threading the fishing line.
- A fishing line is passed through the eyes and secured with ordinary screws or screws. The reel is ready for use.
- Clamping the manufactured bobbin between two washers, it is secured to the trimmer shaft with a nut.
Important! It must be remembered that it will not be possible to tighten or unscrew the nut without rigidly fixing the shaft.
To replace the fishing line on a homemade reel, you will have to loosen the fixing screws, insert a new piece of string and tighten the fastenings again. It is not necessary to remove the coil from the trimmer shaft, but it is necessary to exclude the possibility of the motor starting spontaneously.
So, above, the methods for repairing a string head were described step by step with pictures. As you can see, the process is not complicated. And most breakdowns are directly related to careless threading of the string and its unsatisfactory quality. You can clearly see all stages of the process in the video.
Automatic winding of line onto reel
There is a type of reel in which an automatic mechanism produces winding on its own - the user only needs to thread the line correctly. The fishing line is passed through a hole on the inside of the body, its tendrils are threaded through the hole on the outer body without winding, the bobbin is assembled, and when the winding button is rotated, the fishing line inside is wound on its own. In such a spool it is impossible to wind incorrectly: the mechanism itself will determine the correct direction, since it can only spin in one direction.
Preliminary preparation
First of all, to wind the fishing line, you need to remove the reel (spool, spool) from the trimmer - specific actions will depend on the complexity of the configuration and the type of the product itself:
- small electric trimmers with a working arrangement of the motor and coil in the lower part, as a rule, have side keys on both sides of the reel. By pressing them simultaneously, the upper part of the reel, along with the internal contents for winding the fishing line, is disconnected, while the lower part remains on the trimmer. It is advisable to disassemble the bobbin on a flat, smooth place so that the spring included in the structure does not jump out and get lost;
- electric and gasoline trimmers with a curved rod without the ability to install a knife, as a rule, have reels with a special wing: in such designs, you should hold the spool in a stationary position with one hand, and with the other, rotate the wing nut that secures the reel on the rod counterclockwise. After disconnecting the nut, the entire reel is removed.
- electric and gasoline trimmers with the ability to install a knife on a straight rod (for example, Stihl trimmers) have a hole under the reel. To keep the rod stationary, a screwdriver or other suitable object is inserted into this hole and, with slow rotation, such a relative position is achieved when the screwdriver enters the hole and the reel is fixed. After this, the coil body is rotated clockwise (with a left-hand thread) and removed from the trimmer.
For the second and third cases, the coils, depending on the design, are disassembled in different ways. In bobbins with a wing, the wing is unscrewed; in bobbins with latches, the latches are pressed and one part of the bobbin is released from the other. If the halves of the spool are connected by thread, then it is enough to turn them by hand in opposite directions until they are completely unscrewed.
Checking serviceability and setting the gap
In order to assess the condition of the coil yourself, it is necessary to examine the body of the coil; there should be no cracks or dirt on it.
Current-carrying parts and assemblies must also not be rusty. The spark plugs must be in good condition and installed correctly. The circuit breaker should work well.
READ How to Properly Mow with a Trimmer Video
If everything is in order, then we check the coil.
- We check the resistance.
- We check for the presence of a spark.
- You can use a candle.
- If the situation is hopeless, then you need to remove the lid from the candle and put a nail without a “cap”. The main thing is not to damage the cap.
- We start the unit. We check the ignition system. It is necessary to ensure that the candle is screwed evenly into the hole. We look at the color of the spark. If the color is blue, then there is no malfunction.
During any check, it is necessary to set the gap between the flywheel and the coil. The size of the gap varies and depends on the model of the tool. The gap between the flywheel and the coil should be from 0.2 to 0.4 mm. It is better to check the ignition coil with a multimeter, as well as a tester. It is not practical to repair the ignition coil.
For information on how to choose a reel for a lawn mower, see below.
Video: How to Remove the Head from the Stihl Fs Trimmer
Most motococcal coils include coils that can be single or double. In the first type of device, the hair line used is wound evenly on each side. In two-piece cutting heads, each individual piece of cord must be wound onto a specific portion of the spool. Devices of the second type are considered the most convenient to use, since they do not bend at sharp angles and are not deformed.
How to choose a hair trimmer?
For a mower head to be highly effective, the hedge trimmer owner must fit it correctly. In this case, several factors should be taken into account:
- Experience . If the buyer. Beginner gardener, it is best to buy an automatic reel. Semi-automatic and manual reels are best for more experienced gardeners;
- Material . The reliability of the coil depends on this. They are considered the most durable metal models, but they weigh much more than standard plastic devices. When working with a metal coil, the braid motor is under heavy load, so you only need to buy them to work with a powerful brush;
- Diameter of the mowing line used . For medium power trimmers, coils are used that can be tightened with a wire thickness of no more than 1.6 mm. Motokosa with a capacity of more than 2.5 liters. C. Fixtures can be installed that can be tightened with a cutting cord thicker than 2mm.
The simplicity of its design also plays an important role in choosing a reel. For beginners, reels with a minimum number of parts are best. More experienced gardeners can use heads with more elements in their design.
Top 3 most reliable drums for home use
There are ratings of the most durable mowing heads on the market. They are distinguished by their simplicity of design, reliability and resistance to damage. These include:
- 3rd place. Bosch K-103 . This is a universal reel weighing about 300 g. Most often used to complete Makita and Hyundai scooters. The model is characterized by low energy consumption, impact resistance and durability. The core and other parts are made of forged steel, and the body. Made of plastic;
- 2nd place. Flymo 15 . This semi-automatic trimmer model is equipped with a thin cup, which increases the consumption of cutting line. However, it worked great when cutting grass in rocky areas. To work with it you need to use only thin fishing line;
- 1st place. EFCO 8100 . This model is one of the most reliable mowing heads. It operates in a fully automatic mode, making it easy to fill with cut cord. Only fine hair is used to operate the coil. The body of the model is made of durable multilayer plastic.
Despite their stability and durability, all of these reels are much cheaper than other lower quality counterparts, making them leaders in the post-Soviet market.
What types of fishing lines are there?
A common type of fishing line that is suitable for virtually all types of reels is round cord. Another video on the topic: how to disassemble the trimmer coil. Replacing fishing line on a trimmer. Video on how to disassemble a reel and replace fishing line on a trimmer. Load more similar videos. This is an ordinary fishing line suitable for mowing succulent grass, but it will be much more difficult to mow dead wood, and even more so it will not cope with bushes.
As a rule, the diameter with which young grass can be mowed does not exceed 1.6 mm. The thicker the thread, the coarser the grass it can overcome.
There are fishing lines with sharp edges in the form of an asterisk or a square; this option is more suitable for mowing dry grass due to the existing sharp edges, but its disadvantage is greater wear and is inferior in strength to round cord.
There are fishing lines with improved aerodynamics with characteristic dents, scales and notches; such a product makes less noise, but it is used only on lawn mowers, since it is difficult for such thread to come out of the spool; it is most often used with disks into which segments are inserted. The disadvantage of this product is its fragility.
Most often in gasoline trimmers with an engine power of more than 1.5 hp. cords with a metal cable inside are used. In this video I show how to disassemble the coil of a gasoline trimmer, as well as how to wind it correctly. How to remove the coil: disassemble the coil on the trimmer and rewind the disc onto the shaft. This thread is ideal for mowing dry grass and small shrubs. How to disassemble the trimmer coil. Replacing fishing line on a trimmer. The presence of a core has a positive effect on the wear resistance of this material. The disadvantage of such a cord is its price, which is significantly higher than the above listed opponents.
Why you need to put a knife on a trimmer
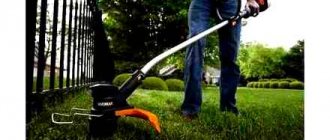
A trimmer with a blade mounted on it is most convenient to use for more comfortable mowing of tall and coarse grass in the countryside. The fishing line on a brush cutter cannot cope in such cases. The thin one breaks very quickly. Using thick 2..3 mm cord or homemade rods with cables causes the vegetation to be wound onto the spool. This increases the load on the engine. As a result, the piston group and other moving parts of the unit wear out very quickly.
If you mow weeds with an electric trimmer without a knife, using fishing line alone, even a thick one with a shaped cross-section, will not solve the problem. There is always a risk of overheating the electric motor and damaging the flexible shaft. And it's all about the high torque of the electric motor. The grass wound around the spindle creates strong resistance to the shaft, reminiscent of a speedometer cable, which cannot withstand and gets twisted.
In order to protect equipment from premature wear, manufacturers have provided the possibility of installing special knives on trimmers. The design and shape of the existing cutting elements make it possible to easily cope not only with coarsened and overgrown grass, but also to successfully deal with young bushes.
Typical problems - causes
Malfunctions that most often occur with the magneto are typical for trimmers from different manufacturers. As a rule, this is a weak spark or its absence, as well as the presence of interruptions in this process.
Unstable sparking
If the magneto produces an intermittent spark, you must first check the contacts. They could get burnt or oily. The detected carbon deposits are cleaned off with a file, and the oil is wiped off with suede, previously soaked in gasoline. The second possible cause of the problem is that the adjustment of the gap between the contacts is broken. To eliminate it, you need to set the correct distance.
If the spark appears intermittently, it may also mean that the breaker arm pad is worn out. To eliminate the problem, you need to replace the lever with a new one. In addition, the gap should be adjusted, as with another possible cause of failure - misadjustment of the outline.
A broken capacitor can also be responsible for interruptions in spark formation. In such a situation, it is necessary to replace the damaged part, since it is impossible to repair and recharge it.
No sparking
If the magneto does not produce a spark at all, the main reason is a break in one of the transformer circuits (primary or secondary). To repair a lawn mower, you must replace the faulty part. If the primary circuit is shorted to ground, this can also cause a lack of spark. You must remove it to fix the problem.
On a note! Broken insulation of a high-voltage wire can also cause a breakdown. The situation can be corrected by replacing the wiring.
Insufficient sparking
A weak spark at the magneto is caused by a damaged capacitor. To eliminate the breakdown, it is necessary to replace the failed part.
Preparing the trimmer coil for winding
Initially, as a rule, the coil is installed to the head of the device itself. The coil consists of two parts - a cover and a spring.
You can buy the highest quality electric scythes, trimmers and additional components here in the Garden Mechanisms online store at the lowest prices from 1,200 rubles for a selected product from the category. The catalog at the link presents the most popular, in-demand electric mowers from world brands such as: Bosch, Makita, PATRIOT, Gardena, Hyundai and others.
- No matter what company you have a trimmer, the preparation steps are the same for all types. Disassemble the device, or rather, remove the coil from the trimmer head. To do this, press all the way down on the latches located on the sides of the head housing and turn the head clockwise.
- To open the mowing head without any problems, press the side latches; if you can’t do this with your hands, use a flat-head screwdriver to help. We take the coil out of the head.
- In order to choose the right fishing line for your equipment, digital markings must be printed on the inside of the reel that indicate the thickness and type of acceptable fishing line. All designations are indicated, as a rule, in millimeters.
- If you did not find any numbers, then the maximum permissible diameter of the fishing line can be determined by the through hole for inserting the fishing line. The line should pass forward and backward without obstruction.
The process of winding fishing line onto a reel
After all the preparatory steps, we need to correctly determine how exactly the fishing line will be wound onto your device, by turning the lid or in the opposite direction.- We measure approximately 7 mm of cutting material and insert one end into the bobbin hole. It is worth noting that the fishing line is wound specifically on the style mower models on both sides. The direction of winding the line in such models is indicated on the bobbin itself.
- The line is extended up to about 17 cm freely so that the ends can be cut off weeds. Let us add that it is not worth winding a fishing line onto a reel of enormous length. Leave a distance of approximately 5 mm from the fishing line to the edge of the bobbin.
- The two ends of the fishing line are inserted into the bobbin holes. Both of these ends must be securely attached to the device body.
- We insert the springs removed from the coil (if any) in the same way as they were removed, i.e. into the bobbin and the head body itself.
- To determine whether you have correctly inserted the fishing line into the trimmer, you need to ensure that the element itself (spool) is easily inserted into the head housing of your device. If necessary, remove the free ends of the fishing line further out. To achieve this, you need to sharply pull the fishing line out of the groove through the holes in the bobbin.
So, let's say you figured out how to quickly, and most importantly, correctly wind the fishing line onto the reel of the calm trimmer. All you have to do is insert everything correctly into the grooves and secure the main cover to the device. Then you can press on the bobbin itself and make movements counterclockwise until you feel a stop. If you don’t feel the pressure, then most likely you have not threaded the line correctly and you will have to start all over again from scratch.
A couple of tips
If you have wound the fishing line correctly, then when you press the bobbin button, the cutting element should automatically be pulled out. The line for your mowing device is one of the most important elements, without which the trimmer may lose all its functionality. We can say that the line (cutting element) is the heart of your mower. Therefore, when buying fishing line, pay attention first to its quality. When purchasing fishing line from one company or another, be sure to compare it with the quality of the old fishing line.
What can be used instead of fishing line
Most mower users ask others or sellers in specialized stores about what else can be used (replaced) besides fishing line. Many of them begin to experiment and use unsafe methods, installing different cutting elements on their trimmer, including copper wire, metal, some manage to use strings from guitars and even cables, and some even use fishing line from fishing nets.
- If instead of a special cutting element, say a fishing line, you install a metal cable, then your trimmer can “turn” into a real dangerous weapon not only for you and your eyes, but also for all the people around you. This is explained by the fact that while the trimmer is operating, the steel cable will constantly operate, which will lead to tangling, and its small pieces can fly off in all directions at great speed.
- The same thing can happen if you use copper wire instead of a steel cable, but in this case, the pieces coming off the copper wire will be slightly larger and can cause you even greater injury. And if, God forbid, you accidentally catch such a cutting element on your leg, then after this it is 100% guaranteed that there will be a deep cut in the soft tissues, and in some cases, all this can lead to the amputation of small limbs (fingers), legs and even arms. Therefore, our advice to you is not to use any other cutting elements other than fishing line, for your own safety and those around you.
Replacing fishing line in a trimmer: 2 simple ways
A trimmer is a necessary and useful tool for a summer cottage and a private home. Many people own and actively use it, but not everyone knows how to replace the line in a trimmer , especially at first.
READ How to Install an Ignition Coil on a Trimmer
How to replace and remove the mowing head of the Black&Decker GL716 electric trimmer
In this instruction we will walk you through the entire replacement process step by step. Looking ahead, there are two ways to thread a trimmer spool with line. There is no fundamental difference - the difference is that in the first case there will be one fishing line folded in half, and in the second there will be two sections of such fishing line.
How to wind fishing line onto the mowing head of a trimmer or brush cutter
Replacing fishing line in a trimmer : 2 simple ways
Feedback from our readers is very important to us. Leave your rating in the comments with reasons for your choice. Your opinion will be useful to other users.