What you need to know about trimmer line
Fishing line is a consumable material that consists of nylon and serves as a cutting device. Using this equipment, the grass is cut, which is ensured by rotating the tool head at a high frequency. This material has different thicknesses, which depends on its use on the corresponding tools: low-power electric (from 1 to 1.6 mm), electric from 500 W (2-2.4 mm) and gasoline trimmers with brush cutters (from 2.4 to 3 ,2 mm).
The more powerful the tool, the correspondingly thicker the cutting equipment should be. This affects not only the quality of grass cutting, but also the service life of the material. If you are wondering how to wind the trimmer coil, then it’s time to change and recharge the tool. With the onset of spring, this question becomes more and more in demand, so it’s time to understand the step-by-step instructions for replacing the fishing line in the trimmer reel.
How to thread fishing line into a trimmer so that working with it does not tire you
Many summer residents use a scythe trimmer with an electric or internal combustion engine to control weeds. It is comfortable when working in places inaccessible to a lawn mower: near fences, flower beds, houses, in narrow rows in the garden, and can also cut small branches. The main element of this miracle technique is ordinary fishing line wound on a reel. The device is ordinary, but the cutting part wears out quickly and requires replacement. And the question of how to thread fishing line into a trimmer worries many summer cottage owners.
How to remove the spool from the trimmer and remove the fishing line
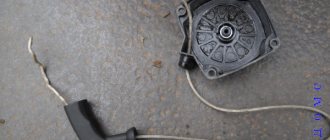
Initially, before threading the fishing line into the trimmer reel, you need to remove it from there. The reel or pointer is a device that is located inside the mowing head, reel or drum. Heads come in different types (depending on manufacturers), but the principle of replacing line on a reel is the same for all. First of all, let's figure out how to remove the head from the tool, as well as how to get the drum with fishing line out of it.
This is interesting!
You can replace the equipment directly on the tool, but if you are doing this for the first time, it is still recommended to remove the head and study the detailed winding process.
After the technology has been mastered, replacement work can be carried out using a trimmer, lawn mower or lawn mower. The instructions on how to unscrew the manual head on a trimmer are as follows:
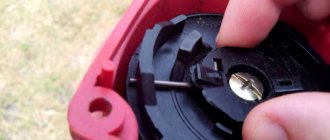
- Turn the tool upside down and, if necessary, clean it of dirt. With two fingers of one hand, grasp the cover latches (on the mowing head), which are located symmetrically to each other. After lightly pressing them inward, remove the protective cover from the drum
- Next, remove the fishing line spool from the drum shaft. It is mounted on a shaft without fastenings, so it can be dismantled with one hand
- The main part of the drum is secured with a screw, which must be unscrewed with a screwdriver with an appropriate tip or bit
- To unscrew, you need to hold the base of the drum with one hand and use the other to unscrew it counterclockwise with a screwdriver
- After this, you can begin dismantling. To do this, you do not need to pull it with all your might, but by slightly rocking it to the sides, slowly disengage it from the metal shaft on which the drum is mounted
- When reinstalling, the head should be seated in the tetrahedral slots
This process is not difficult, and as you understand, there is no need to dismantle the entire head if you know how the replacement is carried out. When dismantling, consider the following nuances:
- It is recommended to remove the head periodically to prevent corrosion of the threaded connection. If you never unscrew a screw, then if necessary, it will be difficult and even sometimes impossible to do so.
- If the screw has a tetrahedral head bore, then for unscrewing you should select a screwdriver or bits of a suitable size to prevent the edges on the head from licking off
- When assembling the unit, the threaded seat should be treated with lubricants, for example, grease or machine oil
- If the edges on the screw are licked off, you can use special clamping pliers to unscrew it.
- There are drums that do not require preliminary disassembly. To dismantle them, grab it and rotate it in the opposite direction clockwise
Knowing how to disassemble the drum, you should continue to figure out the process of replacing the trimmer line. The video below shows the detailed process of how to open the trimmer coil and disassemble it.
How to wind fishing line onto a trimmer reel?
The second method is a little more difficult to do on your own.
You need to wind the trimmer cord in the following order:
- First you will need to cut about 6 m of cord from the total amount and bend it. In this case, one of the parts should be slightly larger than the second;
- Then the thread, where it was bent, will need to be inserted into the recess located on the dividing edge between the two sections of the bobbin. As a result, the first part of the segment should be in the upper, and the second - in the lower section of the spool;
- After this you need to start winding the fishing line. This should be done in the direction of the arrow indicated on the spool body. During winding, the cord should not intertwine. The upper part of the section should be carefully wound onto the upper section, and the lower part onto the lower section of the spool. After this, two 15-centimeter sections of cord should remain free;
- Next, the remaining ends will need to be inserted into the recesses located in the upper part of the spool;
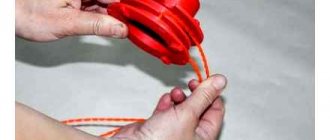
- Then the fixed ends need to be inserted into the through holes of the trimmer's mowing head.
In the end, you will need to connect all the parts of the mowing head and pull each end of the fishing line towards you a little. The finished coil will need to be installed on the trimmer and continue working on the site.
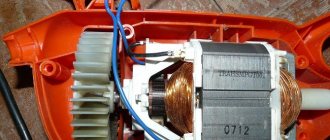
How does a head with a fishing line work on a brush cutter? Why do you need to know the principle of operation?
Depending on the manufacturer, the heads differ in design not only externally, but also internally. Most reels have a pressure spring inside (semi-automatic and automatic). Above are instructions on how to disassemble the trimmer head without a spring, i.e. on a manual type head. The principle of dismantling a semi-automatic head with a spring inside is almost identical to the instructions described above.
The operating principle of a semi-automatic trimmer coil is as follows:
- Inside the head there is a coil, which is seated on splines that prevent its free movement.
- The coil is acted upon by a spring, which presses it against the slots located in the cover structure
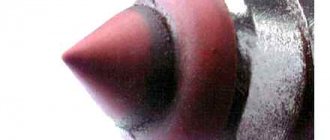
- A fishing line is wound around the tip, the length of which depends on the tool itself. Typically this length is from 1 to 4 meters
- During work, if it is necessary to increase the length of the fishing line, the protruding part of the drum is pressed, causing it to disengage with the splines. In this case, the fishing line unwinds from the drum, increasing in length
- Having released the required amount of fishing line, you should release the pressure and continue mowing the grass.
The advantage of a tool with a fishing line is that this consumable does not require sharpening, compared to metal discs. In addition, if a stone or tree gets in the way, the line simply comes off without negatively affecting the gearbox and engine of the tool, as is the case with metal cutting discs.
Knowing the design and structure of the types of mowing or trimmer heads, it is necessary to move on to consider the process of threading fishing line into the trimmer reel. After all, it is precisely this moment that causes difficulties for most owners of special tools.
How to quickly remove the spool from a tool
Before the thread is wound onto the bobbin, it must be removed. However, removal methods depend on the characteristics of the tool. On trimmers with a motor close to the ground, the reel has two side buttons, when pressed, part of the body is separated along with a device for winding the thread.
On instruments with a bent rod, the thumb on the device is moved counterclockwise; Having disconnected it, remove both the bobbin and the spring in it. On trimmers with a straight rod, fix it with a screwdriver, twist it clockwise and remove it. Then the device is disassembled either using latches, or by moving its parts in different directions. The spring is removed from the coil.
Instructions with a step-by-step description of how to wind the coil of a trimmer and lawn mower
In order not to make a mistake in choosing the appropriate fishing line for your tool, you should first disassemble the head and look at the side wall of the reel. This information is usually presented on a tip, which will not allow you to make mistakes when using the appropriate equipment.
If there is information on the reel about what diameter of fishing line can be threaded, then this information can be clarified in the instructions. Having decided on the thickness or diameter of the equipment, all that remains is to figure out how to charge it. There are two ways to do this, but they are not applicable to everyone. Let's consider both methods in detail, and depending on what models of lawn mowers and trimmers you use, decide for yourself which option is suitable.
This is interesting!
The principle of how to wind a fishing line onto a brush cutter is appropriate not only for autonomous gas-powered units, but also for electric trimmers.
Which fishing line to choose
Before stocking up on this material for refilling the trimmer
, you need to make a choice.
After all, the ordinary so-called round fishing line
is far from the only type available. How to choose the most suitable one? First you need to find working conditions.
Select by type. Line with a round cross-section is the most common. It will fit any reel with rare exceptions. This type of consumable is suitable for mowing the freshest, juiciest grass. But this species may no longer be able to cope with mowing the so-called dead wood. It is stupid to even mention attempts to mow bushes with this thread.
READ How to Correctly Thread the Trimmer Head
In addition to the ordinary type, there are others that have sharp edges. Usually they are made with an asterisk or square. The presence of sharp edges is the main feature and main difference between these threads.
It is precisely thanks to this particular feature that threads of these types are able to mow dry weeds. But sharp-edged threads are not without shortcomings, the main of which can be called rapid wear and strength, which is noticeably inferior to the round type.
In addition to the types of fishing lines already mentioned, there are still noteworthy and common varieties. Particularly among them can be noted the fishing lines, inside of which an iron wire is stretched. Threads of this type are often used in tools that run on gasoline and have an engine stronger than one and a half horsepower.
Threads with an iron core come with both a round cross-section and sharpened edges. Regardless of the type of section, such threads are ideally suited for overcoming difficult-to-mow plants. Threads of this type easily mow not only dry grass, but even small bushes.
Threads with wire inside differ from other types of consumables due to their indescribable wear resistance. But unfortunately, this feature has a more than noticeable impact on the cost of this type. The price of threads with a core is significantly higher than the price of other types of threads.
Method 1 - how to properly wind the fishing line or put it on a reel and select the required length
To implement this method, you will need to first prepare a fishing line of the required length (usually up to 4 meters). It all depends on the thickness of the equipment used, as well as the design of the reel. There is a simple way to find out the required amount of fishing line that will be needed to charge the reel. To do this, wind the equipment inside the reel until it is level with the side protrusions. In this case, the equipment should not extend beyond these extreme protrusions.
The thicker the equipment used, the shorter its length will be needed, and vice versa, the thinner it is, the longer the segment will be needed.
Instructions on how to properly insert the equipment into the tip of a trimmer or brush cutter are as follows:
- To begin, the piece of fishing line that was prepared to be installed in the reel must be folded in half. In this case, one edge should protrude 10-15 cm more than the second
- After this, take the second end from the other side and bend it in half. Move towards it so that the measured protrusion of 15 cm is preserved
- There is a slot in the inner partition of the coil into which the resulting loop should be inserted. The slot in the wall is shown in the photo below
- Next, we find out the direction of winding the fishing line. If you wind the rig in the wrong direction, it will not function correctly and the job will need to be redone. To insert the fishing line and wind it in the correct direction, you should inspect the surface of the reel. It should indicate the direction of winding (in 99% of cases this direction is indicated). What the direction indicator on the reel looks like is shown in the photo below.
- This arrow-shaped indicator may also have a designation, as in the example above “WIND LINE”, which indicates the winding direction. If there is no pointer on the reel, then you need to look at the head. The head has the direction of its rotation, and in order to wind the fishing line correctly, you should wind it on the drum in the opposite direction to the indication of the arrow pointer. So, if the arrow is on the pointing, then you need to wind it in the indicated direction, and if it is not there, then you should wind it against the direction of the arrow on the surface of the head
- Having decided on the direction of rotation, you should begin winding. Each end should be guided in its own groove. If there is no separator, then the equipment must be laid out in the appropriate distribution order
- When almost all the fishing line is wound on the reel, you will need to do the following - place a short part in the hole in the side wall of the aiming line, the protrusion of which should be up to 10-15 cm, and then do the same procedure with the other end, placing it in the hole on the parallel side
- We insert the reel into the head, first passing the ends of the fishing line into the holes of the drum
- We put the drum in place and, by pulling the ends of the fishing line, remove them from engagement with the temporary clamps in the wall of the reel. After this, you can put the lid on until the latch is activated.
- At this point, the process of how to replace the fishing line on a trimmer is completed, and if necessary, you can trim only the ends (if their length is not satisfactory) and install the assembled drum on the tool
There are no difficulties with putting the drum in place. There is a second way to load mowing equipment into a brush cutter. Let’s find out in detail what the difference is and how the second method of threading fishing line onto the reel of a lawn mower is carried out.
How to insert fishing line into the trimmer?
Threading a mowing reel with cutting thread for a trimmer is not a difficult task, but novice gardeners will have to practice a little in order to be able to quickly insert the cord into an existing household trimmer.
There are several ways to refuel the trimmer's mowing head. The first method is the simplest and is well suited for beginner gardeners.
In this case, the cord is inserted into the reel in the following sequence:
- First, you will need to unwind about 6 m of trimmer line from a common spool, and then cut the resulting segment in half. The result should be 2 threads, each 3 m long;
- Then, at one of the ends of the first segment, you will need to make a kind of hook and insert it into one of the through holes located in the upper part of the spool;
- Next, you need to start winding the fishing line onto the spool in the direction indicated by the arrow. When winding, you need to make sure that the fishing line lies evenly on the surface of the spool and does not extend beyond its upper section. There is no need to wind the piece until the end; about 15 cm of thread should remain in your hands;
- The remaining free end of the wound cord will need to be inserted into one of the recesses located in the upper part of the spool;
- Next, the same procedure will need to be done with the second piece of fishing line. It will need to be wound onto the lower section of the spool;
- As in the first case, there is no need to wind the line around the lower section all the way. The remaining piece of thread will need to be inserted into the second groove of the bobbin.
After the operation is completed, the coil will need to be installed on the trimmer and wound up. To check the reliability of the thread, you will need to press the throttle lever all the way so that the engine reaches maximum speed. If the line does not fly out of the head, then the line is held securely and will not fly out of the mowing reel while mowing the grass.
Method 2 - how to properly put fishing line on the reel of a lawn mower with photo description and video
The second method differs from the first in that the coil is charged not with a single piece of equipment, but with pieces of two parts. Manufacturers use this method, and it is also suitable for those who have leftover material. The principle of how to insert two pieces of fishing line into the tip of a lawn mower is the same as the first method, and to make sure of this, below are detailed instructions:
- There are two equal length pieces of material that can be used
- One piece is taken and the edge is bent in the form of a clamping bracket or hook, with the help of which the fishing line will be secured
- Inside the coil there are holes in the form of a bracket for fixing, which are there for a reason. If they are not there, then the second option will not work. The appearance of these brackets is shown in the photo below. Each bracket is on its own half
- The fishing line should be hooked onto the bracket and reeled in in accordance with the direction of the arrow.
- The equipment is wound until a 10-15 cm segment remains, which is fixed in the corresponding hole on the side of the aiming
- Manipulations with the second end of the fishing line are carried out in a similar way.
- The protrusions are inserted into the holes of the head, and then, removing the equipment from the temporary fasteners in the reel, the cover with clamps is installed
The above instructions on how to install a fishing line in a lawn mower will help not only correctly, but also quickly carry out the replacement procedure. Assembling the trimmer coil, as mentioned above, can be done without removing the head, but in this case you will need to conveniently fix the tool. Video instructions are presented below.
Preparing to wind the fishing line
Before the winding process, you must first remove the reel with fishing line from the housing. Depending on the manufacturer, power and type (electric or gasoline), there are three design types of trimmers:
This model provides the ability to install a knife. Removing the coil in such models is done using two keys recessed into the coil body. To install the trimmer knife, you need to align the hole of the reel and the rod, and then insert a device in the form of a steel pin (screwdriver, iron rod). After fixing the coil, the housing can be easily unscrewed clockwise by hand.
Tips and tricks on how to wind a fishing line and what you need to know
There are several useful tips and tricks that will be useful to know not only for beginners, but also for experienced mowers. These tips will help prevent negative consequences in the form of injuries and improper functioning of the mechanism. These recommendations state the following:
- Install the cover until it clicks. Moreover, this is 2 or more clicks, which depends on the number of latches. If one latch does not latch, the drum may jump out when starting the tool and injure a person.
- Do not wind the fishing line with too much tension, or in more quantities than can be inserted into place. It is better not to rewind the equipment than to have more of it, as this will lead to negative consequences in the form of the impossibility of unwinding it if necessary
- If you own a tool not with two fishing line outputs, but with one (usually these are low-power units), then the winding process is performed in a similar sequence as described above, only with the difference in the absence of a middle side between the extreme bases of the reel
- After replacing the material, you must first check the functionality of the tool, and only then start mowing the grass. If a preliminary check is not made, the scaffolding may unwind and injure a person.
This is interesting!
Choose material of appropriate quality to avoid injury when working with lawn mowers, trimmers and brush cutters.
During the process of mowing grass, small stones and other materials fall under the rotating parts, which can fly long distances; therefore, despite the fact that the fishing line is not a knife, work with the tool should be carried out in special protective clothing. The result of the work done is as follows - after the replacement, the new material is enough for an area of up to 600 square meters, but taking into account the presence of a reinforcing layer on the fishing line. Conventional nylon materials last less, which is important to consider when working. Do not try to mow thick-stemmed grass with a fishing line, as there are special metal discs or blades for this purpose.
Preliminary preparation
First, to wind the fishing line, you need to remove the reel (spool, spool) from the trimmer; certain steps will depend on the difficulty of the configuration and the type of the product itself:
- small electronic trimmers with a working arrangement of the motor and coil in the lower part usually have side buttons on both sides of the reel. By simultaneously pressing them, the upper part of the reel, together with the internal contents for winding the fishing line, is disconnected, while the lower part remains on the trimmer. It is better to disassemble the bobbin on a flat, smooth place so that the spring included in the structure does not jump out and get lost;
- electronic and gasoline trimmers with a curved rod without the ability to install a knife usually have reels with a special wing: in similar designs, you should hold the spool in a stationary position with one hand, and with the other hand, turn the wing nut that locks the reel on the rod counterclockwise. After disconnecting the nut, the entire bobbin is removed.
- electronic and gasoline trimmers with the ability to install a knife on a straight rod (for example, Stihl trimmers) have a hole under the reel. To keep the rod stationary, a screwdriver or other suitable object is inserted into this hole, and with a slow rotation, such mutual placement is achieved when the screwdriver goes inside the hole and the reel is fixed. After which the coil body is rotated clockwise (with a left-hand thread) and removed from the trimmer.
For the second and third options, the coils, depending on the design, are disassembled using different methods. In reels with a lamb, the lamb is turned out, in reels with latches, the latches are pressed and one part of the reel is released from the other. If the halves of the spool are connected by thread, then it is enough to turn them by hand in the opposite direction until they are completely unscrewed.