Sharpening trimmer knives - price for services
Our craftsmen sharpen trimmer blades efficiently and quickly; the price of the service will appeal to every client. And those who regularly contact us for tool sharpening receive pleasant discounts.
Contact us, we guarantee excellent service and high-quality work.
How to sharpen trimmer blades without the help of others?
The trimmer is designed to keep lawns and hedges looking perfect, which is why it is so important that the blades of the blades are kept sharp. But what to do if they are still dulled by hard grass or branches? You can purchase a new trimmer or trimmer head. However, it is much easier and faster to sharpen knife blades yourself. Let's figure out how to do this.
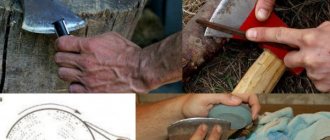
First, find gloves that will protect your hands from cuts. You can also wear safety glasses to prevent sparks from the sharpening process from getting into your eyes. At the preparatory stage, you should disassemble the trimmer, or rather, remove the blades from the trimmer cutting head. Carefully remove the protective grille, and determine the method of fastening the blades. If they are attached with bolts, unscrew them with a screwdriver; if they are removed by normal pulling, remove them slowly. Be extremely careful, do not try to tear something off by force, use screwdrivers.
You should then secure the blades to keep them in place. You can place them in a vice. You need to make sure that the fixation is strong, and the blades do not “move” back and forth, but at the same time, the fixation should not be deforming, crumpling the trimmer
no use at all.
The trimmer blades for sharpening should protrude slightly from the vice
, otherwise the sharpening process will be difficult.
For sharpening itself, you will need a special file for sharpening the metal surfaces of tools. These special files are sold in garden tool stores and are used mainly for sharpening saws. The file should not be very wide, otherwise it will not be possible to get into the gaps between the blades, and it is also quite difficult to work with a very small one. Therefore, the width and length of the file should be selected based on the size of the gap between the trimmer blades.
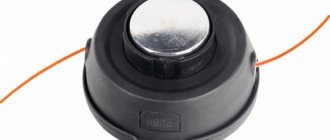
DIY trimmer knife
The easiest way to make a homemade knife is in the blade version. For this you will need:
- A piece of pipe (copper is better than steel) of a suitable diameter for making an adapter sleeve for the output part of the flexible shaft.
- A sheet of steel no more than 1 mm thick for the washer.
- A regular cotter pin in accordance with GOST 397-66, for attaching the base to the trimmer shaft.
- Stainless steel strips 1…1.2 mm thick, for making knife blades.
- Fasteners (it is better to use rivets rather than screws or a nut for a knife, even if it is included in the original kit).
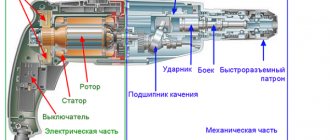
The general view of a homemade trimmer knife is shown in the figure.
The production of equipment is carried out in the following sequence. First, mark out the general dimensions of the device so as not to go beyond the protective casing. Then a sleeve is made from a piece of pipe. To improve the fit, the bushing is split and seated along the outer surface of the output part of the trimmer shaft. Since the diameter of the washer is determined solely by the dimensions of the available space, it can also be selected from the nearest standard sizes. The washer is welded to the bushing in such a way that the formed seam leg is minimal.
It is better to make blades on a milling machine, respecting the corners and sharp edges, and avoiding bending of the blades during their subsequent processing (sharpening). Fastening with rivets with a slight vertical play will allow for better cutting, especially of woody stems. During installation, it is worth carefully checking the presence of minimum (at least 1.5 mm) gaps between the pipe and the blades in order to prevent rubbing of the blades during their possible thermal expansion.
The final fixation of the device on the shaft is done with a cotter pin.
Trimmer blades - how to sharpen
, short properties, including knives for lawn mowers and knives for trimmers, purpose comparison, advantages and disadvantages, the right knife, also reviews of knives for trimmers
Sharpening the trimmer disc. Do it yourself.
Showed how to sharpen
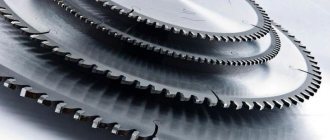
Standard trimmer disc for better cutting of grass and thin trees.
Each blade has a minimum of four sharpening surfaces. These are two side edges at the bottom and two side edges
above. It is also worth noting that only the upper, cutting part of the blade blades of the trimmer is sharpened; the lower part does not need to be sharpened.
For a trimmer whose blade blades are quite thin, 4-6 movements with a file
on each of the surfaces. The file movements should be strong, but smooth and not sharp, otherwise the edges of the trimmer knives may become jagged. Remember what's important. This is to ensure that all surfaces are sharpened equally and symmetrically, otherwise there will be interruptions when mowing the grass. The file is usually moved downwards at the same angle at which the edges of the blade are located. Rust is removed in the same way. You need to be careful not to grind off too much material from the edge, otherwise the trimmer will not be able to work: after all, all other parts of the trimmer are “adjusted” to a certain width of the blades.
Sharpening trimmer blades by hand is very difficult and time-consuming; this process is too labor-intensive, so some people try to sharpen blade knives on a sharpening wheel. This should not be done, since trimmer knives will
when brought to an emery stone rotating at high speed, a non-professional cannot hold it.
Knives can be pulled out of your hands and cause injury. How to change a knife to how to properly sharpen a disc for an element for a trimmer. Sparks from the contact of the metal of the knives and the grinding wheel can get into the eyes and blind, which can also cause the trimmer knives to fall out of your hands. So it’s worth the effort and carefully sharpening the trimmer knives
by hand.
After the knives are sharpened, you can rub them with wax for better glide. Wax will also protect your knives from rust. After all the necessary operations are completed, the blade knives are installed back into the cutting head in the opposite order to the disassembly order.
Despite the fact that lawn mower blades are made of high-quality steel, they need to be sharpened from time to time. Fortunately, this does not require special skills or equipment, and today we will tell you how to sharpen a lawn mower blade yourself without deteriorating the quality of the metal.
You can cut excess grass from the lawn even if the edges of the mower blade are obviously dull. However, in this case, the shoots will stratify in the longitudinal direction, turning into a fringe. A few days after mowing, the grass will become withered and will hurt for several more weeks. The cut should be even and neat, then it will take literally a few hours and the lawn will always be lush green. This requires that the knife be sharpened almost perfectly.
Left: Grass cut by a dull lawnmower blade. Right: grass cut with a sharp blade
Disk selection criteria
You need to choose a plastic or metal knife, taking into account the area of the area that you plan to process, as well as the type of trimmer - electric or gasoline. The number of blades will depend on what kind of growth needs to be removed using the tool. You can select the desired disk shape, number of blades and material of manufacture using the device’s operating instructions. Usually it specifies which cutters are recommended to be used to solve certain problems.
Material
It is not recommended to use metal knives on electric scythes, since the design features make their use dangerous for the user . This is explained by the curved shape of the rod, the absence of stops on the handles, and the high rotation speed.
Important! The straight shaft ensures safe use of the trimmer in moments when the rotating disk encounters an obstacle. In this situation, it bounces back towards the person, so the curved structure can cause injury.
For safety reasons, trimmers with flexible shafts should use plastic blades. Their purpose is to mow soft grasses and dead wood. Whereas metal discs do an excellent job with tall, dense, hard growth, shrubs, and tree shoots.
Blades
The number of blades is important when solving diverse problems. So, two or three pieces are enough to grind grass. To make hay, it is necessary that the disk have from four to eight blades. To destroy small shoots of trees and shrubs, instead of blades, the disks must have a large number of small teeth.
How to remove a blade from a lawn mower
Before you begin to partially disassemble the lawn mower, you need to protect yourself and it. While an electrically driven device can be simply unplugged, gasoline lawn mowers require preliminary preparation. First of all, you need to remove the cap from the spark plug. Next, you should eliminate fuel leaks, that is, either drain the tank, or place a sealed rubber membrane under the cap and turn off the fuel valve. The lawn mower should only be turned towards the handle unless otherwise specifically stated in the operating instructions. Before turning the mower over, be sure to clamp the crankcase exhaust hose to prevent oil spillage.
Lawn mowers use blades of different configurations. In the simplest case, this is an ordinary two-bladed plate of complex shape, but the knife can also be compound - the upper blade is intended for mulching the mown grass. There are also four-bladed knives, which can be either composite or on a common base.
The knife can be fastened either with one bolt in the center through a shaped washer, or with two bolts seated on a centering hole or pin. In any case, the threads on the bolts are right-handed, so you need to unscrew them counterclockwise. To block the shaft from rotation, place a block resting on the ground under the knife. It is advisable to remember or mark the position of the blade(s) so as not to confuse anything during reassembly. Temporarily install the removed bolts into the free holes.
The procedure for installing the disc on the trimmer
Installing the blade on the trimmer is very simple. To do this, use the supplied key to disconnect the cutting attachment and a pin to lock the gearbox . The procedure is as follows.
- First of all, you should unplug the electric trimmer, and simply turn off the gasoline trimmer. Disconnect the protective cover and move it aside.
- Next, you need to align the holes on the gearbox and the shaft in order to insert a pin into them and lock the drive.
- If a spool with fishing line was used, it must be unscrewed clockwise.
- Then you need to find a nut to tighten the knife.
- The next step is to install the knives. Trimmer owners often wonder which side to put the disc on. This should be done so that the markings with numbers and letters are on top.
- Then you need to place the boot on top, and above it - a fixing nut, which must be tightened tightly with a wrench.
- The last step is to install the protective cover.
As you can see, the procedure is very simple and the same for many brands, be it equipment or Husqvarna.
On a note! If the owner of the device wants to replace the disk back with fishing line, you can install the reel with it in a similar way.
Cleaning and editing
When the knife is removed, the first thing you need to do is clean it from adhering dirt and hardened herbal juice. The easiest way to do this is to use a metal brush. The knife strip should be clean on all sides: not to a metallic sheen, but without the smallest adhering fragments.
Often, due to hard objects such as stones and chips getting into the working area, the blade is quite noticeably deformed. Most blades themselves are not straight, but the cutting edge and the strip 10-15 cm from it need to be examined for the presence of local bumps and curvatures. This is done using a short straight ruler.
You can straighten the blade with a regular hammer, the edges of which are slightly rounded. The knife is placed on a flat, massive support (anvil), then the metal is given the correct shape with weak blows. You need to edit the knife starting from the edges of the curved section, gradually moving towards the center. A crooked blade body is a minor problem, but it is very important that the cutting parts are straightened into a straight line. You also need to check the ejection blades, which often become unbent from the impact. If the blades are bent at different angles on different blade arms, this will impair air flow and the grass clippings will not be mulched properly.
Removing descents
If a knife has not been sharpened for a long time, chips are likely to appear on it. You need to get rid of them by bringing the edge of the blade at a uniform angle along the entire length of the cutting section. Please note that there may be several edges on each side, in which case the lawn mower will have several cutting planes.
Lawn mower blades have a one-sided sharpening, the descent of which, as a rule, faces upward. To set the trigger at the desired angle, you should use an electric sharpener with a carborundum stone, or, if you don’t have one, use a fine file. It is very important to remove the metal evenly from both blades. Therefore, keep the same pressure and at least approximately count the number of passes of the sharpener.
Small deviations in the sharpening angle are not critical, however, the smoother the slopes are, the longer the life of the knife will be. When shaping the blade, it always moves towards the grain to avoid the formation of large burrs and flashes. You should not use a grinder for preliminary sharpening - overheating can deteriorate the quality of the metal. However, you can install a flap or disc disc on your angle grinder under sandpaper.
How to sharpen brushcutter and trimmer blades
- First, carefully inspect the trimmer blade to see if there are any bends or cracks on it (to prevent the blade from breaking at high speeds).
- Using the template of the new knife, draw sharpening stripes on the worn knife (to ensure the correct shape of the knife and even wear).
- The trimmer blades must be sharpened on a low-speed sanding wheel with medium grit (so that the cutting edges become sharp and at the same time do not overheat the metal).
- Sharpen all edges identically!, slowly, at an angle of 30° (to eliminate vibration of the knife when the trimmer is operating and ensure a clean and easy mowing).
If the knives are brush cutters
(trimmer blades) are dull or incorrectly sharpened - this means overloading the motor, increased fuel consumption, low productivity, poor mowing and rapid operator fatigue.
Blade sharpening
The purpose of sharpening itself is to eliminate small chips on the edge and bring the descent into one straight plane. The presence of a “file” on the blade leads to a rapid decrease in sharpness, and with a rounded descent there is too much impact on the cut stems. In addition, a blade with a rounded shape gets dirty much faster.
It is best to sharpen the blade with a flat emery stone of about 400-600 grit; there is little point in using more “delicate” stones. Soak the block in soapy water for 10-15 minutes and wet it periodically while turning. The knife is also sharpened for grain with a small stretch of the whetstone from the center of the sharpened area to the edge.
When sharpening, try to keep the stone in the same position to maintain a constant angle. As with the removal of descents, sharpening should be carried out with the condition that the same amount of metal is removed from opposite blades. This condition, however, does not have to be strictly observed when sharpening four-blade knives.
Editing edges
Once the blades are sharpened, they need to be straightened. This is done using a piece of moisture-resistant sandpaper with a grain size of about 600-800 grit. The paper must be moistened with water and rolled into a cylinder with a diameter of 100-150 mm.
The purpose of editing is to remove the slightest burrs and flashes, due to which the thinnest edge of the blade can curl. The sandpaper rolled into a cylinder should be lightly pressed against the descent plane and pulled out in a smooth motion away from the grain. It is also recommended to make a smooth shift from the center to the edges.
When removing the triggers and sharpening, all manipulations were carried out on only one side of the blade. During the editing process, the knife is also processed from the back side. Here the paper is pressed almost flush against the body of the knife, but with a slight tilt towards the edge. The pressing force on the paper when editing is very small, but you need to make quite a lot of movements in order to eliminate large scratches on the shiny slope that remained after sharpening.
For reference:
You can also sharpen a lawn mower blade by riveting, similar to a regular hand scythe. This, however, requires a special device - a headstock, as well as a specific skill. But with this method of sharpening there is no need to balance the knife.
Balance check
Before you put the blade back, you need to make sure that its arms have at least approximately the same weight. Otherwise, vibration will occur during operation, which will not have a positive effect on the durability of the spindle.
Balancing is carried out mainly for double-sided single and compound knives; four-blade knives are not so susceptible to imbalance. To check the knife, you need to clamp a smooth rod in a vice in a horizontal position. The blade is put on it through a hole in the center, after which attempts are made to install it strictly horizontally. If one of the arms weighs significantly more than the other, the knife will inevitably turn to one side.
Equating the weight of the arms is done by grinding a small amount of metal off the back of one of the arms of the knife. It is not necessary to achieve ultra-precise balancing, but the knife should remain in a strictly horizontal position for at least a few seconds. Once the balancing is done, you can put the blade back in place and finally refresh the look of your lawn.
Gradually wear out. For this reason, the speed, quality and productivity of work decreases. The efficient operation of the equipment is restored by sharpening the parts.
Hair clipper
The highest quality sharpening of hair clippers is done using professional equipment. However, there are ways to do this work at home. Let's look at the most common of them.
The procedure for sharpening blades
Sharpening knives of hairdressing clippers is carried out in several stages:
- Removing and preparing blades for sharpening.
- Sharpening and grinding knives.
- Processing of sharpened parts.
- Assembling the knife block.
- Test haircut.
- Final adjustment of the knives.
Before performing work, carefully prepare the workplace. Provide the necessary level of comfort and illumination. Place all the necessary tools and materials in their places.
Clean and lubricate knife blades after every haircut. This will help ensure long-term operation of the device.
Using a screwdriver or screwdriver, remove the fastening screws of the knife block. The removed parts are put aside or placed in a separate box. Carefully remove the upper (moving) and lower (fixed) knives.
Lower and upper knives
The lower knife is in a stationary position when the machine is operating. It is attached to the machine body using fixing screws.
The upper knife slides along the working surface of the lower knife. Movements are carried out left and right along the sliding axis of the knives.
A polymer shock-absorbing gasket is installed between the knives.
How to mow grass?
Cutting the grass begins with the brush cutter starting to work. The best way to do this is on the ground to make it safer. It is also recommended to wear a relief belt, which may be on couplings or a carabiner, before working with saliva. Once started, the tool is attached to the belt and can be started.
Trimming the belt is important before mowing. This is correct if the load on the operator’s hands is minimal. The lawnmower moves the device only with your hands, otherwise it will be too tired.
The main weight should rest on the worker's shoulders.
The tool should move slowly to the right and left. In this case, the trimmer should be at the same distance from the ground. It is important that the operator moves slowly (“rolling steps”).
READ Do I need to lubricate a new angle grinder?
It's not easy for beginners to keep the momentum up. Depending on the density of the grass, the speed should vary. For example, cutting young grass does not require much effort at all.
It is important to feel the operation of the device. After all, if the queen cannot cope with the grass, then you need to increase the speed. However, constant work at high speeds quickly wears out the tool.
When mowing with a gas trimmer in one direction, experts recommend accelerating and moving it to the other side to release the gas and take a step forward. This method is especially good if you need to put the grass in rolls.
What are gasoline wheels, see the following video.
Trimming grass with trimmers is caused by using a mower with metal discs and trimming. Each type of cutting device has its own basic characteristics. The use of fishing line is limited by the type of vegetation, so when the head is not up to the task, a metal disc is used. How to choose a cutting blade for a trimmer, which they are, and how to sharpen, we will find out the details before purchasing the appropriate equipment.
Removing and preparing blades for sharpening
Using a brush and a damp cloth, clean the knives from dirt and dust. To remove rust, use improvised means or special solutions. These products are sold in a wide range in household chemical stores. They can also be purchased at auto parts and plumbing departments.
Disassembling the knife block
To remove rust, knives are dipped into a container with a special solution for several minutes. Using a cotton swab or brush, treat the surface of the blades. If necessary, repeat the procedure.
Use only specialized oil to lubricate blades and other moving parts. In some cases, the use of machine or spindle oil is allowed. The use of vegetable oil is strictly prohibited!
Using a dry cloth, wipe the blades dry and dry them in a warm place. After processing and lubricating the rubbing surfaces, the machine is reassembled in the reverse order.
Thorough cleaning of the knives from dust and debris helps to partially restore the functions of the machine. Completing these procedures is sufficient to continue operation of the device with self-sharpening blades. If the measures taken are insufficient, they move on to the next stage.
Blade sharpening
Professionally sharpening knife and trimmer blades is quite a difficult task. Sharpening is a responsible and labor-intensive process. The quality of further work with the device depends on the accuracy of the work at this stage.
Sharpening blades with a knife sharpening kit
Professional sharpening kits can be purchased in specialized stores.
Knife sharpening machine with casing
The kit includes the following components:
- grinder;
- protective machine casing;
- double-sided aluminum disk (plane washer);
- special composition for cleaning the disc and knives;
- special composition for lubricating the disc and knives;
- a block for uniform distribution of abrasive;
- magnetic holder;
- abrasive powder;
- laser pointer;
- brush or brush.
The operating procedure on the sharpening machine is as follows.
The plan washer is first cleaned of dust and debris using a sponge. Using a sprayer or sponge, apply a lubricant to the surface of the disc.
For your own safety, do not use machines with a broken power cord, damaged housing elements, etc. All detected damage must be repaired at specialized service centers.
Using a piece of cloth, rub the oil over the entire surface of the disc. In this way, all irregularities on the surface of the washer are filled. Using a soft brush, evenly distribute a thin layer of abrasive powder over the surface of the disc. Using circular movements of the bar, rub the abrasive into the surface of the disc.
Sharpening blades on a sharpening machine
After applying lubricant and abrasive powder, begin sharpening the knives. To do this, install a magnetic laser pointer. The blade is secured using a magnetic holder. Turn on the machine and start working.
The working planes of the knives are sharpened by a translational movement from the edge of the disk to its center. After sharpening, wash the blades in a special solution. Using a brush, remove particles of abrasive powder between the teeth of the plates. Wipe the parts thoroughly with a dry soft cloth, rinse and dry.
After processing the sharpened parts, they begin to assemble the knife block. Before assembly, apply a lubricant to the rubbing surfaces of the plates.
Sharpening blades with a whetstone
Using a double-sided whetstone helps sharpen the blades of your clipper. One surface of such a block is intended for rough sharpening of knives. The other surface is used for grinding pre-sharpened surfaces. The width of the bar is taken equal to or greater than the width of the cutting elements.
Sharpening blades on a whetstone
When working, the blade is moved in the longitudinal and transverse directions over the entire surface of the stone. The movements are performed smoothly and without pressure.
For models with ceramic blades, use only diamond-coated sharpening stones.
The final grinding is carried out on the other side of the block. The work is carried out until a characteristic reflection appears on the sharpened surface. Then the remaining metal and abrasive powder is removed.
Sharpening blades on a lathe
To sharpen parts on lathes, replace the abrasive wheel with an aluminum disk. The working surface of the disk is cleaned of dust and dirt. A thin layer of diamond paste is applied to the cleaned surface.
Sharpening blades on a lathe
Set the required disk rotation speed and turn on the machine. The optimal disk rotation speed is from 1200 to 1500 rpm.
Upon completion of work, the sharpening disk and processed blades are cleaned of dust. The treated parts are washed in a special solution.
Sharpening blades on a grinder
Two types of equipment are used to sharpen cutting parts:
- with an emery (grinding) wheel;
- tape (with sandpaper).
In the first case, the process is similar to the process of working on professional equipment. The main disadvantage of models with this design is the inability to adjust the speed of rotation of the disk. Therefore, such a tool is used for rough sharpening of parts.
Resharpening helps restore the operation of the machine in case of mechanical damage or removal of teeth. This work is performed in a specialized workshop using professional equipment.
The belt sanding machine has a fairly wide and flat working plane. When working, the machine is turned over with the working plane facing up. Using various stops and clamps, the equipment is fixed in a constant position.
Grinding machine with wheel
Some craftsmen have invented the possibility of placing the machine on the side surface. To do this, place a sheet of clean white paper on the machine. Outline the contours and determine the location of the holes for the fastening bolts.
Belt sander
Place a sheet of paper with a drawn outline on a sheet of plywood. Holes are made according to the resulting markings. Bolts are inserted into the holes and secured with nuts.
The machine is mounted on bolts and is in a fixed position. This ensures convenience and control of sharpening at every stage of work.
Sharpening blades with sandpaper
This method allows you to sharpen any blades at home. To do this you will need sandpaper and a fairly flat surface. This is achieved by using a piece of plywood, organic or quartz glass.
The grain size of the paper at the coarse sharpening stage is taken to be 30-40 microns. For final sanding, paper with a grain size of 5 to 10 microns is used.
Sandpaper for sharpening blades
A sheet of plywood or a piece of glass with sandpaper is placed on the table or lap. Using circular smooth movements, sharpen the blades one by one. Sharpening is carried out until a characteristic shine appears.
How to hone and deliver?
If you use your gas tank for a long time, sooner or later it will require regular maintenance. One of the important points is sharpening knives. A metal disk can certainly work dullly, but you can't use it. This leads to reduced efficiency, engine overheating, and gearbox wear. Sharpening teeth or blades is not easy, but you can simply install new knives if you wish.
- First of all, the knife is removed from the device. Sharpening directly to the scythe is not recommended as it is dangerous.
- Then inspect the cutting element for chips, cracks and damage. If so, you will need to install a new drive.
- You can use a file, sharpener, or grinder to sharpen your knives. The safest tool. This is a file that even a beginner can handle. To sharpen the knife, place it in a vice and then grind it by hand at an angle of 30 degrees. This method is considered to be of the highest quality.
When using a grinder, it is important not to overheat the metal, otherwise the disc will quickly become unusable. A grinder with a thin abrasive wheel is suitable for sharpening discs with a large number of teeth.
- Once you've finished sharpening, you can put the disc back on the trimmer and check how well the tool works. The sharp parts of the knife cannot be removed to avoid injury.
Over time, the blade wears out and must be replaced. Installing a new disc on the trimmer is quite easy. This procedure takes no more than 5 minutes if you follow simple instructions.
- You will need to remove the protective cover first, but on some models it may remain on. For example, metal shells cannot be removed from a hedge trimmer.
- Then take a hex wrench (hex wrench) and use it to lock the transmission. The hole for the lock should be located on the side or end.
- The mower should then be removed from the hedge trimmer.
- The disk will be replaced. It should be noted that the inside diameter of the knife must be located entirely within the groove provided for this purpose. The nozzle face should be positioned upside down.
- Now you need to secure the disc with a special washer and screw the lock nut clockwise. Before this, the transmission shaft must be locked.
- Last step. installation of a plastic protective casing.
Adjusting the knives
To ensure normal operation of the knives, their relative position in the longitudinal and transverse planes is adjusted. To do this, install and slightly tighten the fastening screws of the knife block. By pressing the blades, their relative position in the transverse plane is adjusted.
To prevent rust, blades should not be treated with water. Use alcohol or special gel-based compounds.
The adjustment is considered completed if the line of the cutting edge of the teeth of the movable knife is 1-2 mm below the line of the teeth of the fixed blade.
Adjusting the longitudinal position of the knives
In this case, a slight slope of the cutting line of the teeth of the movable knife relative to the upper cut of the teeth of the stationary knife should be ensured.
Adjusting the lateral position of the knives
Adjustment of the knives in the longitudinal direction is ensured by the coincidence of the cutting edge of the leftmost tooth of the upper blade with the beginning of the row of teeth of the lower blade.
Once the adjustment is complete, tighten the fastening screws completely.
Manufacturers of well-known brands guarantee high build quality. Constant monitoring of lubrication and periodic sharpening will ensure uninterrupted operation of electrical appliances for a long time.
With the arrival of summer, many homeowners are concerned about the question of how to put a knife on a trimmer. No less pressing are the questions of why and when it is advisable to replace the fishing line on a brush cutter with a more durable cutting element. In our article we will try to sort it all out and give useful recommendations to summer residents.
Why you need to put a knife on a trimmer
A trimmer with a blade mounted on it is most convenient to use for more comfortable mowing of tall and coarse grass in the countryside. The fishing line on a brush cutter cannot cope in such cases. The thin one breaks very quickly. Using thick 2..3 mm cord or homemade rods with cables causes the vegetation to be wound onto the spool. This increases the load on the engine. As a result, the piston group and other moving parts of the unit wear out very quickly.
If you mow weeds with an electric trimmer without a knife, using fishing line alone, even a thick one with a shaped cross-section, will not solve the problem. There is always a risk of overheating the electric motor and damaging the flexible shaft. And it's all about the high torque of the electric motor. The grass wound around the spindle creates strong resistance to the shaft, reminiscent of a speedometer cable, which cannot withstand and gets twisted.
In order to protect equipment from premature wear, manufacturers have provided the possibility of installing special knives on trimmers. The design and shape of the existing cutting elements make it possible to easily cope not only with coarsened and overgrown grass, but also to successfully deal with young bushes.
Features of discs for mowers
Blade blades are made from plastic and metal and come in a variety of shapes to suit different tasks.
- Two-, three- and four-bladed knives with pronounced blades are used for mowing grass and overgrown trees. However, they are not suitable for haymaking because they shred the shoots by chopping them several times.
- Massive four-legged Disks are designed not only for clearing grass from the soil, but also for mowing hay. They prevent the shoots from being cut back again, making them suitable for winter harvesting.
- Perimeter cutting blades are useful for cut reeds and reeds. These knives are very heavy - a necessary quality for cutting thick stems.
- Professional discs, dental discs for brush cutters and mowers allow you to trim small trees and bushes.
READ How to properly thread line into a STIHL trimmer
Plastic knives are used as an alternative to metal blades. They do not need to be tightly installed in the head, but they rotate under the influence of centrifugal force. The durability of plastic knives is high, so their service life is quite long.
What knives to put on electric and lawn mowers
Before buying and installing a knife on a lawn mower, let’s find out what they are and in what cases they are used. Today, manufacturers offer consumers a large number of types of these consumables. In general, all cutting tools intended for mowing grass can be classified:
- By the type of material from which it is made;
- According to the shape of its cutting blades.
The main material for making trimmer knives can be plastic or metal. The use of such consumables largely depends on two parameters:
- Type of brush cutter;
- Mowing area.
For safety reasons, manufacturers do not recommend using steel blades on electric trimmers. Almost all brush cutters powered by electricity and a battery are equipped with plastic blades. Depending on the manufacturer, they can be of a solid disk-shaped design, with several blades, or in the form of a special mowing head that includes the installation of removable plastic blades.
A straight shaft for a gasoline trimmer and a curved one for an electric trimmer
Its design features do not allow placing a metal knife on an electric trimmer.
- The curved rod of the unit reduces the distance from its working part to the mower’s feet. If the blades collide with a stone or other hard object, the scythe is thrown towards the feet.
- The high torque that we mentioned above, in the event of a collision between a metal blade and a hard object, transfers a large load to the flexible shaft of the trimmer and its motor. What causes their premature failure.
- The handle of an electric scythe most often does not have a limiting bar that acts as a stop. This does not exclude leg injury.
It is these features that allow the use of exclusively plastic knives on trimmers with electric motors. When colliding with an obstacle, the blades are destroyed, thereby protecting the mower’s legs from possible injury.
Plastic knives work well with overgrown and dry grass. They can mow down nettles and burdock stems.
The use of metal knives only on gasoline trimmers is also due to design features.
- The straight design of the boom increases the distance to the legs, which ensures complete safety for the mower.
- Comfortable U-shaped and J-shaped handles allow you to hold the tool firmly. The D-shaped handles of the lawn mowers are equipped with a limiter that rests against the leg of the mower, which does not allow the head to be allowed to approach the legs when the cutting disc encounters a solid obstacle.
- The clutch of a gasoline engine allows you to smoothly gain speed to the optimal level. And when the blade collides with a hard surface, it is able to absorb part of the impact.
Thus, gasoline trimmers with a metal blade installed are best used in large areas. They will successfully cope not only with tall, coarse grass, weeds, burdocks and nettles, but also shrubs and young trees.
The shape of the blades of the disk placed on the trimmer does not in any way affect the quality of the work performed. Speed does not depend on them either. Triangular, trapezoidal, rectangular shapes are all a marketing ploy by manufacturers.
If you plan to make hay, it is best to use knives with a large number of blades on your brush cutter. Look for discs with eight teeth or discs with four large blades and four additional ones. Two and three bladed knives will chop up the grass greatly.
In what cases is a serrated disc knife used?
Metal toothed disks have the shape of a circle, along the base of which the corresponding number of teeth are located. These teeth come in different types, shapes and sizes. The more teeth, the more effectively the tool copes with thick grass and even small trees. Milling wheels for trimmers gain speed faster, which is their advantage. They also have a high moment of inertia, which is their disadvantage. This negatively affects the driving device of the tool, as the starting power increases, and as a result, the motor overheats during frequent stops. In addition, the equipment differs in the presence and absence of perforation.
- Perforated wheels with holes and a large number of teeth, up to 40 teeth, effectively cope with mowing thick, tall and small, coarse grass and shrubs.
The greater the number of teeth, the less the grass is crushed. Circles with a large number of teeth do not get grass wrapped around them. Discs with teeth in the amount of 60-80 pieces are intended for mowing grass with small trees existing on the territory, the thickness of the stems does not exceed 7 cm - Solid - discs that do not have holes in the structure.
They are heavy, so installing them on lawn mowers with an engine capacity of up to 30 cm3 is strictly not recommended. The tool simply will not be able to pull out the heavy cutting element. Compared to perforated ones, they weigh 1.5-2 times more. Effectively cope with thick and sparse grass. The smaller the number of knives, the more the grass is chopped, and at the same time the load on the motor increases. The load on the gearbox also depends on the angle of sharpening of the teeth.
If the operator is faced with the task of mowing thick grass and dead wood, it is recommended to choose discs with perforations and a large number of teeth. Solid discs are suitable for cutting green grass of different densities, but they are used exclusively on powerful lawn mowers with an engine capacity of more than 40 cm3.
This is interesting!
Pobedit-tipped milling discs allow you to mow grass close to existing obstacles. For cutting grass for hay, it is recommended to use steel ones with a large number of teeth. The smooth sharpening of the teeth on these knives allows you to effectively cut grass. For cutting thick-stemmed plants (raspberries, ragweed), solid discs with a number of knives of 16, 24 and 32, as well as perforated ones with any number of teeth, are used.
How to properly place a knife on a trimmer
Putting the knife on the trimmer is not that difficult. The manufacturer equips its tools with a special pin that allows you to lock the gearbox and a key with which you can unscrew the spool with fishing line. The most important thing is to observe safety precautions and the sequence of assembly and disassembly when changing cutting elements.
The algorithm for installing the knife on the trimmer is as follows:
- Remove the protective cover;
- We block the drive. To do this, you need to align two holes - in the shaft hub and in the gearbox cup. After aligning them, insert a pin into the holes;
- Unscrew the spool with fishing line or the fastening nut holding the boot clockwise from the hub (if the trimmer has not yet been used);
- Next, install the cutting knife so that the slots on the hub washer coincide with the recesses in the hole of the cutting disc;
- Install the boot;
- Tighten the fastening nut (counterclockwise) while holding the locking pin;
- Tighten it using a tubular wrench;
- We return the protective casing to its place.
As you can see, there is nothing complicated. Now you can safely start mowing the weeds on the site.
Instructions for replacing a disk on a lawn mower with a step-by-step description
Having understood the design of cutting knives, it remains to find out the process of replacing them and installing them on the tool. If the lawn mower has a head with a fishing line, and you plan to install a metal disk, then no modifications to the design will be necessary.
To install a metal disc on the trimmer, you must follow the following instructions:
- To begin, remove the plastic protective casing - not necessary. Depending on the tool model, the dismantling process may vary. If the trimmer has a metal casing, then there is no need to remove it. The plastic casing is removed in order to install the metal
- Using a special hex key or screwdriver, you need to lock the gearbox. The hole for blocking the shaft can be located on the side or on the end side
- The mowing head or spool, if installed, is unscrewed from the tool
- A disk is installed in place of the head or spool. The inner diameter of the disk should be located in a special groove. The nozzle is installed so that the front side (with the letters) faces up
- After installing the disk, a locking washer of the appropriate size is installed. After this, the fastening nut is screwed in, having previously blocked the gearbox shaft. The direction of rotation for screwing the fastening nut is counterclockwise
- After completing the work, it is necessary to install a protective metal casing. If it is not there, you should leave the plastic casing
As you can see, the procedure for replacing the disc on the trimmer is not at all difficult and takes no more than 5 minutes. The video below shows how to properly change mowing heads and wheels on lawn mowers.