Any power tool contains rotating parts in its design that are subject to increased wear as a result of friction. It is possible to prevent their premature destruction and extend the service life of the tool if you carry out timely preventative maintenance of rubbing parts. In an angle grinder, the main wear and tear is on the gears of the gearbox. The harmful effects of friction can be reduced by applying lubricants to the surface of parts. Let's consider which lubricant for an angle grinder gearbox is best to buy.
When is a lubricant change required?
With intensive daily use of the grinder, the lubricant in the gearbox should be replaced at least once a year. Often, users do not adhere to certain periods of preventive maintenance of the tool, and routine maintenance is carried out after the appearance of extraneous sounds during operation. This is absolutely not the correct method of caring for the gearbox.
A grinding noise during rotation or rattling indicates that wear has formed on the gears and they will soon have to be replaced.
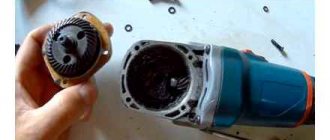
Preventative inspection of the gearbox begins with separating its casing from the rest of the angle grinder. To do this, simply unscrew the four mounting screws.
The next photo shows that there is grease in the case, but it has collected on one side of the case, and there is not enough of it.
This happens because the angle grinder (angle grinder) operates at high speeds. Under the influence of centrifugal force, oil particles tend to move away from the axis of rotation. During prolonged operation, the surfaces of the gears become completely dry, and without lubrication the metal wears off. In this case, it is enough to lubricate the gear teeth with the existing composition, then close the gearbox and work until the next maintenance.
You can often notice grains of oil mixed with dust in the gearbox. During operation, the grinder heats up, and these grains are sintered, solid particles interfere with the operation of the mechanism. This lubricant must be replaced.
Methods
In modern mechanisms, the following methods of cooling the gearbox are used.
- Water cooling is a constructive design solution (artificial water cooling). Used in special gear mechanisms in 1 of 2 options.
- In the first case, perforation of the body is provided (the installation of several channels through which water is supplied).
- In the second, water cooling is carried out using a coil (installed in the crankcase block filled with lubricant).
- Air cooling of the gearbox . May be artificial or natural.
- With artificial air cooling, a fan impeller (centrifugal) is installed on the worm. Fastening is carried out through the casing in which the impeller is placed. In this case, the body ribs should run along the axis of the box. Artificial air cooling is important for ensuring the operation of powerful large devices.
- The self-venting air cooling system is based on the use of aluminum boxes with vertical ribs. This approach is good for lightweight, small-sized devices.
Read also: Solder for soldering food-grade copper
How to lubricate the gearbox
Any tool with moving elements needs periodic lubrication. Especially if it is actively used. For angle grinders, the consistency and composition of the lubricant must meet certain requirements.
Features of the lubricant:
- absence of solid particles;
- maintaining viscosity at temperatures above 100 degrees;
- good adhesion;
- moisture resistance.
The presence of hard or worse abrasive elements in the composition will cause abrasion of the working surface and individual parts of the device. When a temperature threshold of 100-120⁰C is reached, a cheap lubricant simply evaporates. Therefore, special attention should be paid to the maximum permissible values of the lubricant, otherwise the tool will be left without lubrication in the heat of work.
A good composition protects the surface from moisture, as well as from subsequent corrosion, which means it must have water-repellent properties. The adjusted consistency allows you to keep the lubricant on the surface: too thick a lubricant will impede the operation of the mechanism, and a liquid one will simply drain into the gearbox.
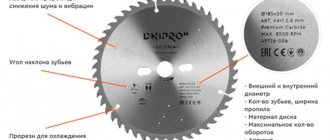
The viscosity of power tool lubricants is classified according to the NLGI (National Lubricating Grease Institute) standard. The choice of one or another consistency depends on the specific model of angle grinder, namely, the speed of rotation of the gearbox. The higher this indicator, the less thick the lubricant should be.
Viscosity classification for power tools:
- NLGI 00. The most liquid consistency used in heavy equipment: jackhammers, professional hammer drills, etc.
- NLGI 0. This is a semi-liquid composition, which is precisely used for grinders, as well as circular saws and gasoline scythes.
- NLGI 1. Sufficiently viscous consistency for use in construction hammers and medium-power impact drills.
- NLGI 2. Soft type of lubricant. Used in household jigsaws, light hammer drills and drills.
The required class of lubricant must be indicated in the operating instructions for the equipment. If there are no documents with the grinder, then all parameters of the model must be indicated on the official website of the equipment manufacturer.
How to properly lubricate and assemble a Bocsh hammer drill
For long-term operation of a Bosch rotary hammer, any regular and timely maintenance, the use of high-quality lubricants, and timely replacement of carbon brushes and rubber products are necessary. Monitoring the condition of bearings and wear of parts. When starting to repair a Bosch rotary hammer with your own hands, it is recommended to use the lubricants recommended by the manufacturer.
How to extend the life of a Bosch rotary hammer
Bosch rotary hammers require mandatory technical inspection and maintenance. To operate rotary hammers correctly, you must:
- prevent dust from getting into the cooling holes (you can wear a nylon stocking or use a vacuum cleaner);
- lubricate the drill shanks with special lubricant;
- do not overheat the power tool (if overheated, the lubricant crystallizes and stops lubricating the rotating parts);
- during intensive work, replace the rear rotor bearing every 6 months; after 70 hours, change the carbon brushes;
- when drilling holes in the ceiling, turn the hammer drill down and rotate it in this position to allow the lubricant to flow into place;
- After work, be sure to blow out the insides of the hammer drill with compressed air;
- change the rubber cuff on the hammer drill chuck more often;
- prevent sparks from appearing on the commutator brushes in idle mode;
- the duration of continuous operation should not exceed a 30-minute interval;
- Do not use the “Shock” mode often.
When starting to repair a Bosch 2-20, 2-24, 2-26 rotary hammer, read the lubrication chart indicating lubrication points and lubricants.
To lubricate Bosch rotary hammers, several types of lubricants are used, depending on the operating conditions of the components and parts.
Bosch rotary hammers use four types of lubricants:
- lubricant 1615430001 - for the gearbox and its cavity;
- lubricant 1615430002 - for gears, pendulum bearings, clutches;
- grease 1615430020 - for bearings (FT1V26);
- SAE 20 W lubricant - for rubber products.
Lubricants vary in viscosity and consistency.
Among Russian lubricants, we can recommend lubricants under the ringing name “Zubr”:
Bosch rotary hammers use 8 bearings: three rolling bearings pos. 13, 14, 67, a pendulum bearing (piston bearing) and four needle bearings pos. 60, 61, 62, 63.
It is recommended to assemble the hammer drill according to the diagram, for example, of the Bosch 2-26 hammer drill. The presence of an assembly diagram simplifies the process and suggests the sequence of assembly of parts and assemblies.
The assembly of other Bosch rotary hammers is carried out similarly, although some design features are present in the Bosch 2-20, 2-24, 2-26 rotary hammers.
Assembling the electrical part of a Bosch 2-26 rotary hammer
The assembly of power tools, including the Bosch 2-26 rotary hammer, should be performed in a previously prepared area. Prepare your work area by covering the table with clean paper or a napkin.
Prepare the tools necessary to complete the work. The tools you will need are: screwdrivers, pliers, tester, 100 g hammer, soft metal spacers.
Spacers are useful when installing bearings on the rotor and intermediate shaft of a Bosch hammer drill, for their attachment.
Assembling the rotor of a Bosch 2-26 hammer drill
On the repaired or new rotor, pos. 803, install the fan, pos. 5, and bearings, pos. 13, 14. To lubricate the rotor bearings, use Bosch grease 1615430020.
Installing the stator into the housing
Installation of the stator pos. 2 into the housing pos. 801 begins by threading the connecting wires of the stator coils through the housing. The stator is secured in the housing with two screws, pos. 80. To protect the stator from dust or dirt, a plastic casing, pos. 45, is installed on it in the housing.
In the case pos. 801, sequentially install the Bosch hammer drill power button, contacts pos. 19 and the reverse switch board pos. 16. make sure that all supply wires fall into special grooves in the hammer drill handle.
Assembling the mechanical part of a Bosch 2-26 rotary hammer
Before assembling the mechanical part, check the presence of new rubber seal rings, the integrity of all parts, and the presence of lubricants according to the lubrication chart given above.
Intermediate shaft assembly
The assembly of the intermediate shaft pos. 826 begins with the installation of the bearing pos. 67, the clutch coupling pos. 62 and the driven bearing pos. 830 on the shaft.
A gear sleeve pos. 823, a needle bearing pos. 63, a compression spring pos. 81, and a retaining sleeve pos. 65 are put on the shaft.
The intermediate shaft assembly is installed in the inner housing, pos. 820, and secured with a clamping bracket, pos. 48.
Assembling the percussion barrel assembly
The assembly of the impact mechanism assembly begins with the installation of a spur gear, pos. 22, a conical spring, pos. 80, retaining rings, pos. 85, and a steel ring, pos. 38, on the barrel shaft pos. 821.
The installed gear, pos. 22, on the barrel shaft is fixed with a roller, pos. 88, which does not allow the gear to rotate on it.
On the opposite side, the hammer assembly pos. 847 and the impact piston assembly pos. 26 are inserted into the shaft cavity.
Assembly of the striker begins with the installation of rubber rings for sealing positions. 74.75, scraper item 71. The assembled striker is tightly inserted into the table cavity.
Assembly of the impact piston begins with the installation of two washers, pos. 41. To ensure that the washers stay in the piston groove, lubricate the groove surfaces with grease. It remains to install the piston pin pos. 29. Install the firing pin, position 27, into the internal cavity of the impact piston and insert the entire structure inside the cavity of the impact mechanism barrel.
The impact mechanism assembly is assembled.
Install the impact barrel and intermediate shaft in the inner housing, pos. 820.
Assembling the mechanical unit and rotor
The rotor is attached to the assembled mechanical assembly. The rotor gears and impact mechanism assembly fit tightly into each other. To install the rotor into the mechanical assembly of the hammer drill, the helical gear of the rotor must be inserted into the inner housing until it contacts the helical large gear of the intermediate shaft. After assembly, rotate the rotor, checking for smooth rotation.
The assembled mechanical unit is closed with a black plastic cover, pos. 819. The cover is secured with four screws, pos. 90, with the installation of a rubber sealing ring, pos. 77. Be sure to lubricate the rubber O-ring with SAE 20 W grease before installation.
It remains to connect the stator housing (green) with the mechanical block housing (black). The housings are connected with four screws.
At the last stage, carbon brushes pos. 811 are installed in the brush holders of the reverse switch pos. 16. The handle has a button position 4 for the speed controller.
Wires from stator windings pos. 101, 102 and power cable pos. 806 are connected to the button.
Rotate the impactor shaft (first by hand and then under power), and make sure that the rotor rotates smoothly and that the brushes do not interfere with its movement, evenly touching the commutator lamellas. The sparks in the area of the brushes do not have a tail, but spark evenly across the entire width of the working part.
It remains to close the cover, pos. 41, with two screws, pos. 77.
Installing the mode switch knob
To install the mode switch knob pos. 832, you need to place the Bosch 2-26 hammer drill on its side.
The assembled mode switch handle pos. 832 is installed in the hammer drill body so that the red button of the handle is directed parallel to the hammer handle.
The handle is rotated clockwise to the “drilling” position. A characteristic click will occur. The hammer handle is inserted.
Be sure to check the operation of the mode switch by turning it to the desired position and turning on the hammer drill in each mode.
Assembling the quick release chuck
Bosch rotary hammers use the SDS-plus model chuck.
Structurally, they differ in the clamping device of the working parts.
The assembly of hammer drill cartridges is carried out after repairing the cartridge and replacing the damaged part.
Before assembling the cartridge, it is imperative to check the fixation balls. They should not show signs of corrosion, and their diameter should not differ from the nominal one by more than 0.01 mm.
The assembly sequence of the quick-release chuck has been described more than once on our website.
The quality of assembly of a quick-release chuck is determined by its performance. Insert any tool with the appropriate shank into the hammer drill chuck. Holding the body of the drill with your hand, try to pull it out of the chuck by weight. If you fail to do this, then the operation of the cartridge is considered reliable.
That's all. The Bosch 2-26 hammer drill is assembled. The assembly of rotary hammers of the Bosch 2-20, 2-24 models is practically no different, with the exception of small parts that do not affect the assembly process.
for repairing malfunctions of a Bosch rotary hammer: A minute of vandalism) (19) Bosch rotary hammer 2-26 bearing wedge \ bearing jammed
: Repair of a Bosch GBH2-26 hammer drill: Minor Bosch repair 2-26: Disassembling and lubrication of a pistol-type hammer drill: How to install a mode switch on a 2-24 Bosch hammer drill: Lubrication of sealed non-removable bearings, trick
Source: https://www.sibear.ru/information/kak-pravilno-smazyvat-i-sobirat-perforator-bocsh.htm
Assembling a Bosch 2-26 rotary hammer
It is recommended to assemble the hammer drill according to the diagram, for example, of the Bosch 2-26 hammer drill. The presence of an assembly diagram simplifies the process and suggests the sequence of assembly of parts and assemblies.
The assembly of other Bosch rotary hammers is carried out similarly, although some design features are present in the Bosch 2-20, 2-24, 2-26 rotary hammers.
Installation of hammer drill control units
In the case pos. 801, sequentially install the Bosch hammer drill power button, contacts pos. 19 and the reverse switch board pos. 16. make sure that all supply wires fall into special grooves in the hammer drill handle.
for repairing faults with Bosch rotary hammers
Source: https://sdelalremont.ru/poryadok-smazki-i-sborki-perforatora-bosch-2-26.html
Ready-made lubricant
Manufacturers of power tools advise using special compounds of their own production. Such recommendations are given, in particular, by Bosch.
You can buy such products, but their cost is quite high, and the costs are not always justified. more democratic in the type of materials used. Which lubricant is best? The lubricant for the grinder gearbox must meet certain requirements:
- the viscosity of the composition does not exceed 800 Pa*s;
- temperature of separation of drops from the main mass is not less than 120°C;
- homogeneous composition without the presence of mechanical inclusions;
- resistance to moisture.
The industry produces many types of lubricants, including special formulations for use in gearboxes. The best results are shown by mixtures containing molybdenum disulfide as an extreme pressure additive. If we talk about foreign manufacturers, Castrol and Mobil have proven themselves to be excellent.
For ease of use, Mobil places its products in syringe-shaped tubes.
Domestic brands include MS-1000 and Limol. The use of grease, lithol or Tsiatim-221 does not give the desired result.
Homemade mixtures
If the required lubricant is not available for sale or if the user considers the price of the product to be unreasonably high, you can try to make the lubricant mixture yourself. There are several formulations using different bases. One of them is the common Tsiatim-221.
Transmission oil TAD-17 is added to the container with Tsiatim. Continuously stirring, add oil one drop at a time until the required consistency is achieved. The mixture should adhere well to the parts, not be too thick and not flow like liquid oil.
Another base can be CV joint lubricant in combination with MS-20 liquid oil.
How to lubricate the gearbox
First of all, it is necessary to disconnect the equipment from the network and clean the housing from dust, dirt and other construction debris. The lubrication procedure includes several stages: opening the protective cover, disassembling the gearbox, cleaning off the old lubricant, pouring in a new one and checking.
Removing old grease
The gearbox must be cleaned of any remaining old grease and wear. Under no circumstances should you add a new lubricant by mixing it with the old one. The fact is that used lubricant contains solid particles.
First remove old grease
Advice! It is better to remove old grease with a soft cloth that absorbs moisture well. You can also use paper towels. An ordinary rag will simply drive dirt and solid particles around the gearbox without absorbing anything.
All parts must be treated in solvent or gasoline, and then dried thoroughly. Neither the first nor the second should get into the new lubricant, because they will change its characteristics for the worse.
Applying lubricant
Before pouring, you should make sure that there are no foreign elements in the composition, and that the consistency is uniform - without lumps or light/dark spots. Lubricant is applied to moving parts in a thin layer, but in such a way that it covers all areas of the mechanism.
The easiest way to add lubricant to bearings is with a regular syringe. After processing the parts, you can pour the composition into the gearbox.
Lubricant quantity
Allowable volumes of material are indicated in the operating instructions. Excessive lubricant is no less detrimental to a tool than its lack. The lubricant should completely cover the gear teeth. Due to an insufficient amount of material, the moving parts will quickly wear out, and the tool itself will begin to smoke under heavy load.
Excess lubricant makes it difficult for parts to work, plus oil will ooze through all the cracks and fasteners.
Advice! In the absence of documentation for the equipment, you can rely on figures of 40-50% of the lubricant from the total capacity of the gearbox.
Control of composition application
The last step in changing the lubricant is to check the equipment in light mode. After assembling the structure, you need to make sure that all parts fit tightly together and the fasteners are securely tightened. The semi-liquid composition NLGI 0 can seep even into tiny holes, especially during prolonged operation of the equipment, when the oil is heated above 100⁰C.
We turn on the angle grinder at low speed and make sure that there are no extraneous sounds. When you first start it up, a slight burning smell is considered normal: it should disappear in less than a minute. If this does not happen, then the equipment must be turned off and the build quality checked.
Particular attention should be paid to the temperature of the gear unit. The lubricant's job is to distribute heat evenly. Standard temperature indicators for the engine and the structure as a whole are indicated in the specification for the angle grinder. They should not exceed the norm.
After the dry check, the equipment must be disassembled and the correct application of lubricant must be assessed. We open the gearbox and inspect the helical gears. If they are completely covered with lubricant, it means it has been applied correctly. Excess can be seen almost immediately after turning on the machine: oil in the cracks and in the places where the gearbox is attached.
Properties of gear lubricants
The standard characteristics of thick oils for general use are not suitable for a rotary hammer gearbox. Only compositions for automobile CV joints have similar parameters.
Some properties are generally unique, since the gearbox mechanism does not simply operate under large variable loads. When the impact mechanism operates, the lubricant is spontaneously squeezed out of the contact zone.
Read also: Sulfation and how to desulfate
Composition requirements
- Adhesion must be so high that an oil film remains between the parts under any load.
- A high level of water resistance is required - rotary hammers can operate in conditions of high humidity. When cooling, a reduced pressure occurs in the gearbox housing, atmospheric air along with liquid vapor is sucked inside.
- If water gets in, an emulsion should not form.
- Since the gearbox gets very hot during operation, the lubricant thins out due to temperature. In this case, the basic properties should be restored after cooling. The heated composition should also not lose its basic antifriction parameters.
- Requires high dropping point. Otherwise, the rotating gear, under the influence of centrifugal forces, will throw lubricant from the surface of the teeth.
- Fine cement (stone) dust gets into the gearbox housing. The composition of the lubricant is selected in such a way that abrasive particles are bound and removed from the zone of intense friction. When using good oil, the dirt is always on the walls of the gearbox, and not inside the gears.
- Since the gear housing is made of aluminum alloys and the gears and bearings are made of alloy steel, the anti-corrosion properties should be equally suitable for both metals.
The same properties (with the exception of dropping point and adhesion indicators) must be present in liquid compositions. In a sealed gearbox housing, lubricant adhesion is not required: liquid oil constantly washes all parts of the mechanism during operation.