One of the most important tools of a carpenter and joiner is a plane. Enterprises often use power tools to quickly complete work. However, the sharpness of the blades on them deteriorates faster than on hand tools. To continue removing wood quickly, efficiently, without damaging the workpieces, you need to sharpen the knives for the electric planer.
Knife on an electric planer for sharpening
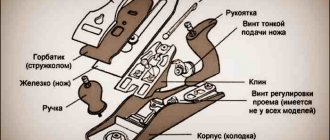
Knife design
Before you start learning how to sharpen knives on an electric planer, you need to understand their designs. It consists of two main parts - supporting and working, which contain several elements:
- working angle;
- front corner;
- chamfer on the back of the blade;
- back angle of the chamfer.
When sharpening the cutting element of a power tool, the greatest attention should be paid to the front angle. The smoothness of the surface after planing, the load on the blade, and the efficiency of removing sawdust from the working area will depend on how correctly it was sharpened.
Sharpening knives for hand planes
The working edge of the knife is an edge, which still has a slight radius of curvature. Before sharpening, visually check the integrity of the edge: there should be no local metal tears on it. If they are present, the planer knives will have to be shortened.
To minimize the radius of curvature on the edge, sharpening is recommended to be carried out in two stages. First, primary sharpening is carried out: the dull knife from the chamfer side is brought to the periphery of the sharpening wheel and pressed firmly. The speed of the sharpener should not exceed 600...700 min-1, otherwise the metal removal will be significant. It is important not to overdo it with the pressing force, since blue-violet tarnish may appear on the steel - an unpleasant sign of tempering of the metal. In this case, the hardness of the plane knife will decrease, and it will be necessary to restore the strength characteristics of the material through rather complex heat treatment (annealing + hardening + tempering).
If there is no sharpener, proceed as follows. Sharpening a knife for a hand plane is done with a coarse-grained sharpening stone, which must be fixed on a workbench (both hands must remain free). Sharpening is performed by circular movements of the chamfer along the surface of the block. In this case, it is advisable to periodically moisten the knife with water or soap solution. This not only cleans the sharpened surface from the smallest particles of the knife metal, but also allows the tool to be cooled evenly.
The appearance of a thin burr on the blade along its entire length is a sign of transition to the second stage of sharpening. Here the tool is sharpened using a finer-grained stone that will remove the burr. The generally accepted gradation of bars according to their grain size is as follows:
- High grain size (30...180 microns): whetstones/sharpening stones made of silicon carbide or corundum. Used to remove large defects on knives, change the chamfer angle, etc.
- Medium grain size (7...20 microns): whetstones/sharpening stones made of electrocorundum or chromium dioxide. Suitable for pre-sharpening.
- Fine grain size (3...5 µm). The materials are the same, the tool is used for final sharpening of knives.
After sharpening is completed, the knife blade is passed along a piece of hardwood, which will finally remove the burr fragments.
Types of knives for electric planer
Planer knives are divided according to several factors. By form:
- Rounded - they are used when working with wide workpieces. Using a rounded blade, you can make a neat transition between two or more planing planes.
- Straight - used for planing small workpieces. Allows you to select a quarter.
- Wave-shaped plane blades. With their help, they simulate the aging of wood.
A separate division concerns the length of the blades. It varies depending on what kind of power tool is used for planing.
Features of the work
Before you start sharpening, you need to select the sharpening angle of the plane knife. This indicator is influenced by various factors:
- Properties of the tree that will be processed. To work with soft wood (larch, linden, pine, aspen), the optimal angle range is from 40 to 50 degrees. For hard wood (oak, hornbeam, maple, pear), set the angle to 55–65 degrees.
- Setting the tool at a certain angle. The quality of planing also depends on this indicator. For soft wood - about 40 degrees, for hard wood - about 25.
- The material from which the cutting edge is made.
After thoroughly studying the tool and selecting the materials to be processed, you can begin resharpening the plane at home.
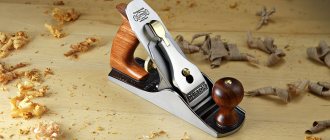
Hand planes
Step-by-step instructions for sharpening a hand plane:
- Determine the sharpening angle.
- Unscrew the clamping bolts and remove the blade.
- Place a coarse-grit whetstone in a vice.
- Use the chamfer of the blade to make circular movements on the abrasive material.
Movements should be slow. When sharpening, the metal is moistened with water. After processing with large grains, a fine-grained stone is used. Sharpening of a plane, which is intended for manual planing, can be carried out on a special machine.
Sharpening a hand plane blade
Electric planers
The main difference between electric planer blades and hand tools is double-sided sharpening. When one side becomes dull, the knife is turned over to continue planing. Their sharpening is carried out using sharpening machines. Step-by-step instructions for sharpening planer knives:
- Unscrew the blade from the tool.
- Moisten the abrasive stone with water and set the speed to low.
- Start the engine.
Minor damage and unevenness can be restored using sandpaper. We must not forget that blades for electric tools can be made of hard alloys. If such a cutting edge is dull on both sides, the element will have to be replaced.
Knives for electric planers become dull faster than those for hand tools. This is due to high planing speeds. To sharpen them, it is necessary to use specialized equipment, accurately set the angles and the number of revolutions of the abrasive wheel. Exceeding the speed will lead to loss of hardness and destruction of the cutting edge.
Tools
0 votes
+
Vote for!
—
Vote against!
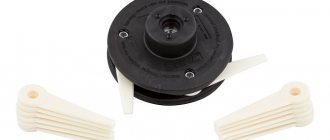
An electric plane serves as an indispensable tool in the construction and repair of a house, as with any power tool, it contains consumables. The consumables of an electric planer are knives, with which the wood is processed. As a rule, knives are double-sided, in a set of 2 pieces. Remember: if the plane doesn’t remove shavings well and your knives are dull, then it’s time to change them. But in this case it is worth mentioning that some of them simply need to be sharpened. To do this, you need to know how to position the knives of the electric planer after sharpening, and how to carry out the procedure for sharpening the knives.
Electric planer knives
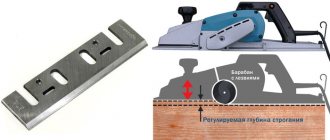
The knives are mounted on a rotating drum of an electric planer and are intended for removing the top layer of material during the planing procedure of wooden products. If this equipment has 1 cutting edge or 2. The latter blades are called rotary blades because their position can easily be changed if one side becomes dull. Electric planer knives are made of tool steel or tungsten carbide. The first of them can be sharpened again. Blades are shaped like: straight - used for cutting quarters and planing narrow parts; rounded - intended for processing wide areas, because they make transitions between planing lines more neat; wavy – shaped knives for electric planers are suitable for simulating “aged” surfaces.
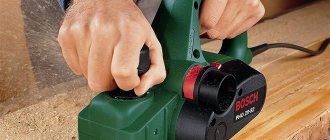
Before using the electric planer, it is recommended to check each time whether the knives are installed correctly. Their cutting edge should barely protrude outwards and should be parallel to the sole of the plane. To determine how the knife is adjusted, lift the tool to eye level with the sole up.
The cutting edge of the knife should protrude on average 0.5 millimeters above the sole. For Scherhebel, which is intended for initial rough planing, the cutting edge must be released by at least 1 millimeter. Adjusting the position of the knife is very simple. Turn the small and large adjusting screws, which are located behind the platform for the electric planer knife, sequentially left and right until the cutting edge is in the desired position.
After this, install the knife into the electric planer and fix the position using the centering lever and screw on the top plate. A new electric planer, as a rule, already has the position of the knife adjusted. However, after prolonged use, the setting will become lost. Therefore, if you are using a plane after a long break, you need to first check that everything is fine. Do not immediately start working on parts with a newly adjusted electric plane without testing it on an unnecessary board.
Classification of knives for electric planers
Also, knives for electric planers are divided by size. If you have an imported plane, for example, from Black & Dekker or Skil, then there are traditional 82 mm knives, they are popularly called “plates”. Among inexpensive and high-quality knives, we can recommend carbon steel knives. These knives are suitable for most foreign planes, even for professional electric tools from Bosch and Makita.
Exact overall dimensions: length 82 millimeters, width 5.5 millimeters and thickness 1.2 millimeters. You can find knives from various manufacturers on sale, and the price in this case depends primarily on the company. If you buy Boshevsky ones, the cost will be 2 times higher than simple household ones - Zubr, Stayer, Fit, Matrix. Of course, the difference in quality will be very noticeable.
There are knives that are specifically designed for certain models of electric planes. For the popular planes Interskol and Baikal, special knives are intended; they are wider than the “plates” and thicker. They are stronger, and when you hit a twig or nail when working with an electric planer, the knife will not break, and the notch can be easily removed with sandpaper.
The width of these knives is always approximately 1 centimeter, they differ significantly from others. These knives for electric planers come in different lengths: 82 and 102 millimeters, for different models of Baikal and Interskol. If such knives become dull, you can always sharpen them yourself. Unlike thin ones, they can be sharpened using sandpaper if you have sufficient sharpening skills and the ability to maintain a flat surface.
Well, the third type of knives for electric planes is wide and thick, with holes for fastening. They are very specific and are suitable exclusively for certain models, for example, for planes from the manufacturer Rebir, which have a power of 2000 Watts. These knives are distinguished by their great thickness and power, the width reaches 110 millimeters.
Changing electric planer knives
The highest demands are placed on electric planer knives. The fact that they are dull can be easily determined by eye. To do this, hold the chamfer of the piece of iron up to the light and turn it around the cutting edge. The cutting edge is dull if a shiny thread-shaped strip appears at the end of the chamfer in a certain position. The sharpening angle of the electric plane knife should be close to 30 degrees.
Today there are knives for electric planers using a rotary cutter. If one of these knife blades becomes dull, it is customary to turn the knife over for the first time, and the next time replace it with a new sharp knife.
Electric planer knives are installed in a knife holder, which is placed in a conical transverse groove and clamped with three nuts. The height of the knives is adjusted with two screws located at the edges. To remove the knife from the knife holder, you should loosen the nuts and tighten the screws to the end of the screws, which will help pull the knife holder out of the groove.
After this, you need to select a drift that suits the thickness of the knife, and use it to knock the knife out of the knife holder in the transverse direction. Next, turn the knife over or take a new one if the old one is unusable, and carefully push it into place, placing it on the side. Make sure that the knife enters the knife holder exactly parallel to it.
Having placed new knives on the electric planer, you should adjust them in height with screws and tighten them with nuts. In this case, it is recommended to set the same gap for both knives, otherwise the shaft will become unbalanced.
Editing on the touchstone
When planing, good quality of the processed surface can be achieved only by using a sharp knife in the planer. If the cutting edge is slightly dull and has no jagged edges, it can be sharpened by straightening. It is recommended to grind dull or jagged knives using a grinding wheel.
When grinding a knife on a grinding wheel, it is placed loosely on a flat supporting surface or clamped into a slide. When grinding, the iron must be moved along the grinding disc from side to side. Due to friction, the parts heat up. Therefore, it is necessary to apply moderate pressure when processing the product so that the cutting edge does not lose its hardness and does not turn blue.
The electric planer knife must be straightened after grinding. Only thanks to this manipulation will he receive the desired sharpness. To manually adjust the knives of an electric planer, artificial or natural bars called whetstones are used. The piece of iron can be mechanically straightened on a finishing disk.
On Belgian whetstones, straightening can only be done with the addition of water. On Arkansas bars, a mixture of oil and kerosene is used for straightening. Artificial whetstones come in different levels of grinding. Many have a coarse and fine grain side. The coarse-grained side is intended for preliminary straightening, and the fine-grained side is needed for fine straightening. To straighten knives on artificial whetstones, you can use a mixture of oils or water. Under no circumstances should you edit on a dry block, because the blade will lose its hardening (release) and become dull. The whetstone needs to be washed from time to time so that the whetstone does not become salty.
When straightening, the chamfer is firmly pressed against the block and moved crosswise until it becomes as shiny as a mirror and all the burrs disappear. The front side of the piece of iron is driven only down and up along the whetstone, and the procedure for straightening it takes less time. The finishing lapping disc is made from an artificial material that contains a finely dispersed abrasive agent. With the help of such discs you can straighten knives for electric planers in machine mode.
Sharpening electric planer knives
Before the procedure for replacing electric planer knives, you first need to determine the need for it. This is easy to find out: if the electric planer passes through the workpiece worse than before, then you need to start re-sharpening its knives. In addition, remember that dull knives can increase the risk of the device being thrown when it hits hard areas of wood, for example, knots.
The first step in sharpening an electric plane knife is to place an abrasive stone in water for a few minutes. The stone should absorb as much moisture as possible. This helps to avoid excessive dust formation and improves the quality of sharpening of the electric planer. When sharpening knives, it is important to ensure that they touch the abrasive stone at the same angle at all times.
The second stage is fixing the knives in a special block. In order to properly sharpen a knife for an electric planer, it is customary to use a special device, which will help to avoid violations of the geometry or balancing of the knives. Loosen the two nuts that secure the block clamping plate and insert the knives as far as they will go into the electric planer knife sharpener. Then tighten the locking nuts again. Make sure that the cutting edges of the knives are located in the same plane.
The third step is the sharpening process itself. Sharpening knives for an electric planer must be done using a special technology. The steel on re-sharpened knives is of such high quality that it allows you to re-sharpen the knives well and make them razor-sharp. However, make sure that the balancing of the knives is not disturbed. Since two knives are used in the electric planer, the issue of balancing is strict.
The straightness of the blade during sharpening is checked using any straight surface. Along the entire length of the blade, the width of the chamfer should be exactly the same. Knives are usually sharpened on a hand sharpener. It is recommended to sharpen for as long as possible until the finest burrs appear on the blade, which are difficult to distinguish by eye. Make sure that the chamfer is smooth, without concavities or convexities. Burrs must be removed. To do this, when sharpening the knives of an electric planer, the knife is placed with its back side flat on the block and passed along it several times.
Assembling electric planer knives
After sharpening the knife, first connect it to the guard. It should protrude 3 millimeters beyond the edge of the lining. Completely assemble the tool, adjust the correct position of the knife so that its edge protrudes beyond the edge of the platform, as expected, by 0.5 millimeters. Connect the knife and the cover with one screw. Loosen the screw, turn the knife 90 degrees and separate the parts.
First, attach the knife to the block with a chamfer and move it in this position back and forth at an acute angle of 30 degrees. When burrs appear on the cutting edge, turn the knife over, place it flat on the block and move it back and forth to remove the burrs. The edge of the knife should protrude 3 millimeters beyond the edge of the pad. The screw that holds the cover and the knife together must be tightened thoroughly so that even after prolonged use both parts fit tightly together.
After sharpening the electric planer knives, you should immediately test the blade by removing a few shavings. It has been proven in practice that the blade of a tool that is put into use immediately after sharpening becomes less dull. To avoid frequent sharpening of knives on a sharpener, carefully monitor the condition of the iron while working, and when the first signs of dullness (shiny stripes) appear, immediately straighten the electric plane on the sharpening stone.
Now you know why it is so important to constantly monitor the position of the knives on the electric planer, adjust them in time, remove and install new pieces of iron. In addition, you always have the opportunity to sharpen the electric planer knives on a special device and put them back on.