Hand plane device
Any plane needs modification and adjustment for high-quality wood processing. It's easier to do this if you know the structure of the tool.
The classic design includes the following elements:
- body (sole);
- handle;
- knife feed screw;
- cutter;
- wedge;
- pen;
- pressure cover;
- humpback chipbreaker;
- slot for chip exit;
- cutting depth regulator.
The main unit of the plane is the cutter. Externally, it looks like a metal plate with a pointed end. The blade is placed at a given angle to the surface to be processed. Using the regulator, the knife extends to a certain distance. This allows you to precisely adjust the planing depth.
Factory models are produced with a standard knife sharpening angle. Professionals use a sharpening angle for their work, taking into account the type of wood.
Types of planes
Speaking about the types of planes and their purpose, let us pay attention to the classification of carpentry tools:
- It can be used for flat planing;
- And figured processing is possible.
First, let's look at the first type.
- Half jointer. It is represented by a shortened version of its brother, significantly inferior in size. The sole of the semi-jointer can reach sixty centimeters. The width of the incisor is up to eight centimeters. The device is intended for processing large areas of wood;
- Medvedka. This tool has large paired handles. Its width and length are also large. A special wedge is used to hold the knife. Work with the bear is carried out by two carpenters who hold it by the handle on each side. The device is used to process large areas of wood, for example, boards that are going to be used to sheathe the outside of a house. Or decorate the walls and ceiling with wood. At a time, the bear removes chips one millimeter thick;
- Sander. It is used when you need to clean a wooden surface. With its help, defects that arise after processing wood with other devices are corrected. Easily cleans areas around knots and ends. If the wood has an uneven structure, then use a sander. It can handle any patterns. It has a double iron designed for scrapping shavings. It is presented in the form of a straight blade. The squat angle is sixty degrees;
- Zinubel. It is used if the surface needs to be given a slight roughness. It is also used to plan twisted wood. This treatment allows you to glue several surfaces more tightly, since the glue clings to the wood better, and the structure can last a very long time. Tsinubel knives have grooves, which give roughness to the wooden surface. They are placed at an angle of eighty degrees. Therefore, scoring does not appear even when processing twisted wood. Knives are usually single, with a serrated, straight blade. The length of the block reaches twenty centimeters. It is six and a half centimeters in width and the same in height;
- Tortsovy. Used for planing ends, as well as for small surfaces of wood that has an uneven structure;
- Single. Used for re-planing wood. The chips usually do not break, but small chips and nicks are possible on the surface;
- Double. Compared to a single one, it has two irons, one of which breaks the chips, which turns work into pleasure, improving the quality of processing.
Read also: Diamond grinding wheels for sharpening tools
Figure planing
The following planes can be used for figure planing:
- Zenzubel. It has two knives, so the quality of work remains high. Used to clear quarters or plan perpendicular surfaces. The width of the iron is approximately thirty-three millimeters with a blade-shaped shape. This is the closest relative of the falsebel;
- Federgubel. Its task is to process longitudinal protrusions located on the edges of the workpieces. The blade has a special shape that allows you to create rectangular protrusions along the edge of the product;
- Falsebel. It is used to clear quarters. Single knives, having both straight and oblique shapes. The tool has a stepped sole that can be removed. Not all models have this function. But where possible, it is easy to change the folds of the desired profile and size in order to better process the wood;
- Stabgobel, stabgaltel. Thanks to it, you can give a wooden product a rounded shape. This is possible due to the iron made in the shape of a concave blade;
- Tongue and pile pile. They form longitudinal grooves that are located on the edges of the workpieces. The rabbet has two blocks connected by special metal screws. One of them directs, and the other secures the work, holding the knives;
- Mold. Its main purpose is to figuratively process wood to give it a special shape. Used when creating cornices for houses, baguettes or doorways. Her incisors are special. Their edge is figured. The sole has many steps, which are selected depending on the shape of the future part and what exactly the master wants to achieve;
- Gruntubel. It is used to plan grooves across the wood fibers in the form of a trapezoidal section. The appearance is represented by a block with a pointed hook inserted into it, used as a cutter;
- Gorbach. The name itself speaks for itself. Its block is curved, which helps to process surfaces that have a convex or concave shape. The diameter is completely unimportant. The humpback will process any curved surface.
Why are there so many varieties?
It is difficult for joiners and carpenters to get by with just one tool. Since the surface made of wood can be very different. You never know what shape it will have, and the customer may also require you to create a masterpiece made of wood, for example, with a convex surface.
There are devices that can only be used in pairs. We are talking about federgubel and tongue and groove. They can also be applied one after the other. First, the wood is rough processed using Sherhebel, then finished using a jointer.
Therefore, a master engaged in carpentry and carpentry cannot get by with just one tool. The quality of the source material, the result that the carpenter strives for - all this requires a variety of efforts from the carpenter. It is for this reason that he needs different devices.
First of all, I would like to say about the plane. It is what is traditionally used for wood processing. You can do a lot with it. But a home master does not always pick it up, believing that such a model is long outdated. Having looked at the article about how many varieties of this type of device there are, you can understand how such ornate wooden works of art come out of the hands of a carpenter.
The class of planing devices is very wide. And the above varieties of planes are an example of this. Their main task is to process planar-rectilinear surfaces, creating the required relief. The dimensions of the part can be reduced by cutting off the wood a little.
The standard model is from twenty to twenty-five centimeters in length. In addition to the wooden body, it may have a metal composition. It is possible to use, as we have seen, one or even two knives, performing various operations with wood.
The variety of types and modifications of models was made possible thanks to the centuries-old approach to the work of a wood craftsman. A variety of tools have been created that allow you to process any wooden surface. Now the work of the carpenter and joiner is greatly facilitated. In a short time, you can prepare a wooden structure for use in creating a stool, table, bed, wall, and the like.
BLOCK
- the upper part of the plane is traditionally made from a single block of hard wood, such as beech or hornbeam. Modern technology involves gluing blocks from different types of wood: hard on the outside and soft on the inside. This allows you to vary the weight of the pad and promotes shape stability.
SOLE
- a very important part of the plane; the service life of the tool depends on its quality. It is made from hard, finely porous wood (hornbeam, maple, pear, apple, ash) without flaws. For convenient work, ergonomic stops play an important role - the front horn and the back stop or handle.
IRON
– a steel cutter fixed in a block at an angle to the surface being processed. Depending on the modification, the piece of iron can have different shapes and angles of inclination. The cutter presses the wedge directly into the block.
What are there
Planers come in different types. Their differences can be traced in the design, shape of the blades, parameters and purpose.
Medvedka . The instrument is characterized by a long sole, making pair work possible. Used for leveling large pieces of wood and performing large volumes of work.
Joiner . Equipped with double cutter. Its purpose is finishing surface treatment. The length of the sole exceeds the sherhebel, which allows you to plan a larger volume of workpieces in the same time.
Half jointer . This is a shortened version of the jointer. The design also has a double blade. Used for finishing wood.
Additional _ The design of the sole consists of three full planes. The distance between the front and the knife is minimal. The purpose of the plane is to trim sharp corners on the edges of wood pieces.
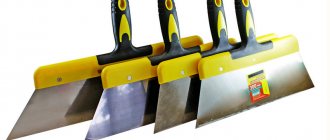
Roughing . The purpose of the tool is rough planing of wood, as well as cutting edges on sheets of drywall to obtain an even, sloping cut.
Sander . The plane provides high-quality finishing of the wood surface. Used in the area of knots, near the ends and in other areas of the workpiece after rough planing.
folding
tongue and groove
Zenzubel
Types of planes for figured cutting | |
| Federgubel | Thanks to the unique shape of the blade, it is possible to create protrusions at the ends of the edge. |
| Zenzubel | Planing of quarters and perpendicular surfaces. The design is equipped with a double blade resembling a spatula. |
| Staffgobel | The knife has a rounded tip. A tool is used to process concave workpieces. |
| Falsebel | The sole has a ribbed surface. This form allows you to strip the quarters. Knives in the design are straight and oblique |
| tongue and groove | The tool consists of two blocks, which are connected by clamping screws. It is used to create longitudinal grooves along the edge of the workpiece. |
| Gruntubel | The design is a block on which a cutter is installed on the side. The plane makes grooves along the grain of the wood. |
| Mold | Provides a figured cut used for decorating cornices, frames for doorways, baguettes. |
| Gorbach | It is distinguished by a block that has a curved shape. Suitable for surface treatment of outer and inner diameters of workpieces. |
How to distinguish a sherhebel and a jointer from a planer
Some types of planes have the same external design, which raises the question of their differences. For example, what is the difference between a sherhebel and a regular plane? Sherhebel, unlike a plane, is intended exclusively for rough cleaning of the surface of wood materials. Structurally, it differs in the shape of the cutter, which has a semicircular appearance. In addition, the width of the cutting part on a scherhebel is smaller than on a plane, but it protrudes by 2-3 mm, unlike a plane, where its protrusion is up to 1-2 mm.
Another type of woodworking tool - a jointer and a semi-jointer - has the same external design as a plane. However, there is still a difference, and it lies in the size of these instruments. A jointer differs from a planer in the number of blades, of which there are two on the first tool (depending on the model). The jointer is designed to perform similar tasks with a plane, but due to its two blades and long length, it can be used to finish large volumes of surfaces.
This is interesting!
Despite the identical external design, the planer, jointer and sherhebel have their respective purposes.
Criterias of choice
To make the task of choosing a hand plane easier, it is recommended to take into account important criteria. They determine the functionality and durability of the tool.
| Manufacturer | When choosing a tool, you should consider models from well-known brands. Large companies place the issue of quality as a priority, which is confirmed by long-term warranty obligations. Among the best manufacturers: TUNDRA, KRAFTOOL, PINIE, STAYER, BISON. |
| Processing material | Depending on the type of design, the tool is capable of performing a range of tasks for processing parts made of different materials: wood, chipboard, fiberboard, plastic, plasterboard. |
| Knife width, mm | This parameter determines the width of the blade's passage through the wood. It also affects the processing speed of the part. There are models with knife widths from 6.3 to 250 mm. A common value is considered to be a width of 82 mm. |
| Knife angle | Almost every type of wood material needs to be processed at a certain angle of the cutting element. Models are available with the ability to adjust the knife at an angle: 12°, 15°, 25°, 50°, 60°, 80°, 90°. |
| What is the body made of? | The body can be made of wood, plastic, metal. For household use with a light load, the first option is suitable. For daily work, it is worth considering a model with a metal body. It is advisable to use models with a plastic body for processing edges, working with soft wood, and drywall. |
| What adjustments | When choosing a model, craftsmen give preference to a tool in which the planing depth is adjusted and the transverse position of the blade changes. This expands the range of tasks performed and makes the plane universal. |
When purchasing a hand plane, in addition to the listed criteria, you also need to focus on the convenience of gripping the handle. When working for a long time, it is important that your hand does not get tired quickly.
How to choose the right plane
Deciding which plane is best to choose is not as difficult as it seems at first glance. Hand planing tools are fairly simple designs where all the main elements are in plain sight.
To choose a high-quality and durable plane, professionals recommend paying attention to 3 points:
- Sole. It should not have visible damage or chips, it should be smooth without disturbing the geometry. The only exception is planes for figure cutting, where a stepped sole is initially provided for by the design;
- Knife. It is better to give preference to tool steel, which holds the sharpening angle well and is not subject to mechanical damage and wear. For factory planes, the blade should be firmly fixed to the body without play.
- Handles. Here you need to focus only on individual feelings. The tool must fit comfortably in your hand, otherwise it will be problematic to work with it.
If we talk about manufacturers, then when choosing a hand plane, you can pay attention to the products of Stanley and Sigma. Among power tools, electric planers from BOSCH and Makita are deservedly popular.
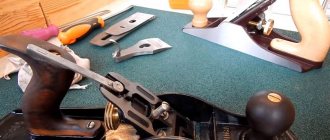
Assembling the plane and adjusting the position of the frog
Before you begin assembling the planer parts, you need to inspect the metal elements. It is recommended to treat unpainted areas with oil to prevent rust formation.
Design and setup of a hand plane
Build process:
- Move to the side the screw stop plate responsible for the longitudinal adjustment. This will allow the frog to take its place in the center of the body.
- Lightly tighten the frog clamping screws. Thanks to this, it will move back and forth using the adjustment screw.
- To determine the correct position of the frog, you need to install the blade and adjust it for thin, uniform chips. Stretch the wooden piece along the sole, directing it across the blade. The edge of the knife should run parallel to the leading edge of the mouth. If asymmetry is observed, you need to slightly move the frog without touching the knife skew lever. Thus, parallelism is achieved.
- For beginning craftsmen, the gap is set within 0.4-0.5 mm. Experienced carpenters will be able to adjust the gap to 0.15 mm.
- After setting the parallelism and gap, remove the knife without touching the frog. Tighten the clamping screws without using excessive force. Otherwise, the thin section of the sole in the mouth area may crack. Tightening is necessary only to fix the position of the frog.
- Before work, all screws are tightened and the knife is installed. Unfair preparation of the tool will provoke deformation of the sole under the influence of the lever-clamping insert.
- Lastly, the screw of the lever-clamping insert is adjusted. He takes a position so that under the force of his thumb a clear fixation of the lever is felt. A loose fit in the threaded hole provokes the formation of backlash. To seal the element, it is recommended to unscrew the screw, degrease it, drop a liquid fixative into the threaded hole, return the screw to its original place, making the same number of turns as it took to unscrew.
Grinder cutting wheels for wood materials
Operating an angle grinder in tandem with a cutting disc for wood necessarily requires compliance with safety precautions. Work should be carried out in special protective clothing, and the workpiece to be cut should be firmly fixed in a vice or clamp
It is important to hold the tool with both hands to prevent it from being knocked out of your hands. Preference should be given to an angle grinder that has a speed regulator
Manufacturers produce discs for grinders on wood of four main types, which we will learn about in detail:
- Circular or serrated - appeared the very first, but did not gain widespread popularity due to their kickback effect.
The disk has an external (end) arrangement of large teeth. Manufacturers produce wood cutting discs for grinders with a maximum diameter of up to 180 mm. The teeth can be equipped with special brazings made of carbide materials. Although such circles are the most common, they are the most dangerous attachment in action. If possible, avoid using it. It should be noted that such discs can only be used on grinders if the tool is used as a stationary circular saw - Chain - they look like a disk, only along the outer circumference instead of teeth there is a chain, like on chainsaws.
This type of attachment is safer and can be used to cut medium-density wood chips. With wheels of this type, the risk of jamming and kickback is minimized. This is achieved due to the special design of the nozzle, which is similar to a chainsaw bar. The circle consists of two parts, and there is a groove on the end side. The saw chain is located in this groove, moving due to the force of inertia. This design prevents the disk from jamming, and is thus a safer option compared to the first type. It is strictly contraindicated to saw wood with nails. At the same time, the teeth quickly become dull and fail - Universal - received this name due to the fact that it allows not only sawing wood, but also cutting metal, as well as making grooves.
The universal type nozzle has the appearance of a regular steel disk, but with three additional teeth in the form of grooves. The teeth are tipped with hard metal, which increases the service life of the cutting attachment. The advantage of a universal cutting disc for an angle grinder lies in the fact that it is as safe as a chain wheel, and at the same time costs 2 times less. Produced by Graff, which is why it got the name “count” - With a tungsten carbide edge, manufacturers do not stop there and are constantly improving their products.
Another type of cutting disc that is completely similar to a concrete cutting attachment. The only difference is that on the end part of the circle there is a tungsten carbide coating (diamond coatings are also found). The disk is equipped with slots with holes that serve to dissipate heat when working with dense materials, such as wood. Wheels with a tungsten carbide edge are effective not only for cutting wood, but also other materials - plastic, metal, etc. It is better not to use such an attachment for cutting one metal, because it will quickly fail. The wheel does an excellent job of sawing wood that contains nails, screws and other metal objects.
Now it’s not difficult to choose saw blades for wood for an angle grinder, knowing what types there are. For housework, it is recommended to use a wood saw blade with a universal or tungsten carbide edge. They are not only considered effective, but also safe. Circles with a saw chain are more expensive, but they are also safe when cutting wood with a grinder. The most dangerous are circles with teeth. They are recommended to be used only in situations where a stationary circular saw is made from an angle grinder.
How to sharpen a blade edge
To work in accordance with the operating rules, it is necessary to use a tool with a well-sharpened blade. You can sharpen the knife yourself using a mandrel with a side clamp and a support roller.
The desired angle is set, after which the blade is pulled along the abrasive stone (800). Initially, efforts are directed to the left edge of the tip. After eight passes, repeat stripping, applying pressure to the right side of the blade. Next, the force is applied to the central part of the knife. In this case, 4 passes through the abrasive are sufficient.
The simplest device for sharpening planer knives and chisels.
After obtaining the desired profile, the blade is sharpened on an 8000 stone. This operation is necessary to polish the sharpening surface. The sequence of pressure direction is the same as when passing through a coarse abrasive.
The process is completed by removing burrs from the back of the cutter. To do this, use an 8000 stone in combination with a ruler.
How to smooth and polish the back of a blade
The back side of the cutter should be flat after sharpening. This ensures a half sharp and smooth cutting edge. The smooth surface promotes better fit of the chipbreaker. In this case, after sharpening, leveling and polishing are required. The process is performed using a ruler and an 8000 stone.
- Create a slurry on the surface of the abrasive stone using a nagura stone.
- Place a ruler on the right edge of the stone (thickness 0.5 mm, length about 15 cm).
- Move the ruler over the stone 2-3 times to feel the sticking effect.
- Lay the blade across the stone, so that the edge hangs (up to 6 mm) from the left edge, and the middle remains on the ruler.
- Apply light pressure with 3 fingers to the area behind the edge to be sanded. Pull the blade back up to 12 mm from the edge of the abrasive. You will need to repeat the broaching 12-15 times. As a result, a strip appears near the cutting edge. A one-degree chamfer does not affect the quality of planing, but saves time and effort in the process of processing wooden workpieces.
How to make it yourself
Assembling a homemade wood plane is not difficult, so many craftsmen prefer not to mess with factory models, initially making the tool for themselves.
It is better to purchase a plane knife and chip breaker at a hardware store. To ensure high quality cuts, you need tool steel, which is difficult to find in the household or garage. In the design of a plane, the knife is considered a consumable element, so its cost is affordable to everyone.
The tool is cut out from a solid block, onto which markings are first applied: vertical and oblique lines. Then the center of the workpiece is drilled and 4 holes are formed in the corners. 2 cheeks are sawn off from a solid block, the workpiece itself is cut at an angle into two unequal parts.
Then the cheeks are glued to the base elements. When the glue dries, the sole is glued to the bottom of the finished structure. A metal rod is inserted into the opening of the cheeks, which will perform a supporting function when the blade is clamped with a wedge.
A simple handmade plane is ready. All that remains is to sand the surfaces, set the knife at the required angle and you can start working.
Rules for working with a plane
Working with a hand plane requires compliance with safety precautions. Among the basic rules:
- use only a properly tuned tool with a well-sharpened knife for wood processing;
- Before planing, the workpiece or part must be secured in a workbench clamp or by installing a stop in a wedge;
- during the planing process a lot of chips are formed, they block the view of the working surface, it is recommended to remove debris with a wooden wedge;
- when the plane moves, the body is held with two hands;
- during a particular operation there is no need to be distracted due to the risk of injury;
- disassembling or adjusting the tool is allowed only above the workbench;
- the device is stored in a tray or box, placing the structure with the sole down;
- It is forbidden to control the smoothness of the treated wood surface by hand;
- to store the tool, you should choose a workbench or shelf, no more than 1 m high from the floor;
- The blade is not allowed to protrude from the sole.
Handle the plane carefully, without frequently sharpening the blade. While sharpening, you need to cool the knife with cold water. When planing, move the tool away from you.
Working with wooden workpieces involves the presence of dust and small chips. To protect your eyes from small particles, it is recommended to use safety glasses according to safety regulations.
How to use a wood planer
If you need to plan with a plane, the question arises of how to use it. If labor lessons at school have already been completed a long time ago, then it will not be difficult to master the use of a planing device. However, not everything is as simple as it might seem at first glance. Before using a plane, you need to prepare it. The preparation is as follows:
- Disassemble the tool to check the flatness of the sole
- Then you need to remove the protective coating from the sole. For this, acetone and cloth are used to thoroughly abrade the varnish from the sole and side surfaces
- It should be noted that not all planes are varnished, but only high-quality tools from well-known manufacturers. Varnish is applied to prevent corrosion on the surface of gray cast iron.
- Check the quality of the blade sharpening. To do this, you need to remove the piece of iron from the tool, and then try it on a piece of wood
- The plane of the sole is checked. It should be perfectly smooth. To do this, apply a metal ruler to the surface of the sole and point it towards the light. There should be no gap between the sole and the ruler. If it is present, then the sole has unevenness. It will not be possible to carry out high-precision processing with such a device, but for home use it is quite suitable
- If necessary, level the sole. For this purpose, metal sandpaper with a roughness of P1000 or more is used. The paper must be placed on a perfectly flat surface (for example, glass), and then move the plane in one direction away from you
- Check the blade for nicks. If any, the blade is subject to additional processing
- After this, assemble the tool. How this is done is described in detail in the video material.
After this, you can begin to carry out the relevant work. After the tool is prepared for use, it needs to be configured. To configure, perform the following steps:
- The procedure involves placing the iron from the sole at the appropriate distance
- Initially, it is necessary to connect the chipbreaker with the iron. To do this, the ends of the elements are aligned exactly with each other and secured with a tightening screw.
- After installing the adjusted cutting elements in place, you will need to fix them using a pressure plate
- Carry out a test pass with a plane over the workpiece. Based on the results obtained, make more precise adjustments using a special adjustment lever
- Make more precise adjustments to the protrusion of the iron from the sole. The cutter must protrude equally on both sides to ensure efficient chip removal from the workpiece.
After this, you can begin to use the tool for its intended purpose. To do this, it is necessary to fix the workpiece with clamps or in a vice, which depends on the size. After this, begin performing manipulations. To do this, you need to hold the plane with both hands and apply the same force from start to finish. After this, you need to return to the starting position and perform the passage again.
To summarize, it should be noted that the plane is a unique tool that is popular in the field of woodworking and furniture construction. It makes no sense to buy a whole set of different types of planes for your home, unless you plan to make furniture, etc. But novice carpenters will be interested to learn about the purpose of certain types of wood planes.
Hand tools
Axe
A hand tool assumes that the energy that powers its operation is the strength of the person using the tool; it is used in all woodworking operations.
- Hacksaws equipped with various types of blades are used for sawing boards in various planes. Round timber is harvested with two-handed saws, and with their help and with the use of bow saws, the harvested timber is cut. Jigsaws are used to make decorative design elements, as well as crafts and furniture of various designs.
- An ax is a construction tool and military weapon known from time immemorial. Axes are used by joiners and carpenters when performing various operations using wood (building houses, manufacturing structures and individual elements - windows, doors, etc.). Cleavers are used when preparing firewood.
- In the manufacture of wooden structures (windows, doors, stairs, etc.), various types of planes (sherkhebels, jointers, tongue and groove piles, etc.) are used to process the raw materials.
- When making grooves and tenons, and making holes, chisels and chisels of various sections are used.
- For drilling, hand drills and rotary hammers with drills of various designs (center, twisted, spoon) are used, as well as drills used for deep drilling.
- In the manufacture of furniture and various carpentry, clamps are used to tighten and fix the assembled elements into a single structure.
- Nail puller and pliers are indispensable types of tools when removing foreign objects from solid wood.
When to use an electric planer
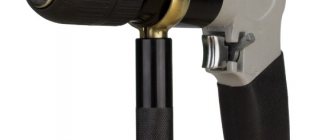
The advantage of an electric planer is that it can perform various woodworking jobs with minimal effort. An electric planer can be used for rough, finishing and shaped finishing of surfaces. The tool is effective when it is necessary to perform large volumes of work in carpentry workshops or when carrying out repair and construction work. The main disadvantage of the tool is that it is quite expensive, and therefore it is not profitable to buy it for home use if you plan to use the device only once.
Structurally, the tool is a massive plane, which is equipped with an electric motor, as well as special knives. The knives are driven by an electric motor through a gearbox. The electric tool has the function of adjusting the planing depth, the maximum value of which reaches 82-100 mm, depending on the brand and power. The electric planer also has some disadvantages:
- Noisy operation
- Dusty - this drawback is easily eliminated by using a special bag or connecting a hose from a vacuum cleaner
However, against the backdrop of such advantages as fast and efficient removal of chips from the surface of the workpiece, the devices in question are popular. An alternative replacement for an electric planer is a grinder with a special attachment. This attachment is called a plane for a grinder for wood processing.