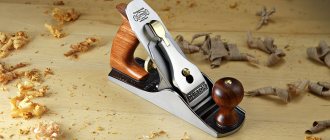
Carpentry work involves the use of various woodworking tools. Planes occupy a separate class of tools for woodworking. Every craftsman has been familiar with them since school, when in labor lessons the task was to make a blank. Although the wood planer is obsolete, when the need arises for chamfering, it is always able to help out the craftsman.
Design features of planes
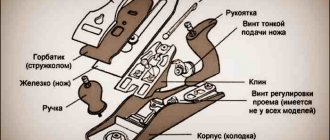
You need to start by considering the purpose of the tool. And it is intended for planing wood, that is, to give the wooden surface the desired shape, while eliminating various irregularities, roughness and other defects. The components of the device are:
- Body made of wood or metal - last with sole
- Steel knife, piece of iron or cutter - the main cutting element
- Wedge
- Lever
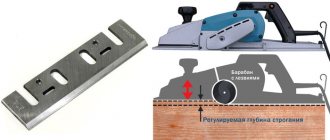
A more detailed design of a hand plane for wood is shown in the photo below.
The basis of this tool is a cutter, which looks like a rectangular plate with a pointed end. The plate is placed in the block opening at the appropriate angle. A special adjustment mechanism allows you to set the knife to the required distance. This distance is set in order to adjust the cutting depth and chip removal thickness. According to the standard, the blade has a certain sharpening angle, but if the tool is used by a professional, the master sharpens the cutter himself, depending on what type of wood is to be processed.
An equally important element in the design of the tool is the handle. Moreover, a hand plane consists of two handles, one of which is a guide, and the second is a persistent one. The guide handle has a curved design that allows the tool to be grasped by hand. The thrust handle allows you to create the necessary force when performing work.
The body has a smooth surface from which a sharp cutter protrudes. The main condition for the instrument is a perfectly flat and smooth sole. If the sole is not level, then precise processing will simply not be possible. The body of the instrument is made of wood or metal. Home craftsmen give preference to wooden planes, which are cheaper. Woodworkers prefer to work with metal planes, the base of which is made of gray cast iron.
Despite the fact that the hand tool in question has a typical design, today more than 10 varieties of these woodworking devices are known. To begin with, it should be noted that all types of planes are divided into two main groups according to the type of drive - manual and electric.
This is interesting! Electric planers are replacing hand tools, but when it comes to planing wood, home craftsmen prefer the second option.
How to use a hand plane on wood correctly
The rules for using hand tools in general are almost the same as the operating instructions for an electric planer. Before work, the device is carefully inspected for defects and it is made sure that the sole is not deformed, and the cutting parts are located parallel to it.
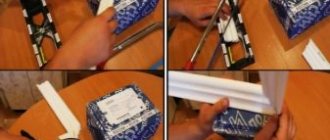
The process of using a plane looks like this:
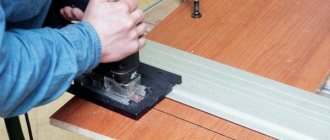
- A piece of wood is secured in a workbench clamp and a hand tool is placed on top of it.
- The device is firmly grasped by both handles and begins to move smoothly and with even pressure along the fixed board.
- The body is moved forward along with the tool, with the supporting leg placed forward.
As with an electric planer, when performing complex work, it is recommended to remove layers of wood gradually. This will prevent gross mistakes and protect against the appearance of snags, humps and depressions on the surface of the board.
A hand plane is convenient for planing small narrow boards in small quantities.
Types of hand planes and their purpose
Tools for wood processing are divided into the following types according to their intended purpose:
- Finishing
- Shaped cutting
- Rough processing or for general use
Finishing planes include the following:
:
- A sander is a tool used for finishing wooden surfaces. With its help, the master removes irregularities and defects that remain from the use of the previous tool.
The device is based on two sharp knives, the sharpening angle of which is 60 degrees. An additional element of the grinder is a chipbreaker. The chipbreaker is a support plate that is located above the cutting insert - Tsinubel is a device that belongs to the category of finishing tools. This device is used to impart roughness to wooden surfaces. This roughness is similar to a ground surface (adhesion), which is necessary to improve the quality of adhesion, for example, when applying varnish. The incisors are positioned at an angle of 80 degrees and have grooves. The design of the tsinubel uses single knives with a blade that has serrations at the end
- End plane - used when it is necessary to process small-sized wood. The name of the device does not speak about the design, but about the application, that is, it is used for planing the end surfaces of workpieces
- Single - used for repeated processing of wood. The use of the device allows you to obtain clean chips without kinks, but at the same time chips and burrs form on the material being processed. That is why, after using a single plane, you will need to refine it with a sander.
- Double planer - equipped with a cutter and chip breaker, which improves the quality of planing work. After this device you will also need to treat the wood with a sander.
If there is a need to perform finishing processing of woodworking materials, then a complete list of such devices is presented above. They are also called flat planing devices. After treating the surface with a sander, proceed to the use of sandpaper, through which sanding is carried out.
Types of hand planes
Paintings divided into several parts for the interior (12 photos)
The typical design of this carpentry device has many varieties. Even a classic manual professional plane, which has standard dimensions, can be classified according to its design features.
- Single plane. Suitable for leveling surfaces due to the design of the single straight blade of the knife. The cutting edges have the smallest radius of curvature, so they do not leave marks on the surface.
- Double plane. It is convenient because it is equipped with a chip breaker, which ensures clean planing. Therefore, the tool is indispensable in the final processing of the product.
With the development of the craft, the types of planes acquired many modifications, each of which meets a certain number of tasks.
- Jointer. This is a hand tool for finishing the product. It differs from a plane in a long block with a double or single knife, which allows for high-quality leveling of the surface.
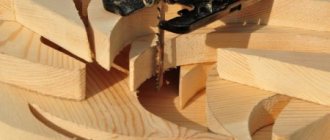
- Sherhebel is a narrow plane designed for notches, similar in appearance to the classic model. But the sherhebel is more massive and is distinguished by a small rounded blade, which during operation is located at an angle of 45° to the surface. This feature allows you to plan wood along and across the grain, leaving deep hollows. The main significance of this device is the rough processing of the product and the removal of the rough top layer of wood.
For flat planing
Machining flat surfaces, such as bars or boards of regular geometric shape, must be done with high precision. Deviation from straightness entails a change in the overall dimensions of the product. For this type of processing, devices with characteristic design features are provided.
- Half jointer. Unlike a standard jointer, it has a smaller base and cutter. This allows you to process both large and small products with a straight and even surface, while achieving high levels of accuracy.
- Zinubel. Designed to provide roughness, which is necessary for better adhesion of products when attached with glue. The device is equipped with a serrated blade, which can be used to plan even twisted wood and the ends of workpieces.
For figure planing
Figured wood processing is an art
To create unique samples with a profile section, it is important to use first-class timber - straight-grained, with a minimum number of knots. However, the use of varieties of special-purpose carpentry planes is no less important.
- Kalevka is a type of plane designed for shaped processing of products. It has a multi-level sole and special edges on the knife. Used in the manufacture of cornices, baguettes and doorways.
- Tongue and pile pile. It is used for making grooves, tongue-and-groove joints or holes in boards connected using a tongue-and-groove system. It consists of a guide and securing pads held in place by screws.
- Gruntubel. Suitable for cleaning trapezoidal grooves along wood grains.
- The quarters and grooves are selected with a zenzube, and then they are cleaned. The knives of this tool resemble spatulas, and there is a special hole in the body for the chips to escape.
- The rebate is used for selecting and stripping quarters and has a stepped sole.
- The humpback has a convex shape of the sole part, therefore it is convenient for processing semicircular, concave or cylindrical surfaces.
Shape cutting tools or planes for complex geometries
A separate category of woodworking devices that are used to produce parts with complex geometric shapes. Structurally, they are similar to a classic plane, but have corresponding distinctive features. There are the following types of planes for figure cutting:
- Zenzubel is a tool with a double knife, the use of which allows you to achieve high quality of the processed surface. Effective for planing perpendicular surfaces and cleaning quarters. The knife of the device reaches 33 mm in width, and its shape is more similar to a shovel. Zenzubel is a close relative of Falsebel
- Federgubel - used for making longitudinal projections on workpieces. It has a special blade design, through which the corresponding groove processing is carried out
- The folding belt is the best device for stripping quarters. The design of the device contains straight and oblique cutters, and the base has a stepped design. The stepped design allows you to select folds that match the desired profile and size
- Shtabgobel - has a rounded blade format, through which fast and efficient processing of concave parts is carried out. This tool is also called a stacker, which is actually due to its design
- Tongue pile - the device has two blocks that are connected to each other using two screws. Using the device, longitudinal grooves are created on the edges. One part acts as a guide, and the second is equipped with knives and carries out the necessary manipulations
- A molding machine is one of the main tools for performing figured cutting in wood. The tool found its application in the production of wooden cornices, baguettes and door slopes. The device is equipped with cutting knives with a shaped edge. The multi-stage sole part is selected depending on what you want to achieve in the final result
- A groundtube is a block on which a trapezoidal cutter is mounted on the side. Allows you to machine a groove in a part in the longitudinal direction of the fibers. It has two handles, as well as an adjustment mechanism through which the depth of the resulting groove is set
- Selector - designed for profile planing of wood
- Gorbach - has a design corresponding to the name. The curvilinear shape of the tool makes it possible to process the surfaces of round workpieces. Moreover, processing is carried out not only on the outer, but also on the inner diameter of the workpieces
In the garage, one hand plane will be enough, but in the carpentry workshop, all of the above tools should be present. Some of them, although they are interchangeable, require the use of only the right instruments to perform quality work.
General purpose devices or how to rough finish a part
A separate category of planes are universal devices for rough and final cleaning. With their help, you can perform not only rough, but also fine finishing of surfaces. One of the most important tools for a carpenter is the sherhebel. With its help, the master carries out the initial planing of wood, that is, removing the bark. We will consider in more detail what types of general purpose planes there are below.
- Sherhebel - looks like a regular plane in a metal case. The main task of the tool in question is to give the workpiece the necessary shape for its subsequent processing. The tool allows you to remove edges up to 3 mm thick. It is almost impossible to obtain a smooth surface using Scherhebel, so after work you will need to perform finishing work with other tools. The sherhebel differs from a regular plane in that the cutting part with a rounded blade is located at an angle of 45 degrees. The presence of a rounded blade makes it possible to plan wood in the transverse direction
- Medvedka - got its name due to its similarity in shape to the insect of the same name. The similarity is due to the design of elongated handles with side protrusions. Used for leveling large surfaces. Special protruding handles ensure easy use of the tool, which is equally convenient for both right-handers and left-handers. The bear is also intended for use in pairs by two people. The metal cutting tool is fixed with a wedge. The cutter protrudes from the sole by 1 mm, which allows the removal of the corresponding layer of wood
- Planer - the device is equipped with two cutters, therefore, unlike the Scherhebel and Medvedka, it is used for finishing or final leveling of the corresponding wood surfaces. A distinctive feature of the jointer is its long length, which allows you to remove chips from a large surface area in one pass. The design of the tool can use not only two, but also one blade
- A semi-jointer is an analogue of a jointer, which has a shortened length of up to 60 cm. The design uses a double cutter and serves as a tool for finishing the surface of small-sized material
Using these four tools, you can carry out complete processing of the material from start to finish, that is, from removing the bark to manufacturing the required size and shape of the part. It is worth understanding that these tools will not produce a perfectly flat surface, so if necessary, you will need to use additional devices for finishing and shaping.
Types of planes
Even though the variety of models is incredibly large, woodworking tools
can be divided into the following main types:
- For general purpose.
- For finishing processing.
- For shape cutting.
We propose to consider representatives of each group separately.
General purpose tool
The very first tool that a carpenter picks up when starting to process a wooden piece is a sherhebel. We are talking about a massive plane in a metal body, which is needed for rough planing of surfaces that have not previously been processed.
The main task of the sherhebel is to give the workpieces the desired shape, and a special feature of the plane can be called deep planing (up to 0.3 cm), so you will not be able to achieve an ideal surface with it. In such a plane, the knife has a rounded shape, and, as a rule, is set at an angle of 45 degrees to the sole. The blade makes it possible to remove chips in thick layers and work not only along, but even across the wood fibers.
When the workpiece has already been processed to the desired size, the carpenter needs to get rid of the deep nicks that remained on the surface after the sherhebel.
To do this, you can use any of 3 types of devices:
an oblong tool that is designed to work in pairs, and it is ideal for leveling massive surfaces or performing large volumes of work.
Medvedka –- A jointer is a device that has a double cutter and is used for the final leveling of wooden surfaces. The length of a manual jointer will be approximately twice the length of a Scherhebel, which makes it possible to remove shavings from a large area in one pass.
- The semi-jointer is an analogue of the previous version in a shortened form. A double knife is also used here, and this plane itself is needed to level the workpiece.
Next, the workpiece becomes even, smooth, but not yet ideal, and therefore professionals move on to the next stage of work, preparing the next tool in advance.
Finishing planer
Depending on the type of product, two different types of planes are used for clean planing. The sander will perform final cleaning of parts and eliminate defects that remain after previous planing. The cutting tool looks like a double knife with a straight blade, which is sharpened at 60 degrees and equipped with a chipbreaker. Thanks to this structure, using a grinder it will be convenient to plan the surfaces of the end parts of parts and around knots. Tsinubel is a rather interesting tool that is used to process wooden elements, and in the future they will be glued together.
Please note that the peculiarity of the last plane (tsinubel) is the presence of a serrated blade, which leaves neatly shaped grooves on the surface.
The result is a rough surface that will provide excellent surface finish and excellent adhesion of materials. the tzinubel knife is located at an angle of 80 degrees, and therefore the surface becomes rough, but without burrs or burrs. There are different types of hand planes, and for secondary finishing of parts, you can use a single, end plane, or double planer. Double and single planes make it possible to remove nicks left by the sherhebel and level the surface, but after them you will need to treat the workpiece with a sander.
Shaped cutting
And this is even a whole series of woodworking tools, which significantly helps to make the life of the master easier and specializes in the manufacture of wood parts in the form of complex geometric shapes.
For figured cutting, the following manual types of planes are used:
- Zenzubel - required for planing perpendicular surfaces and quarters. The tool is equipped with a double blade and is made in the form of a spatula.
- Federgubel - has an unusual blade shape, which helps create protrusions on the end edges of the product.
- Falsebeel - used to trim quarters, equipped with a ribbed sole and oblique + straight knives.
- Shtabgobel - the design consists of two blocks, which are connected by clamping screws, and are designed to form longitudinal grooves on the edge part of the product.
- Kalevka is an indispensable tool for figure cutting, and is used to create baguettes, cornices, and door frames.
- Primer - made in the form of a block with side mounting of the cutter, and is also intended for forming grooves along the wood fibers.
- Gorbach - the device block has a curved shape, which makes it possible to process the surfaces of the outer and inner diameters of various products.
Professionals who work on wood rarely use only one type of plane, and in order to turn a piece of wood into an unusual product, you will need to stock up on a full set of planes and more.
Electric planer
This type of carpentry tool is separate, and it combines all the previously listed types of hand tools. The electric planer is capable of performing figured, straight planing, and is also ideal for performing a large volume of work. But using an electric tool in itself cannot bring inner satisfaction, and the cost is sometimes too high.
For this reason, if you are talking about building a country house or putting wood processing on stream, an electric tool will be an indispensable assistant, but it is unlikely that you will be able to make an original little thing for yourself or give an unusual wooden product to your loved ones. The warmth of wood products is only possible through manual processing.
When to use an electric planer
The advantage of an electric planer is that it can perform various woodworking jobs with minimal effort. An electric planer can be used for rough, finishing and shaped finishing of surfaces. The tool is effective when it is necessary to perform large volumes of work in carpentry workshops or when carrying out repair and construction work. The main disadvantage of the tool is that it is quite expensive, and therefore it is not profitable to buy it for home use if you plan to use the device only once.
Structurally, the tool is a massive plane, which is equipped with an electric motor, as well as special knives. The knives are driven by an electric motor through a gearbox. The electric tool has the function of adjusting the planing depth, the maximum value of which reaches 82-100 mm, depending on the brand and power. The electric planer also has some disadvantages:
- Noisy operation
- Dusty - this drawback is easily eliminated by using a special bag or connecting a hose from a vacuum cleaner
However, against the backdrop of such advantages as fast and efficient removal of chips from the surface of the workpiece, the devices in question are popular. An alternative replacement for an electric planer is a grinder with a special attachment. This attachment is called a plane for a grinder for wood processing.
How to distinguish a sherhebel and a jointer from a planer
Some types of planes have the same external design, which raises the question of their differences. For example, what is the difference between a sherhebel and a regular plane? Sherhebel, unlike a plane, is intended exclusively for rough cleaning of the surface of wood materials. Structurally, it differs in the shape of the cutter, which has a semicircular appearance. In addition, the width of the cutting part on a scherhebel is smaller than on a plane, but it protrudes by 2-3 mm, unlike a plane, where its protrusion is up to 1-2 mm.
Another type of woodworking tool - a jointer and a semi-jointer - has the same external design as a plane. However, there is still a difference, and it lies in the size of these instruments. A jointer differs from a planer in the number of blades, of which there are two on the first tool (depending on the model). The jointer is designed to perform similar tasks with a plane, but due to its two blades and long length, it can be used to finish large volumes of surfaces.
This is interesting!
Despite the identical external design, the planer, jointer and sherhebel have their respective purposes.
Features of choosing the right tool or what you need to know
An ordinary hand plane is probably present in every master’s arsenal of tools. However, if you need to purchase it, you need to know some features that will help not only save money, but also choose an effective woodworking device.
- Sole - first of all, you need to inspect the bottom of the instrument, which should be perfectly flat, smooth and without visible damage or chips. This applies to all types of planes. It will not be possible to visually determine maximum evenness, but if the base is massive, then even minor irregularities can be removed when preparing the tool for work
- A knife is a working element, the quality of which determines not only the efficiency of work, but also the service life of the tool. You need to choose models in which the knives are made of tool steel. In addition to remaining sharp for a long time, such material is also not subject to wear. Factory planes have a blade that is fixed rigidly to the body without any play
- Handles - when choosing, you need to take the tool in your hands and try it out. If the handles are small, then it is better to choose a plane with large handles. After all, how comfortably the plane fits in your hand determines its use and, accordingly, the quality of the work performed.
It is important to pay attention to the question of who is the manufacturer of the planes. The most popular are Japanese companies Sigma and Stanley, but there are other models. It should also be noted that today it is much easier to find an electric planer than a hand tool.
How to use a wood planer
If you need to plan with a plane, the question arises of how to use it. If labor lessons at school have already been completed a long time ago, then it will not be difficult to master the use of a planing device. However, not everything is as simple as it might seem at first glance. Before using a plane, you need to prepare it. The preparation is as follows:
- Disassemble the tool to check the flatness of the sole
- Then you need to remove the protective coating from the sole. For this, acetone and cloth are used to thoroughly abrade the varnish from the sole and side surfaces
- It should be noted that not all planes are varnished, but only high-quality tools from well-known manufacturers. Varnish is applied to prevent corrosion on the surface of gray cast iron.
- Check the quality of the blade sharpening. To do this, you need to remove the piece of iron from the tool, and then try it on a piece of wood
- The plane of the sole is checked. It should be perfectly smooth. To do this, apply a metal ruler to the surface of the sole and point it towards the light. There should be no gap between the sole and the ruler. If it is present, then the sole has unevenness. It will not be possible to carry out high-precision processing with such a device, but for home use it is quite suitable
- If necessary, level the sole. For this purpose, metal sandpaper with a roughness of P1000 or more is used. The paper must be placed on a perfectly flat surface (for example, glass), and then move the plane in one direction away from you
- Check the blade for nicks. If any, the blade is subject to additional processing
- After this, assemble the tool. How this is done is described in detail in the video material.
After this, you can begin to carry out the relevant work. After the tool is prepared for use, it needs to be configured. To configure, perform the following steps:
- The procedure involves placing the iron from the sole at the appropriate distance
- Initially, it is necessary to connect the chipbreaker with the iron. To do this, the ends of the elements are aligned exactly with each other and secured with a tightening screw.
- After installing the adjusted cutting elements in place, you will need to fix them using a pressure plate
- Carry out a test pass with a plane over the workpiece. Based on the results obtained, make more precise adjustments using a special adjustment lever
- Make more precise adjustments to the protrusion of the iron from the sole. The cutter must protrude equally on both sides to ensure efficient chip removal from the workpiece.
After this, you can begin to use the tool for its intended purpose. To do this, it is necessary to fix the workpiece with clamps or in a vice, which depends on the size. After this, begin performing manipulations. To do this, you need to hold the plane with both hands and apply the same force from start to finish. After this, you need to return to the starting position and perform the passage again.
To summarize, it should be noted that the plane is a unique tool that is popular in the field of woodworking and furniture construction. It makes no sense to buy a whole set of different types of planes for your home, unless you plan to make furniture, etc. But novice carpenters will be interested to learn about the purpose of certain types of wood planes.
General information
The history of the manual plane goes back to ancient times with deep roots, and the first, simplest variations of the device were discovered during excavations of the famous city of Pompeii.
Planer construction
Over the many years of evolution of such a device as a plane, a fairly large number of its types have appeared, with which it was possible not only to process the wood plane, but even to engage in figured cutting. To truly enjoy making things with your own hands, you need to have a good plane, and then you can create incredible works of art from the simplest piece of wood. Current planes can be roughly divided into metal and wooden models, and each of them has its own advantages and disadvantages, but in terms of design features the tools are very similar to each other, as if they were twin brothers.
The most common plane consists of the following parts:
- Cutter.
- The sole (this is the body).
- Wedge.
- Cutter clamp.
- Chip ejection slot.
- Horn - front handle.
- Cutting depth regulator.
- The emphasis is the rear handle.
The main structural element is the cutter - this is the cutting element, which is made in the form of a pointed plate. The blade is located at a given angle to the wood surface being processed. Due to the built-in regulator, the knife extends to a specific distance, and this makes it possible to precisely adjust the depth of the cut, as well as how thick the chips will be removed. In factory-type models, the sharpening angle of the blade is the most common, but professional craftsmen change it depending on what type of wood they are processing.
About the handles
Believe me, even the handles also play a certain role assigned to them. The front one, called the horn, acts as a guide, and is usually curved to provide an ideal grip for the hand. The rear handle is a stop, thanks to which it is possible to create the force necessary for work. With the base (i.e. the sole), which can be either metal or wood, everything is ambiguous.
The main criterion for this structural element is a perfectly flat surface. If this requirement is not met, then it will be difficult to use a hand plane, and you can completely forget about the accuracy of planing. Taking into account all the nuances, a metal sole is much preferable - it is made according to a template, and therefore it always has the correct geometry.
But it happens that the manufacturer also made mistakes during casting, and then the advantages of the tool will be reduced to zero. Moreover, metal as a material is highly susceptible to corrosive changes.
And if we talk about the types of planes for wood, where the sole is also made of wood, then if it is deformed, it is possible to fix everything with your own hands and breathe new life into the plane. But wood is not a durable material, and it is subject to wear and tear from mechanical action, and also loses its properties when exposed to high temperatures and moisture for a long time. Despite the typical designs, there are more than 10 types of planes, and each tool has certain functions when processing parts, so we suggest taking a closer look at them.