Professional builders cannot imagine working with polyurethane foam without special tools. Carrying out large volumes of work manually using cylinders is very time consuming, difficult and uneconomical. For ordinary users, purchasing an additional tool for one day of work is impractical, but for some home construction projects it is impossible to do without it. Today we will learn how to use a spray foam gun and learn its design.
Types of polyurethane foam
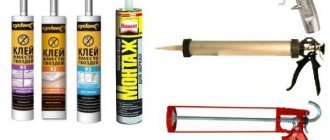
To correctly understand how to use polyurethane foam, you need to learn to recognize its types. When you come to a hardware store, on the shelves you can see a large selection of tubes from different manufacturers. Cylinders are sold in various capacities, but they are all divided into two types:
- Professional foam is sold in cylinders with a capacity of 1.5 liters or more. It comes out of the tube under strong pressure, which is why it is designed for a pistol. Although, some manufacturers complete the cylinders with a tube for manual spraying. Applying professional foam from a tube is not economical. Strong pressure increases its useless consumption.
- Foam intended for household use is sold in tubes with a capacity of 0.6–0.8 liters, and must be equipped with a straw. It is convenient for filling small spaces and correcting installation defects. Foam for household use has the same properties as professional foam. If necessary, such a cylinder can be used in conjunction with a pistol.
The cost of professional foam is much higher than household foam, but all this is only due to the difference in volume.
What are the dangers of using foam incorrectly?
The main properties of this material are increased volume, reliable fixation and inertness to most influences. But they are the ones that turn into a problem if you use the foam carelessly. After all, polyurethane foam has specific properties:
- can expand uncontrollably, turning mounted slopes or other interior elements into a pile of garbage;
- sticks to the skin and hair so that it is almost impossible to clean them;
- if it gets on furniture or other surfaces, it can irreparably damage them;
- dangerous if ingested or in the eyes.
If the foam has dried, it can only be removed mechanically. True, the real effect comes from using the medicinal antiseptic “Dimexide” or battery acid. But these products will dissolve not only polyurethane foam, but also the coating on the surfaces being cleaned.
Compliance with these simple rules will extend the life of the equipment, save expensive materials and preserve the interior. To protect your health, it is advisable to work with gloves and goggles, ventilating the room.
Pistol design features
Before we learn how to properly use mounting foam installed on a gun, let's first learn the design of the device itself.
Regardless of the manufacturer, the general arrangement remains the same and quite simple:
- If household foam is supplied simply through a plastic tube, then in a gun the supply process occurs through a metal tube with a special tip - a nozzle. The size of the tip hole is five times smaller than the cross-section of the supply tube, which allows you to create a high working pressure of the mixture;
- the cylinder is connected through an adapter - an adapter attached to the body;
- the adjusting screw is designed to dose the mixture output;
- the handle of the tool can be plastic or aluminum. It is secured to the barrel with a nut. The collapsible design allows you to easily clean the gun from frozen residues;
- The last important part installed at the pistol grip is the trigger. It is designed to supply the mixture from a cylinder.
Having studied the structure of the gun itself, you can try to install the cylinder and do a test foaming of any recess.
How to choose a reliable mounting gun?
Among dozens of manufacturers and an abundance of models, it is not always possible to find a suitable tool the first time. In order not to make a mistake with your choice, we advise you to pay attention to a number of criteria:
- Material. The service life depends on the strength and reliability of the material. Plastic elements can wear out and break. Low-quality products quickly fail and you will not be able to use them for their intended purpose. Polymer parts are less durable compared to metal, but due to their use the tool weighs less. Metal guns are easy to disassemble, they have a simple design and are easy to use. Their main drawback is their significant weight, but modern manufacturers are solving this problem. On the market you can find many combined models with metal supporting elements and inserts made of other materials.
- Disassembling the pistol structure. If you choose a non-removable gun, it will be difficult to clean if it gets dirty with foam. Removable parts allow, if necessary, to disassemble the gun and clean individual parts from frozen foam. If a part fails, it can easily be replaced with another.
- Possibility of regulating foam supply.
Choose reliable manufacturers and use all the capabilities of mounting guns.
Installing the cylinder on the gun
To learn how to properly use a spray foam gun, you need to move on to practical work, starting with charging it:
- The container is closed on top with a protective cap, which must be removed before installation. The gun is positioned with the handle down and the cylinder is screwed to the adapter in a vertical position. During connection, hold the gun firmly by the handle with one hand, and with the other hand, screw the cylinder onto the adapter with rotational movements.
- After connecting, the contents of the container must be shaken well. This process brings the polyurethane foam substance to a homogeneous composition. The container mounted on the gun is held firmly with your hand and shaken sharply from top to bottom about twenty times. When shaking, the handle should only be at the top.
- After shaking, the device is moved with the container up and the handle down. This is his working position. Turn the adjusting screw a quarter turn and try to pull the trigger. After filling the entire barrel with foam, the tool is ready for use.
During operation, it may be necessary to adjust the mixture supply. This can be done by turning the same adjusting bolt.
The working position of the gun is with the cylinder up
How to use the gun?
When working with the device, you must follow some rules:
- Do not point the charged cylinder towards people or animals. If the substance ends up on wool, hair or clothing, it will be extremely difficult to clean it up. Contact with the mucous membranes of the eyes can be very dangerous.
- Work is carried out only in safety glasses and rubber gloves.
- Do not use the cylinder near heat sources or open flames. When storing foam, it is necessary to protect the container from direct sunlight.
- The room must be ventilated during work.
Sealing joints with polyurethane foam Source stroy-podskazka.ru
Beginning of work
To work with foam for installation, follow the recommendations:
- Shake the container well and remove the cap.
- Turn the gun upside down and screw it onto the cylinder from above.
- Turn the adjusting screw to the left 1⁄4 turn. Squeeze the trigger while pointing the muzzle into the trash can to adjust the desired foam consistency.
Exchange distributor for installation Source stroy-podskazka.ru
Problems with the pistol
Sometimes it happens that the foam does not fill the tube. This can happen for the following reasons:
- the shelf life of the substance has expired;
- the device is broken.
But, whatever the reason, the device will have to be disassembled and cleaned if necessary.
If no sounds are heard when connecting the cylinder to the device, and foam does not enter the tube, this may indicate that the inlet valve is broken. In this case, you need to unscrew the adapter and use a solvent to rinse the ball on the spring. To do this, use a cotton swab or toothpick.
The device may not work due to foam leaking from the nozzle. This can happen if the rod or tip is clogged. To deal with the problem, use a solvent, a rag, a wrench and pliers. You need to proceed as follows:
- disconnect the cylinder;
- remove contamination from the bottle;
- disconnect the tube and clean all its elements;
- assemble the device.
Rules for applying polyurethane foam
Using polyurethane foam does not require any special skills. It is enough to try to foam something a couple of times, and the process will follow the established course. To have a better idea of the process, let's look at its order and some nuances:
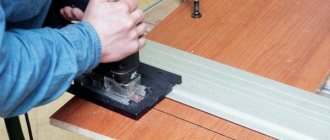
- Polyurethane foam tends to have better adhesion to a wet surface. Moisture increases the volume of the mixture, expanding it, making the structure more uniform. Therefore, before applying it, the surface to be treated must be moistened with water. This is convenient to do from any spray bottle;
- by pointing the gun nozzle at the prepared area, gently pressing the trigger to apply the required amount of foam. You need to know that foaming of vertical slots is done from the bottom up. If the gap is quite wide, it is filled using zigzag movements;
- Having different sizes, the treated surface requires the application of a certain amount of foam. The adjusting screw is responsible for this process. The mechanism must be optimally adjusted to the volume of foaming;
- even if the gun is in operation all the time, the components of the mixture gradually settle to the bottom of the container. Periodic shaking of the instrument will bring them back to normal;
- The extruded mixture expands greatly upon contact with air. It is recommended to fill the free space with no more than 1/3 of the volume. It is better to further foam the remaining unfoamed areas after the first layer has hardened. Removing large excess foam will result in additional costs and waste of time;
- Although the design of the tool has a fairly long barrel, there are hard-to-reach places that it cannot handle. This is where an extension adapter comes to the rescue. This is a kind of flexible hose that fits onto the barrel of the instrument.
How to use a foam gun
A gun for using polyurethane foam or sealant is a special construction device that has a narrow focus, namely maintaining a container of foam, supplying the required amount of polyurethane foam sealant and then laying it in a designated place.
In this article we will try to answer all the questions in detail - how to use a spray foam gun, how to choose a tool and what types modern manufacturing companies offer.
Design and advantages of the tool
Currently, there are a large number of guns for using sealants and polyurethane foam. Their differences can be in minor details, for example, the color or design of the handle, or in significant points, for example, the design or configuration of parts. But no matter how much the types of this tool differ, they all have common details that are basic for all types.
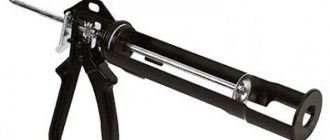
The main elements of a spray foam gun:
- Tool body. It is the basis of this product and can be made of metal or plastic.
- Trunk. It is designed to supply polyurethane foam sealant. As a rule, the barrel is made of metal.
- Lever. It is designed for ease of use and handling of the unit, but it also contains a trigger that allows you to start or stop feeding the foam mass.
- The tip (nozzle) of the tube. Necessary for the application or use of a variety of attachments that regulate the sweat of the sealant.
- Gun reducer (adapter). This element is designed to maintain a container of sealant or cleaning fluid in a stable position on the product. The cylinder is simply screwed onto the gearbox.
- Adjustment screw. It regulates the operation of the trigger, and accordingly regulates the supply of foam mass.
Advantages of the device
The main advantage and difference between a spray foam gun and simple nozzles is its convenience. Moreover, the unit has a number of other important advantages that can push you to purchase this product.
- The gun provides the ability to accurately control and regulate the flow of foam mass.
- The unit provides the opportunity to seal the most inaccessible places, thereby improving the quality of sealing and thermal insulation of various seams.
- The tool allows you to use foam mass economically, because... with a gun you can use a cylinder that you have already used.
Types of device
Plastic version
This is the cheapest and most accessible option today, but this type of tool is not durable and reliable. This option quickly becomes unusable and in a faulty state or becomes clogged with foam, which cannot be removed later. This gun is not dismountable, so if it breaks, you need to purchase a new tool.
But with all its shortcomings, a plastic tool has several important advantages. It is great for small-volume work, and after work is done there is no need to clean it.
Plastic tube
It is an excellent replacement for a plastic gun. The tube is also suitable for small jobs and there is no need to clean it either.
But there are several differences between this option and the plastic type. First, due to the configuration of the balloon and tube, the balloon itself fits differently in the hand. Secondly, the tube costs several times less than a plastic pistol.
Metal models
They are durable and reliable. This option is dismountable, so after the work has been done, you can clean it of sealant residues, and if it breaks, you can repair it yourself. The metal gun not only does its job well, but also does it better than its plastic counterparts. This tool belongs to the class of professional products.
The metal version has a few disadvantages. These include: the mass of this unit and the high price.
Combination pistol
This type of tool is made of both metal and plastic. Parts such as the body, adapter, handle, trigger are made of plastic, and the barrel is metal. The combined one is lightweight and shock-resistant. For example, if you drop it from 2-3 meters, it will still function, unlike its plastic counterpart.
When purchasing such a tool, you need to make sure that its design is collapsible. If the instrument is one-piece, then you will not have the opportunity to clean and repair it if necessary. This means that it will last as long as its plastic counterpart.
Teflon coated guns
These can be either combined models or metal ones. Their main advantage is reliability and durability. This type can serve you for ten years. Moreover, they can be easily cleaned and repaired. But the main disadvantage is the high price.
How to choose a gun for polyurethane foam?
Modern manufacturing companies offer a huge selection of construction devices for working with polyurethane foam sealant. As mentioned earlier, their differences can lie in both minor details and significant points. In order to choose a pistol that will be reliable and performant, you need to pay attention to many points.
The main points that you should pay attention to when choosing a device for polyurethane foam.
Tool material
As you already know, pistols can be made of plastic, metal, and can also be combined and coated with Teflon.
Mechanism – collapsible or not
As you already know, the one-piece foam gun must be replaced after it breaks for the first time.
Tightness of device valves
This parameter determines the normal functioning of the product.
To check the gun for leaks, you need to place a container with cleaning fluid in the adapter and press the trigger several times. Then you need to make sure there are no leaks. Also, the liquid from the gun should be sprayed under pressure, and not flow out in a stream. After which you need to get rid of the container and leave the instrument for a day.
After 24 hours, you must press the trigger again; if the device is sealed, the remaining liquid in it should spray out again. If everything happens as described, then you have purchased a sealed and therefore serviceable gun for polyurethane foam.
How often will the tool be used?
If you intend to use the gun on an ongoing basis, then it is best to buy a durable tool, for example, a metal or even a Teflon-coated gun. If you intend to use this unit not very often, then it is best to purchase a cheaper, dismountable mechanism or use polyurethane foam without a gun.
Gun kit
When purchasing an expensive pistol, you should inquire about the availability of spare parts included with this unit. If there are any, then in the event of a breakdown, you can easily repair it. If these are not available, then it is better to give preference to a kit with spare parts, since quite often replacement parts are quite difficult to find. Why do you have to buy a new pistol?
How to use a pistol correctly?
It is important to observe the necessary safety precautions when working with the device for using sealant.
Before using this device, you must resort to basic safety measures. You need to take care to protect your hands and eyes; to do this, purchase construction glasses and work gloves. Since it will be quite difficult to wipe off the foam from your hands or clean the foam from your clothes.
After following the safety precautions, you can calmly begin to consider the next question: how to use a spray foam gun?
Operating procedure:
- Before work, you need to prepare the place where you are going to apply the foam mass. For example, if you are going to install plastic windows, an interior or entrance door, then the seam needs to be cleaned of dust and moistened with water.
- It is also necessary to shake the container with sealant. If you work in cold conditions, then the cylinder also needs to be warmed up. You can do this at home by simply leaving the sealant at room temperature for a while. Or put the balloon in a bucket of warm water.
- To use the device you need to charge it. To install the cylinder into the device, you must place the sealant on a flat surface. Then remove the protective cap from the container. Place a gun on top of the sealant bottle. Hold the device and turn the container until it stops. Then turn the loaded pistol upside down. Turn the adjusting screw and lightly pull the trigger.
- After loading the gun, you can start filling the seams. Hold the device by the handle with one hand and hold the cylinder with the other. Using your index finger and pressing the trigger, you will begin dispensing the sealant. The intensity of the foam supply can be adjusted using the adjusting screw.
- When filling vertical seams, you must move from bottom to top. When filling horizontal surfaces, the direction of movement does not matter. If the seam is wide enough, then it is also necessary to make zigzag movements.
- Any seam should be filled only 25-30%, i.e. most of it should remain empty. If necessary, the surface can be additionally filled with sealant. But cutting off excess foam will take a lot of your time.
- If the foam mass does not flow well, you need to shake the container.
- At the end of the work, the empty container is removed from the device. Then you need to clean the foam gun with a special cleaning liquid. If there is still sealant left in the container and you plan to use it in the future, then the container should be left on the unit. Then the barrel tip is washed.
Instrument care
Now you know how to use a foam gun, but an important point is caring for it. With proper care, the device will serve you for a long time and will still do its job well.
Easy tips for caring for the unit:
- Do not disassemble the instrument frequently. The more often you violate the integrity of the pistol’s design, the worse its fastening becomes each time.
- The container with sealant must be removed only for replacement. Frequent removal of sealant can also lead to failure of the fastening.
- When changing the cylinder, the adapter must be cleaned of any remaining foam mass using a cleaning agent.
- Upon completion of the work, it is necessary to clean the barrel.
- Periodically it is necessary to tighten the screw gasket, which is located between the trigger and the rod.
Procedure for changing a used cylinder
When performing large volumes of work, naturally, it will be necessary to replace the used empty cylinder with a new container. This action has its own order:
- Even if the nozzle has stopped delivering mixture, the container may still contain some residual pressure. Before replacing the cylinder, you must bleed it by pointing the barrel into construction debris and pulling the trigger. After the hissing sound has completely stopped, the instrument is placed with the handle up and the empty container is unscrewed.
- The connection point, that is, the adapter, will be covered with excess foam. They must be immediately washed off with a washing solution and a new cylinder quickly screwed on. Delaying these actions will lead to solidification of the remaining mixture in the barrel. Then for further work you will have to completely clean the entire tool.
Having made a quick change of container according to all the rules, you can begin further work with the tool.
When replacing the cylinder, you must quickly wash off any remaining foam from the adapter and do not let it harden.
Assortment of "foam tools"
Before learning how to use a foam gun, it is better to buy one. This means that the first question for discussion is which of the existing models is better to choose. Their prices differ, sometimes very much. Consulting a seller does not always guarantee the right purchase: many of them try by hook or by crook to get rid of an unpopular or overly expensive product.
Material is the first criterion for selection.
- Plastic. Such pistols, which have no metal parts, are among the cheapest tools. Outwardly they look like toys. The kit sometimes includes several replacement tubes. Their big disadvantage is their fragility, since it is impossible to disassemble the structure. Plus - the price: this product is inexpensive, so after it gets clogged, you don’t mind throwing it away. If the technician has a small amount of work to do, and cleaning the gun is not a pleasure, then this model is suitable.
- Metal. A tool, all parts of which are made of metal (steel), is capable of serving its owner for several years. The gun is easy to disassemble and clean. In the event of a minor breakdown, repair is also possible. If you use these models carefully and do not allow them to fall from great heights, then you don’t have to worry about problems.
- Combination pistols. The adapter, body, trigger and handle in such products are made of very durable plastic, the barrel is made of metal. Their advantage is lightness when compared with previous models. Less sensitivity to shocks and falls is another plus. Before purchasing a product, it is better to ask whether the gun can be disassembled.
- Teflon coated. This is a type of combined models in which the barrel (or almost the entire pistol) is protected from sealant adhesion. The quality of the instruments is excellent, but their main drawback is the rather high price, so the advisability of overpaying for a thin layer of Teflon is still in question.
The most popular models from the above list of candidates for the title of assistant master remain practical and lightweight combination pistols.
Taking a break from work and reusing the gun
It often happens that not all the contents of the container are produced in one day. In this case, you should not rush to remove the cylinder and wash the instrument. The hermetic design of the tool will not allow the mixture to harden for a month. But every four days you will need to bleed it out a little to prevent clots from forming in the trunk.
Before reusing the tool, the nozzle must be cleaned of dried residues and the contents of the container must be thoroughly shaken. Having cleaned the adjusting screw, make a test release with the trigger until a normal flow of foam appears, after which they begin to work.
Gun device
The design is simple and consists of the following mechanisms and parts:
- body (made of metal or plastic);
- trunk;
- needle rod;
- trigger mechanism on the handle;
- nozzle (it is possible to use removable nozzles with different characteristics);
- reducer with valve for installing a cylinder;
- an adjusting screw that allows you to change the trajectory of the trigger mechanism, which makes it possible to control the amount of foam coming out of the device.
If you look at the cross-sectional drawing of the pistol, you will notice that the diameter of the barrel is slightly larger than the diameter of the needle rod. It is through this cavity that foam flows from the cylinder under pressure.
Cleaning the tool after finishing work
If the work is completed or a long break of more than a month is expected, the instrument must be washed with a special washing solution. To do this, point the gun with the nozzle away from you and replace the container with foam with a similar one only with a washing solution.
By pressing the trigger, fill the barrel with liquid and leave the tool for 15 minutes to dissolve the remaining mixture. After the time has passed, the trigger is pressed again to drain the liquid from the remaining mixture and flush the barrel with a clean solution. Next, unscrew the container with the washing solution, bleed the residue from the barrel and put the instrument into storage until next use.
The foaming process from a straw and its disadvantages
Manual foaming through a plastic tube is identical to professional foaming, only it is performed without a gun directly from the container.
For large volumes of work, this has its disadvantages:
- dosed feeding from a pistol allows you to economically use the contents of the container, which cannot be said about a plastic tube;
- ease of use of the tool reduces time costs. Constantly holding the balloon upside down by hand is very tiring and sometimes inconvenient. The hand gets tired and constant breaks are required.
Having familiarized yourself with how to use polyurethane foam, let everyone decide for themselves what is more profitable for them.
Is it possible to do without a pistol?
Sometimes there are times when you have a can of foam, but you don’t have a gun at hand. In this case, the tube that comes with the sealant can be used. The procedure is as follows:
- Wear gloves to protect the skin of your hands from foam.
- The container is shaken for 1 minute. This is necessary so that the substance inside becomes homogeneous.
- The lid is removed and a tube is attached, which is brought to the place that needs to be filled with foam at a distance of approximately 5 cm.
- The valve is pressed. The gap is filled 1/3. This is due to the fact that the foam begins to expand after leaving the container.
- After 10-12 hours, the excess foam is carefully trimmed with a construction knife.
Using polyurethane foam for sealing joints Source palitrabazar.ru