Classification and design
The design of this tool is quite simple; it is used for sawing skirting boards at an angle based on materials such as:
- tree;
- plastic;
- polyurethane.
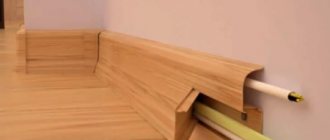
The miter box has the shape of a tray with through slots at an angle, a hacksaw fits into them.
According to the design features, miter boxes are as follows:
- simple - used for cutting materials at angles of 90 and 45 degrees;
- rotary - equipped with devices for fastening parts and a hacksaw that can be turned manually by 15-135 degrees;
- electric - they look like electric saws that are installed on a rotating base.
Based on the material used, the instruments are divided into the following:
- made of wood - this is a classic version of a miter box that you can make with your own hands;
- made of plastic - they are inexpensive, weigh little, but are short-lived, since the slots quickly expand;
- metal - usually these are expensive professional tools, durable and easy to use.
Features of a wooden miter box
Finding a ready-made wooden miter box for cutting skirting boards on sale now is not easy. However, not so long ago, such types of work were performed exclusively with wooden tools.
The structure is based on a board; a plank and two boards are placed on it, acting as sidewalls, in which there are cuts.
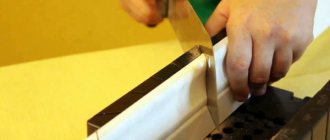
When using such a miter box for cutting ends, you should be especially vigilant, since careless handling can lead to its damage. To prevent this from happening, instead of a simple hacksaw, use a special saw that cuts exclusively the baseboard
Plastic and metal tools
Tools for cutting skirting boards based on polyvinyl chloride can be called a worthy alternative to wooden products. Their advantages are the following:
- low cost;
- a large number of standard sizes on sale;
- light weight.
However, there is also a drawback - rapid wear. The cuts are developed and expanded beyond the permissible norm. As a result, the hacksaw blade becomes unstable, and the cut will be inaccurate because of this.
But metal products are distinguished by their durability. But such equipment is very expensive and professional. It also has a long service life, so the high cost is justified. Using such equipment, you can develop cuts made in steel or aluminum housing.
Advantages of a homemade miter box
Anyone can purchase such a tool in a store for a small price. But, a homemade design has its advantages and features:
- the ability to create a multifunctional tool with different angle appearances;
- strong material is used in production, which helps the product last for many years;
- fast manufacturing method;
- minimum number of consumables;
- making the tool will cost free if you have old boards from a previous renovation at home.
The only unique feature of a homemade tool is to make the correct calculation for marking the angles.
Tool Features
A miter box is a specialized device designed for cutting floor and ceiling plinths at different angles. The device is made in the form of a box with missing end walls and without a lid. Several pairs of slots are formed in the side surfaces, having a through design and located at certain angles relative to the central axis of the base. The width of the slots allows you to freely place a hacksaw or saw in them, provided that the teeth are slightly set apart.
Some tool models are equipped with a universal hacksaw equipped with a raised handle. This contributes to a particularly precise cut and makes it easy to hold the hacksaw blade in a horizontal position.
If the miter box is not equipped with a cutting tool, then when choosing it, it is necessary to take into account the material of the baseboards. So, when cutting plastic skirting boards and MDF products, it is better to purchase a hacksaw for metal; for a wooden product, choose a wood saw with frequent teeth; and for sawing foam or polyurethane baguettes, use a stationery knife.
During operation, the miter box is fixed on a workbench or table and securely fixed with a clamp. This does not allow the tool to move under the influence of sawing and makes working with it convenient and completely safe. The process of cutting skirting boards using a miter box is quite simple and looks like this:
- a plinth is placed on the bottom of the tray and fixed in the desired position;
- then a hacksaw blade is inserted into the guide grooves that determine the desired angle and are located on the opposite walls of the tray and the baseboard is cut.
To prevent creases and chipping of the baguette, it is recommended to make a test cut, during which the pressure force and intensity of movement of the cutting blade should be determined. This is especially true for ceiling skirting boards made of polystyrene foam and polyurethane, which, if cut incorrectly, begin to crumble and wrinkle.
Woodworking miter boxes are classified according to three criteria: size, material of manufacture and type of construction. According to the first criterion, there are standard products designed for processing narrow and medium-sized moldings, and large-sized models that allow sawing high floor and wide ceiling plinths. The width of the slots in dimensional products is no different from that of medium and small samples, however, the side walls of the tray and the width of its base are much larger.
Based on the material used, miter boxes are divided into wooden, plastic and metal.
Wooden
Wooden models are the most popular type of tool, due to their good performance characteristics and the possibility of self-production. Wooden products have a classic structure and are represented by a structure of three boards , one of which acts as a base. The two side boards are equipped with paired grooves that allow cutting off different angles. Despite the low cost and ease of manufacture, wooden models have a big drawback: when working with a hacksaw or saw, the grooves are gradually filed, which is why, with regular use of the device, its service life is significantly reduced. However, for performing one-time work, for example, when carrying out renovations in an apartment, wooden models are quite suitable.
If you plan to use the wooden miter box more often, you can purchase a special saw that cuts exclusively the baseboard. This will protect the wood from being cut and significantly extend the life of the tool.
To make a wooden miter box yourself, take a piece of board 10 cm wide and 50 cm long and use a protractor to measure angles of 45, 90, and if necessary, 60 degrees. Then the sidewalls are screwed on and the corner markings from the base are transferred to them. Next, they check the transferred marks with a protractor - if everything is in order, then they begin to form the grooves. The cut is made until the hacksaw begins to touch the upper surface of the base of the tray. The grooves should be formed in such a way that a hacksaw or saw can easily enter them, however, they should not be made too wide either. After the tool is ready, test sawing the plinth at different angles is carried out, after which the workpieces are removed and the angles are measured using a protractor.
Read also: How to disassemble a Husqvarna Chinese chainsaw
Made of plastic
Plastic miter boxes made from polyvinyl chloride are a good alternative to wooden models. The advantages of such products include their low cost and light weight. The tool is presented in a huge range of standard sizes, which allows you to purchase a model for almost any baseboard. Plastic devices have one drawback - the rapid expansion of the working grooves, which subsequently leads to large deviations from the required angle and makes the tool unsuitable for further use. However, as in the case of wooden models, plastic miter boxes are ideal for one-time use.
Made of metal
Metal miter boxes belong to the category of professional tools and are characterized by a very long service life and high cutting accuracy. Alloy steel or aluminum is used as the manufacturing material for such models. Aluminum products weigh slightly less than steel products, so they are used by craftsmen much more often. No significant deficiencies were identified in the metal tool. The only thing that can be considered a disadvantage is their price, which, however, is quickly justified by the durability, cutting accuracy and ease of use of the tool.
The third criterion for classifying tools is the type of design. Based on this feature, simple, rotary and electric models are distinguished. The first are the classic version of the instrument and were discussed above. A design feature of the rotary model is the absence of one of the side walls, instead of which there is a rotary sash with a cutting blade installed on it. The base of the tool is equipped with a special holding device that reliably fixes the plinth when cutting. The use of such a tool makes it possible to form angles from 15 to 135 degrees and allows you to cut skirting boards for non-standard rooms, which cannot be done using a classic device.
The electric model, better known as a miter saw, consists of an electric saw and a miter box. The required angle is marked using a laser beam, which allows you to cut the plinth very accurately. The device has high productivity and is capable of cutting a large number of workpieces in a short time. The power tool is classified as a professional one, which, of course, is reflected in its price and classifies it as an expensive device.
How to use a miter box correctly
Using a miter box greatly simplifies the work of the master. Next, let's look at what a miter box is used for using specific examples. Before work, carefully read the instructions from the manufacturer.
How to cut material
To properly cut an element, you need to carefully prepare the material by taking a miter box with a saw. The presence of grooves allows you to make accurate and even workpieces since the saw will take the set position. The first step is to secure the tool with screws or a clamp on a flat surface. Next, use a pencil or laser to make a mini-drawing. The workpiece is placed in the tray. In this case, the marking should be opposite the corresponding slot. Then a hacksaw is inserted and the cut is made.
How to cut an arbitrary angle
It is possible to change the angle. Depending on the conditions of the drawing, it can be increased or decreased. Unfortunately, not all walls adjoin each other at right angles. Therefore, a logical question arises: how to seal the joint between drywall and wall. The easiest way is to use putty. In small corners it is permissible to use a serpyanka. You can make an arbitrary angle using an electrical model of the tool. The plinth is placed on the work surface, fixed and marks are made using a protractor. After sawing, the resulting parts should be combined.
Sawing off corners of interior and exterior floor plinths
When preparing the corners of the floor plinth, you need to know the basic rules. The formation of the internal corner is done as follows:
- the miter box is placed on the table with the side facing you;
- the plinth, depending on the left or right side, is moved to the other side of the device;
- the left part is placed on the left side of the miter box, and the corner is cut off on the right;
- for right parts, the corner is cut off on the left accordingly;
- the cut should be without allowances for joining;
- Next, the workpieces are combined and checked for tight fit.
When working with an external corner, the plinth is pressed not against the opposite part, but against its own. The left part is installed on the right and the left corner is sawed off. The right part is installed on the left and the right corner is sawed off. In each case, the plinth is cut from the front side.
How to cut the corner of a baguette correctly. Using a Laser Level
In modern conditions, many home craftsmen already have a tool “arsenal” that is excellent for checking the straightness of the corner and marking the baguette when forming both internal and external corners.
How this is done is described step by step in the following instruction table.
Illustration Brief description of the operation performed
| First, you need to accurately position the laser level itself. To do this, set the same distance from the corner along the joint lines of the floor and walls, for example, 500 mm. The marked points are connected to each other by a diagonal line. After this, its middle is found and marked. The laser level is installed on the floor, turned on, and then placed so that the vertical plane it sets (its projection in the form of a line) passes through the middle marked on the diagonal and coincides with corner of the room. The beam should pass vertically along the corner's mowing line - this will also show how smoothly the corner of the room is formed. In essence, a plane is specified that cuts the corner of the room exactly in the center. It is in this plane that the junction of the skirting boards should be located. |
| In this case, the level should be positioned so that the projection of this plane is also displayed on the ceiling. You can fix the resulting bisector line with pencil marks. But it’s even better not to remove the device, as it will help to more accurately display the required cutting line on the plinth placed at the place of future fastening. It’s probably clear that the next step is to install one baguette at the installation site. The plank must be rested with its end side against the wall. The beam from the laser builder, passing along the surface of the plinth, and even along all its relief protrusions, will accurately show the cutting line. |
| After this, the cut line is marked along the mowing line, using a pencil or thin marker. |
| Using a knife, a corner is cut along the intended mowing line - it is impossible to make a mistake in this case. Then, in the same way, the cut of the mowing line is marked and the second baseboard is cut. |
| Now that both parts for forming the corner are ready, they need to be connected to each other at the site of future fastening. If the joint is neat, then you can install the baguette with glue. If there is a small gap between the planks, then the ends of the plinth must be adjusted with a knife. |
| When installing ceiling plinths, the strips that form the corner are glued first, and the flat areas of the finishing are fixed last. |
| If, during the fitting of the corner side of the baguette, its other end ends up on an already fixed piece of plinth, you should immediately note the required length in order to cut off its excess. In this case, the straight edge is simply cut at a right angle. |
| In order to correctly cut the baguette for the outer corner, you also need to start marking from the floor using a laser level. There is a slight difference in the initial construction. First, the mowing line is simply drawn along a ruler, which is a continuation of the walls. Then an equal distance is laid on them from the corner, these points are connected by a diagonal on which the center is determined. The beam is directed through this mark to the protruding corner, also with a projection of this plane on the surface of the ceiling. |
| Next, pieces of baguette are alternately applied to the wall and the protruding corner so that the beam passes through them. The projection is marked using the mowing line, and then the end part of the plinth is cut. After which it is necessary to try on both pieces at the installation site, aligning the cuts. If necessary, the ends of the planks are adjusted. If everything is fine, proceed to fixing the fillets on the surface. |
READ How to Cut a Ceiling Plinth at an Angle of 45
How to use a miter box correctly
Thanks to the miter box, everyone will be able to saw various materials. But before starting work, be sure to read the rules for its use. In addition, prepare additional materials:
- hacksaw (the pitch of the teeth must correspond to one or another type of material that is being processed);
- assembly knife - needed for cutting foam baseboards;
- ruler and pencil - for markings on materials;
- sandpaper - for cleaning irregularities and burrs.
The operating rules are as follows:
- It is better to secure the plinth in a miter box on the right side, and cut the corner on the left side of the product;
- the left product is attached to the left, and the corner is cut off to the right.
How to cut material
When cutting, it is extremely important not to mix up the sides. In order to correctly cut the material using a miter box at an angle of 90 or 45 degrees, it is secured in the body and then rested against the end wall
And only then the material is sawed. If the tool is professional, then you can adjust the size down to the millimeter.
A template should be made for each section, taking into account a margin of 50 mm. Since the walls in rooms are not always smooth, before cutting the material you should check how they fit together.
The cut should be carried out as follows:
- mark the cut line with a pencil;
- place your product in the miter box body with the front side so that the cutting line mark looks like a continuation of the slot in the tool;
- Press the workpiece from the end of the body wall, insert a hacksaw into the slot, then cut the material according to the mark;
- insert the second blank with the other side into the slot;
- We clean out any unevenness using fine sandpaper.
How to cut an arbitrary angle
Sometimes the walls are not connected to each other at right angles, then the sawing will need to be adjusted. This is done in two ways:
- Using thick paper or a homemade cardboard template. If the plinth is hollow from the inside, it is unlikely to stay vertical. In this case, you will need a homemade corner in which the product is placed, just like in a miter box. The corner is placed on a pre-prepared stencil so that it matches the template, then the product is cut according to the marks.
- Make marks on the material using a pencil. Cut two products at an angle of 90 degrees, then attach them to the wall and mark the junction line. Find the point of contact between the skirting boards, then transfer the markings to the material and make a cut.
Sawing off corners of floor plinths (internal and external)
The rules for sawing off the inner corner of a floor plinth are as follows:
- the miter box must be placed on the table parallel to itself;
- press the product to the side opposite to you;
- place the right plinth on the right, and the left one on the left, respectively, cut from the opposite side;
- align both parts of the plinth, you will end up with an internal corner, the top of which is located away from you.
As for sawing off the outer corner, you must adhere to the following rules:
- We place the miter box on the table parallel to ourselves, as in the previous case;
- press the baseboard on your side;
- we install the right product on the right, the left one - on the contrary, we bring it to a diagonally located line, sawing is carried out from the bottom up;
- Connect the parts, we get an outer corner with the vertex towards you.
Preparing the side walls for the miter box
Parts of plywood or scraps from boards are used to make side parts for the miter box. To ensure a high-quality tool, you should adhere to precise measurements and recommendations:
- the approximate dimensions of the side walls should be 10 millimeters for plywood and 20 mm for boards;
- their height is selected from 30 to 50 millimeters, depending on the purpose of the tool (30 mm is recommended for ceiling plinths, and about 50 mm for wooden ones);
- The length of the side walls of the miter box should be 250 mm or more, but it is not recommended to lengthen it too much, since it will be inconvenient to perform the work. As an exception, a longer miter box length can be used, but this is only for massive objects.
After measuring the side parts of the boards, we cut out two absolutely even and identical elements
This is very important for further cutting of boards and marking them with tools. In the prepared instruments we make notations at the bottom under confirmations
This is interesting: Dividing heads - universal and optical
How to use a miter box: ceiling skirting boards, recommendations for using a miter box for cutting them
It is impossible to imagine any modern interior without a plinth. As a rule, it serves to frame the ceiling covering. Using it you can hide any defects, if any. But in order to correctly cut the plinth, you need a special tool, a miter box. Many people do not know how to use a miter box. Ceiling plinths must be laid so that there are no gaps between them. Let's look at how to do this correctly.
What is a miter box?
Modern ceiling plinths (or fillets) are made from various materials. It could be wood, plaster, plastic or even foam. Depending on this, the tools for working with them are selected. But the miter box remains an essential tool for working with fillets.
The miter box is made from plastic, wood or metal. Its shape resembles a tray. Only this carpentry device helps to correctly determine the angle at which the plank needs to be cut. All thanks to special slots called grooves. Each groove is made differently from the other, and helps the saw take the desired direction. But let's move on directly to working with this tool.
Preparatory work
Before starting work, you need to prepare a set of tools that will be needed to cut the planks. So, we will need:
- Carpenter's miter box,
- Assembly knife,
- Metal hacksaw,
- Sandpaper,
- Pencil,
- Ruler or square.
If the thickness of the material from which the fillet is made is small, then it is better to prefer a metal miter box. For a small amount of work, a wooden version of the tool is also suitable.
Now you need to choose the right cutting tool. As mentioned above, skirting boards come from a variety of tools. To avoid damaging the strip, the tool must be selected correctly.
Plastic strips are better cut with hacksaws for metal. It will prevent damage to the material, and the cut will be smooth. If a foam plinth is selected for finishing work, then it is better to use a mounting knife. Wooden fillets can be easily sawed with a fine-toothed hacksaw.
Determining the cutting angle
In order for the plinth to lie flat and unsightly gaps not to form at the joints between the two planks, it is necessary to correctly determine the cutting angle. But you need to take into account that the angles in one room may not be the same, so it is better to measure them additionally and write down the results.
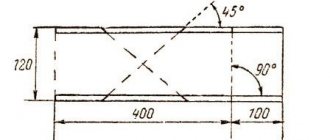
The angle at which you need to cut the baseboard is equal to half the angle between the two walls. That is, if the corners in the room are standard straight and equal to 90 degrees, then the parts will need to be cut at an angle of 45%.
Cutting fillets
Starts cutting fillets. To do this you need to follow the instructions:
- The bar is placed face up in the miter box. In this case, the pencil line should become a continuation of the slot itself.
- The fillet is pressed against the wall of the tray, and a hacksaw is inserted into the selected slot at this time.
- Make a cut along the previously drawn line.
- The second edge of the plinth is sawed similarly to the first, but with one difference. The bar is placed in the device on the other side.
- Blanks of non-standard shape are cut, having previously measured the angles of all intended joints. The edges of the parts must be cleaned of burrs using fine-grained sandpaper. This will help join the planks even more tightly.
You need to know that before attaching the plinth to the ceiling with glue, you need to check how well the parts match with each other. There should be no gaps.
A miter box for ceiling plinths is a tool that no professional who finishes the ceiling can do without. It greatly simplifies and speeds up the process of installing fillets and ensures beautiful joining of products.
If you still have questions, you can ask them through the Questions to Experts button. or watch this video:
Three working methods for trimming skirting boards
For floor and ceiling skirting boards, the cutting instructions are almost the same. But if on the floor a crooked corner can be covered with something, then on the ceiling this is already a problem, so we will pay more attention to how to cut the ceiling plinths.
Method number 1. Classic miter box
The classic miter box is a U-shaped box with slots in the opposite sides. A piece of suitable size is inserted into this stock and sawed off with a hacksaw through the slots in the sides. The idea is not new, the tool is already several hundred years old, but despite its simplicity, not everyone knows how to correctly cut the corner of a ceiling plinth using such a miter box.
Not everyone knows how to cut a ceiling plinth in a corner using a classic miter box.
Tip: when trimming, ceiling plinths are applied to the side of the miter box that is closest to you, and floor plinths, on the contrary, should be applied to the side of the tool farthest from you. This is not a dogma, but it is much easier to work this way.
It is easier to work with floor plinths, since the miter box lies on a horizontal plane, it is easier for you to orient yourself in the position of the plinth. People most often make mistakes when cutting ceiling fillets; they simply insert them into the tool incorrectly. There is a simple but important rule here.
Important: the side of the ceiling fillet that touches the wall should be directed to the upper edge of the side of the miter box, and that part of the plinth that borders the ceiling should be placed on the bottom of the miter box.
Scheme for trimming skirting boards.
As you know, a corner has 2 sides, so in order to make fewer mistakes, train yourself to place the bar that will be mounted on the right side of the corner in the miter box on the right, and the bar that is attached to the left in the miter box on the left. The intricacies of using a classic miter box are described in detail in the video in this article.
How to properly trim the inner and outer corners of a ceiling fillet.
In addition to the classic U-shaped miter box, there are two more types of similar designs - a professional and a rotary tool. As for the professional option, only masters use it. The device is quite bulky, but it rotates at any angle and has a hacksaw that can be locked in the desired position.
Professional miter box with the ability to fix a hacksaw and workpiece.
The rotating device can easily be called a “pocket” miter box. The only advantage here is the ability to clearly fix the angle of rotation of the bar. On the one hand, it’s easy to work with - set the corner, apply it to the baseboard and cut it off. But on the other hand, you need to get used to such a tool; if you do not have experience working with a hacksaw, then you should not take a rotary miter box.
How to work with a rotary miter box.
Advice: when choosing a classic U-shaped miter box, first of all, do not buy Chinese products. And secondly, try to buy models with the ability to rigidly fix the part inside; one of these models is shown in the photo below.
A miter box with the ability to fix the part inside is much more convenient to work with.
Method number 2. Trimming according to a template
Most often, both ceiling and floor skirting boards need to be cut at 45º. If there is no specialized tool nearby, then an improvised miter box can be drawn on a piece of notebook paper. From the school geometry course we know that the diagonal of any square in relation to the base has an inclination angle of 45º.
Read also: Photos of USSR metal lathes
You can set the 45º angle by attaching the plinth to the diagonal of the square.
Next you need to draw a square and draw 2 diagonals in it - this will be the required 45º. All you have to do is correctly attach the plinth to the leaf and mark. True, in order to cut the plinth smoothly without guides, you need a good eye and a steady hand.
Method No. 3. Applied universal
Trimming at 45º is a common option, but what if you need a different angle and only have a hacksaw and a pencil? It turns out that there is a very simple way out of this situation. Plus, this method is universal, it is suitable for both external and internal corners.
Moreover, I can assure you that those angles that visually seem straight, in fact have deviations of a couple of degrees. As a result, you buy a good tool, cut at exactly 45º, and when joining, a gap appears between the baseboards. Here this problem disappears. And then, using an example, we will look at how to cut the ceiling plinth in the inner corner.
| Illustrations | Recommendations |
| Stage 1. |
Take a fillet, place it on one side of the corner and use it to draw 2 lines, along the wall and along the ceiling.
Advice: to make the lines unnoticeable, they can be drawn not with a pencil but, for example, with a nail or the tip of a knife.
Important nuances
If you tried your best, but a small gap at the joint still “came out,” do not be discouraged. In wooden fillets, such a gap can be easily covered with furniture wax. To fill a gap on baseboards made of polyurethane, foam, plastic or plaster, putty is perfect. Naturally, the color of the composition must match the color of the baseboard.
All cracks in the area of the ceiling fillets are sealed with putty.
Wide ceiling fillets are certainly beautiful, but they can only be mounted on perfectly flat walls. If the plane of the wall in relation to the ceiling is wavy, then it is better to buy narrow polyurethane fillets, they are elastic and will smooth out this drawback.
The most questions arise about how to cut wallpaper to fit the ceiling plinth. There is nothing complicated here: the wallpaper is glued with a slight overlap on the baseboards and when the wall is completely glued, take a large spatula, place it in the corner and cut off the excess along the blade with a knife.
How to cut wallpaper to fit a ceiling plinth with your own hands.
But keep in mind - neither the knife nor the spatula can be removed from the wall until you have gone through the entire plane. That is, you put a spatula from the corner, cut the wallpaper along the length of the blade, and then, without lifting the blade from the wall, move and cut until you reach the next corner.
How to choose a miter box
To choose the right miter box, you need to pay attention to well-known, reputable brands. Thus, the “Fit 41255” model is made of hard plastic
It can cut wood, plastic and metal workpieces. The width of the part to be sawed off is 120mm. Workpieces can be sawed off at angles of 45,90,22.5 and 135 degrees. Equipped with an axing saw.
- "Stanley1-20-112" is famous among craftsmen for its precision and cutting quality. The cuts are made at an angle of 22.5, 45 and 90 degrees in the vertical plane and 45 in the horizontal. Eccentrics securely secure the workpiece. The miter box is made of impact-resistant plastic.
- “Zubr15375-75” is also valued by craftsmen, it allows you to make precise cuts. It is made of durable ABC plastic, so it is strong and will reliably last for a long time.
- The miter box “Stayer 15402” is a professional carpentry tool, which differs from others in that the part can be cut in the range from 0 to 180 degrees, the graduation step is 15 degrees. The fastening screw secures the part firmly.
- “Fit Pro 41321” is a rotary miter box supplied with a steel saw. The part is securely secured with a clamp. The miter box is made of steel, aluminum or plastic. The length of the working part is 60cm.
- "Champion180" is half a meter long. This rotary miter box fixes products at 45 and 90 degrees, but at the same time can process polygonal parts (four, five, six, eight and 12 coal). The miter box is equipped with a bow saw with a pitch of 1.4 mm. The maximum width of the workpiece is 20 cm. The processing depth is 20 cm.
- The professional miter box "Bison-saw" works in horizontal and vertical planes. The rotary device allows you to saw off workpieces made of non-ferrous metal, alloys and steel. The scale determines the rotation of the saw to the required angle. The rigidity and strength of the rotary miter saw helps to cut the corner of the baseboard with filigree precision.
- The miter box saw “Stayer” allows you to work without additional measuring tools, because its base is marked. The metal base is durable, the maximum width of the workpiece that can fit on it is 160mm. The cutting depth is 600mm. Adjustment of the saw tension, its different rotation and tilt facilitates accurate cutting of workpieces.
- The Kupper miter box has great functionality. Not only does it rotate at a certain angle, but the carriage also moves along the body of the miter box along a guide. This ability of the carriage helps to secure it in the desired place on the workpiece. The part that needs to be sawed remains motionless and is fixed with removable clamps. When processing material in a vertical plane, there is a hinge with a scale. The workpiece can be processed in vertical and horizontal planes simultaneously. Using this miter box, you can achieve the desired depth of cut, which helps in the manufacture of parts with spikes. The diameter of the workpiece can reach 150 mm.
List of necessary materials and tools for work
Making a miter box with your own hands is not that difficult if you follow the recommendations of experts. First, make sure that the materials prepared for work are sanded
To make a miter box, it is important to choose wood that must be dried, without dents, and have a smooth surface without any defects. You should not choose plastic as the starting material, because it is not strong and therefore can easily be damaged during work.
The boards made for the tool should be about 2 centimeters thick.
Before starting work, you should prepare the following devices:
- Ruler and pencil;
- fine-grained skin;
- hacksaw for metal;
- vice;
- drill with a different set of drills;
- European screws (confirmed);
- a hacksaw with small teeth, designed for sawing skirting boards.
All of the above tools should be sufficient to carry out the work. Among the additional accessories, a hex wrench may be useful, with which it will be easier to tighten the confirmations. Also, before starting work, it is worth preparing individual elements for a homemade tool
Before we begin describing the instructions: how to make a miter box with your own hands, let’s pay attention to a detailed inspection of the manufacture of parts for the device
How to cut a corner without using a miter box
When laying ceiling or floor plinths, the joints are most often made at right angles. Therefore, it is necessary to cut internal and external corners at 45 degrees.
The most popular method is to apply markings to the wall (ceiling, floor) and determine the vanishing points on the baguette using the resulting lines.
IMPORTANT! It is better to do this work with an assistant. It’s safer this way, and you won’t ruin the material.
- We attach the plinth to the ceiling at the installation site. Draw two tangent lines. These will be the base coordinates on one side;
- We install the second blank for marking. We carry out the markings similarly to the previous one;
- Two crosshairs from both lines formed on the ceiling and wall. The intersection points indicate the beginning and end of the cut on each of the mating workpieces;
- We reapply the baguettes and place dots on the plinth where the lines intersect;
- We connect the points with a line and cut the workpiece along it with a tool that is suitable for the material.
Of course, no matter how careful and diligent it is, it will be difficult to make a perfect cut. Therefore, after installation, uneven areas and crevices are covered with plaster using hard spatulas.
IMPORTANT! Before gluing skirting boards with cut off oblique corners, do not forget to cut the opposite ends at right angles in advance, for a linear connection with the next piece.
The next way to make an accurate cut (cut) at the desired angle is to mark it on the cutting table.
On a workbench, or a sheet of fiberboard (chipboard, plywood), markings are applied that repeat the configuration of a real miter box. The plinth is laid parallel to the virtual wall, the cut is made along the corner markings, looking strictly vertically at the cutting tool.
This method is even less accurate than the previous one - but with some skill you can achieve good results.
The most advanced way to cut corners without a miter box is to use a high-quality power tool. If you have a hand-held circular saw with a coordinate suspension system, you can cut plastic, metal and wooden plinths without a miter box.
This device is also suitable for cutting stucco. Of course, not plaster - but made of foamed PVC.
Despite the simplicity and accessibility of the device, many craftsmen prefer to make a miter box themselves, especially for soft ceiling plinths. For platbands and wooden floor cladding, it is still better to use factory tools.
How to cut a profile tube at an angle
The profile of a profile tube differs from the profile of a round one. Doing it manually can cause significant error.
The best way to solve the problem is to create a cutting template from the same profile, but with a larger diameter.
Take a small part of the profile tube.
On it, using projutor, mark it as 45 degrees. Now, using a grinder, the piece of workpiece should be cut along the marked mowing line. The cutting edges must be routed to correct defects. The remaining product remains only in the template for cutting the tube at an angle.
Next, you need to mark the larger profile cut line. And already a tube is cut on it.
The text describes methods for cutting the tube at a 45 degree angle.
When the tag is already completed, it is recommended to use the Bulgarian language. With its help, she can cut smoothly. We can replace it with a metal saw. The other part of the product will be welded, but you will need experience with the tool, otherwise there will be irregularity. Also read: How to Smoothly Split a Tube - Tools and Cutting Techniques.
Now in construction shops you can find a special tool for cutting pipes. However, it is easier and cheaper to create a template yourself.
At first glance, it seems that the installation procedure for a baguette is not particularly difficult.
Indeed, this is true if you cut the cornice for the ceiling correctly. This is easy and simple to do using a device such as a miter box. But if the tool is not at hand, do not despair. There are techniques that allow you to perfectly cope with the task without it. We will teach you how to cut ceiling plinths without a miter box.
In most houses and apartments, a right angle is decorated with a ceiling plinth, so we will cut the baguette into 2 sectors of 45 degrees.
And let's start with the method, which consists of creating markings on the wall:
- Let's attach the product to the corner in place of the fastener.
- Along its edge we draw a fishing line on the surface, which will act as a base for the fastening level.
- Let's do the same on the other side, attaching the baguette to the connecting wall.
- As a result, two mowing lines are formed, which intersect at one point.
Transfer it to the baguette, since this point is the top cutting point.
- Next, you should again attach the plinth to the ceiling in order to pass the mowing line between the edges of the cornice to mark the cut with the mowing line.
- Place it against the corner of the room to trim.
- To cut the ceiling plinth, use a knife or hacksaw, depending on the material from which it is made.
In addition, there is a rather interesting way to cut a baguette - draw a miter box on paper.
Draw this device on paper: draw two lines that should be parallel to each other, mark the angles, maintaining their degrees, for which you can use a protractor. In this case, it is necessary to cut the baseboard in the same way as when using a real miter box.
The product must be located parallel to one of the lines. Trim the corner. But this technique may not give an ideal result, since we will be cutting the product at an angle of 45 degrees, but the corners in our houses, as a rule, are crooked, and in the end we get a noticeable gap.
This method of cutting ceiling plinth consists of creating a special shape.
To do this you will need 3 planks or pieces of thick plywood. Make cuts in the sides of the product at an angle of 45 degrees using a protractor. This way, you can trim the baguette without miter box.
Another simple method lies in paper manipulation. Bend the sheet at the desired angle. Then it needs to be placed on a block and cut along the formed mowing line, which should be pre-drawn.
READ How to Cut a Circle in Metal
Such a block will serve as a kind of template: ceiling plinth is placed under it in the position in which it will be attached, and the corners are cut off, holding the knife strictly vertically.
A rather expensive way to create the corners of a ceiling plinth without a miter box is to use special additional inserts.
They are divided according to their purpose: for internal and external corners, there are also connecting inserts.
If you have to work with non-standard corners, for example, those that have several intersecting edges, or rounded ones, you will not need a miter box.
How to use?
In order to correctly cut a plinth using a miter box, you will need the following accessories:
- a hacksaw for metal, the pitch of the teeth of which must correspond to the material of the baseboard;
- assembly or stationery knife (for cutting foam ceiling products);
- a protractor and a simple pencil (preferably very soft);
- fine sandpaper.
How to cut a baseboard?
Before cutting the plinth, measure the required angle on its front side with a protractor and make markings with a soft pencil. Next, the workpiece is placed in a miter box in such a way that the outlined line is located strictly on the axis connecting the two paired slots. Then the plinth is pressed against one of the side walls, held firmly with your hand and the hacksaw is inserted into the grooves. Sawing off the corner must be done clearly according to the markings, otherwise the geometry of the connection will be disrupted and the work will have to be redone.
How to cut an arbitrary corner?
Arbitrary angles are cut using a rotary or electric model. To do this, the plinth is placed on the work surface, secured, and laser markings are applied using the built-in protractor. Next, sawing is carried out, after which the parts are combined as a control. Cutting corners using such tools is characterized by the ideal shape of the cut points and high measurement accuracy.
How to saw off internal and external corners?
When forming internal and external corners, there are some rules, if you familiarize yourself with them, there will be no difficulties in cutting the plinth. The internal corner is formed as follows:
- the miter box is placed on a table or workbench with the side facing you;
- the plinth is placed according to its left or right accessory, and is moved closely to the opposite wall of the instrument;
- the left element should be placed in the miter box on the left side, and the corner should be sawed off on the right and vice versa: the right parts should be placed on the right, and the corner should be cut off on the left;
- the cut is made without allowances, strictly along the outlined line;
- After the left and right corners are sawn off, both workpieces are combined and checked for tight fit of the parts.
The outer corner is formed somewhat differently, namely: the plinth is pressed not to the opposite side, but to its own side, after which the left part is installed not on the left, as was the case in the previous case, but on the right, and the corner is sawed off. Do the same with the right fragment: install it on the left and cut off the corner. When working with a miter box, you should remember that cutting the baseboards in both cases is done from the front side.
Types of miter boxes and their prices
Depending on the functional purpose, there are several types of miter boxes. As you can see in the photo, miter boxes differ in both the type of device, the material used, and the design. Professional and high-precision products include rotary and electric products.
Normal
This is the simplest and most common modification. If you wish, you can make a miter box with your own hands. It is recommended to buy for household needs, repairs, and a summer cottage. Most manufacturers produce such tools from plastic or wood. The design is a box and has a pair of side holes for a hacksaw. It is necessary to have slots at 45 and 90 degrees. With the help of a miter box it is convenient to work with baseboards, slats, platbands and beams. Pieces of drywall and plastic panels can be easily sawed. In some types it is possible to work with molding widths up to 120 mm.
The estimated cost of the model is 150 – 500 rubles. The advantages include low cost, the ability to fix on any surface, small dimensions and ease of transportation. Among the disadvantages are that:
- the dimensions of the workpiece are limited by the width of the wort;
- the smoothness of the cut is imperfect;
- inability to set the cutting angle;
- the number of slots laid usually does not exceed 7 pieces;
- You have to cut with short movements and the blade often jumps out of the grooves.
Rotary
The wort is equipped with a hacksaw made of metal or plastic measuring 29-60 cm. Thanks to this structure, it is possible to rotate the cutting surface by 15-135 degrees. The product allows you to change the angle in two planes simultaneously. This makes it possible to make a bevel on a workpiece of almost any size. Some craftsmen call the model precision. In addition to the saw, the kit includes an adjustable stand. The cost of the model starts from 2 thousand rubles. It is chosen for work of high complexity.
Electrical
In addition to the turntable, as in the previous model, the miter box is equipped with an electric saw. The most common type is a miter saw on an adjustable stand. This installation is often chosen for industrial enterprises and large production volumes. Non-standard devices include products that can be used to make dovetail fasteners. The models are compact. They are used as a template, located in the place of the workpiece where the groove is cut.
Universal
This miter box looks like a frame. It contains disks connected to each other. They act as guides. A saw is inserted between them and the angle is adjusted in two planes. Professionals rarely use this device. It requires additional configuration, and therefore time.
Magnetic miter box
The operating principle of the device is based on holding the hacksaw at an angle using magnets. On average, such an option will cost 400 rubles. More complex options are equipped with additional elements:
- A latch built into the body.
- Eccentrics. They look like holes into which fingers with tips resembling a rounded wedge are inserted. They press the workpiece tightly against the side.
- Inclined surface of the saw.
Choosing a saw or hacksaw for a miter box
First of all, before starting work, you should choose a hacksaw for the job in order to make a miter box. Actually, choose a miter box for the hacksaw, and not in the reverse order. A good and high-quality saw should have the following characteristics:
- have a thin blade;
- small teeth;
- good cruelty.
The presence of small teeth makes sawing wood neat and without flaws. The thin blade adds confidence that the material will be cut exactly along the line. Blades that are too elastic for a hacksaw are a significant drawback. It can be eliminated with a butt - a special rib of strength and rigidity. Miter box hacksaw - the photo shows all the features of this blade for the tool.
For sawing skirting boards and polyurethane, it is recommended to choose a metal saw. Such a tool has a perfectly smooth and thin blade, as well as the necessary rigidity, which is obtained by tensioning the blade. Also, a hacksaw for metal may be suitable for spraying template cuts, and in the beginning of the work of making the device.
Using a miter box at home
The easiest way to fit the skirting board strips is to cut it using a miter box. This device is a U-shaped structure (something like a box without one of the walls). Cuts are made in advance in the sides of the miter box, which are later used as a template for cutting both plinth and other materials.
For cutting skirting boards at an angle using a miter box, see this video.
The miter box has the following advantages:
- It allows you to accurately trim the edges of the plinth according to the finished template.
- It is easy to make with your own hands using four planks, a square and a saw. At the same time, template grooves can be cut to suit any taste, depending on the required type of work.
- With its help it is easy to form both internal and external corners.
The only drawback of this method applies only to those cases when the miter box is made by hand: it is necessary to extremely carefully, in advance, mark the lines for the template slots using a protractor, without deviating even a degree.
DIY miter box for ceiling plinth
Cutting a corner on a ceiling plinth using a miter box has its own characteristics. Maybe,
Popular materials
Different materials and their features
- . The most durable material in comparison with the other two below, the advantages of which are hardness, impact resistance and the ability to withstand certain mechanical loads. However, wooden skirting boards (another name is fillets) glued to the ceiling are also relatively easy to process - they can be cut (a hacksaw is used for this) and varnished. Wood will add warmth to the interior. One of the disadvantages is the higher cost than that of polystyrene foam. However, wooden fillets retain their appearance longer than foam fillets.
Styrofoam. Perhaps this material is the most fragile - it is not resistant to mechanical damage, scratches and even minor impacts. The advantages are light weight, the ability to be painted in various colors and ease of processing (it can be cut with a stationery knife - although very carefully).
Expanded polystyrene. This material can be considered a type of polystyrene foam, although its strength characteristics are slightly higher (extruded polystyrene foam is denser than polystyrene foam). As for processing, polystyrene foam is just as easy to cut with an ordinary sharp knife, and is also lightweight, and this is an important factor when taking into account the load on the walls.
Internal elements
How to carefully cut out the inner corner that is located on the ceiling plinth? After completing the markup, work according to the following algorithm:
- Place the bar in the bottom of the miter box so as to repeat the location on the surface.
- Press the plinth against the far wall of the miter box.
- Hold the product and pinch it with your free hand.
- Place the hacksaw at a 45° angle into the recess and make a cut.
- Trim the adjacent element using a similar method.
On a note! An internal corner made of PVC or polystyrene foam can be processed with a stationery knife or a hacksaw for metal.