Skirting is an integral element necessary to decorate a room and give it a complete and neat look. It can be made from various materials, but plastic skirting boards are especially popular now. It is easy to install, but even in this process there are some subtleties that are important to know about. How to cut a plastic skirting board correctly so that it can be neatly joined in the corners?
How to cut a plastic skirting board
Main types of floor skirting boards
Previously, skirting boards were made primarily of wood and were considered specifically wooden products. But now in hardware stores you can find decorative elements that are made from metal, plastic and other materials.
Floor skirting boards
Wooden plinth is a classic. It is a natural product, as it is made from solid wood. This type is distinguished by its high strength and durability - skirting boards installed back in Soviet times still serve faithfully in some apartments and houses. Now they are made mainly from pine wood, but there are also products from walnut, oak, ash and other species. However, due to this, the cost of the products increases - not everyone can afford such skirting boards.
Wooden floor plinth
Because of this, veneered skirting boards have appeared on the market - their prices are an order of magnitude lower. However, in appearance they are practically no different from products made from expensive wood. The fact is that their upper part, which plays a decorative role, is made of a thin layer of expensive wood. Without certain knowledge and experience, it is almost impossible to distinguish a veneered plinth from an ordinary wooden one.
On a note! To cut skirting boards - wooden and veneered - use a regular wood saw.
It is convenient to cut wooden skirting boards with a hacksaw
Plastic skirting boards, that is, made of PVC, are especially popular now. It has partially displaced conventional wooden products from the market, as it has a number of advantages:
- looks beautiful and neat - can imitate products made from natural wood;
- easy to install, flexible and very easy to cut;
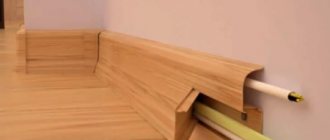
- can serve as a cable channel for laying wires;
- is not afraid of exposure to water, and also does not rot, mold does not grow on it;
- inexpensive compared to wooden or veneered products.
Plastic skirting board
Skirting components
Plastic plinth is made of polyvinyl chloride, which is passed through special molds under high pressure. After the mass hardens, a neat plastic product is obtained.
On a note! Some manufacturers decorate the edges of plastic skirting boards with rubber. This measure helps the product not to slide on walls and floors during installation and to adhere tightly to surfaces.
Plastic floor plinth
Plastic skirting boards come in several types - for example, used for carpet (they have a special shape in the shape of the letter L, they fix the material) or for linoleum . There are also universal products that can be installed on any type of flooring. They can also be classified depending on their hardness.
Table. Types of plastic skirting boards depending on hardness.
| View | Description |
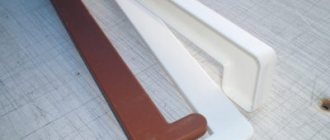
| Hard | The shape resembles ordinary wooden skirting boards and can be installed both near the floor and under the ceiling. The product is based on ordinary polyvinyl chloride, due to which the skirting boards have all the qualities inherent in this substance - strength, rigidity, various colors and moderate flexibility. However, if there is strong pressure on the fracture, the product can easily break. |
| Soft | This type of skirting boards in appearance resembles a flexible tape that is laid along the wall without the need for cutting, which makes installation much easier than in the case of rigid skirting boards. They are also made of PVC, but due to their modest appearance, they are not as popular as regular hard ones. Their main advantage is the ability to use them in rooms with uneven walls, and the products are glued with a special polyurethane-based glue or putty. |
Flexible plastic skirting boards
Cutting corners
At what angle the ceiling fillet should be cut directly depends on its location, or rather on what the slope will be - internal or external.
Cutting an internal corner using a miter box is performed in a strictly defined sequence:
- The required length of the plinth is measured on the ceiling.
- The workpiece strip is placed in the fixture as it will be on the ceiling surface. To perform the job correctly, the fillet must be positioned with its front surface facing up.
- The workpiece is pressed against the far wall of the device and held with your left hand.
- Next, the file is placed at an angle of 45 degrees so that its handle is as close to the left hand as possible. To cut down a ceiling plinth, cutting is done without applying too much pressure on the hacksaw.
- Then you need to prepare the counter plate, for which the workpiece is moved towards the far wall and held with the right hand.
- The hacksaw is turned at a 45-degree angle. In this case, the handle is directed to the right and part of the baseboard is cut off.
- After cutting the inner corner of the decorative fillet, the correctness of the work done is controlled by joining the planks.
By acting in accordance with the algorithm described above, you can cut the corners of the ceiling plinth with an accuracy of one millimeter without much effort.
To make a correct cut on the outer corner, you must proceed as follows:
- First, as in the situation with an internal corner, markings are made on the ceiling, making marks with a pencil.
- Next, the fillet blank is placed close to the near wall of the carpentry fixture.
- Holding the bar with your left hand, turn the hacksaw handle to the left 45 degrees and cut off.
- To saw off the counter element, you need to bring it closer to the front wall of the miter box, holding it with your right hand. The fillet is cut at an angle of 45 degrees, turning the handle to the right.
- At the end, the cut parts are joined and, if necessary, the surfaces are trimmed, creating a neat outer corner.
Methods for cutting plastic skirting boards
Cutting skirting boards is a seemingly simple, but responsible task. If the corners are cut incorrectly, they will not fit together correctly and all the work will go down the drain, since the product will no longer have a beautiful appearance - there will be gaps between two sections of the plinth and decorative inserts (corners, joining elements, etc.).
Most often, a regular hacksaw , which has fine teeth, is used to cut skirting boards. However, it is not suitable for thin skirting boards, since the product will simply tear under the influence of this tool.
Cutting plastic skirting boards with a grinder
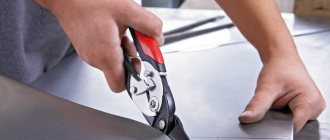
Sometimes the plinth is cut with metal scissors . But the method also has its drawbacks, because the product can wrinkle under the pressure of the blades. Less often, but still used, the grinder is also used. However, the cutting line after it may be sloppy, since the tool often “tears” the soft plastic. This method is especially often unsuccessful for beginners in the world of repairs who do not yet know how to fully control the work. So the grinder can be classified as a rather specific method.
Metal scissors
On a note! To cut thin baseboards, you can use a sharp knife or a utility knife. But such work requires some skill, so it is recommended to first practice on scraps of old plastic plinth.
The most important thing in the plinth cutting procedure is compliance with the required geometry. The procedure is never performed “by eye”; accuracy of measurements and accuracy are important here. Therefore, there are other methods for cutting skirting boards.
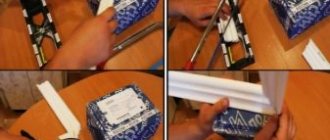
The absence of fittings suggests the use of other methods of connecting skirting boards. This is an option with and without cutting templates
Stencil cutting
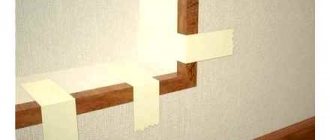
The method is recommended for cutting products intended for installation in non-standard shaped rooms with angles different from the standard mark of 90 degrees. Stencils of the desired angle can be made from paper or thin cardboard. First, strips are cut from the rough material, which have exactly the same width as the plinth. Next, they are applied to the corner and fixed, after which they are cut to the shape of the corner. Then, using the resulting stencils, the plinth itself is cut at the required angle.
Cutting plastic plinth using a stencil
Cutting with stencil
If the corners of the walls do not meet the required parameters, the stencil cutting method is used. To do this, you will need strips of thick paper or thin cardboard, which will serve as material for making a stencil. Based on the obtained parts, the cut on the plinth is marked. Considering that each angle can have a different degree, it is necessary to make an individual stencil for each.
Cutting plinth using a stencil
First of all, two strips approximately corresponding to the width of the plinth are cut out of cardboard or thick paper, which are applied to the intersection of the walls. The strips are fixed in the required position, after which the unnecessary part is trimmed with a stationery knife in one movement. The cut is made perpendicular to the intersection of the walls, so that at the end you have two equal parts of one corner.
Cutting floor plinths using a miter box
To properly trim the plinth, a special device was invented, which was called a miter box . It is a small block with a recess for the plinth and with gaps located at different angles - for a cutting tool.
Miter box
Using a miter box you can get neat and even cuts. The plinth is fixed inside the product, then the angle and cutting direction required in a particular case is selected.
Cutting skirting boards
On a note! If it is necessary to form a beautiful corner using a miter box, then one piece of plinth is cut at one angle, and the second - in a mirror image.
Making a miter box with your own hands
When working with a miter box, it is important to ensure that the edges of the plinth protrude a short distance beyond the edges of the selected slot. If the cutting tool has a larger width than the plinth itself, then it is recommended to securely fix the product inside the miter box before cutting. Otherwise, the plinth may move inside, the cut angle will constantly change, which is why it (the cut) will turn out incorrect and incorrect.
Making cuts for joining skirting boards using a miter box
Important! During cutting, the pressure on the baseboard should be moderate. Otherwise it may break.
Cutting with a rotary miter box
Using a ruler and pencil without a miter box
If you don’t have a miter box on hand and don’t want to make stencils, then you can try applying the necessary markings to the baseboard using a pencil. In the case of forming an internal corner, the width of the product is measured with a ruler, then the resulting value is deposited on the end part of the plinth, and a pencil line is drawn from its corner to this marked point, along which the cut will be made. The second plinth, which will form an angle together with the first, is simply cut along the first one attached to it.
Important! If the installation of skirting boards is carried out in a room with complex geometry, then all corners will have to be carefully measured to avoid mistakes.
Floor plinths in non-standard corners
Basic cutting rules
To ensure that your efforts in cutting PVC panels are not in vain, and that the result of the work meets your expectations, experts recommend adhering to a number of rules for working with plastic. These little secrets will not only help to significantly reduce the amount of spoiled material, but will also protect the craftsman from unnecessary financial expenses and injuries.
When carrying out work during the heating season, you should not start cutting panels that have recently been brought into the room. The plastic must naturally warm up to room temperature, which is achieved in at least 12 hours. The fact is that at low temperatures the plastic panel becomes brittle, and therefore can crack and break off in large fragments.
Regardless of the chosen method of processing the material, it should be placed with the front side facing you, which will avoid deformation of the panel and difficulties during its further installation. When cut from the reverse side, you can find microcracks on the front part, which will appear over time and significantly damage the interior.
It is necessary to mark in advance the straight line of the planned cut, which can be done with a simple pencil and a stationery ruler.
To speed up the process of preparing the material for installation work, you can cut or saw several PVC panels at the same time. To do this, just stack them and create a two-point support. It is best to rest the opposite edge of the stack against the wall, which will help avoid shifting of the products, and accordingly, the result will be parts of the same length.
Useful tips
Experienced craftsmen recommend starting the installation of the baseboard from the inner corner. At the junction of two walls, which form the internal corner, the cut on the baseboards will be equal to 45 degrees (in a room with correct and precise geometry). It is recommended to cut using a miter box - this is the only way to achieve a perfectly even cut.
Cutting floor and ceiling plinths using a miter box
Advice! If necessary, you can slightly adjust the plinths to each other using a sander or rasp, slightly “removing” their edges.
In general, in any case, the cut edges of plastic skirting boards should be sanded - this way you will be able to get rid of sharp edges and it will be easier to work with. And cutting of skirting boards with cable channels is carried out only after disassembling the product - the decorative strip, designed to hide the wires and places where the skirting board is attached, is cut separately.
The plinth is cut to the required size
It is recommended that immediately before installing the plinth, cut the pieces to the required length and shape the corners, so as not to be distracted by this procedure while assembling the plinth. You should not neglect the use of additional elements - plugs, corners and other products for the plinth. With their help, it will be possible to give the finished work a finished and harmonious look.
Advice! If the corners where the plinth is laid and joined are uneven, then you can even trim decorative caps and other elements if necessary.
This device makes it very easy to cut skirting boards at any angle.
Step-by-step instruction
To beautifully design a corner, you should first use ready-made fittings. Together with plastic floor skirting boards, manufacturers offer ready-made corners with sufficient plasticity. Thanks to this, they can be used to beautifully decorate different angles. The formation of the angle is performed in the following sequence:
- two pieces of plinth are cut to size. The ends are polished. The prepared fragments are inserted into the prepared fitting;
- the formed angle is applied to the place to be designed and carefully moved to the desired position.
- The floor plinth is secured with screws.
The internal corner can be designed in a similar way. If you decide not to use fittings, or there are no suitable ones on sale, you can arrange the pairing as follows:
- Measurements are taken right on the spot. To do this, draw a line right on the plinth along which the excess amount of material will be cut off;
- the excess amount is cut off using the selected tool. This can be either a manual or power tool. The main thing is to be able to use it. If the blade is not sharp enough, there is a risk of the material being crushed, which will certainly affect the appearance of the decorative element;
- elements cut to size are applied to the corner to check the quality of the mating. If there are minor deviations, the markings are reapplied. Excess amount is cut off. The steps are repeated until a tight connection can be achieved.
We invite you to watch a video that describes in detail the procedure for performing the work:
Perhaps this will simplify understanding of the process and allow the planned amount of work to be completed efficiently.
How to cut plastic floor plinths
If the angle in the room where it is planned to finish the joints of walls and floors with skirting boards is 90 degrees, which happens extremely rarely, then the cuts of the skirting boards should each have an angle of 45 degrees. This type of cut is the easiest to make, especially using a miter box. It is enough to insert the plinth into the miter box, then select a groove of 45 degrees and make a cut.
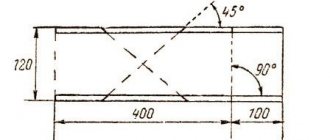
However, such 90-degree angles in rooms are extremely rare; they usually differ by several values in one direction or another. And in some rooms the corners may even be larger. Then cutting is done differently: markings are drawn on the floor with a pencil, where the border of the plinth location is drawn on one side and the other of the corner - you get a small rhombus . The diagonal of this rhombus will be the very cutting line of the product. Next, a plinth is applied to the markings, on which markings are made in accordance with the diagonal of the diamond. If you draw a straight line from this mark to the corner of the plinth, you get the very desired cutting line.
Cutting corners on baseboards
Advice! When cutting the baseboard, it is recommended to cut it a little smaller than necessary. In case of an error, this will allow you to correct the situation by slightly processing the edges of the product by hand and adjusting the plinth to the desired size.
The outer corners of the skirting boards are formed a little differently, or rather, in a room with ideal geometry, you can also cut the products at an angle of 45 degrees (but in a different direction) and after joining, close the edges with a cap. Non-standard corners are cut like this: one of the plinths is applied to one of the walls, its boundaries are marked with a pencil. The same procedure is carried out with another product - again there is a rhombus on the floor, the diagonal of which will become a guideline for cutting the products.
Decorating the outer corner of a plastic plinth
Cutting thin plastic sheets
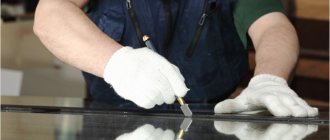
If there is a need to cut sheet polycarbonate or acrylic plastic, the thickness of which is 2-3 mm, then the best tool for this work will be a regular mounting knife with replaceable blades, used for cutting drywall. It is better to carry out the work on a hard, flat surface, securing the sheet to it with clamps. Accurate markings play an important role when cutting plastic. Do not forget that in case of an error, it will be impossible to correct the defect and the sheet of material will be damaged. A metal ruler or profile is placed along the line along which it is planned to divide the sheet, along which several passes are made with a mounting knife. You need to cut the plastic slowly but surely, making sure that the blade does not go to the side and plunges into the polymer to the same depth throughout the cut.
Instructions for cutting skirting boards
Let's look at how to trim a plinth using a miter box and a hacksaw.
Step 1. After all measurements have been taken, the plinth is placed in the inside of the miter box and pressed against one of its walls.
The plinth is placed in the inside of the miter box
Step 2. Using a hacksaw, trim the baseboard. The cutting (sawing) tool is inserted into the selected groove and a cut is made.
The plinth is cut
Cutting the floor plinth
However, sometimes it is enough to cut plastic skirting boards at a right angle - now a large number of various additional products for them have appeared on sale. For example, there are corners that will allow you to hide even cuts and decorate everything beautifully. For your attention - instructions for installing plastic skirting boards.
How to fix the baseboard? The answer is here!
In general, all existing methods for attaching skirting boards can be divided into two categories - installation by fastening to the floor and installation to walls. You will have to choose depending on the type of baseboard and the design features of the living space. Read more in this article.
Step 1. All measurements are taken - the required length for the plinth sections is determined. These values are deposited on two products from which the corners will be formed.
The required length of the plinth sections is measured
Another photo of the process
Step 2. The skirting boards are cut using a miter box and any cutting tool and applied to the walls - this is necessary to make sure that the products are cut correctly and have the required length.
Plinth pieces are attached
Step 3. If everything is done correctly, the baseboards are screwed to the wall using self-tapping screws and dowels. But before that, plugs or corners are put on their ends.
Drilling holes
A corner is placed on the baseboard
Step 4. At the outer corners of the plinth, they are connected to each other with special plastic devices.
Connection device for external corners
Connection of skirting boards for external corner
Step 5. The plinth is installed in its designated place and screwed to the wall with self-tapping screws.
External corner
Screwing a plastic skirting board
Step 6. Next, the cable is laid in cable channels. It extends under all the corners and caps.
Cable laying procedure
Step 7. The cable channel with the laid wires is closed with a decorative plug.
Installing a decorative plug
Step 8. External corners are closed with special corner plugs, which are simply placed on the edges of the baseboards forming the corner.
Decorative corner for outside corner
Prices for plastic floor skirting boards
plastic floor plinth
Video - How to cut skirting boards
Stencil cutting
If the corners of the walls do not correspond to standard parameters, then stencils can be used. For this, strips of thin cardboard or thick paper are used, from which strips are cut out that match the thickness of the selected plinth. They are applied to the junction of the corner and fixed there, then the unnecessary part is cut off using a stationery knife. You need to cut perpendicular to the intersection of the walls, so that in the end you can get two absolutely identical parts of one corner. The template is used if the wall corner does not meet the standard. The creation involves cardboard with a fine structure or thick paper. You should cut the strips with a thickness suitable for the selected baseboard. The cut piece should be applied so that the unnecessary part is cut off with a stationery knife.
How and with what to fasten
The simplest, least labor-intensive and fairly reliable method of fastening is the use of universal quick-drying adhesives such as “liquid nails”. The disadvantages of this method include:
- When dismantled (if necessary), the product will most likely be damaged, so initially it goes into the category of “disposable”.
- The inner surface of the fillet must have a wide enough flat strip to allow the required amount of glue to be applied.
Skirting mounting options
After all the preparatory activities have been completed, you can begin installing the plinth. The material of the walls will determine how the fastening will be carried out.
Fastening with hidden brackets
When choosing fastening with brackets, you do not need to nail the baseboard to the wall. The distance between fasteners should be calculated based on the curvature of the walls. For smooth surfaces it is about 50 cm. If there are uneven surfaces, the distance is reduced to 20-25 cm.
Fastening with hidden brackets
To mark, each bracket is pressed tightly against the wall in one line and the places where they are fixed are marked. Holes are made according to the marks obtained. Dowels are hammered into each of them, then clips are applied, which are secured with screws.
The baseboard is attached to the installed brackets. To do this, apply it to the clips and lightly press them into place. To install the next plank, its edge is inserted into the connecting fittings, previously put on the edge of the previous one, and then the product is also snapped onto the clip.
Dowel mounting
If the walls in the room are made of plasterboard, then the installation of the baseboard is carried out using dowels with self-tapping screws. You can use a dowel, which is popularly called a “butterfly.” A hole is made in the wall at the installation site. The dowel parts are pressed against it, and the element is installed in the hole.
There is another way to install the baseboard using dowels. It involves drilling holes in the profile itself, and in relation to these holes, drilling the wall. In this case, you need to use dowels with caps.
Installation with liquid nails
The simplest way to fasten skirting boards is with “liquid nails”. It is suitable for working with wood and plastic. Installation of skirting boards begins from the corner of the room. The adhesive composition is applied in separate drops at a distance of 3-5 cm from each other. Then the plinth is pressed tightly against the wall with the side treated with glue. After 5-8 minutes, final fixation is performed. With this technology, “liquid nails” set better. Upon completion of installation, a coupling is attached to the free end of the profile.
When installing with liquid nails, you need to consider some points:
- glued plinth cannot be reused;
- the wall for gluing the baseboard must be flat;
- it is necessary to be able to dose the glue used for fastening.
To avoid the appearance of glue drips on the floor and walls, the work must be carried out very carefully.
Nuances and installation technology
You can correctly handle the installation of floor plinths yourself, having first studied the features of this process
It doesn’t matter at all what material the decorative element is made of, the specifics of its installation are the same
Plastic skirting board
Plastic skirting boards are mounted to the wall using fasteners. With their help you can achieve a beautiful appearance of the room. Installation of PVC skirting boards begins with cutting them into elements of the required length.
It is recommended to start work from the inner corners or from the doorway. The elements that do not require cutting are installed first. Joining parts are used only if solid pieces are not enough.
The step-by-step installation of plastic skirting boards is as follows:
- A corner is put on the bar and applied to the wall. If necessary, the required length is cut.
- Using a drill with a drill bit with a diameter of 4 mm, shallow holes are made in increments of 30-40 cm.
- The holes made are enlarged with a larger 6 mm drill, the size of which corresponds to the plastic anchors.
- After installing the plastic anchors, the plinth is secured with screws.
All planks are mounted in a similar way. After installing the plastic plinth on the floor, the installation site is cleared of construction dust.
Wooden plinth
The installation method of wooden skirting boards is no different from the installation of plastic products. The only problem may be joining the panels in the corners of the room and adding a profile. Intermediate joining of skirting boards is performed at an angle of 45 degrees. At the joints, the thickness of the elements should be the same, and the wood should not have burrs.
An easy way to secure a wooden baseboard is to attach it to glue or liquid nails. You can also use special sticks with a round cross-section. They must be made from the same wood as the baseboard itself. With their help, the attachment points will be invisible.
Features of cutting various angles
We have discussed the general technology of how to cut ceiling skirting boards. But there are also some nuances when cutting different corners of this product.
Indoor floor
View of the internal corner
First, let's set the left and right plinths at right angles. We insert the left product into the miter box, applying it to the outside, and cut off the left inner corner. Then we perform a similar operation with the right one. Ready.
External floor
View of the external floor corner
In this case, using a miter box, we set the mode not to the inner, but to the outer edges. Otherwise the operation is similar.
External ceiling
View of external ceiling corner
We already cut the ceiling corners on the inside of the device. Inserting the left plinth into the miter box, cut off the left outer corner. We substitute the right one – the mode is right outer edge.
Internal ceiling
View of the internal ceiling corner
By analogy with the outer corner, we also cut the inner one. Just cut the inner left and right edges respectively.
How to cut plastic panels? 4 tools to choose from to help
When covering a PVC surface, you need to decide in advance and decide how to cut the plastic panels. Currently, as a decoration for a bathroom or balcony, this material is practically unrivaled and is very, very popular.
Someone may object and remember at least tiles as one of the most traditional finishing materials for bathrooms. Yes, tiles are a classic and a tradition. But PVC is easier and faster to install, requires much less maintenance, since it does not collect soap and sediment from water, and can be easily replaced in case of damage. In a word, tiles still give way to plastic panels. And if you need to quickly and efficiently sheathe services, now many people choose panels.
First of all, people fell in love with them for the availability of self-installation. It causes the only difficulty: the standard length of the strip of 3 meters is too long for most apartments. In addition, the height of the ceilings may vary - both due to the errors of the builders and due to the flight of the owner’s design ideas. So the finishing material needs to be shortened, which means trimmed.
How to cut plastic panels has long been invented. And these methods - both folk and modern technological - are diverse enough for us to choose: either the method that seems more convenient, or the one for which there is a suitable tool on the shelf. Let's take a closer look at several of the most popular methods by which this process is carried out. And let's take a closer look at each of them.
They significantly speed up the process and give a fairly even cut. Almost indispensable for longitudinal division. Like a hacksaw, they can process a stack of panels, as long as its height does not exceed the length of the working surface of the tool.
There is one “but”: at high speeds the panel begins to melt, which is why the edge turns out wavy, and unpleasant-smelling and toxic substances are released into the air. So work is carried out exclusively at low speeds.
In addition, you need to carefully measure your efforts, since all three instruments are quite heavy and, so to speak, aggressive. Using them too actively leads to damage to the panels. Considering these disadvantages, many craftsmen recommend using a regular, non-electric, jigsaw for cutting. It separates panels a little faster than a hacksaw, the cut is obtained without creases, is convenient for longitudinal cutting and is safe to use.
When using any tool, you need to fulfill some requirements. Moreover, this is in your own interests if you strive to avoid work-related injuries and unnecessary defects.
Before cutting panels brought in from the cold, they must be warmed. The main mistake of inexperienced finishers is to store the trim on the balcony and bring it in as needed, immediately starting to cut. PVC becomes brittle in the cold and the cut becomes splintered. Cracking along almost the entire length of the panel is also common. So after bringing the planks into the room, they are left to cure at least overnight.
You can cut (again, in any way) only with the inside down. If you place the panel incorrectly, its profile will wrinkle and cause installation difficulties. Panels from some manufacturers may have more significant defects: microcracks on the front surface, which do not appear immediately.
If you are cutting a stack of panels that need to be the same length, stack them on 2 supports to prevent them from sagging or shifting. It is advisable to rest the uncut end against something, at least against a wall. Otherwise, under the influence of the tool, the elements will shift and turn out to be of different sizes.
And one more thing: when cutting, it is advisable to use safety glasses. Especially when operating a power tool: the probability of a fragment flying into the face area is quite high. And if scratches on the hands are experienced by people indifferently, then an eye injury is much more dangerous. Naturally, it is up to the finisher himself to choose how to cut the plastic panels. However, before choosing one Honor tool over others, you need to know what difficulties you may encounter when using it. We tried to cover them in full.
Sources:
https://stroy-podskazka.ru/paneli-pvh/chem-rezat/ https://remtra.ru/164-chem-rezat-plastikovye-paneli-4-instrumenta-na-vybor-v-pomosch.html
How to cut skirting boards at inner corners: step-by-step action plan
Begin installing the skirting boards in one of the corners. If this is your first experience, choose the part of the room in which something will stand. Not always, of course, the first pancake is lumpy, but still it’s better to play it safe. To make a neat corner on the baseboard, work slowly. One was sawed off, checked, adjusted. Let's move on to the next one. It is better to fasten after two adjacent corners have been assembled. But you shouldn’t delay the assembly too much either.
Trimming skirting boards in corners requires certain skills. But by making a few joints yourself, you can beautifully design complex angles
How to use a miter box to cut baseboards? Place the device in front of you, preferably on a table, but it can also be on the floor. It doesn’t matter which way you turn it, it’s symmetrical. Insert the bar into the profile and turn it so that it will stand against the wall. When cutting down a floor plinth in a miter box, the “wall” is the wall that is farthest from you. Once again: firmly press the baseboard strip against the back wall in the position in which it will be installed. Insert a hacksaw into the required slots. You can start sawing.
First joint in the room
The first strip of the baseboard should be cut as close to the edge as possible. Carpenters have their own jargon and they say to "cut" a corner. It doesn’t matter what you call it, it’s important that we set the bar in the miter box so that we can make the cut at the very beginning. We push the bar a short distance beyond the cutting line, for starters maybe 1-2 cm. Cutting off a smaller piece is more difficult, so save the savings “for later,” when you have at least some skill.
In the miter box, we place the floor plinth against the far wall “facing” ourselves. This makes it easier to check whether you are cutting/sawing correctly
Next, you need to make a corner on the baseboard like this:
- We place the plinth in the miter box and press it against the wall opposite to us. We set it in its mounting position - as it will stand against the wall.
- We insert the hacksaw into the required slots (see the picture below).
- We move the bar so that it extends slightly beyond the cutting line.
- Let's cut it off.
- We take the second piece of plinth, repeat the same operations, but change the position of the saw on the miter box to the opposite. We insert the bar on the other side. Be careful here, otherwise you will have to redo it several times, as the connection will not work.
How to properly cut a floor plinth in a miter box: for external and internal joints
We received two sections sawn down for joining in the inner corner. To make the joint perfect, we try on the parts in place. Most likely, there are some flaws. Take medium-grit sandpaper and remove everything that interferes with joining. Then using fine grain we achieve a tight joint without cracks or gaps.
When connecting skirting boards in a corner, use transparent silicone sealant. Before installing the fasteners, a layer of silicone is applied to the cut. Immediately after the plinth is fixed, we remove the excess that appears on the outside. Clean until the surface is completely clean. This method of connecting skirting boards in the corners looks more neat and does not get clogged with dirt and dust.
How to file a corner of a plinth at the required distance
The second and all other corners of the baseboards must be done at a certain distance. If the next corner is again an internal one and the distance to it is less than the length of the plank, we use the same fragment that already has a notch on it. We measure the distance using a tape measure - strictly from corner to corner. Then this distance is laid out on the bar using the same tape measure. We align the beginning of the measuring tape with the protrusion, measure the required distance, and make a mark with a pencil. This will be the starting point for the cutting.
Miter box: varieties and methods of use
A miter box for cutting plastic skirting boards is a special device designed for accurate cutting at a certain angle. The simplest products are made of wood or plastic. In geometric shape, they represent a segment of an inverted U-shaped profile. The side walls have narrow cuts for a hacksaw blade. Until recently, the most common devices were devices with three cuts, allowing the end of the plinth to be cut at angles of 45° and 90°. However, the layout of modern apartments is very diverse and there is often a need to arrange different corners of the premises. Therefore, manufacturers produce products with a large number of slots designed to install the hacksaw blade at different angles.
The price depends on the size and material of the device. Thus, a plastic device from Stanley with a length of 310 mm, a width of 130 mm, a side height of 78 mm and the ability to saw at angles of 90°, 45° and 22.5° now costs 750-800 rubles.
The application algorithm is quite simple:
- Using a marker and ruler, mark the cutting line.
- We press the profile tightly against the vertical wall of the device so that the markings clearly coincide with the installation location of the saw.
- We carefully saw off.
You can cut plastic skirting boards with a hacksaw. This tool has its advantages: small cutting teeth and a slight gap. However, the low longitudinal rigidity of a narrow hacksaw blade can negatively affect the quality of the processed surface. It is better to use special axing saws (with a wider and stiffer blade) for this purpose. The hardened teeth can easily cut through plastic.
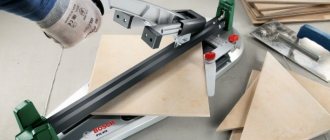
More complex designs consist of a base with clamping clamps (for fixing the workpiece). The kit already includes a saw mounted on special guides. The cutting angle can be adjusted within a wide range. The materials used to make the base are metal or impact-resistant plastic. But such devices are already more expensive. Thus, popular rotary models from Gross or KWB with a double-sided saw (size and sharpening of teeth for various materials), depending on the size, already cost 2200-4700 rubles.
Using such devices is very simple:
- set the required angle;
- We press the fillet to the frame using clamps, so that the markings are strictly under the saw blade;
- we make a cut.
And even if you decide to renovate only one room, then you should think about renting such a device and not worry about how to cut a plastic baseboard. Ease of use, speed and quality of processing will fully repay the money spent.
Choosing the optimal tool
What should you use to trim the material? This question arises for almost any novice builder. The cutting tool you choose will affect the straightness of the cut edge. Polyvinyl chloride skirting boards contain a structure with a hollow filling, therefore the use of tools containing large teeth or a wide wave is not recommended due to the high risk of chipping and numerous irregularities.
For skirting cuts, it is better to use a hacksaw. Its structure is characterized by sharp, fairly fine teeth and an acceptable working width. Using a hacksaw only applies to panels. A thin-walled plinth will take on an uneven shape due to the influence of the teeth.
A hand jigsaw is the best tool for cutting the corners of a ceiling strip.
Any plastic product will be cut absolutely straight. But the jigsaw has a drawback - its small size. This will greatly affect the speed of repair work due to the large number of canvases. Abrasive files should not be used when working with a jigsaw, as the first tool will significantly complicate the entire procedure.
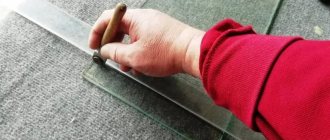
It is better to cut a thin-walled plinth using a regular stationery knife with a reinforced blade. Obtaining a clear and even cut will only happen if you have extensive experience working with a tool and material of this type, so it will be quite difficult for beginners.
How to make an angle on a plinth more or less than 90°
Not all angles are exactly 90 degrees. If the deviation is small, the cracks can be removed using sandpaper. In other cases, you will have to mark and cut taking into account the real degree. The main task in this case is to find the point on the floor where the two skirting boards will join.
Let's start by explaining how to properly cut an outside corner if it is not 90 degrees. We take the plank, place it against the corner on one of the sides, press it tightly against the wall - as it should stand. Draw a line on the floor along the bottom edge of the baseboard with a pencil. We apply the bar to the other side of the corner and do the same. The intersection of the two lines will be the joining point of the two baseboards.
How to join a plinth if the angle is less or more than 90 degrees
Now we attach the baseboard strip again and set it the way it will be attached. We make two marks: at the top at the very turn, at the bottom at the place where the straight lines we drew intersect. Now the important task: we need to make a cut along these marks. If you have a miter saw or a miter box with an adjustable saw angle, set it up and cut it. If not, carefully cut with a hacksaw. To avoid confusion, you can use a pencil to draw a line along which you need to cut. Similarly, mark and cut off the second part. We finalize the connection of the baseboards with sandpaper.
Few professionals process joints with sandpaper - this requires time and additional labor. But if you join skirting boards in the corners of your own home, with your own hands, you definitely want everything to be beautiful. This is why this manual finishing is required.
With an internal corner of a non-standard size, everything is exactly the same. Place the plinth in the corner and draw a straight line on the floor. Let's do it on the other side. We transfer the intersection point to the planks.
Working with ceiling skirting boards
Novice craftsmen often ask how to cut the ceiling plinth in order to correctly form an internal or external corner. Ceiling skirting boards cannot be cut accurately without using a miter box. This device allows you to cut at any desired angle.
Correct pruning can be done by strictly observing geometric shapes. Using a miter box makes it possible to obtain a perfectly even and precise cut.
Scheme of working with a miter box
The full set jig has grooves designed to cut workpieces at an angle:
To perform an operation during which it is necessary to install a plinth in a corner, you will need to cut the panel exactly to 45 ͦ. In this case, two parts put together will give a full 90 ͦ when creating both external and internal corners. For more information on how to properly cut skirting boards at the required angle, watch this video:
Cutting any plinth (ceiling or floor) is performed after determining the correct slope.
The location of the cut on the inner or outer surface of the part depends on the configuration of the angle itself.
In cases where the walls in the room are uneven and there are practically no strict corners, you should not use a miter box. It is better to cut the baseboards manually using a regular painting (stationery) knife.