Requirements for the design of the welding table
Before you start developing a drawing of a welding table, you should familiarize yourself with the requirements that apply to this type of structure. Among them:
- mandatory presence of a hood. It should not interfere with the work and at the same time effectively remove gases generated during welding;
- a supply fan is installed on the left side of the welder at a height of about 1.3-1.5 meters;
- it is necessary to provide copper edges on the welding table. It is necessary for quick cleaning of electrodes;
- Several drawers and hanging shelves are installed for tools and components;
- grounding fixtures;
- A sufficiently powerful lamp is installed to provide good visibility in all areas of the desktop.
During installation work, it is prohibited to use flammable materials or components with a high content of harmful impurities. When heated, they will be released into the air and could cause poisoning to the welder. The design of the table can be as simple as possible (a flat surface on four legs) or more complex - with additional devices and clamps. The choice depends on the frequency of use of the workplace and the complexity of the operations performed.
Welding table design
The design and layout of the workbench must be selected depending on the height of the person, the nature of the parts being welded, dimensions and weight. The most significant conditions ensuring comfortable work and handling of the welding machine are the following factors:
- Table height for welding work. When working while standing, the tabletop or work surface should be at the level of the welder’s belt;
- Tabletop dimensions. As a rule, for professional work, the width and length of the working surface is 70-75 cm. Maximum welding accuracy is achieved if the welding zone is no more than ¾ of the length of the welder’s arms;
- The dimensions of a welding table for working in a sitting position can be copied from a regular home stool or chair, but in this case the device must be equipped with a protective screen at a height of 70-80 cm to avoid sparks and hot slag getting on the worker’s legs and clothes.
Welding and assembly tables
Workbenches and tables used for simultaneous installation, assembly and welding work are conditionally excluded from the general range of welding equipment. Conventional tables, stands and workpiece holders are made, as they say, in the format of a bedside table; a small square tabletop provides convenient access to parts from any side.
In terms of dimensions and table top structure, welding and assembly tables are closer to metalwork benches.
The working surface is made of thick sheet metal with drilled holes for installing clamps, mounting clamps or measuring tools.
Additional devices for fixing workpieces may be located on the tabletop; for example, when carrying out welding work on voluminous parts made of thin rolled products, it is necessary to install supports, support plates, and tripods on the table to ensure reliable retention of the welded edges until the end of the assembly work.
Rotary welding table
A rotary workbench looks more like a piece of industrial welding equipment. The working surface is made in the form of a solid metal disk with a fireproof heat-resistant coating, raised above the table frame. The free outer edge of the disk allows you to fix the parts to be joined anywhere on the welding fixture.
As a rule, special beacons or markings are applied to the tabletop, allowing the axes of rotation to be aligned as accurately as possible and to avoid beating of the weld during the rotation of the part. This is the most complex version of the welding fixture, but sometimes you simply cannot do without such a table. For example, if you need to weld a circumferential seam on a cylinder, a round body of a potbelly stove, connect the blanks of two steel pipelines. In this case, the welding table must be equipped with a rotary belt drive. By rotating the tabletop, the welder can weld a heavy seam without changing his position relative to the fixture, which is very important for ensuring high quality welding.
Simple table for welding work
The simplest version of the table can be made according to the diagram shown in the photo. The base of the frame is welded from two sections of I-beam No. 70. Legs 60-65 cm high can be made from a square profile pipe. To make a tabletop, you will need ten meters of I-beam No. 50 or five profile pipes 40x60 mm.
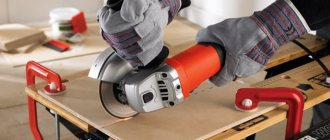
The pipe is cut into two halves with a grinder along a short edge, ground and welded onto the finished frame.
The result is a very reliable and convenient welding table on which most welding work can be done.
Semi-professional welding table
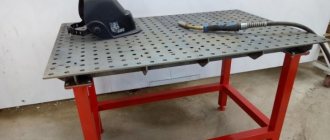
To perform welds in higher-level products, you will need a welding table of a more complex device. One of the models of modern devices is shown in the photo. Structurally, the table differs from any other only in the presence of height-adjustable supports and a special table top.
The working surface is made of perforated lamellas. A set of steel angles will ensure reliable fixation of even the most complex product configuration on the welding table.
Simple and semi-professional models of welding tables
The basis of the simple version is a rigid tabletop, to which vertical racks are attached. From below, at a height of 20 cm from the floor level, transverse reinforcement is welded to the legs. A table top is welded to the main frame, which has grooves for clamps and a welding cable bracket. Below the working horizon, a horizontal sheet is attached, which will serve as a tray for collecting waste. On the side of the table you can provide a set of vertical shelves for components and consumables. A container of water is also placed here.
The semi-professional welding table is equipped with additional equipment. Thanks to wider equipment, the welder will be able to perform other operations: drilling, grinding, milling, etc. Systems that provide forced air circulation can also be built into the table. The supporting posts of the structure are attached to the table, and the tabletop is made rotating. This ensures maximum convenience and high stability of the table when working with heavy workpieces. The package includes a vice and additional clamps. The inverter is installed on a separate turntable.
Varieties and drawings of the table
The design of the product is chosen taking into account the complexity of the upcoming welding work. When routine operations are rarely performed, simple schemes are used. To form complex metal structures, a professional welding and assembly table is required.
Simple welding table
Such furniture is stable, easy to assemble, and convenient to use.
The basis is a rigid frame, to which 4 racks from a corner or a pipe with a rectangular cross-section are attached. Cross bars are placed at a short distance from the floor. A tabletop with clamps for a vice is placed on top of the metal structure. A cable holder is welded to the frame, and a garbage tray is placed down. Additionally, a cabinet with drawers for placing electrodes is assembled. A platform for a tray with water is placed next to it.
We recommend reading: How to make an oscillator yourself
Semi-professional equipment
More complex options are equipped with additional elements.
Such workplaces are no less convenient than the previous type.
However, the scheme includes heads for drilling, stripping, and milling. The racks are attached to the floor with anchors or concreted. The rotary table allows you to create complex metal structures without moving. A rotating stand is provided to place the welding unit. The kit includes clamps and a vice.
Selecting a Welding Table
The choice of design option depends on the type of work that will need to be performed and the availability of free space. For a garage, a folding workbench is best. If there is enough free space, then it would be more practical to make or buy a stationary table with a turntable. For those who want to get maximum comfort, it is recommended to make a homemade welding table with a rotating work surface.
To perform complex repair work, additional equipment will be required. It can only be installed if the countertop has a sufficiently large area. To make the welding table as functional as possible, it is advisable to take into account the advice of practicing experts:
- The work area is fenced with vertical protection made of fire-resistant material.
- Sufficient structural rigidity is ensured when the table weighs 180 kg or more.
- Glare from lighting must be avoided. Therefore, it is not advisable to use energy-saving light sources, since the glass of the mask does not absorb them.
- A turntable is highly desirable.
- If it is not possible to equip stationary supply and exhaust ventilation, then it is necessary to provide at least a mobile fan with magnetic suction cups.
Dimensional drawings for welding tables
The following models and drawings of welding tables with photos have different manufacturing complexity, layout, and materials.
- The simplest table for welding work.
This design has a small size and load capacity, but allows you to process small parts if they need to be secured in a vice or with clamps.
The supports of the product consist of a corner with parameters 60x60x670 mm. For strapping or drawers, use a strip with a cross-section of 20x100 mm. The length of two fragments (on the longer side) is 1,000 mm, the other two (on the short side) – 620 mm. The strips are welded to the outer part of the corner so that the top edge of the strip is 20 mm above the top edge of the corner.
Inside the rigid frame, which is formed by the table supports with strapping, strips 20 mm thick, 580 mm long and 100–150 mm wide are laid and welded. The last indicator may vary, since such a run-up is not critical. To strengthen the structure, cross members are sometimes added 200–300 mm from the floor. They can be made from a corner so that, if necessary, a shelf can be placed on top of them.
Making a welding table from a profile pipe with your own hands
This is not only a real opportunity to save money, but also an excellent chance to tailor workspaces to the needs of a specific person.
Tools
The minimum set of tools that will be required when making a welding table with your own hands:
- tape measure, chalk, pliers;
- hammer, square, ruler;
- wire cutters and clamps;
- taps, grinder or, at a minimum, a hacksaw;
- welding machine, lathe or milling machine.
Welding table dimensions
You should not rely on industrial designs. Implementing such projects at home is very difficult, and sometimes simply unrealistic. However, they will be useful as a basis for drawing up your project. The drawing must indicate the dimensions of all structural elements. Basic ergonomic requirements:
- The working area is no more than 1 meter in length and 0.8 meters in width.
- The height of the working surface should be within 0.7-0.85 m from the ground.
- The total height of the welding table with a protective fence is up to 1.4-1.5 m.
Uncover
In the manufacture of the table, you can use both purchased and improvised materials. Required:
- 4 blanks for the shelf frame from a 25x25 mm corner. Length 46o mm, ends cut at an angle of 45 degrees.
- 2 sheets of metal measuring 445x750 mm for shelves.
- The legs will require 4 pieces of corrugated pipe 30×230×21.5 mm, 760 mm long.
- For the longitudinal frame of the table, you need to cut 4 corners 25x225 mm with a length of 760 mm.
- 2 pieces of profile pipe 60×240×25 mm, 1 and 2 meters long.
- 8 pieces of profile sections 40×230×21.5 mm, 720 mm long each.
- There are 4 wheel supports: 2 with stoppers and two without them.
- You will need 4 more corners 30x30 mm for greater rigidity of the table.
Welding table top
The frame is made from a profile pipe measuring 60x240 mm, and the tabletop itself is made from a profile 40x230 mm. The distance between the workpieces to be welded must be the same. In the future, clearances will be necessary for fastening parts with clamps and clamps. If it is necessary to extend the table for welding work, then a folding additional surface should be provided.
Legs
The legs are welded to the corners of the tabletop frame. To accurately align them, you should first grab the workpieces in two places, check the positioning accuracy with a square, and only then weld them “tightly.” Small straight plates are welded at the bottom of the legs, which increase the stability of the table and protect the floor surface from damage by the walls of the profile pipe.
Stiffness belt
The strength of the table increases significantly due to the installation of a stiffening belt. It can be welded from a 30x30 mm corner and attached to the legs at a height of approximately 25 cm from the floor level. This type of tying is done in a circle.
Protective screen
Such an element is necessary to prevent welding splashes from scattering to the sides. A protective screen is made from a corner and a steel sheet. It is advisable to do not only the front part, but also the side walls. The screen is removable for convenience when moving the table or working with large workpieces.
Wheels and handle
In cases where you plan to move the welding table frequently, wheels and a transport handle are simply necessary. It should be borne in mind that if four wheels are installed, they must have a locking mechanism. Otherwise, the stability of the work site will not be ensured. For ease of transportation, U-shaped handles are welded to the body.
Tool shelf
It is made of sheets of metal, along the perimeter of which a corner is welded. It is the base and at the same time a stiffening rib. The shelves are mounted on a wall or desktop. Ideally, a small tool trolley on two or four wheels is assembled from such shelves. To store small equipment and components, it is advisable to make one or two drawers.
Painting a welder's table
The final step in making a welding table with your own hands is painting work. Welding seams are pre-cleaned and treated with an anti-corrosion agent. If the paint will be applied by spraying (spray gun or spray can), then you need to protect the wheels, tabletop corners and other similar places. Otherwise they may jam. For decorative surface finishing, heat-resistant enamels for metal are used. Iron minium showed itself to be on the good side. After applying the paint, it is fired with a torch to improve heat resistance.
Manufacturing stages
Step-by-step instructions for making a welding table at home consists of several stages. The first block of work includes the construction of the tabletop, the second - the legs, the third - the protective box. The whole process is based on welding metal parts.
How to assemble a simple coordinate table with your own hands, tips for craftsmen
Working surface
The tabletop of the welding workbench is prepared in two steps: first - the frame, then - the surface itself. According to the drawing, the sections necessary for making the frame are cut from the profile pipe using a grinder. The ends of metal parts are cleaned of burrs. Then the profile is welded, maintaining a clear geometric shape.
Next, internal parts are cut from a profile pipe or channel, also focusing on the drawing or size of the finished frame. Before welding the table, the workpieces are laid out on the frame at a distance of 3–5 cm from each other. If these are not channels, but a profile, it is inserted inside the frame. The parts are fixed by welding and the seams are cleaned. Finally, handles made of rounded reinforcement are welded to the sides of the structure.
Cut the sections necessary for making the frame from the profile pipe
Clean the ends of metal parts from burrs
Cut internal parts, focusing on the drawing or size of the finished frame
Weld the table by placing the pieces on the frame at a distance of 3–5 cm from each other
Fix the parts by welding and clean the seams
Legs
According to the given table height, four racks are cut from the pipe. They are welded to the corners of the finished tabletop. It is important to maintain an exact angle of 90 degrees, otherwise the structure will be unstable. To do this, use a square.
Next, a crossbar is attached to metal tables for reinforcement. Stepping back 20–30 cm from the end of the posts, weld a corner around the perimeter. It is placed with its flat side on the inside of the legs so as to form a shelf stand. If necessary, wheels are attached to the bottom of the racks, and hooks for work equipment are attached to the top.
Cut four racks from a profile pipe to a given height
Weld them to the corners of the finished tabletop
Make a crossbar for reinforcement
If necessary, attach wheels to the bottom of the racks
For convenience, tool shelves can be included with the table.
Protective box
At the final stage of installation, a special monolithic pallet is made for the welding table. To do this, a workpiece is cut out of a metal sheet in dimensions exceeding the working surface of the workbench lid. The edges of the pattern are folded up to create low sides. The protective box is attached to the bottom of the tabletop at a slight slope. This screen plays a protective role during welding work. Slag and scale are collected in it. Thanks to this structural element, sparks and debris do not fall on objects lying below.
For convenience, you can add a large bedside table with shelves for tools to your welding table.
Make a monolithic tray and secure it to the bottom of the tabletop at a slight slope
Generally accepted rules and useful tips
The profession of a welder is one of the hazardous professions, since during operation of the welding machine the specialist is exposed to:
- negative effects of high temperatures;
- risk of injury from splashes of hot metal;
- harmful ultraviolet radiation;
- possibility of electric shock.
To minimize and even completely eliminate negative consequences associated with professional activities, you should adhere to the following rules:
- the workroom must be equipped with effective supply and exhaust ventilation;
- Before starting work, you should check the equipment for integrity of insulation, reliability of fasteners and contacts;
- During welding work, use protective equipment: mask, respirator, special clothing, shoes and gloves. Overalls must be made of fire-retardant material;
- It is not allowed to clutter the table and the space around it with foreign objects that are not used for this cycle of welding work;
- work from unsuitable supports is strictly prohibited;
- elements intended for welding must be securely fixed with clamps or clamps;
- If work is performed in rooms with fuels and lubricants, the distance to them must be at least five meters.
To ensure maximum comfort, the welder’s workbench should be equipped with auxiliary devices. The accuracy of welding depends, among other things, on the reliability of fixing the workpieces. Clamps and clamps should be an integral part of the welder's toolkit. Small workpieces that are difficult to fix mechanically are held using a magnetic field.
Safety precautions during welding work
Since all stages of the process are directly related to welding, standard safety rules must be followed. They relate to the placement and equipment of the welding station, special clothing, and the physical parameters of the devices. Safety precautions include the following points:
- The workshop must be equipped with a ventilation system. The room must provide for ventilation.
- If welding is carried out outdoors, the workplace should be under a canopy. At the same time, during heavy rain or snowfall, the process is stopped.
- The welder must be dressed in protective clothing, which includes a mask (visor), mittens made of split leather or suede, shoes and a suit made of non-flammable material.
- If welding parts made of galvanized metal is carried out, the craftsman needs a respirator to protect the respiratory tract.
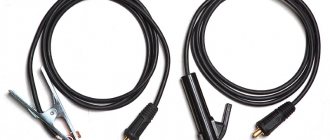
- Welding cables must have an intact winding, and high-quality insulation at their joining points. If a defect is detected, work should be stopped and the integrity of the wire restored.
- The length of the electrical cables leading to the welding machine should not exceed 10 m. The cords are suspended at a height of 2.5 m or lowered to the floor in a grounded steel pipe.
- The equipment can be used at a voltage of no more than 90 V. The optimal current for operation is no more than 0.05 A.
Tips for making a computer desk with your own hands, stages of work
For a craftsman who has the necessary skills, making a table for welding work is a simple undertaking. The main thing is to follow all safety rules, adhere to the prepared drawing and perform actions in a certain sequence. In this case, the end result will be reliable and stable, and the durable finished product will provide the welder with ease of work for many years.
The workshop must be equipped with a ventilation system, and the room must be ventilated
The welder must carry out welding work in special protective clothing
Welding cables must have an intact winding, and their connecting points must have high-quality insulation