A hair dryer can be used for many different purposes, but one of its main purposes is to dry your hair. Hair dryers come in different designs and price ranges. It is clear that a good device cannot be cheap. And if it breaks, and even at the wrong time, this is a reason for disappointment. But don’t throw away your device and run to the store for a new device. Most problems can be fixed on your own. Any person can easily cope with this if he knows how to disassemble a hair dryer, its features, what breakdowns occur most often and how to fix them yourself.
Internal organization
Before you start disassembling the device, it would be a good idea to find out what’s inside and what it generally consists of. In principle, this is a fairly simple device and there are not so many basic elements in it. Any hair dryer consists of:
- Electrical cord;
- Switch/mode switch;
- Motor;
- Impellers;
- Heating element;
Now you can clearly see that the device is designed quite simply. Self-repair is quite possible. Below we'll take a closer look at the main reasons why a hair dryer isn't working and what you can do to fix them.
For this simple job you need to prepare in advance:
- Multimeter;
- Screwdriver with replaceable bits;
- Electric soldering iron.
Expert advice
Experts advise adhering to the following recommendations:
- The cause of the breakdown is identified by diagnosing a hair dryer. It would be a good idea to disassemble the device, even if the defect is visible visually.
- In order to properly assemble the device after disassembling and fixing the problem, it is necessary to record all located parts with a camera. You can draw a diagram, but this is more difficult and requires a detailed, painstaking analysis of the constituent elements.
- When the device is turned on, a characteristic barely audible sound comes out. If it’s not there at all, or if creaks or rustling noises appear, then the problem is definitely in the engine.
Repairing hair dryers is quite easy if you do everything correctly. To do this, you need to follow a clear sequence of actions to identify the breakdown and quickly fix it.
How to disassemble a hair dryer
Now the tools are prepared, the desire to repair the device has not disappeared, but how to disassemble this device without damaging the fragile plastic?
But disassembling the case can be a problem, since the manufacturer is confident in the reliable operation of its device and is not at all concerned about quickly and safely disassembling its device.
The case can simply be held on by latches. And if you know where they are located, you can simply squeeze them out to open the patient.
The outer parts of the housing can also be connected using screws. But not ordinary ones, but non-standard ones, which can have several types of contact edges on the head:
- Plus.
- Star.
- Fork.
- Triangle.
There may be just one self-tapping screw, covered with a decorative sticker, and then both parts of the body are connected with latches.
You must be very careful and careful not to accidentally break off the latches. And it's very easy to do. It is enough not to notice the self-tapping screw or screw hidden under a sticker or decorative plug.
There are also hair dryers in which the handle rotates to several positions. This is where you need to be extremely careful and remember the order in which all elements are disassembled. Otherwise, reassembly may not be possible.
If all the screws are unscrewed and the latches are released, both halves of the device will be in your hands. Now you can begin to “treat the patient.”
How to make a hair dryer with your own hands
Such a tool as a hair dryer is little known to ordinary people. But those who use it for its intended purpose claim that it is very convenient and practical, in particular when performing home repairs. The cost of branded models is quite high. They provide various modes that can significantly simplify the workflow. However, as practice shows, many of the “bells and whistles” are absolutely unnecessary, and in order to perform basic heating of materials, you can make a construction hair dryer with your own hands, while significantly saving on the purchase.
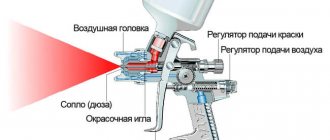
Electrical circuit of a hair dryer
The simplest model can simply dry your hair with hot air.
More complex specimens have three airflow options:
- warm;
- hot;
- cold.
There is also a “more/less” fan speed control.
The heating element in a simple version is a nichrome spiral thread.
If you look at the diagram:
It is clearly seen that after the current passes through the spiral, which has its own resistance, it loses its strength. Now he needs to get to the electric motor. But first it is straightened through a diode bridge and only then goes to the electric motor.
The motor is connected to the impeller. It is she who supplies outside air to the hair dryer body. Passing through a hot spiral, the supplied air warms up and exits this hair dryer through a nozzle.
The entire device is controlled by an external switch, which allows you to:
- Turn on/off the device.
- Adjust the air flow speed.
- Select heating or fan mode.
Modern models are equipped with protection that will not supply voltage to the heating element if the motor is not turned on.
There may also be a thermostat - it prevents the coil from overheating too much and will turn off the power supply in time.
If there is an electrical circuit for the device, we will repair your home hair dryer together, but in order to understand what is wrong, we will turn to possible malfunctions.
How the hair dryer works
The body of budget and most mid-budget devices is made of plastic. And not simple, but heat-resistant, capable of withstanding decent temperatures. More expensive premium models have a metal body. Unlike plastic analogues, the latter does not deform and heats up noticeably less during operation.
The purpose of the device is to heat the incoming air to the required temperature and dry the object, be it hair, in the case of a household appliance, or, for example, wallpaper, in the case of hair dryers. The latter can heat the air up to 650 degrees, while a good half of ordinary home models are limited to 80⁰C.
Hair dryers are equipped with various attachments
The versatility of the device is added by various attachments that are installed on the nozzle. Thus, the device can be turned into a hair dryer comb or hair dryer brush. In addition, the design of the nozzles can be very different, which significantly expands the scope of application of the device.
Possible faults
Despite its apparent simplicity, the hair dryer has some things to break:
- The power cord may have an internal break or short.
- The thermal fuse has failed.
- The resistor has burnt out.
- A breakdown of the diode bridge has occurred.
- The capacitor has burnt out.
- The mode switch itself is broken.
- The cold air switch is broken.
- The motor shaft is jammed due to hair being wrapped around it.
- The motor shaft bearing is jammed.
- The engine itself burned out.
- Broken nichrome spiral.
- Closing the heating coil.
- Carbon deposits on a spiral.
- The fan blade broke off.
This is the entire list of possible faults.
We will focus only on typical breakdowns that we can fix ourselves.
Characteristic signs of a faulty device:
- The device does not turn on;
- The device turns on, but the fan does not spin or gain speed;
- When running, the engine sparks and smells burnt;
- The hairdryer only blows cold air.
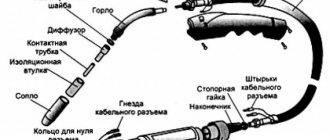
Electrical circuit for an INTERSKOL hair dryer on a DB230V board
Hairdryer Interskol FE-2000. DB230V board with triac and optocoupler. Photo in analysis.
DB230V board. Closer photo.
Hairdryer Interskol FE-2000. DB230V board. Connection diagram
DB230V board_connection diagram. Option 2.
DB230V board_electrical circuit diagram. In the circuit, there is an underdrawing - between the point Gx and the connection point of the spirals R1 and R2 - a thermal fuse is turned on (see the table with the list of parts above). In addition, the thermocouple output is connected incorrectly, see comments.
04.03.13: I am posting for public use the electronics diagram of the DB 230 V board, which was sent to me by a reader who wished to remain anonymous:
Interskol FE-2000 hair dryer circuit on DB-230V board
Connection of the old and new hair dryer board, interchangeability of terminals:
- N3–S2
- N1–S3
- N2–S1
- N–GX
We begin inspection and repairs
As we have already said, it is quite possible to disassemble the device yourself if you are extremely careful and follow the procedure.
Device repair is also subject to its own logic, which we will discuss below.
Cord
If the hair dryer does not turn on, the most logical first step is to check if there is current in this outlet?
If everything is in order with the outlet, proceed to checking the power cord. Kinks and twists are common causes of power cord failure. When the hair dryer is disassembled, the contact points of the wire to the mode switches are also carefully inspected. To carry out this procedure you will need a tester.
If the wire is damaged, there is no point in repairing it. It is necessary to replace the entire wire and plug.
Attention! The most common place for a wire to break is at the entrance to the hair dryer body.
After such a technical inspection, we connect the device to the network and check the result of the work performed.
Switch and switch
We also check the power button itself. It should turn on smoothly and without jamming. There should be no traces of carbon deposits or melting on the switch contacts.
The three-position switch will be checked by turning on each mode separately. Before checking the switch, it is worth marking all the wires so as not to confuse the reverse connection locations.
Clean damaged areas with fine sandpaper and resolder with a soldering iron.
If the switch itself fails, the best option is to replace it with a new one. But if it is not possible to find a new switch, another option is to bypass it and connect the power wire bypassing the broken switch. Since there will no longer be a power button, the device will turn on immediately after connecting the device to the outlet.
Fan
The fan is responsible for generating air flow. On the back side of the case there are special openings for air intake. The fan impeller is made of lightweight but durable plastic and rotates on a metal rod. This metal axis, on one side, is a continuation of the electric motor, and on the other hand, it rests on a special hole in the device body, which acts as a support sleeve. It is the impeller that takes in outside air through the holes in the hair dryer body and drives this flow towards the nozzle.
The most likely cause of reduced fan performance:
- clogged holes in the housing;
- hair is wrapped around the impeller shaft;
- One of the impeller blades broke off.
There are two options for solving the problem of a clogged air duct:
- If the device is equipped with a replaceable filter, you need to remove it and try to clean it thoroughly.
- If dust and debris have accumulated in the air intake cracks, everything can be successfully removed with a toothbrush.
If hair is wound around the fan shaft, it is better to remove the impeller and carefully remove the obstacle so that it rotates freely.
Attention! When cleaning the fan shaft, do not use excessive force to avoid damaging the shaft or impeller.
Spirals
Let us repeat once again, the material from which this heating element is made is nichrome. As soon as current is supplied to the nichrome spiral, it begins to heat up and makes the air passing through it hot. In normal mode, the hot air temperature is between 50–60 °C.
More advanced models have several such spirals that provide different air heating modes.
Typical manifestations of heating element failure:
- There may be a burning smell when the device is running;
- The air coming out of the nozzle is either too hot or completely cold.
These signs indicate that the heating element is faulty. All these breakdowns can be eliminated if the hair dryer is carefully disassembled, inspected and tried to detect the source of the malfunction.
If, after the device has been disassembled, you need to carefully inspect the heating element for integrity.
If burnt areas of the thread are found, it can either be soldered or two opposite ends twisted. Alternatively, crimp both ends of the spiral with a thin copper tube.
But we must warn you that, based on the experience of using nichrome spirals, such repairs can extend the life of the hair dryer, but not for long.
If possible, it is best to replace the burnt out spiral with a new one.
Important! You need to understand why the part failed in order to eliminate the cause of this problem in the future.
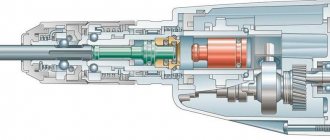
Engine
Electric motors on hair dryers can be in different versions - 12, 24, 36 volts.
A special additional electronic circuit reduces the voltage of 220 V. Thus, the level of danger of electric shock is reduced.
If the engine stops working, there are two main reasons for this malfunction:
- The supply wire is broken;
- The electric motor itself has failed.
We have already written above how to repair the supply cable with a plug, and the following symptoms indicate a malfunction of the electric motor:
- After turning on the engine, you can hear a slight crackling sound;
- The motor is unstable;
- There is a smell of burnt wiring;
- The fan does not rotate and a slight hum is heard.
If you suspect that the electric motor has burned out, the chances of repairing it yourself are zero. You can try to disassemble the motor, but where will you find the necessary part later?
Give it to a workshop? This is also not an option - repairing the device may turn out to be unprofitable. It’s easier and more profitable to buy a new hair dryer.
Chip
In professional hair dryers, operating modes are controlled using microcircuits. Everything is a little more complicated here. If you have skills in working with electrical circuits, you can try to find the cause of the problem yourself and fix it:
- The getinax substrate may crack and break the contact track. If a gap is found, it can be repaired using a soldering iron.
- A characteristic swelling can be seen on a faulty capacitor. When burned out, the resistor may darken. If a burnt part is detected, the fault is eliminated by replacing it with a new one.
Thermostat
This part protects the entire device from overheating.
If there is a thermal fuse, it can also cause poor operation of the coil. Its performance can also be checked with a multimeter. If it shows an open circuit, the fuse must be replaced - it cannot be repaired.
But there is an option to repair the device by excluding the temperature sensor from the general circuit, bypassing the wires past it. The device can be used for some time if it is not overloaded.
What kind of breakdowns can occur?
Problems with buttons and switches
The hair dryer buttons get stuck due to carbon deposits and oxides appearing on the switch. These defects prevent electrical current from passing through the contacts. To identify a malfunction of the switch and button, use a multimeter.
To do this, in ringing mode, you need to touch the button terminals with the probes. If the device is turned off, it should not make any extraneous noise. Whistling is especially suspicious. When you turn on the first - second modes, a barely audible sound should be made when the switches are in good condition. This is the reason: other nodes in the system are faulty.
After disassembling the hair dryer, you need to clean all connecting contacts that have rust on the surface or other elements that have fallen from the outside. Sometimes it is enough to replace the switches with new ones for the device to work properly.
Network cable fault
It is impossible to visually detect a faulty network cable.
Damage occurs to the cores inside the insulation, which are not at all visible from the outside. Damage to the wire occurs both due to mechanical reasons, for example, squeezing the wire by a door, and due to long-term operation of the device at maximum power. The core overheats, burns out, and as a result, the copper material becomes brittle and brittle.
You can use a multimeter to diagnose the breakdown of this part, following the instructions:
- the hairdryer is disassembled;
- The dialing mode is turned on on the multimeter;
- One probe from the multimeter is connected to the plug contact;
- the second probe is applied one by one to the contacts on the terminal block;
- if any of the contacts gives a signal during such manipulation, it means that one of the cores is still working, and the problem lies in the other core;
- the probe is connected to the second contact of the plug, and the procedure continues;
- The multimeter should make a sound when you touch the second terminal block.
Attention
Poor contact in the wire can also cause the hair dryer to malfunction. The device switches itself off regularly. Interruptions in operation can be corrected by replacing the network cable.
Commutator motor malfunction
To clarify the problem with the commutator motor, you need to use a multimeter. They are ringed and then connected to a constant voltage source of the required value. The board with the diode bridge is disconnected if there is no source of alternating voltage of the required magnitude.
To test the electric motor with a multimeter, you need to connect the output contacts of the device to the probes. The resistance that appears is a signal that the winding is not damaged. The engine is faulty when it makes unusual sounds. In this case, you can hear a clicking or grinding sound.
You need to disassemble the device and remove the engine. It can be repaired by cleaning the connecting parts. Long-term operation can cause engine springs to become clogged. But the problem may lie elsewhere. The engine may be produced by the manufacturer with a defect that cannot be corrected using improvised means. It is necessary to change the commutator motor to a more reliable one.
The board and the spiral are burnt out
Diagnosis of a malfunction of the spiral and board is performed according to the following scheme:
- the heating element is removed from the metal flask;
- the wires are inspected to see if they are connected to the contacts of the heating element coil;
- at this stage you can already see a possible breakdown: oxidation of contacts or disconnection of one of the wires;
- in resistance measurement mode, turn on the multimeter and connect it to the contacts of the spiral;
- violation of the integrity of the nichrome thread is determined by the zero value of the device: the spirals must show resistance.
Attention
As a result of using an electric hair dryer, the nichrome thread loses its original characteristics and does not have its inherent properties. It becomes fragile and disables many of the component elements of the device - the board and the spiral are the first to burn out.
If the spiral is broken and damaged in different places, then it must be replaced with a new one. A simple break can be eliminated by connecting two parts of the spiral. To do this you will need to use small bolts and nuts.
Problems with the board depend on the model of this element used. Outdated models contain only one board - a diode bridge rectifier. It can be fixed with a simple soldering iron. If the hair dryer is equipped with an inverter board, then upon inspection you can detect a malfunction. Burnt out parts have a darkened color. A soldering iron removes all unnecessary plaque.
Little tricks
There are standard requirements for the safe operation of an electric hair dryer, which can push the boundaries of trouble-free operation of the device, without contacting service centers:
- There is no need to wrap the electrical wire around the handle of the device and generally try to avoid twists and loops on the wire;
- Use only those attachments that were supplied with the device;
- Do not use the device in rooms with high humidity to prevent water from entering the hair dryer body;
- If the distance to the outlet is too large, only factory extension cords can be used;
- It would be a good idea to protect the air intake area with a fine-mesh filter to prevent dust particles and hair from getting inside the device;
- Do not carry the hair dryer, holding it suspended by holding it with your hand by the cord;
- If even minor interruptions occur, further operation of the device is prohibited;
- Avoid excessive overheating of the product;
- After work, you need to let the device cool down and only then put it away for storage;
- The electric hair dryer must be stored in a dry and ventilated area;
- Follow basic safety rules when repairing electrical appliances;
- Repairing a hair dryer requires electrical skills. If they are not there, it is better to entrust the work to professionals in specialized workshops.
Let us repeat once again - independent repairs are possible if all work is carried out especially carefully. This is always true for electrical appliances.