A screwdriver is a tool that is often used at home. The device consists of various parts that, if necessary, have to be removed and replaced. The question of how to remove the cartridge from a screwdriver is quite relevant, especially for those who often use it.
Manufacturers produce different models of screwdrivers that differ in design
Design and main types of cartridges
A chuck or head is a metal cylinder that is attached to the screwdriver shaft. Its task is to reliably fix the working bits under the fasteners. The cartridge is fixed to the shaft using a thread or a special cone. According to the type of fastening, clamping elements are divided into:
- quick-clamping;
- self-clamping;
- gear-crown, they are also cam.
The difference between the first two types is only in the way the bit is clamped. In a quick-release chuck, the shank is twisted and clamped manually. Modern drills and screwdrivers use clamps to fix shanks with a diameter of 0.8-25 mm.
Quick-release
A BZP type device consists of the following parts:
- nut with teeth;
- clamping bearing;
- washer;
- sleeve;
- sponges;
- sleeve.
BZP heads are divided into single-coupling and double-coupling. The first type is used in screwdrivers with a locking device. Thanks to it, the clamping device can be rotated with one hand, since the second part of the housing is fixed motionless. With double-clutch cylinders, both hands are used.
In a self-clamping sleeve, the bit with the drill is automatically clamped while turning. The risk of turning the drill when working with such a screwdriver is almost zero. When the cams are loosened and tightened, the device makes a clicking sound.
Self-clamping
You cannot tighten the jaw chuck by hand - you need an L-shaped wrench. It is inserted into the groove perpendicularly. The ZVP type, that is, a toothed chuck, is considered less convenient to install, but provides a more reliable clamping of the bit. This is a type of cam type clamping cylinder. This head consists of three main elements - a cylindrical body, a rotating outer ring and an internal cam mechanism. The mechanism, made of durable steel, consists of 3 cams, which close together when the ring rotates.
Cam
Operating principle and main components
Before you start repairing a screwdriver with your own hands, you need to understand the principle of its operation and what parts it consists of. The main difference between a screwdriver and other power tools is the use of a mechanism that stops the rotation of the working part of the device. This happens when the maximum resistance configured for the instrument is reached. This value is not constant and can be adjusted. There are two types of device:
- operating from a 220 volt network;
- using a rechargeable battery.
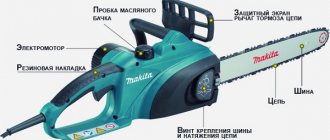
Regardless of the type of device, their operating principle is the same and is based on the transmission of torque. It determines which fastening tool the screwdriver can tighten. To increase torque, devices use gearboxes with a large gear ratio, but the rotation speed is reduced. For screwdrivers operating on AC power, the torque value is related to the power consumption of the tool. The main parts underlying the device of a screwdriver, be it Makita, Hitachi or Bison, are as follows:
- electric motor;
- push button;
- speed controller with reverse;
- chuck;
- the electronic unit;
- gearbox
The electric motor rotates the spindle at a set speed using a planetary gearbox. The torque is controlled by a clutch, and a chuck or hex holder is placed on the spindle. A replaceable device called a “bit” is installed in this cartridge. The screwdriver is controlled by an electronic circuit and reverse switching.
Reverse occurs by changing the polarity of the power supply. The motor is a single-phase continuous current commutator motor. This motor is designed to be connected to an alternating current network. The field winding is connected in series with the armature winding and is divided into two parts. One turns on before the anchor, and the other after it.
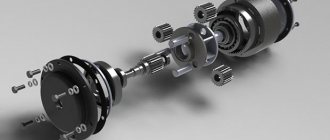
The tool uses a planetary type gearbox. The gearbox includes sun and ring gears, satellites, and carrier. The electric motor shaft rotates the sun gear, which transmits torque to the satellites, and they directly affect the carrier.
The gearbox is available in one- and two-stage types. In the second case, a double carrier connected to the shaft is used. The design of two carriers and satellites is located in the middle of the ring gear. It is fixed through special grooves on the body. Along the entire perimeter, the lugs of the ring gear rest against spring-loaded balls through the ring. The load control mechanism acts on the ring through a controlled spring, the force of which is changed by moving the regulator.
Speed control is performed using a pulse circuit assembled on a pulse-width modulation (PWM) chip. The controller controls a field-effect transistor operating in switch mode. The pulse frequency is changed using a variable resistor. The resistance value of the resistor depends on the force applied to the button.
The screwdriver clutch is a ratchet. If the load on the cartridge exceeds the permissible value, the load regulator is activated. The spring force becomes insufficient to hold the ring gear, and it comes off the balls. The electric motor begins to rotate the gear idle. When switching to electric drill mode, this gear is turned off and does not participate in the work.
The battery consists of several elements installed in one housing and connected in series. The case has a special latch that allows you to quickly remove the battery.
Options for attaching to the screwdriver shaft
The chuck is attached to the tool shaft by:
- thread. To do this, the threads of the cylinder and shaft must match. A metal cylinder is screwed onto a shaft.
- fixing screw. The fastening also requires tightening, and the screw itself only strengthens the contact between the cartridge sleeve and the shaft. It has notches for a Phillips screwdriver and a left-hand thread.
- Morse cone. One of the oldest fastening methods. The screwdriver shaft has a cone shape, and the same groove is made inside the sleeve. When the outer and inner cones fit together, the head is securely seated on the shaft.
Morse taper devices
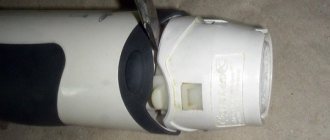
Brushes for Makita screwdriver
The brushes used for the screwdriver have a graphite base. Their cost today varies between 2–5 USD. e. They are located in the electric motor housing and consist of two graphite cubes mounted on metal plates. With intensive work, they wear out and wear out.
When doing DIY repairs, you can sharpen them with a file from brushes from another tool, for example, a car starter. After recessing, they should be inserted into the brush holder and put in place, assembling the engine.
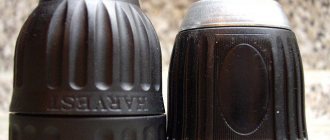
Standard sizes and markings
Before disassembling the screwdriver, it is necessary to determine the type of cylinder mounting. The marking will tell you this. An inscription of the form 1-6В14 indicates the type of fixation Morse taper, where the numbers before the letter are the diameter of the bit shank in millimeters, and after that the size of the conical hole. There are 9 articles – from B7 to B45.
For cartridges with threaded fastening, markings of the form 1.5-13 M12x1.25 are provided. Here the numbers before the letter also show the permissible diameter of the tail of the bit, and after the letter there are thread sizes in millimeters.
Important! Foreign screwdrivers use markings in inches - it looks like this: 2-13 1/2 - 20 UNF. 1/2 means inch, and 20 means the number of threads per inch.
Threaded cylinder
How to remove the head from a screwdriver
It is recommended that the cylinder be removed periodically for routine cleaning and lubrication of parts to extend the life of the power tool. The removal method depends on the type of attachment to the shaft and the model of the screwdriver. Read more about how to remove the chuck of different types of fastening from Makita, Metabo, Bosch screwdrivers.
Removed head
On a note! You only need to disconnect the cylinder from the shaft with a screwdriver that has cooled down after work.
With fixing screw
Removing the head with the fixing screw is carried out in the following order:
- The screw is located between the clamping jaws. You need to open them completely and unscrew the screw clockwise with a Phillips screwdriver.
- After this, a suitable size hex wrench is placed in the cams. It must be turned sharply and strongly counterclockwise.
- If the clutch of the cylinder with the shaft is very strong and the key does not help to separate it, you will have to additionally help with gentle blows of the hammer.
The screw is here
With Morse taper
Sleeves of this type are disconnected from the screwdriver by knocking the shank out of the conical socket with a hammer. But this standard method may not give results. Then you need to disassemble the screwdriver. The shaft with gearbox and chuck is removed, and then the clamping cylinder should be unscrewed with a pipe wrench. Nuts on a sleeve with a Morse taper are an extremely rare phenomenon.
With threaded fastening
You will need a 10mm L-shaped hex key. It must be placed between the cams, securely fastened and rotated. Next, you should start the screwdriver at low speed and immediately turn it off, pressed against a support - for example, a table or wall. It is against the support that the free part of the L-shaped hexagon should hit a couple of moments after starting the power tool. As a rule, after this the fastening is loosened and the cylinder is carefully removed.
Removing the head with a threaded fastening is shown in the video:
Advice! If none of the three options helps, the screwdriver must be disassembled.
Removal from a disassembled gearbox
If the screwdriver gearbox fails, you will need to remove the cylinder to get to it. This is done like this:
- Unscrew the fixing bolt inside the sleeve.
- Find the gearbox, put the head on the back side of it, and securely fix it. The head diameter is usually 19 mm.
- With your other hand, carefully unscrew the cylinder counterclockwise.
Elimination of mechanical breakdowns
Mechanical breakdowns of a screwdriver include malfunctions of the ratchet, gearbox and chuck of the device.
Ratchet repair
If the ratchet on the screwdriver does not work, you will need to disconnect it from the gearbox to troubleshoot. Sometimes special rods are installed in the coupling, which regulate the force, and in some devices, instead of rods, 2 balls are installed in each hole. They are pressed by a spring, which, when the adjusting ring is tightened, presses on the balls.
In most cases, repairing a screwdriver ratchet consists of cleaning its components from dirt and applying new lubricant.
Screwdriver gear repair
If unusual noises are heard in the gearbox, or the spindle rotates jerkily, with slipping, then the fault may be faulty gears of the mechanism, ground off teeth on its body.
In the next photo you can see the gearbox structure.
The reason that the spindle does not rotate when the engine is running may be wear of the plastic teeth inside the gearbox housing.
To restore the functionality of the mechanism, it is necessary to disassemble the gearbox (it is better to photograph the disassembly process) and screw in a small bolt ground to the required size in place of the worn teeth. The place where you will install the bolt must be marked. It should be located strictly opposite the plastic tooth located on the inside of the case.
Make the same markings on the back side of the case, opposite the first.
Next, drill holes in the marked places.
Screw bolts of the required length into these holes, first grinding them down so that they are flush with the other plastic teeth. After adjusting the bolts, you can assemble the gearbox by applying the required amount of lubricant to the gears. At this point, the repair of the screwdriver gearbox can be considered complete.
Keyless chuck repair
To begin repairing this unit, you must first remove the chuck from the screwdriver. To do this, complete disassembly of the screwdriver is not required. How to unscrew the quick-release chuck was described above.
Frequent chuck malfunctions include incomplete exit of one of the jaws, as shown in the following photo.
The cause of the malfunction may be a worn thread on the nut that clamps the cams, or worn teeth on the cams themselves. To verify this, you will need to disassemble the cartridge.
Disassembling and repairing the screwdriver chuck is done as follows.
- It is necessary to hit the part protruding in its center with a hammer. In order not to deform this part, you can lay a small piece of wood.
- Separating the top will not be sufficient and further disassembly of the cartridge will be required. To do this, you need to lightly clamp the bolt into your fists and hit it with a hammer.
- When the inside of the cartridge falls out, its disassembly is considered complete. You will see a nut consisting of 2 halves. Most often, malfunctions in the cartridge occur due to this part. The thread on it wears out and the cams slip when tightened. Therefore, incorrect alignment of the latter occurs.
Also, the threads can be worn out on the cams, which, like the nut, need to be replaced. But if you do not find the necessary parts to change them, you will need to completely replace the cartridge. When assembling the cartridge, the cams must be installed at the same level, in a compressed state, after which a nut consisting of 2 halves is put on, and after that the entire structure is placed in the housing. When the problem is fixed, you can assemble the screwdriver.
How to disassemble a cartridge
Once the cylinder is removed from the screwdriver, you can begin disassembly. The first step is to remove the plug in the base. For a plug made of plastic, careful prying with a knife is enough, but the metal part must be knocked out by hitting the base of the cartridge and turning it by hand.
You need to hit here
This requires a large bolt. It is placed in the sleeve and lightly clamped with fists to fix it in the center. At the same time, he should not get stuck, but move freely back and forth. The head of the bolt should protrude 2-3 cm from the cylinder. Then a gentle but pointed blow is applied to the bolt with a hammer, and then the metal plug is removed.
Next, the actual disassembly of the screwdriver chuck begins. The design of any cylinder consists of unchanged main parts:
- sleeves;
- grounds;
- washers;
- bearing;
- nuts
Second parsing option
If it was not possible to disassemble the cylinder using the indicated method, it is worth trying another one. Many models of screwdrivers are not designed for unwinding, so this option will not work and will only harm the chuck. One of the disassembly methods involves the use of a hammer drill or drill. The action instructions are as follows:
- Take a hammer drill or impact drill, insert a bolt or broken drill with a diameter of up to 12 mm into the tool.
- Place the head on the bolt or drill with the side opposite the jaws.
- Unclench your cams, rest the cylinder against a solid, stable base - a wall, floor, etc. Between the cartridge and the support there must be a shock-absorbing layer - rubber or foam.
Disassembly using a hammer drill
- Start the hammer drill or drill in impact mode.
The vibrations will cause the sleeve to fly off the sleeve, revealing the remaining parts. After cleaning or replacing elements, the head can be easily reassembled.
Important! When assembling, it is important not to confuse the location of the cams.
Disassembling the quick-release head
BZP or self-clamping cartridges can only be disassembled up to a certain stage, since beyond that, irreversible damage can be caused to the device. The analysis proceeds according to the following algorithm:
- The groove between the two halves of the plastic coupling must be pushed apart along the entire circumference using a knife or flat-head screwdriver using gentle prying movements. The main thing is not to damage the case.
- Once the coupling is in place, the lower part can be easily removed by hand.
- After this, the cams are moved apart until they stop, and a long bolt is inserted into the cylinder.
- You need to hit it with a hammer until the upper half of the coupling falls off.
- There is no need to disassemble further. The cartridge does not have a body; it can be coated in all places.
Reassembly proceeds in the following sequence:
- Upper part of the coupling.
- Using a hammer, press the corkscrew washer into the groove between the coupling and the cylinder through a wooden board.
Groove for corkscrew washer
- Manually put on the lower part of the coupling - the cartridge is assembled.
A detailed analysis of the quick-clamping cylinder is shown in the video:
The nuances of removing, disassembling and replacing heads on screwdrivers from different manufacturers
The design of the screwdriver chuck is such that the procedure for its removal, disassembly and replacement is generally the same and standard for all models. The differences are only in the subtleties for each company.
- Makita
Household tools from this manufacturer are often equipped with a plastic head. It should be removed carefully, because the risk of damage is higher than that of a metal sleeve. Quick-clamping devices on Makita screwdrivers are usually single-socket.
- Bosch
The cylinders on Bosch screwdrivers are designed similarly to Makita and are removed and disassembled in the same way. The only difference is that Bosch has a fixing screw in the cylinder. It must be unscrewed clockwise.
- Bison
To replace the cartridge, you need to unscrew it clockwise from the shaft.
Removing the head on screwdrivers of the Interskol, Hitachi, DeWalt, Metabo, and Vikhr models is not very diverse. The procedure is:
- Unscrew the fixing screw using a Phillips screwdriver. It is recommended to lightly lubricate the pre-unscrewed element with WD-40. This will not only loosen the strong clamp, but will also dissolve any rust if there is any.
- Clamp an L-shaped hex key of 10 mm or more with the short side into the chuck.
- On the long side of the hexagon, it is worth applying one pointed blow with a hammer in a clockwise direction. It is necessary to hit the hexagon, and not the cylinder itself: this can break the clamping device and deform the screwdriver shaft.
- After the impact, you can unscrew the cartridge by hand.
You only need to hit the hexagon
Screwdriver chuck: description, function
The cartridge is a metal cylinder with a cavity inside, equipped with a ring and a control sleeve. It is fixed to the shaft. With its help, the drill or grinding attachment is securely fixed in it for further work. The fixation of the working part of the tool (drill) is ensured by the thread. The drill is tightened in two ways. The first method is to tighten it with a special wrench; in the second method, the drill is tightened when the chuck is rotated in the direction opposite to the axis of rotation of the drill.
How to disassemble a screwdriver chuck
Despite the fact that today there are many models of screwdrivers on the market, they have the same general approach to removing such an element as a cartridge. Now we will briefly describe it.
In order to unscrew it, you need to remove the screw securing it to the shaft. It is located inside the cartridge; the screw should be rotated clockwise. After you have unscrewed the screw, you should jerk the cartridge in the opposite direction.
Attention! If you try to unscrew it manually, you must set the drill to second speed if it is two-speed. When purchasing a tool, it is advisable to lubricate the screw with machine oil. In some cases, when this element does not want to give in, then you should put the tool on first speed, hold it in your palm, and turn the reverse to the left. The cartridge should come off the thread easily.
How to replace a screwdriver chuck
It will not be easy for an untrained user to replace it, since without the help of a special tool you will not be able to do it with your bare hands. There are two ways in which it can be removed, and we will consider them further in our article. In order to change it, you should pay attention to the actions that we described in the article above. Dismantling is performed with the following tools:
- A hex key is usually a 10mm L-shaped metal rod. Its short part should be fixed in the chuck, the long part should be rested against something, for example, a table. We turn the cartridge, and then remove it by turning the key.
We looked at the dismantling method using a key.
The method to remove the element manually is described above. Important! In especially severe cases of jamming of moving elements, you will have to completely disassemble the tool body and remove the spindle with gearbox and chuck. To do this, you will need a vice in which you will clamp the tool, and a pipe wrench with which you will unscrew the chuck. Tools designed for inserting a wrench make this task easier. But they are not found on all models, so you will have to deal with it using the above method.
How to repair a clamping cylinder
Often the reason for removing and disassembling the screwdriver head is to repair individual parts and eliminate defects. Read more about how to do it yourself at home.
With backlash
If the deviation of the sleeve during operation does not exceed 1 mm, then this is not critical. If there is more play, you will need to disassemble the device. Repairing a screwdriver chuck for this case is performed as follows:
- Unscrew the fasteners on the top cover of the tool and remove it.
- Disconnect the engine from the gearbox and carefully check all fastenings.
- Disassemble the gearbox. If the bushing fails, then it is the cause of the strong play. This part must be removed manually and replaced with a new one.
Disassembled gearbox
- Next, you need to lubricate all the rubbing elements and assemble the gearbox back in a clear sequence: bushing - shaft - bearings - retaining ring.
- The gearbox is attached in place to the engine.
- The top cover of the screwdriver is screwed back.
When the cylinder runs out
If there is beating of the chuck in the screwdriver, the reason also lies in the gearbox. It must be dismantled, disconnected from the electric motor, disassembled, and carefully inspect all the parts. A broken cartridge case is a consequence:
- violations of shaft geometry;
- wear of gears, pins;
- failure of the shaft bearing.
After identifying the broken elements, you need to purchase new ones, install everything correctly, assemble the gearbox back and attach it to the engine.
When jammed
Another common problem is that the cartridge begins to jam. This is caused by the jaws losing full clamping over time. To repair the head, there are several methods:
- Carefully lubricate the cylinder in all places - perhaps this is the only reason.
- Squeeze the cartridge in your hand and hit it hard 1-2 times on a hard wooden object - a beam or a stable table.
- Compress the body with a vice and the cylinder with a gas wrench. Place the screwdriver against the table with the chuck and turn it on.
Often the head jams after it becomes clogged with sawdust and other small debris. If there is a suspicion of clogging, the cylinder should be thoroughly heated with a hair dryer, or even better, held over an open fire for several minutes. The part is then thoroughly lubricated.
When scrolling
If the cartridge rotates, then the problem is most likely due to the abrasion of the teeth on the locking coupling. The problem is solved like this:
- Remove the coupling.
- In place of the ground teeth you need to drill small holes.
On the left is the coupling and its teeth.
- Insert screws into the holes. Their protruding parts are removed with pliers.
- Return the coupling to its place and check how the cylinder now moves.
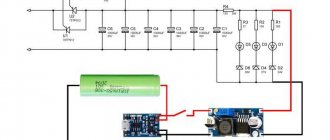
A little about how to convert a battery from cadmium to lithium and who needs it
Let's talk about how to convert the battery yourself from one type of battery to another. There are many videos on the Internet on this topic, where they talk a lot about the advantages of using lithium in a screwdriver. However, unless you use the tool intensively and constantly, there is absolutely no point in using a lithium battery. Lithium-ion batteries tend to “age” faster than cadmium, and simply will not have time to exhaust their service life under conditions if the tool is used occasionally.
Converting a screwdriver battery using lithium batteries may be necessary for professional craftsmen who use the tool every day and need powerful power sources. Of course, if you really want to, you can solder the battery to lithium, but whether this will be advisable is up to you to decide. Read more about which batteries are best for a screwdriver →
Thus, you can not only disassemble the battery of any screwdriver, but also solder two bundles into one, which will last as long as possible, and you will not have to buy a new battery in the near future.
The performance of a converted battery, provided the elements are properly soldered, will be no worse. The main thing is to treat the process with patience and maximum care, so that during the first experiment you can finish the job with minimal losses and solder everything correctly. If you manage to collect everything, this will be an additional incentive to continue your experiments in the field of electronics. Assemble the battery yourself once - and you can save on buying new batteries for your screwdriver in the future.