Sawing purposes and suitable tools
Depending on the purposes of sawing, we select what can be used to cut plywood most effectively. Among the tools used for work are the following:
- electric circular saw;
- hand saw;
- electric jigsaw.
Let's consider the features of using various tools for cutting plywood and in what cases it is more advisable to use one or another device.
Hand saw
When cutting plywood with a hand saw, physical effort is required due to the significant density of the material. This tool is used when it is necessary to cut a sheet of plywood into identical fragments.
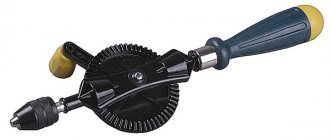
A hand jigsaw is the best assistant in processing plywood sheets
A hand jigsaw is considered the best tool and allows you to decide in advance how to cut plywood without chipping, eliminating the need to purchase electric tools. It can be used to produce a small number of elements of complex shapes. Having certain skills in working with a jigsaw, you can make a neat cut, however, due to high labor costs and low productivity, this method cannot be called optimal.
Hand saw for plywood
If you don’t have electric tools or a simple jigsaw at hand, you should resort to using a simple hand saw. To make cutting a sheet convenient and to avoid chipping, the tool blade must have a large number of small and well-sharpened teeth. The angle of the saw to the plywood sheet should be sharp. It is recommended to avoid jerking and make even movements with strong pressure.
Circular Saw
Sheets of plywood can be created into various shapes using a circular saw or circular saw, but the main purpose of these tools is to create square cuts. When cutting material, it is very difficult to get a neat cut because the rotation speed of the discs is very high. In this regard, preference should be given to those cutting wheels that have small teeth and are used for working with wood. When processing plywood, it is good to use cutting wheels designed for sawing chipboard.
A cutting wheel with fine teeth will prevent the formation of large chips
Tip: when cutting a plywood sheet, make sure that the pressure on the sheet is insignificant and the rotation speed of the disk is low.
Circular Saw
When making furniture or repairing it, you often have to choose what to cut laminated plywood with. To get a clean cut, you need to select discs or blades that have frequent and fine teeth. The angle of their sharpening, as well as the shape, is of great importance. It is advisable to select discs with a positive sharpening angle and different tooth shapes (alternating trapezoidal and straight teeth are observed). If the disk has negative sharpening angles, then it is necessary to reduce the speed, otherwise the wood will burn.
A relationship has been established between the size of the chip and the saw teeth: small ones leave less damage than large ones. The amount of tooth set affects the cleanliness of cutting plywood. The best result is achieved with minimal wiring. You can check this parameter using a regular ruler. You should not saw a thick sheet using a disc with minimal tooth spacing, since increased friction will cause it to burn and the disc will become pinched.
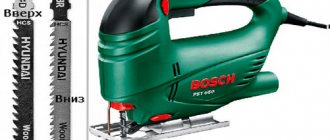
Electric jigsaw
An electric jigsaw is best for cutting any plywood. When working with this tool, you should use small files, cut the blade, pressing the jigsaw and avoiding jerky movements. Upon completion of the process, the ends of the material are processed using sandpaper.
A jigsaw will make sawing easier and make a high-quality cut of the sheet
You should not purchase low-quality tools, since after a cut 5 meters long, the cutting edge becomes severely dull, which causes chips to appear. The absence of setting and the opposite sharpening of teeth located next to each other and the small width make it possible to make complex figured cuts. But these qualities of files for finishing cutting cause the fragility of the blades.
Plywood saws are the key to successful sawing of the material
Finish cutting of plywood can be done using blades for working with metal parts. The size of the teeth of such saws is minimal, which greatly slows down the cutting speed, but allows you to achieve the highest quality. Since the width of the metal files is large, it is possible to carry out a figured cut only with a large bending radius (0.6-0.8 m).
How and with what to cut plywood without chipping
Anyone who is going to make a piece of furniture from a plywood sheet, for example, a stool, a carved box, a cabinet or a rocking chair, asks what should be taken into account when working to make the product reliable and attractive? Many people are also interested in how to cut plywood (using a jigsaw or saw).
Sheet material should be cut on a rigid installation to avoid shaking of the treated area
To answer the question of what is the best method for cutting plywood and how to do it correctly, you need to familiarize yourself with all the aspects and subtleties that should be taken into account in the process in order to achieve a good result before work.
Edge processing
In order for the edges to turn out without chipping, you need to choose the right tool
:
- Needle files are used when cutting complex shapes. Thanks to them, the edges can be made round or angular. The set includes triangular, flat and round files.
- For coarse products, you can get by with two files, flat and round.
- When plywood sheets need to be processed before rough finishing the walls, use a flat gusset. With its help, the master will clear the ground from chips.
- Small parts are sanded with sandpaper.
- Another way to achieve straight edges is to tape the cut path together with duct tape as you cut.
Protecting the edge from chipping with insulating tape
Sawing Tips
How to cut plywood correctly to avoid chipping along the edges? To avoid such problems during operation, you should consider some nuances:
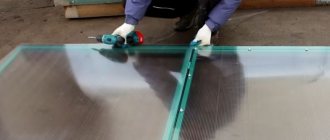
- How to cut plywood with a jigsaw/saw to make the job easier? Several clamps will help a beginner master in this matter. Thanks to them, cutting will be much easier. It is much more convenient to control the material and tools when the sheet is firmly pressed to the table. Thanks to the reliable fixation of the plywood, damage to the table itself can be avoided.
- Drawings of any product can be found on the Internet.
- The drawing from the letter to the plywood can be copied.
- How to cut plywood with a jigsaw to avoid chipping? When working with a hand jigsaw, you should always make sure that it moves perpendicular to the nap.
The correct position of the jigsaw in relation to the workpiece
Tips for working with manual and electric jigsaws:
- When working with an electric jigsaw, follow the angle of the platform. Most often this can be customized.
- When cutting out simple shapes, you should monitor the position of the blade. The cutting should occur from the front of the figure's outline.
- If the cut is made along a straight mowing line with a scythe, then you should focus on the pointer (to the platform). If there is no pointer, the outline should be drawn with a pencil.
- To cut a complex hole with an electric jigsaw, you need to make a hole in any part of its outline. The diameter of the drill should be greater than the width of the blade.
We pierce a hole for the entry of the jigsaw with a special awl
- If you are going to make a hole with a hand jigsaw, then the part should be pierced with an awl. Then you should lay the canvas through it. After the part is fixed in the frame again.
- If an electric jigsaw is used, then during the work the tool is returned, not a sheet of plywood (if you need to return it according to the drawing). Working with a hand jigsaw, return the plywood.
- If you need to cut out a shape and a sheet of plywood with cutouts, cut the cutouts first (turning the sheet over is much easier than turning a small piece).
- During operation, care should be taken to ensure that the material does not overheat. When the edge gets hot, you need to pause for a while to let the file cool down. Otherwise, the teeth will lose aggravation.
- The fabric should be well stretched. Otherwise the file will break.
Finally
If you take into account all the subtleties and nuances when working, then the result of all negative aspects can be avoided.
Edge processing
In order for the edges to turn out without chipping, you need to choose the right tool
:
- Needle files are used when cutting complex shapes. Thanks to them, the edges can be made round or angular. The set includes triangular, flat and round files.
- For coarse products, you can get by with two files, flat and round.
- When plywood sheets need to be processed before rough finishing the walls, use a flat gusset. With its help, the master will clear the ground from chips.
- Small parts are sanded with sandpaper.
- Another way to achieve straight edges is to tape the cut path together with duct tape as you cut.
READ How to Cut Laminated Chipboard Without Chips Using a Jigsaw
Protecting the edge from chipping with insulating tape
Hand electric saw
- Saber. An alternative to a jigsaw, but more suitable for quickly cutting off excess without creating an equal and neat edge.
- Disk. It is used most often because it allows you to carry out large-scale work. The disadvantage of the device is that cutting is only possible along a straight line.
A reciprocating saw is not designed for precision cutting, so it can only be used for rough cutting of plywood, while a circular hand saw is considered one of the best options for such work.
It is better to cut plywood to the specified dimensions using the latter option, taking into account some application features:
- Adjustable insertion depth minimizes edge damage.
- Small format carbide blades with closely spaced teeth are suitable for the job.
- Ease of use. The tool is lightweight and does not require a special installation platform.
When choosing an appropriate disc, you need to pay attention to the alignment of the teeth: a small discrepancy is convenient for thin materials, a large one. For thick plates.
Anti-splinter liner
This is a special pad for a specific brand of jigsaw. It is simply inserted between the legs of the jigsaw and is not secured in any way. The insert adheres to the nail file, so it does not allow the nap of the top layer to rise (causing chips), so the file turns out smooth. At the same time, experts advise using files from the same manufacturer as the jigsaw. So the quality of the cut will be better with the use of an insert.
Headphones are sold in sets of 3-5. They don't last forever. They have to be changed periodically. There are inserts and plexiglass
There is such an insert, for example, for a Bosch jigsaw, about four hundred rubles.
If you haven’t found an insert for a jigsaw or don’t want to buy one, then the craftsmen have a little life hack. Apply regular tape to the area where you will cut. After this, the tape should be smoothed well with your fingernail. Then I saw it right above the top of the tape. After that, delete it. The result will be similar to the liner.
A circular saw
This device is a cutting wheel mounted on a table, so it is similar to the tool described above. Cutting plywood using this device is not difficult, and you can only cut straight, which ensures that parts of a certain format are obtained.
To work with circulars, the following nuances must be taken into account:
- For the process, only special discs with a large number of teeth (at least one hundred and sixty by five cm) are used.
- To quickly and accurately cut out the desired part, you need a stop, which is a movable rod of an even shape. This is true for all cutting devices.
- The need to equalize the gap between the disk and the mounting hole. The fact is that the gap does not allow sawing without the appearance of chips, so a special overlay is used or a platform is made from a furniture board or a sheet of plywood.
- It is desirable to be able to adjust the position of the disk. It is taken into account that the teeth should not protrude more than twenty-five mm.
Such a device is rarely used for cutting plywood sheets. To cut wood panels, a circular saw is most often installed on the tool, which does not provide complete safety at high speeds. In addition, greater power requires greater effort to hold the device in one position. You can cut the desired section of glued veneer board using a grinder, but using the tool throughout the entire work is highly not recommended.
Sawing Tips
How to cut plywood correctly to avoid chipping along the edges? To avoid such problems during operation, you should consider some nuances:
- How to cut plywood with a jigsaw/saw to make the job easier? Several clamps will help a beginner master in this matter. Thanks to them, cutting will be much easier. It is much more convenient to control the material and tools when the sheet is firmly pressed to the table. Thanks to the reliable fixation of the plywood, damage to the table itself can be avoided.
- Drawings of any product can be found on the Internet.
- The drawing from the letter to the plywood can be copied.
- How to cut plywood with a jigsaw to avoid chipping? When working with a hand jigsaw, you should always make sure that it moves perpendicular to the nap.
The correct position of the jigsaw in relation to the workpiece
Tips for working with manual and electric jigsaws:
- When working with an electric jigsaw, follow the angle of the platform. Most often this can be customized.
- When cutting out simple shapes, you should monitor the position of the blade. The cutting should occur from the front of the figure's outline.
- If the cut is made along a straight mowing line with a scythe, then you should focus on the pointer (to the platform). If there is no pointer, the outline should be drawn with a pencil.
- To cut a complex hole with an electric jigsaw, you need to make a hole in any part of its outline. The diameter of the drill should be greater than the width of the blade.
We pierce a hole for the entry of the jigsaw with a special awl
- If you are going to make a hole with a hand jigsaw, then the part should be pierced with an awl. Then you should lay the canvas through it. After the part is fixed in the frame again.
- If an electric jigsaw is used, then during the work the tool is returned, not a sheet of plywood (if you need to return it according to the drawing). Working with a hand jigsaw, return the plywood.
- If you need to cut out a shape and a sheet of plywood with cutouts, cut the cutouts first (turning the sheet over is much easier than turning a small piece).
- During operation, care should be taken to ensure that the material does not overheat. When the edge gets hot, you need to pause for a while to let the file cool down. Otherwise, the teeth will lose aggravation.
- The fabric should be well stretched. Otherwise the file will break.
Our subscriber experience
Vladimir shared his method of making a fragmentation insert. More likely, it’s not even an insert, but a whole sole for a jigsaw
He simply took a piece of tin one mm thick and made a hole in it for a file. I screwed the piece with the existing holes into the legs of the jigsaw. The cut turned out to be perfect though, as you can see in the photo. Big tooth file.
To get the perfect fit:
- Select a fine tooth file.
- Turning off the pendulum.
- If possible, adjust the anti-burr liner or make a strong sole.
- They sawed the plywood from the back.
READ How to Cut Laminated Chipboard Without Chips Using a Circular
Disable the pendulum action on the jigsaw.
A number of modern electric jigsaws have settings that help cut wood faster. The sawing speed increases significantly. However, the quality of the cut suffers and chips appear on the surface.
Application of adhesive tapes
To protect the back side of the processed material, adhesive tape (tape, electrical tape, fiberglass) can be used. To do this, you need to glue the tape along the cut mowing line, which saves the material from pulling out large fragments.
Surface pasting. One of the most effective ways to ensure the cleanliness of a figured cutout is with a jigsaw. But masking tape is not suitable for these purposes due to its fragility. A high-quality cut can be obtained by covering the cut material with aluminum or fiberglass tape. It should be wide enough so that at least fifteen centimeters of the surface of the material is covered on each side of the cut. In addition, the density of the sticker is important. The tape should be pressed gently with a dry cloth and wrinkles should be avoided at all costs.
Do not use tape with very strong adhesive, as during the tearing process it may carry small fragments of the laminated surface or MDF panels. In addition, severe peeling of the tape will increase microcracks that have already formed during cutting. You need to pay attention to how easily traces of glue are removed and the adhesive has high adhesion for working with rough materials (laminated plywood and OSB).
Ensuring a clean cut
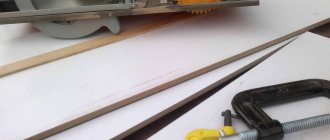
For many parts, it is enough to reduce the chip size to 0.5 millimeters. Such minor edge irregularities will not be noticeable, and if desired, they can be easily eliminated completely by beveling with sandpaper or covering the chips with a correction pencil. In addition, you can sand the end side with sandpaper.
First you need to make two cuts 0.5 mm deep on both sides of the part to indicate the future cut thickness. Make two equal furrows along the edges of the cutting line. This can be done with a slanting shoe or segmenting knife (for wood without chipboard or chipboard), or with a sharp drill bit and winning cutter (mostly for laminated materials).
Teeth and their shape
Miter saws "bison" zpt
The capabilities of the saw depend on its shape and the size of the teeth. A large number of teeth on a given length of blade means a fine cut but slow forward progress. A small number of teeth produces a rough cut.
Wood is made up of fibres, and when sawed they separate. This creates sawdust that needs to be removed. The finer the teeth, the faster the cut and the cutting edge of the saw become clogged with small sawdust - saw flour. The teeth can no longer grip wood to its full height. Sawing is becoming more and more tedious and, most importantly, unproductive. But large teeth almost never get clogged due to the greater distance between their tips and each other.
Almost any saw has teeth that are set apart, that is, their tips alternately deviate to the left and then to the right. The greater the angle of inclination, the wider the cut strip, and therefore it becomes less clogged with sawdust, and the saw jams less.
Over time, saw teeth become dull and need to be sharpened. In this case, the damaged wiring must be restored. Even for a specialist this is not an easy job. Therefore, we recommend purchasing saws with hardened teeth. They don't get dull as quickly, and they are easier to sharpen than the teeth of a regular saw.
You just need to put the saw blade on the table and use a sharpening stone to run it twice along the cutting edge from the end to the handle, then turn the blade over. The saw is sharpened, you can start working.
Steep teeth for rip sawing
This is how the teeth are positioned on almost all hand saws, including hacksaws and back saws.
The cutting edge of the teeth is located vertically. Suitable for longitudinal cuts.
rip sawing with a hand saw
When cutting longitudinally, the workpiece should protrude sufficiently beyond the workbench - this makes sawing easier.
The marking below the gap indicates where the saw deviates.
Kinds
How plywood is made at a factory
Classification of hand tools involves division according to a number of parameters:
- in what direction does the sawing go?
- design features;
- size of elements on the working surface;
- goals.
Types of hacksaws according to the direction of cutting wood:
- for longitudinal section;
- for cross cutting;
- universal.
To solve the first problem, the teeth of the blade must be triangular and resemble a hook. They are sharpened on both sides, so work can be done in both directions. The working area is often covered with medium or large teeth.
A saw for cross-cutting wood consists of triangular elements with equal sides. Thanks to this, sawdust is easily removed.
The universal type of hacksaw is characterized by large triangular elements of 1-2 types, located at an angle to each other, alternating with each other. This allows you to solve several problems at once with one saw.
Depending on the design, it can be:
- standard;
- with butt;
- narrow;
- with a reward;
- foldable;
- onion.
The first product is found everywhere: a rectangular shape with a beveled side, a bundle of plastic or wood located at a slight angle to the main part. The working side can be of any length. Any type of teeth, a replacement blade may be included.
A narrow hacksaw (circular) is designed for working along a curved path, cutting holes in wood. To perform this task, the density of the elements must be higher than 9. The cutting part is thin, the handle is pistol-type.
If you work with hardwood, the steel bends and the saw may break. In addition, the cutting path shifts. Therefore, a saw with an edge is used to perform this task. It is characterized by an additional stiffening rib along the upper edge. The handle of the axing saw is located at an angle of 45° in relation to the main part.
A hacksaw with a reward resembles a plane, which requires a certain skill. This is a precision tool designed for working on rough-cut wood. The hacksaw is equipped with 2 handles and is designed for blind cutting of grooves or tongues. The design of the tool allows you to set the depth of the cut.
The folding hacksaw is designed for on-the-go work because it improves transportation safety. The metal base has a small or medium tooth, the saw is compact in size.
The bow saw is designed for curved cutting of wood. This is a tool consisting of a frame along the top and a blade for work 25-30 cm long. The density of the teeth is 8-17 per inch. This ensures high quality wood cutting. The canvas can be replaced as it wears out.
Jigsaw blades
If you have previously worked with a jigsaw, then you know that if you use the wrong saw, you can ruin the top layer of the material, especially for layered material. Plywood is a layered material - it is wood veneer glued together.
In this section we will look at how saw blades affect the quality of the cut and what types they are in principle.
Files come in different tooth sizes and shapes, the length of the file, the material for which they are intended, the direction of the tooth, the material from which the file is made and for what purpose it was developed. For example, a blade with a large tooth is designed for cutting wood at high cutting speed for rough cuts. And files with shorter teeth will make a more even cut. Thin (narrow) files make it possible to cut radius and other non-standard shapes, while wide ones help to maintain a straight cut.
The letters “A, B, C, D” indicate the size of the teeth, the letter “A” indicates that the saw has the smallest teeth.
The numbers indicate the length of the file 1, 2, 3, 7, the length of the blade, the longer the file, the thicker the material it can cut.
For example, the marking of Bosch brand files looks like this:
In addition, files also differ in cutting edge geometry.
An engineer’s personal experience about jigsaw files:
In production, there are tasks both for an even saw when working with finished portraits, and the need to unravel a large sheet of plywood, when speed is required and quality is not so important. The majority of sawing blades are designed for speed, not quality of cut. And even files with a medium tooth will scratch the surface of the material, i.e. spoil the top layer of plywood. Not so much compared to larger tooth files. Therefore, the engineer adapted himself to using metal files with fine teeth up to 1 mm for even cutting of plywood. When working with such a file, the speed suffers greatly and these files become very hot. But when important cutting work is needed, the time spent is justified. An engineer uses such saws when he needs to work on a portrait that has already been burned out.
READ How to Sawing with a Jigsaw Correctly
Materials and tools
How to cut gypsum board sheets
In a woodworking enterprise, special equipment called a format-cutting machine is used to cut laminated chipboard sheets. Some private furniture workshops purchase such a machine, but it is hardly advisable to install it at home due to its high cost. Home power tools can replace such equipment - sawing chipboard can be done with a circular saw or a hacksaw. The sawing process will take quite a lot of time and effort, but from an economic point of view it will be completely justified.
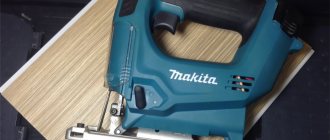
Electric jigsaw
In order to make an even cut without damaging the laminated layer, you will need to take a jigsaw file with the smallest tooth size. It is advisable to use a jigsaw for sawing small sections of chipboard. Jerks and unnecessary pressure during work should be avoided. The cutting blade feed speed of the tool should be set to minimum.
Hand saw
This hand tool is used in combination with a metal blade, as it has the finest teeth. Before work, paper adhesive tape must be applied to the cut site to protect the lamination layer from damage. The hand saw blade must be held at an angle of 30–35°; this position reduces the likelihood of chipping on the material. The movements of the hacksaw blade should be smooth, without pressing on the blade.
Circular saw
This power tool consists of a small work table and a rotating toothed disc. A circular saw makes cuts on a particle board much faster and better than an electric jigsaw. When performing the sawing process, the saw is turned on at low speed. In this case, chips may appear on the opposite side of the saw teeth.
Electric milling machine
This is a hand-held type of power tool that is used to cut and drill wood board. Before starting work, a small cut is made in the laminated chipboard using a hand jigsaw, departing from the marking contour by 3–4 mm. During the sawing process, several cutter knives and its bearing device are used, which regulates the depth of cut. Using a cutter is not so easy, so to cut a slab you need to have some skill in working with this tool. The movement of the cutter is quite fast, and there is a possibility of making an uneven cut.
The use of hand tools is advisable in the manufacture of single products from laminated chipboard. For mass production, it is advisable to purchase formatting and cutting equipment.
How to cut plywood without chipping with a circular saw?
It is recommended to cut on a level floor. A sheet of plywood is laid on wooden blocks of equal thickness, located perpendicular to the mowing line for cutting the cut. Full support from below ensures that the corner of the sheet does not come off at the end of the cut. A metal or wooden guide is installed on top, which is fixedly fixed with clamps.
In order to cut laminated plywood accurately and without chipping, you need:
- Setting the minimum cutting depth. On the opposite side of the sheet, the teeth should protrude by 2-3 mm. With this cutting depth setting, the blade does not cut, but gently cuts through the wood.
- Choosing the right circular saw. For a delicate cut, choose a blade with a minimum size and a large number of teeth (for example, No. 140).
- Low feed speed of the cutting blade when moving without stopping. In this case, the teeth are not cut, but the wood is carefully cut without chopping. To properly cut film-faced plywood, it is also recommended to set the blade speed to maximum. Disadvantage of the method: the carpenter risks overheating the canvas.
- Place tape at the cut site. To do this, it is recommended to use masking tape, which does not leave marks on the surface of the sheet. At the end of the work, the tape is removed at an angle of ninety degrees, moving towards the cut.
If you are working on laminated plywood, it is also recommended to cover the sole with a circular saw blade. This avoids scratches on the front side of the sheet.
Is it better to cut plywood nine mm thick?
Both an electric jigsaw and a circular saw are suitable for cutting this material. The first option is indispensable in the case of a figured track.
To cut thick plywood without chipping with an electric jigsaw, it is recommended to use any of two types of blades:
- Clean Series CleanWood (Bosch);
- For metal.
A regular circular saw is also suitable for cutting plywood smoothly. It is enough to install a blade with a fine tooth (for example, No. 140), adjust the cutting depth within 12-13 mm and lay out the sheet with equal wooden blocks. It is recommended to carry out cutting along the guide, with low tool feed and without interruptions.
If the front surface of the sheet is laminated, then the cut area is first covered with masking tape.
Anyone who doubts that it is better to cut pollen with plywood is advised to contact a specialized company with laser cutting and cutting equipment.
Cutting with an electric jigsaw
To obtain a uniform cut, the sequence of actions should be as follows:
- Fasten the material securely.
- If possible, cut perpendicular to the grain of the wood, otherwise it will be very difficult to get a straight edge.
- Under no circumstances should you put pressure on the tool; this will not increase the cutting speed, but the tool is guaranteed to break.
- The surface of the teeth should be oiled to make work easier (when working with heavy wood).
- It is undesirable to use the tool for a long time due to its heating and damage to the engine.
- After use, you need to clean the jigsaw and lubricate it.
READ How to Tension a Chain on a Carver Chainsaw
Is it possible to cut laminate flooring with a grinder, also known as an angle grinder?
If you have a grinder at home, feel free to use it to cut laminate flooring when installing. She can cut almost anything in the world. A good owner always has this tool at hand. You can find a new angle grinder for $25 (this is the simplest)
The important thing here is to select the right drive. Regular abrasive (black) is not suitable, the board will burn and smoke
Sawing laminate flooring with a grinder is more difficult for a beginner without preparation. You need to get used to the instrument.
How to cut laminate flooring with a grinder - important nuances:
- We immediately decide which blade to cut with. A diamond disc
best suited (for ceramics, porcelain stoneware). We make markings along the front of the board and cut them immediately. The result will be a very smooth and clean cut, no chips. It is advisable to hold the part of the board being sawn; - The grinder cuts very dusty. If sawdust flies from a jigsaw when cutting, then there is fine dust. It settles on the lamella itself and throughout the room. Therefore, it is better to go outside or onto the balcony to cut laminate flooring.
Which hacksaw to choose
If you buy a hacksaw for carpentry work, products with large teeth are suitable
In order for the purchase of such an instrument to bring only positive emotions, you should know the rules by which you need to choose it:
Determine how often the handsaw will be used. A hacksaw with hardened teeth is suitable for regular sawing work. Having bought such a “helper”, you don’t have to worry about tooth separation and sharpening. Models with a non-hardened cutting edge cannot be used as often. With constant sawing, they will quickly become unusable. Price. High-quality models from popular companies sell for more. But well-known brands provide a long warranty on their products. If you are purchasing a tool for one-time work, you can buy a simpler hacksaw. The uniformity of the canvas is an important parameter. To do this, when inspecting the tool in the store, carefully bend it and release it. If there are even slight changes at the bend point, then the metal is of poor quality and will quickly become unusable. The length of the blade affects the possibilities of using a hand saw. How the tool will be used depends on this value. The longer the canvas, the greater its springiness. Therefore, such hacksaws are not suitable for processing oak, maple, ash or other hard woods. If you buy a hacksaw for carpentry work, products with large teeth are suitable. A fine-toothed blade is useful for carpentry
It is very important that centimeter and millimeter divisions are marked on the canvas. Such a scale will help you not to break away from your work process in search of a ruler.
Sometimes manufacturers supplement it with a finger pad made of rubberized material. This detail will prevent calluses from appearing on your hands.
Hacksaw material
Hacksaws for wood do not get dull for a very long time and give an even cut
Most often, saw blades are made of steel. It can be cold rolled, alloyed or tooled. The last one is the most popular. Some hand tools are coated with a thin layer of Teflon. This material reduces friction during sawing and protects the metal from rust.
The quality of the teeth is also important. A hardened cutting edge is better suited for cutting raw wood.
The hardness of the teeth of such hand saws is 7-8 times greater than usual.
Therefore, these hacksaws for wood do not become dull for a very long time and give an even cut. Such models cannot be re-sharpened, which is very inconvenient. This means that after the service life has passed, the tool will have to be thrown away.
It’s easy to find out that the store in front of you is a hacksaw with a hardened cutting edge. Its canvas is black. This is the best saw for cutting any type of wood.
Shape and size of teeth
Experts recommend buying models with teeth from 6 to 8 mm
The cutting speed and accuracy when cutting will depend on the teeth of the saw. The fewer such parts, the cleaner the work will be. But using this tool will take more time. A hacksaw with large teeth will allow you to make cuts faster.
Experts recommend buying models with teeth from 6 to 8 mm. There will be much more sawdust when using it. When working with laminate, chipboard, MDF, etc. choose saws with teeth no larger than 3 mm. The hacksaw tooth can be:
- Chisel-shaped. Used to make longitudinal cuts. Looks like a triangle with different sides. The sharpening in it goes across the blade.
- Dagger. Works in any direction of the hacksaw. The tooth is easy to recognize by its appearance. It looks like a triangle with equal sides.
- Universal. These include triangular teeth sharpened by the 3D method. They cut easily in different directions.
For cutting finishing elements and thin materials, a saw with a pitch of 9 to 15 mm is suitable. Medium-sized parts are cut with a 7- or 9-tooth tool.
Features of cutting tools
Each plywood cutting tool has its own characteristics when used. Let's look at the rules for working with plywood with various cutting tools.
Sawing with a circular saw
To effectively cut sheet metal using a circular saw, follow these guidelines:
- Place the plywood sheet on a stable stand and make the first cut towards the middle of the sheet.
- Adjust the depth of the cuts. To do this, lower the disk and start cutting, while the depth of the disk should be 0.5 cm greater than the thickness of the blade.
- To avoid injury due to the high potential for kickback, you should sit on the side of the mowing line with the saw.
- Prepare the saw to make the required cut. To do this, insert the wheel of the block (part of it from the front) and install the blade on the cutting line after bending the body.
- Make sure there are no obstructions at the bottom of the sheet.
- Turn on the saw and hurry to plunge the blade into the material. Hold the saw firmly to prevent it from rolling back. After inserting the disk into the slot and placing its shoe on the surface of the sheet, replace the protective cover.
- Guide the tool along the cutting line to the end of the blade.
- Turn off the saw and only after it has stopped, completely unplug it from the outlet.
Cutting with an electric jigsaw
To get a smooth cut, the sequence should be as follows:
- Secure the material.
- If possible, cut perpendicular to the grain of the wood, otherwise it will be very difficult to get a straight edge.
- Do not under any circumstances apply pressure to the tool, this will not increase the cutting speed, but the tool is guaranteed to break.
- The surface of the teeth should be oiled to facilitate work (provided that the wood is working with increased strength).
- It is not advisable to use the tool for a long time due to its heating and damage to the motor.
- After use, clean the jigsaw and lubricate it.
READ When You Can Use a Hammer in an Apartment
Working with a hand saw
A hand saw requires a lot more work than a circular saw. To correctly see a sheet of plywood, you must consider the following rules:
- Make a vertical notch on the mowing line. To do this, place the saw and extend the blade to form the groove.
- Tilt the saw blade at an acute angle to the plane of the blade (30 to 40 0) and begin to make smooth movements.
- To maintain an even cut, the forearm and shoulder should be positioned in the same plane. If you deviate from the specified direction, you need to bend the saw slightly in the desired direction and continue working.
- To avoid the formation of a fracture, the waking part should be held with an unoccupied hand.
- Upon completion of the cut, you again need to give the blade a vertical position and finish the job by making several movements perpendicular to the sheet of plywood.
Oil, fuel mixture and engine running-in
Each chainsaw requires a special fuel mixture, in which gasoline is diluted with a small proportion of oil. This way the engine gets the fuel to run and the necessary lubrication to keep it running smoothly and easily. As a rule, it is better to choose high-quality, fresh gasoline, the octane number of which is not lower than 92. However, there are models of imported, expensive chainsaws that run on A95 gasoline and not lower.
Lubricating the chain during operation is the key to good and high-quality cutting. To ensure that the chainsaw cuts logs correctly without harming spare parts and components, it is recommended to use high-quality branded oil. If the saw manufacturer does not produce oils, then you can use motor oil with a viscosity of W30-W40.
Oleo-Mac Polar Lube
The correct start of work with a new tool is another fundamental stage on which the durability, serviceability and quality of the chainsaw depends. In order to do the so-called “break-in”, you need to let the chainsaw run idle for several minutes at different speed settings. Place the saw on a flat surface, start the engine and run for 2-3 minutes at low and medium speeds.
Special cutter, guillotine for laminate
A home craftsman should definitely not purchase this expensive tool. Moreover, he is very bad at cutting laminate lengthwise. For the $40-50 they are asking for it, it is better to buy a more expensive jigsaw. The device consists of a base and a handle with a blade for cutting lamellas.
The principle of its operation is quite simple. Place the laminate board on the base and lower the handle down. However, there are some peculiarities when working with this tool. Here they are:
- As mentioned above, this guillotine does not cut lengthwise well;
- It does not cut very neatly; the cut piece looks like a stub. Even a sharp cutter blade literally tears the laminate;
- You need to apply a lot of force, and the blade quickly becomes dull. My hands get very tired. Thick laminate over 8mm may not be cut;
- Only used for cutting laminate. Those. This device will no longer be useful on the farm. This means it is not suitable for home use.
Key Operating Principles
The chainsaw is always held with both hands, tightly gripping the handle with all fingers (the thumb of the left hand should be located under the front handle). The saw should be placed closer to the body - this way the arm muscles will tire less (there is no need to be afraid of the proximity of the saw). In addition, in this position it will be easier to maintain balance and maintain full control over the process.
Your legs should be spread wide, with your knees bent for stability, but your back should be kept straight. If the mechanic needs to change position, he must first turn off the engine by activating the brake. If you need to move the chainsaw over a considerable distance, it is recommended to cover the tire with a casing.
It is better to learn to use a chainsaw on horizontal, not too thick logs at first. Once you feel confident and strong in your hands, you can learn to fell trees. To cut logs or beams straight, you need to make marks with a pencil and then gradually move along these marks. It’s good if you have the opportunity to watch how experienced sawyers work.
Preparation stage
Before cutting down a tree, you should make sure that surrounding objects (railway rails, buildings, power lines, highways, etc.) will not be damaged as a result of the falling trunk. There should be nothing unnecessary within a distance of two lengths of the tree being cut in any direction. In addition, if the place is crowded, then it is necessary to use warning signs - this is a must.
Pay attention to the following points:
- whether the tree grows straight or not;
- is there a slope of the soil;
- what is the strength of the wind and in which direction does it blow.
This ultimately determines in which direction the trunk will fall. You need to be especially careful with rotten, dry wood. It may behave unpredictably for the lumberjack and may not fall as planned. A damaged tree can be identified by external signs (dry branches, damaged trunk). Experienced fellers determine the quality of wood by tapping the trunk - a healthy tree “rings”, while a sick tree sounds dull or inaudible.
The ground around the tree must be cleared of bushes and other growth - this is another important preparatory action. It is necessary to remove everything that could impede the safe movement of the master with the chainsaw during the felling process.
How to saw
The sawing procedure itself usually goes like this. The lumberjack stands to the right of the trunk and makes a guide cut on the natural slope side at a 45-degree angle to a depth equal to about a quarter of the tree's diameter. This undercut should be as low as possible - this will make it easier to fell the trunk (and the stump will not be too high). It is also worth keeping in mind that the undercut seems to indicate in which direction the tree will subsequently fall to the ground.
A horizontal cut is then made on the opposite side of the tree—the main felling cut. There should be some small distance between it and the inclined undercut - this gap is needed so that the tree does not collapse prematurely.
During the work, it is necessary to monitor where the trunk is tilting in order to have time to react if something goes wrong. When the tree begins to fall, you need to quickly remove the chainsaw from the cut, turn off the engine and leave the dangerous place.
If, having caught on another trunk during felling, the tree does not fall completely, then professional help will be required. Leaving it unattended, as well as trying to correct the situation on your own, is prohibited.
There are times when a chainsaw bar gets stuck in the trunk. There is no need to panic and suddenly pull it out, especially if the tool is in working condition. First of all, you need to stop the engine. And then you should manually tilt the barrel little by little until the chainsaw slips out.
"Zero gap"
The simple technique, which involves simply modifying the sole of the cutting tool, has proven itself well when performing straight cutting of sheet material of different thicknesses.
Instructions for the main steps:
- Make an overlay from MDF, plasterboard or polished metal.
- Reduce the gap between the working part of the tool and the pressure pad.
- Attach the cover plate to the support sole.
- Ensure that there is one narrow slot in the trim.
As a result of this transformation, a tight fit to the cutting part is obtained, so even a significant force during feeding ensures the cutting of small chips without turning out the chips of the upper plywood layers.
Rough floor finishing
Subfloors are installed from hardboard quite often; this material is especially suitable for leveling old plank floors if dismantling work is not expected. In addition to resulting in a perfectly flat surface, the fiberboard layer will serve as a good heat insulator, which is especially important for residents of private houses or first-floor apartments in old high-rise buildings.
For laying the subfloor, untreated fiberboard with increased hardness or soft fiberboard is used as a soundproofing pad. Despite the abundance of hydrophobic additives in the production of modern fiberboards, experts advise that they be further processed before installation. Impregnation with hot drying oil in 2-3 layers gives good results. After complete drying, the sheets can be laid.
Fiberboard floor ready for further processing
If the old base for the floor is quite flat, the hardboard is laid directly on it. If there are significant level differences (more than 10 mm), you will have to level the old floor or lay joists. In any case, the surface for laying fiberboard is pre-treated with an antiseptic primer.
We cut hardboard
Many modern enterprises that sell building materials offer their customers cutting fiberboard to individual sizes upon purchase. Special high-precision equipment guarantees that the work of cutting material and processing edges will be done with high quality, without chipping. In this case, your main task will be to accurately take all measurements. If you are so unlucky, you will have to cut the hardboard yourself at home.
In principle, a hand saw with a fine tooth will be suitable for this work. After all, small irregularities formed at the cutting site are of no importance for laying the material as a subfloor. When there is a significant amount of work, cutting fiberboard is much faster and easier using the following devices:
Jigsaw
- a jigsaw or circular saw, preferably with a laser guide;
- saw blades of a special brand, suitable for cutting hardboard;
- trestles with an inclination of 20-25% from the vertical, allowing you to fasten a large-format fiberboard sheet;
- metal ruler
- marker.
If you have to cut fiberboard for the first time, in order not to spoil the material, first practice on a small piece, placing the jigsaw blade to the right of the marking line. Be sure to first familiarize yourself with the techniques of experienced craftsmen, for example, by watching thematic videos, one of which is presented below:
How to lay fiberboard?
If after laying the fiberboard it is planned to lay linoleum, the hardboard is laid with the wrong side down. In other cases, the corrugated surface will provide better adhesion of the fiberboard to the finishing materials, so it is turned upward.
Installation usually begins from the corner opposite the front door. Fiberboards are fastened using special staples, nails or screws, or glued with mastics. Before nailing or gluing, they try to fit the sheets together with a minimum gap to make puttingtying the seams easier.
By the way, there is no need to seal cracks near the walls; on the contrary, be sure to leave technological gaps that will allow the fiberboard to “play” without deformation when expanding with temperature fluctuations.
The easiest way to cut fiberboard when going around a heating pipe is with a regular knife. More accurately, such work can be done using a specially created template made of thick cardboard, using a jigsaw.
After laying fiberboard, if you plan to finish the floor with linoleum or paint, it is necessary to seal the seams. In addition to having high adhesive properties, the mass with which we will putty the fiberboard must certainly be plastic, since fiberboard floors are somewhat springy and are capable of changing their linear dimensions. If you putty the floors with a hard and monolithic putty, then it can either bend and deform the fiberboard sheet, or itself tear at the junction of the seams.
How to get the perfect cut
You can use either a hand saw or a power tool to get the perfect front cut. There are several tricks that help you achieve a high-quality cut of plywood. Here are some of them.
Zero clearance
The principle of this technique is to minimize the distance between the saw blade and the pressure pad. This avoids destruction of the top layer of plywood. This effect can be achieved by attaching a plate to the sole of the instrument. The cover has a slot to maintain the ability to cut along the planned mowing line. Thanks to this, the teeth are guaranteed to cut small chips and not knock out the material.
It is important to avoid mechanical damage when applying the sheet surface. The cover must be replaced every 5 meters. The use of gaskets made of more durable materials (metal, plastic or fiberglass) eliminates the need for frequent replacement of the cladding, the surface of which must first be polished.
Adhesive tapes
To protect the back of the plywood, tape is applied along the mowing line. This method helps prevent large parts from falling out, which is especially effective if you choose to use a manual or electric jigsaw. However, not every tape is suitable for these purposes. For example, adhesive tape in this case will be completely useless due to its small margin of safety.
Before sawing begins, the tape is glued to the surface using fiberglass or aluminum reinforcement. The requirements for its width are as follows: there should be a margin of 1.5–2.0 cm on both sides of the mowing line. It is better to glue it by pressing the tape with a dry cloth, avoiding the formation of wrinkles and gluing.
After the saw blade or electric jigsaw stops working, remove the tool after turning it off. Then proceed to remove the tape. At the same time, special care must be taken not to cause sudden movements of small fragments of the laminated surface that inevitably form during cutting. Therefore, you should avoid using materials with a strong adhesive base. When choosing such a tape, you should take into account its adhesiveness and ease of cleaning from a rough surface.
How to cut down a tree with a chainsaw
Now let's figure out how to cut down a tree with a chainsaw. The first thing you need to start with is cleaning the small growth around the trunk. This is a necessary procedure, because small branches not only interfere with access to the tree, but can also cause the operator to fall, which is quite dangerous given that the chainsaw is working.
Next, you need to decide on the direction of the felling. Determining the direction of felling a tree standing on a slope is not difficult, since it is almost always laid in the direction in which the center of gravity is shifted.
This is interesting: in order to fell a tree in the opposite direction from the slope, professional fellers use special heavy equipment or tie a cable to the top of the tree and use a winch to pull the trunk in the desired direction.
An upright tree can be felled in any direction, but it is worth considering the location of the branches. It is a little easier to fall the trunk in the direction with more branches than in the opposite direction.
At the next stage, a cut is made from the side of the felling direction. The cut is made in the form of a wedge. The depth of the cut should not exceed 1/3 of the diameter of the trunk, otherwise there is a risk that the tire will jam, because the trunk will weaken and tilt towards the cut. A properly executed cut should not cause the tree to tilt.
Next, a straight incision is made on the opposite side of the cut and 3-5 cm above it. The chainsaw should be directed in such a way that the direction of the felling on the chainsaw is directed towards the intended place where the trunk will fall. After this, using a wedge, fork or felling blade installed in the cut, the tree is helped to begin falling in the planned direction.
Below is a video on how to cut down a tree.
How to cut quartz vinyl laminate
There is a laminate that bends. This is a special waterproof sample for baths. It is made of PVC and is not afraid of water at all and does not swell. It costs more than classic laminate. It is much easier to cut than regular laminated boards.
Here you don't need a jigsaw, a grinder, or a saw. Such bendable lamellas can be cut with a regular knife. use a construction or stationery knife to cut vinyl laminate
.
Take a ruler or square, apply it and you can immediately make a cut with a knife. The ruler is pressed tightly against a piece of laminate. And then we draw a knife along the ruler. After this, carefully break the two parts with your hands.
Some craftsmen advise cutting ordinary laminate with a stationery knife. Do not do that. You'll just break the boards in vain.