Why do you need a router table?
To operate the router, it must be securely fixed to the surface of a metal plate attached to a stationary table. After all, it is more convenient to work with a rigidly fixed tool than to hold it in your hands. Purpose of the router: curly processing of edges, selection of grooves. It can be used to process slabs of any type of wood and drill holes of different depths and diameters.
Moving the workpiece along the surface of the tabletop is much more convenient than holding the tool suspended. Fine-tuning the cutters helps to increase the accuracy of the lines drawn on the workpieces.
For reference! Online stores offer a wide selection of milling tables. A particularly wide range of models with complete equipment is presented by the German company Bosch.
You can buy a milling platform or try to make it yourself from fiberboards. A homemade table will cost much less than its industrial counterparts. The following is a look at how you can make a table for a router at home.
Tabletop drawing
Finishing touch
After assembly, all parts are ground and working surfaces are polished. The sides and bottom are painted and varnished. The electrical part is covered with a metal sleeve.
The question of how to make a milling table yourself is asked by many home craftsmen. This is understandable: equipment on which the milling cutter is fixed motionless and the workpiece moves on a work table specially equipped for this purpose is in many cases much more convenient to use. Often, when working with a manual router, the workpiece is fixed on a regular table, and all manipulations are carried out by the tool itself, which makes it impossible to maintain precision processing.
Making your own milling table is not that difficult
A router table significantly increases labor productivity and efficiency when working with a hand router. It is often unprofitable to purchase a serial model of such a table for your home milling machine. It is much more economical to make a milling table yourself. It will not take much time and will require very little financial investment. Any home craftsman can cope with this task if desired.
Using a homemade table for a manual router when processing wood products, you can achieve results that can be obtained with professional milling machines. With the help of such a simple device, a whole list of technological operations is performed efficiently: cutting shaped holes and making various slots and grooves in the workpiece, manufacturing connecting elements, processing and profiling edges.
You can see the structure of a factory-made milling table in the video below. We will try to do no worse, and in some ways even better and, most importantly, cheaper.
A homemade milling table, which you will equip your home machine with, will give you the opportunity to process not only wooden workpieces, but also products made from chipboard, MDF, plastic, etc. With the help of such a homemade milling table, you will be able to make grooves and splines, process elements of tongue-and-groove joints and tongue-and-groove joints, chamfering and creating decorative profiles.
Read also: Rating of inexpensive alarm systems with auto start
A homemade table for a router, the production of which does not require large financial expenditures, will allow you to equip your home workshop with a real woodworking machine. It will only be necessary to secure the tool itself - a manual milling cutter, for which you can use the stand of a drilling machine or a workbench. It is no coincidence that many manufacturing companies have started manufacturing milling tables and accessories for them, but you will have to pay a decent amount of money for such a device. A homemade table for equipping a milling machine, if made in accordance with the drawings that we will analyze in this article, is in no way inferior in functionality to models produced in production conditions, and it will cost much less.
What is a milling table: design
The simplest homemade milling table for a manual router should consist of a working surface and a bed. It is complemented by limit strips and adjusting devices.
A do-it-yourself router table with drawings can be found for free on the Internet. Schemes are given in three types:
- small structures that can easily be installed on any work surface;
- side tables with fasteners to another work surface;
- stand alone from other devices, with multiple operating functions and tool storage.
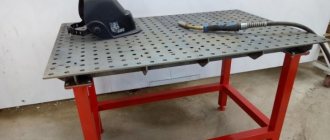
In any of the designs, the base of the table is a strong, smooth tabletop made of hard materials, with fasteners for fixing the router with the possibility of adjustment. Wood and chipboard sheets are suitable for making countertops. The supports can be made of solid timber with dimensions of 40*40 millimeters.
Tabletop small table
All parts are fastened together using screw conveyors. The device must be stable, rigid in shape, able to dampen vibrations, and at the same time be light in weight, so that it does not make it difficult to change location.
A hole is cut in the surface of the table, onto which a metal plate is placed that can protect the wood from possible damage.
Additional recommendations when assembling the table
A new milling table made by yourself must completely match the floor covering of the workplace. If the floors are uneven, you should make legs with a movable mechanism, otherwise the structure will quickly become unusable. In order for the service life of the router table to significantly exceed all expectations, its surface is coated with varnish or other woodworking liquid. This not only increases service life, but also additionally holds the elements together.
Protect yourself from damage that may occur during operation. Install protective glass on the longitudinal support, which will be a barrier to flying chips, sawdust and other elements.
When making a milling table at home with your own hands, remember that working with it is quite dangerous and you better take care of your safety.
Every person's workshop contains all the tools he needs. But at the same time, there may be an urgent need to arrange a workplace, and store prices may not suit you. And in general, not all people have the opportunity to visit stores with similar goods.
The milling table has drawings and diagrams, so making it yourself will not be difficult. Moreover, you yourself will know which model you need and what sizes will be convenient for you. The purchase option may not always be the way out. Don’t be afraid and waste time; even a beginner can figure out how to make a table.
Read also: How to repair a 220V diode lamp
Compared to hand tools, a DIY milling table allows you to obtain a more precise degree of processing of the material. A rigidly mounted router confidently cuts various types of wood, plastic, and coated chipboards. It is possible not only to chamfer, but also to make a groove, a spline, a slot, a tenon, a groove, and a profile cut.
Main parts of a milling table
Before starting to manufacture the device for installing the router, a drawing is developed detailing all the elements and fastening points. The basis of the design is a frame that fits tightly to the floor surface. The working surface is attached to it using bolts. A pump is also attached to the base, supplying the cooling mixture to the device, and a container for collecting it.
Schematic drawing of the device
The mechanism can move in vertical and horizontal directions. High-alloy steel is used for the manufacture of guides. For the vertical direction it is attached to the front wall of the frame, for the horizontal direction - to the top.
When processing edges, a stop with parallel bars, a movable carriage, and fine-tuning and locking screws are used to move the cutter in a straight line. The guide rail is similar to a rip fence. Its advantage is that it can be installed at the angle desired by the master.
The tire and stop are attached to the frame using special clamps. The guide bar can be made at home from 2 wooden blocks securely fastened to the workpiece.
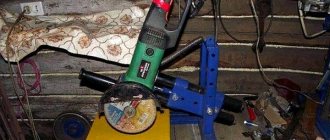
Groove Tool
All processing of parts is carried out with milling cutters of different shapes and sizes equipped with a cutting surface. The relationship between the gearbox and the cutting tool occurs using a thermally hardened steel spindle.
Important! The milling device produces a lot of dust during its operation, which poses a threat to the health of the person working on it. To remove dust, an ordinary home vacuum cleaner is adapted to the homemade device.
Without a dust collector, an expensive tool can quickly become unusable.
The dust collector usually becomes clogged with dust within 5-10 minutes. To prevent this from happening, craftsmen came up with a device with a water filter to catch the smallest particles of debris.
Water filter for a vacuum cleaner made from an aluminum pan and a plastic bottle
On the front side of the panel there is an input switch, as well as mode and cooling switches. There are start and stop buttons to turn the spindle on and off.
To increase the working area of the table, you can attach folding wings on supports to it using furniture hinges. Designs with drawers and shelves are very convenient. Dimensions depend on the workshop space.
Convenient, compact design, where everything is at hand
Making a milling table + (Video)
A well-made router table significantly increases the efficiency of working with a hand router. However, buying them can cost a pretty penny, because it will be much easier to make such a table yourself, using special drawings for this. This will allow you to save a lot of money and, moreover, the process will not take too much time. There are several types of milling tables: stationary, adaptive and portable. In this article we will talk about the stationary option, because it is the most difficult to implement. This means that having learned how to make it, other types of milling cutters can be made without difficulty.
Selection of drawings and materials
Before starting any work, you should decide what kind of result you want to get. The easiest way would be to make a milling table based on a regular workbench, but it is better to make a separate structure. But if you still take an ordinary table for this purpose, then it must be very strong and stable
It is also important to choose the right dimensions: for example, the optimal height is approximately 90-100 cm. An even better solution would be a table with adjustable height, because this will allow the milling machine to be adjusted to the needs of the master
A general view of the milling table elements can be seen below.
As for materials, there are also subtleties here. Often the covers for such a table are made from MDF board. In general, this is justified: they are inexpensive, lightweight and easy to use. Phenolic plastic is also a popular material - it is stronger and more durable than MDF. But also more expensive - by about 20%. You can make a tabletop from a sheet of metal
One thing is important - the surface must be absolutely smooth, since the workpieces must move easily across the table surface without clinging or getting stuck anywhere. The thickness of the cover should not exceed 35 mm
Tools for work you will need:
- Electric drill.
- Chisel.
- Sander. In principle, sanding can be done manually using sandpaper, but it will take much more time.
- Plane.
- Screwdriver.
- Jigsaw.
As you can see, both materials and tools for making a milling table are not so difficult to get
But it is extremely important that everything is of high quality, because the durability and reliability of the product directly depends on this.
Table manufacturing stages
When all the preparatory work is completed, you can proceed directly to the manufacture of the product. Everything is done in several stages. They will be listed below.
Assembly of the frame. This is the name of the table on which the remaining parts of the milling machine will be mounted. If a ready-made table is taken as a basis, then this point can be omitted. However, as already mentioned, it will be more convenient if the bed is made from scratch. For example, the following option can be considered quite successful: Installing a mounting plate. It is necessary to install a not too thick board or textolite on the table cover. The thickness of this part should not exceed 8 mm. Again, you can take a metal plate for this purpose - such a part will last a long time. A hole is made in it, the size corresponding to the router. 4 holes are also made along the edges, with the help of which the mounting plate is attached to the table top
It is important that the plate does not protrude beyond the edges of the tabletop, otherwise they will constantly cling to it. You can see what this device looks like in the picture below.
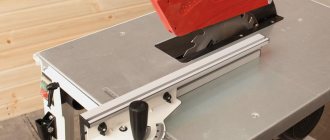
Making a longitudinal stop
It is necessary for performing many milling jobs. The plate used as a guide must be perfectly flat and strictly perpendicular to the tabletop. A guide with a T-shaped slot will be convenient to use. The parallel stop is attached to the frame using a certain type of clamp. To ensure that the plate remains perpendicular to the tabletop, special support legs are used. This is what the guide bar looks like:
Installing a groove for a movable stop. Usually, longitudinal edges are processed using a router, but sometimes you need to work with grooves located across the boards. It is for such cases that the rip fence is designed.
There are some nuances associated with the implementation of each of the points. However, anyone who has experience working with wood products will be able to make a milling table
It is only important to pay close attention to the task at hand.
Types of milling cutters
Milling cutters vary in power, number of motor revolutions, milling depth, processing method, and weight. Lamellar ones are intended only for cutting grooves. Filler holes - paired holes in furniture parts. Rational ones work not only on wood, but also on drywall, plastic, and ceramics.
The best option is trimmers, as they are the most functional. They can create grooves, grooves, and remove chamfers. The most versatile are submersible. They can do all the operations inherent in other types of router.
Preparing for work
You can make a milling table for a manual router yourself. The materials you will need are: wood or rolled metal, wooden beams, angles, self-tapping screws, bolts with washers and nuts. For the countertop, use laminated chipboard or thick sheet plywood. The finished stand for the milling machine resembles a table for a circular saw.
Before you start processing parts, it is worth checking the operation of the device at idle speed, without load.
Some rules:
- The working area should be 2 times the dimensions of the router.
- There should be no fuels and lubricants in the room.
- The device itself must be in good condition.
- Nothing should prevent the spindle from rotating.
- Check the presence of coolant mixture supplied to the milling cutter.
Important! We must not forget to lubricate the friction points of parts in a timely manner.
How to choose a practical option
There are different ways to make a homemade router table, but the design principles for most models are the same.
First, choose one of 3 types of milling installation, which determines the dimensions and location of this equipment in the carpentry workshop:
- Mounted. A separate aggregate unit, which is attached to the sawing machine on the side using clamps. Allows you to use the working surface of other equipment, can be easily removed, and put aside with your own hands when not needed.
- Portable. A desktop modification that is sought to be made with the minimum required dimensions of the bed and milling table. An efficient machine to use when frequently moving around construction sites.
- Stationary. The main type of table for established production, provided there is sufficient space in the room. This is no longer just a milling cutter, but an equipped workplace.
You need to develop a drawing of the future table with your own hands, already knowing the installation dimensions and the weight of the milling part (with motor). The cross-section and location of the load-bearing elements must combine strength and easy access for installation and maintenance.
DIY materials
The working plane of the table ensures smooth sliding of the workpiece in one plane. Laminated chipboard and MDF sheets cope well with this task. To prevent the tabletop from bending under the weight of the router, take a slab with a cross section of 2.6/3.6 cm. For the side parts, a sheet of chipboard with a thickness of 1.6 cm or more is sufficient.
The mounting plate on which a massive router is attached, by definition, has high strength and rigidity. Sheet materials suitable for it are metal, textolite, and hardwood plywood. The thickness of the plate does not exceed 0.8 cm.
The load-bearing support of the table is made with your own hands from a metal profile or sheet chipboard. Sometimes these are just legs with elements of rigidity, in other cases the table includes front-mounted drawers for tools, small equipment, and utility devices.
The main part - the milling cutter - is purchased from industrial production.
Electric motor power for woodworking starts at 500 W. Full milling of hardwood requires power in excess of 1 kW (up to 2 kW). Voltage 230/380 V. Most models have speed control.
Additional devices
The creative use of additional equipment in the design of a homemade milling table can significantly expand its functionality. You can achieve smooth adjustment of the height of the cutting part above the plate if you make a lift for the working tool with your own hands. For this purpose, the vertical axis of the assembly rests on a screw with a fine rectangular thread passing through a fixed nut. Rotating the flywheel on the rod regulates the feed of the cutter. The mechanism is equipped with side stops to prevent bending and a lock nut to hold it in a given position during vibration. If possible, they install more complex lifts - a car jack, a tailstock from a lathe.
Another addition is a steel ruler along the longitudinal axis of the guides of the workpiece. Practical, convenient, allows you to control the sample size, frees your hands for other operations.
Tool
To make all the details of the milling table with your own hands you will need:
- hacksaw, electric jigsaw;
- emery, grinding machine;
- electric planer;
- drill;
- chisel;
- screwdriver, screwdriver.
The use of electro-mechanical tools speeds up work on the manufacture of table tops, guides, oblique stops, but, if necessary, operations can be performed with your own hands and hand tools.
Manufacturing stages
Before assembling the structure, you should prepare all its components and check their compliance with the dimensions indicated in the drawing. Step-by-step manufacturing instructions:
- making a frame, coating wooden parts with paint and varnish, priming metal parts before painting;
- securing the working surface to the bed;
- making a recess in the frame for installing a metal plate with a slot for a cutter, onto which the tool itself will be attached from below;
- insertion of guides for mounting the stop.
Note! All connections must have a countersunk head and not rise above the work surface.
For safety reasons, the on and off buttons are installed on the side surface of the frame.
Marking the tabletop for the profile, mounting plate, grooves
How to make a mounting plate
Along with metal, plexiglass and textolite are suitable for working plates. It is worth remembering that the size of the cutter overhang depends on the thickness of the plate.
Please pay attention! Materials such as hardboard or getinax are not suitable for making a mounting plate. They do not tolerate vibration and high temperatures emanating from the motor.
Approximate marking of the mounting plate
When assembling the structure, fasteners and bolts with special heads inserted into the frame openings play an important role. Without them, rigid fastening of the workpiece to the working surface is impossible. The number of motor revolutions and the rotation speed of the cutter depend on the drive.
Installing the top clamp and drive
When assembling a milling table with your own hands, it is necessary to mount a structure with upper clamping devices to ensure additional safety. Such safety measures are used when work is carried out with large workpieces, for example, in the manufacture of various door trims.
The clamp itself has a simple device. This is a ball bearing, it acts as a roller that is mounted in a special holding device. After this, the roller is rigidly fixed on the surface of the working milling table at the required distance. As a result, sufficiently tight clamping of the workpiece to the working surface during processing is guaranteed.
If a homemade milling machine is being made, then utmost attention is paid to the electric drive design. An important criterion is the power of the drive, which will guarantee the execution of certain types of processing. For example, if you need to make a shallow recess in a wooden piece, you can use a motor with a power of 500 V. But such a machine is not suitable for more complex work. Therefore, it is not worth taking a low-power motor if intensive work is planned; it will constantly stall.
It is best to install the drive at 1100 V, it is optimal for any machine, not just household ones
The difference in cost is fully justified, since with the help of this router you can perform various jobs. A drive with a power of up to 2 kW makes it possible to work with any type of wood using various cutters. Drives can be stationary or manual; a special fastening system must be provided on the table.
When choosing a drive for a milling table, you need to pay attention to the number of revolutions. For a three-phase motor, a special connection diagram should be provided to ensure smooth starting and smooth operation. If a single-phase network is used for such a motor, the efficiency will drop by approximately 40-50%.
Welcome to our page “Milling machines photo review”!
In this photo gallery we have collected and decided to show a variety of ideas and implementation options for a Milling machine, from simple desktop machines to full-fledged multifunctional solutions. * This photo review was created for informational purposes and is not a product. You can print this page yourself and for free.
The information in the review is structured, there are many diagrams and photographs with explanations. If you have your own interesting photos, ideas, suggestions, then you can send them for inclusion in this review (indicating your details as the author) via or by e-mail: . You can write your comments in the reviews on this page.
The primary purpose of milling equipment is profile and flat processing of wood, composite materials (MDF, chipboard and others), artificial stone, and polymers.
Various types are used as an executive instrument.
Using a milling machine, a whole list of technological operations is performed: cutting shaped holes, slots and grooves in the workpiece, manufacturing connecting elements, processing and profiling edges and ends. That is, a milling machine helps to quickly make products with beautiful and complex shapes, be it a figured tray or a box:
Or make a complex carved interior element:
Thanks to the variety of cutters, the machine turns into a universal tool for woodworking. In fact, you can use it to perform the entire processing cycle: cutting, shaping, and treating the surface until it is ready for coating with protective and decorative agents (varnishes, paints, oils).
Safety at work
Working with a router without following safety precautions is associated with the risk of injury. The first thing you need to do before turning on the machine is to read the instructions for use. It doesn’t hurt to check the serviceability of the electrical part of the machine and cutting tools.
There should be no defects on the cutters. They must be securely fastened with a vice or other clamp. The cutter is replaced only when the plug is disconnected from the socket. Do not forget that even when the electrical power is turned off, the cutter continues to move by inertia for some time. There is no need to rush, it is better to wait until it stops completely.
When working with the machine, you must use goggles or a special shield to protect your eyes, and your respiratory system - a respirator or dust mask. Hearing is protected from excessive noise with headphones.
Important! You should not work as a milling cutter in a house or apartment, exposing your loved ones’ breathing to dust and their hearing to loud sounds.
Making a homemade tool will delight you with its low price, ease of operation, ease of assembly and maintenance.