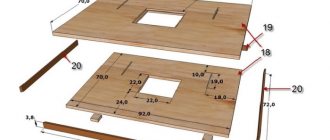
Rallying in a quarter
A quarter splice
produces a tighter joint than a butt splice. Longitudinal side cuts (quarters) are made in the boards to be joined using a hand router, electric planer or circular saw. The depth and width of the quarter should be equal to half the thickness of the board. This type of connection leaves no cracks or gaps. Quarter bonding is useful for cladding external and internal surfaces. For example, to hide unevenness or defects in walls, insulation and flooring.
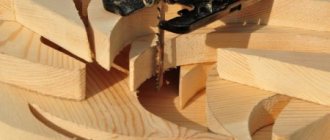
1. For an example of cutting a quarter with a circular saw, take 3 identical boards (photo 1).
2. At the beginning of work, mark 1/4 of their width on the boards on both sides. Prepare the circular saw. To do this, adjust the reach of the saw blade so that the cutting depth is equal to half the thickness of the board (photo 2).
3. For the required distance (half the thickness of the board) of the cut from the edge of the board, we adjust the parallel stop of the saw (photo 3).
4. We secure the workpiece on the work table with clamps and make a longitudinal cut with a circular saw (photo 4).
5. After this, we make longitudinal cuts on the back sides of the board (photo 5).
6. Again, secure the workpiece with clamps on the work table (photo 6.1) and make transverse cuts equal to half the thickness of the board (photo 6.2-6.4).
7. In this way we make 2 more blanks (photo 7).
8. Place the workpiece on 2 perpendicular boards (photo 8).
9. We nail the prepared blanks to their base (photo 9.1, 9.2).
10. When nailing the next workpiece, press it tightly against the previous one and fix it with nails using a hammer (photo 10).
11. The quarter joint is ready (photo 11).
Source: otdelka-profi.ru
What tools do you use?
Methods for making grooves, tongues and grooves vary depending on the arsenal of tools you have at your disposal and whether the finished joint will be visible after the project is finally assembled. (The attached table will help you compare the advantages and disadvantages of these methods.) Remember that some connections can be hidden behind the facade frames, and a more or less even groove can be made even better using special cutters (see the section “Cutters for cleaning grooves will remove flaws in the sawing machine” ).
Having much in common, these samples nevertheless differ depending on their location in the wooden blank. The fold forms an L-shaped depression along the edge or end. The groove has two shoulders (walls) and is located transverse to the direction of the fibers. The tongue also has two walls, but it is located along the grain.
FIVE WAYS TO SELECT GROOTS, RABBLES AND READINGS
| TOOL | RESULT ASSESSMENT | PRICE | OTHER APPLICATIONS | |
| Stackable groove disc | Advantages: cuts cleaner than most conventional blades; precise thickness adjustment using spacers | Disadvantages: leaves triangular grooves in the corners of the sample; When working across the grain, a support board is required to prevent chipping | $80-$250 | Formation of tenons, box joints, half-tree joints, etc. |
| Adjustable groove disc | Advantages: simple and quick setup; affordable price | Disadvantages: uneven sampling bottom; When working across the grain, a support board is required to prevent chipping | $50-$80 | Formation of tenons, half-tree joints, etc., but with low quality requirements |
| Combination saw blade with 40 or 50 teeth | Advantages: allows you to do without a groove disk; when working across the grain, it makes clean folds | Disadvantages: the need to make several passes, which is time-consuming and often leads to errors; tooth marks require cleaning; When working across the grain, a support board is required to prevent chipping | $10-$80 | Rip and cross cuts in normal sawing operations |
| Straight cutter | Advantages: makes clean and rectangular selections; excellent accuracy when the cutter diameter matches the width of the tongue or groove | Disadvantages: deep samples are made in several passes; When working across the grain, a support board is required to prevent chipping | $5-$20 for one cutter or $30-$100 for a set of 6-9 cutters | Selecting nests, milling according to a template, leveling rough surfaces |
| Seam cutter | Advantages: makes clean folds when routing by hand and on a router table; Setup is faster and easier than a straight cutter | Disadvantages: deep folds are made in several passes; when working across the grain, a support board is required to prevent chipping; may tear veneer edges from coated surfaces | $10-$40 for one cutter or $20-$60 for a set with multiple bearings | Not intended for other operations |
Edge cutters for wood
This is the most widely represented range of this tool, due to the most frequent use of hand routers specifically for forming various edges on wooden products.
Even in large sets of cutters, which it is preferable for a home craftsman to have rather than buying a large number of cutters randomly, the main part is edge cutters.
And their classification is much wider than that of other types of cutters. They are:
- profile - giving the processed edge an intricate curly shape;
- molded - rounding the edge with a convex shape to a quarter of a circle;
- conical – chamfering at an angle (more often it is at 45°);
- disk - for grooves in the edge;
- folded - selecting a quarter in the edge;
- fillet - making grooves in the edge on a quarter of a circle;
- figireous - for forming the edges of panels.
As a rule, all edge cutters for wood have a thrust bearing that limits the penetration of the tool into solid wood. The depth of the cutter's reach is regulated by the position of the support platform of the router itself.
And the methods of working with such cutters are the same. If the cutter removes a large mass of wood at once, then it is better to carry out the processing in several passes, gradually deepening it into the wood until the thrust bearing starts working. You can watch the video:
What does drying out lead to?
A typical case: you made a shed at your dacha to store household equipment and for other needs. They did it for themselves, so they pulled together the boards from which the walls were made, carefully, without the slightest crack. Two or three months pass; the boards dry out and the entire wall glows with cracks. In winter, snow blows through them; in summer, the wind blows dust inside the barn.
To prevent this from happening, you need to use quarter boards for wall cladding. A wall covered with such boards will never have through gaps. With their quarters, neighboring boards overlap each other and when they dry out, through cracks no longer appear.
Unfortunately, lumber is very rarely sold with a quarter finished. Therefore, an amateur craftsman should know the ways in which boards can be modified if necessary.
Quarter cutters (READING)
Such cutters differ from cylindrical slot cutters by the presence of thrust pins or bearings that guide the cutter along the edge, thereby ensuring the same width of the selected quarter. If it is necessary to select a narrower or wider quarter, replace the thrust bearing with another of the appropriate diameter or use a different cutter.
If the cutter and its thrust bearing are of the same diameter, then such a cutter is considered as a fitting cutter (sometimes called “overrunning”), which is used to process edge overlays, veneers, etc. flush with the workpiece.
What does drying out lead to?
A typical case: you made a shed at your dacha to store household equipment and for other needs. They did it for themselves, so they pulled together the boards from which the walls were made, carefully, without the slightest crack. Two or three months pass; the boards dry out and the entire wall glows with cracks. In winter, snow blows through them; in summer, the wind blows dust inside the barn.
To prevent this from happening, you need to use quarter boards for wall cladding. A wall covered with such boards will never have through gaps. With their quarters, neighboring boards overlap each other and when they dry out, through cracks no longer appear.
Unfortunately, lumber is very rarely sold with a quarter finished. Therefore, an amateur craftsman should know the ways in which boards can be modified if necessary.
The best milling cutter manufacturers
- Set Fit 6 pieces. Perfectly packaged and suitable for a young master.
- Bit Fit 36692 aybr masters for spot machining. The advantage is that it is a one-piece purchase.
- Set CALIBER 0504 work for wood.
- Total TACSR 1121 great functionality.
- Set STAYER 2992-H12 for soft types of wood.
Making planks with grooves at home
Often you have to make furniture or make repairs at home, using the simplest methods and what is at hand.
If you need to make a groove in the board with your own hands, be patient and have the necessary tools:
- A circular saw. The most practical tool, but, unfortunately, not everyone has it.
- A regular hacksaw for wood. It will take longer to work with it, but this accessory can be found in every home.
- Electric drill. It is also quite accessible, but before making a groove in a board with a drill, it is advisable to practice on an unnecessary block, practicing the skill.
Making a groove with a circular saw.
The optimal materials are wooden boards, bars and the like. The price of raw materials is minimal; in extreme cases, what is available on the farm is used. The most successful solution is a through, single open straight end connection.
The joint will be strong and reliable:
- It is recommended to make tenons with a thickness of ¼ of the thickness of the plank and a groove of the same size.
- The height and length of the groove must correspond to the dimensions of the plank.
- Prepare a pencil and ruler for marking.
- Decide on the coordinates of the cut and mark it.
- The cut should be made along a line inside the side that will then be separated.
- For a circular saw, the instructions recommend a blade width of 2-4 mm.
- Sawing in the middle of the marked line removes 1-2 mm of excess, since two grooves are made on each plank.
- If you need to join two parts at a 90º angle, cut the pieces at 45º at the ends.
- For an end-to-end open miter connection (single straight), mark the cut locations on the oblique cuts of the planks.
- Before removing the groove from the board, double-check that the cut is correct on all sides.
- For an angular single connection that is not through the eye, an eye is made instead of a groove. In this case, the width of the tenon is left unchanged, and the length will be 0.3-0.8 of the width of the board being attached.
- Since the circular saw rounds the edges of the eye, leaving the shape of the tenon unchanged, it is advisable to refine the corners by turning them with a rasp.
The photo shows a groove being cut out with a drill.
The method is quite labor-intensive, but it can be called an alternative to the one described above. If you were unable to get a hand router, prepare a drill and chisel, ruler and pencil.
- Select a drill with a diameter corresponding to the width of the future groove.
- To guess the depth of the groove, you can make a mark on the drill itself (for example, draw it with bright paint).
- Draw two parallel lines along the block at the required distance from each other.
- Having secured the workpiece in a vice, drill a furrow, carefully monitoring the vertical position of the drill and maintaining the depth.
- When finished, remove all excess with a sharp chisel and sand with emery cloth.
Making a transverse groove with a hacksaw.
Well-done markings will help a lot here.
Select a hacksaw blade that is smooth and durable:
- To avoid mistakes, draw two lines along the length of the board, on opposite sides. The distance from the top plane to them will be the depth.
- Securely secure the block and begin sawing.
- It is important to monitor, checking the lines, how far the canvas fits into the wood.
- If the tool is skewed, you can ruin everything, so periodically watch the hacksaw’s entry into the material from the side angles.
- With a wide groove and a thin blade, it is more effective to make two cuts, again along the inner sides of the cut.
- All excess is carefully removed with a chisel and cleaned.
You can select a quarter using several methods using different tools. For example:
- electric plane,
- milling cutter,
- hand circular saw,
- stationary circular saw.
The last method - selecting a quarter using a circular saw - is the most convenient and productive. Let's consider it.
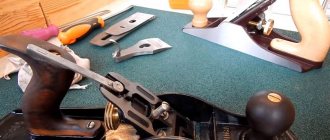
- We adjust the reach of the saw blade so that the cutting depth is equal to half the thickness of the board being processed. The easiest way to do this is right on the spot. To do this, place the board on the side of the saw blade, as shown in the photo, and adjust the reach of the blade.
- We install a parallel stop on the machine so that the width of the cut is also equal to half the thickness of the board. We take into account the thickness of the disk itself. This completes the machine setup.
- We make longitudinal cuts on opposite sides of the board.
- We make cuts from the ends of the board. A quarter is ready. As a by-product we get glazing bead)).
As mentioned, a stationary circular saw is very convenient for selecting quarters. (There is a separate article on our website about the types of circular saws and the features of their choice.) But it is not always in the master’s arsenal, and sometimes it is physically impossible to use it.
If you need to cut quarters out of thick, long boards, you can use a hand-held circular saw. The manufacturing principle and sequence of operations are the same. The difference is that in this case the board being processed and the tool change places. The board is fixed motionless, and the master moves the circular saw with a parallel stop along it manually.
Designs of cutters and their influence on the technology of milling operations
Wood cutters for a manual router can have stacked and monolithic designs. In the first case, the design of the tool is a certain set of plates made of high-speed steel, which are attached to the cutter shank by soldering with copper alloys (sometimes, in cheaper sets, tool steel is used instead of a carbide alloy, and alloy structural steel is used as the shank material).
In the second case, the cutter is a monolithic tool, which is made of tool steel. A special type of cutter for a hand router is formed by mounted cutters, which consist of a removable plate, which is then mounted on an adapter shank. Such cutters are the most technologically advanced to use, since when the cutting blade becomes dull on one side, the removable plate can be turned over to the opposite side and continue to use the tool.
When choosing a set of tools in question, pay attention to the following:
- Soldering of typesetting cutters must be done in such a way that the tool does not lose its longitudinal stability during long-term processing, especially if the workpiece is made of hornbeam, pear, oak and other hardwoods;
- When soldering tools, grades PSr40 or PSr37.5, with a high content of silver and copper, should be used as solders. Solders of other brands usually include nickel, which impairs the strength of the connection between the plates and the shank;
- The easiest way to check the thermal strength of a set cutter is by the thermal deformation of the tool during heating of each tooth to a temperature of 200...2500C: the tool after such heat treatment should not allow its longitudinal axis to run out by more than 0.05 mm;
- The stacking cutter should not be made by welding the shank to the working cutting part. Firstly, at the site of the weld, the strength of the metal is always reduced by 15...20%, and, secondly, with sharp impacts (for example, when cutting a cutter into hard wood), chips may appear on the surface of the weld. The use of such a cutter is unacceptable.
It is especially worth highlighting the problem of the hardness of cutters for a hand router. Manufacturers of sets of such tools may be from China. The price of such a tool is noticeably lower, but the quality of the metal from which the equipment is made also decreases. Most often this concerns monolithic cutters. It is impossible to evaluate the steel grade under normal conditions, but the test can be performed at home. To do this, it is best to use a calibrated file, after contact with which there should be no visible marks on the working surface of the cutter. This roughly corresponds to a hardness of 58…62 HRC.
The durability of cutters is determined by the intensity of their use. High-quality stacking cutters with working plates made of high-speed steels have the best durability, while monolithic cutters made from ordinary tool steel have the least durability.
Inlay
Cutting thin, flush inlays requires shallow cuts and precision, making a router the ideal tool for the job. Inlaying requires shallow digging into the wood to seat the pieces flush with the surface. You can do the job with other routers, but an edge router is best suited for this task. Its small size and much lighter weight are an advantage over other models, as they provide better accuracy when inserting inlay elements.
Source: hobbywood.ru
What is a milling cutter?
The device works due to the movement of the cutter, which affects the material being processed, and it, in turn, moves towards the cutter thanks to a special installation on the table. It is important to install the tool correctly and secure it in order to maintain operating conditions and safety rules (power up to 2000W).
Areas of application: carpentry work with different materials. Wood, acrylic, eurolining, organic glass, polycarbonate, parquet, etc. The machines come in prefabricated models or solid, easily transportable. The machines differ according to the type of processing and the decisive part in them is the cutters, which come in different shapes and types.
It is worth noting that cutters are sold in sets and individually. The choice between them depends on the goals of the work and the professional skills of the master. The kits may contain parts that may never be useful in the work; on the other hand, such kits are more profitable than the cost.
It is also recommended to purchase kits for beginners in this work, in order to have different options available for practice and training.