The chain is stretched
If the chain is used incorrectly or for a long time, it can become very stretched. This is due to the fact that metal can become deformed over time. Very severe wear becomes a prerequisite for which it is necessary to obtain a new version, but it is possible to use the old one for a short period. You can avoid rapid stretching only if you follow the operating instructions. To carry out the work you need:
- Hammer.
- Vise.
- Welding machine.
- Beards.
- Pliers.
It is not difficult to put on the stretched version, but with restoration there are quite a lot of problems, because the metal is characterized by increased strength. In this case, the main elements are fastened with rivets. The work is carried out as follows:
- The product is fastened in cleats.
- If the work is carried out using a grinder, in other words, there is a possibility that the surface will be damaged, because this tool is difficult to keep under control.
- After grinding, the rivets are knocked out. There is no need to throw it away because of its ability to be re-introduced.
- Chain manufacturers do not produce spare parts that are required for maintenance.
- You can make a rivet yourself, but the work is quite complicated.
- The product is divided into two parts. It is worth considering that the number of guides and the distance between them must remain constant.
When solving a problem with a large length, one should not forget that a very small chain cannot be tensioned. In addition, it is not recommended to apply oil to the chain of an electric saw.
How to Connect a Chainsaw Chain
Content
How to shorten a chainsaw chain without the help of others?
- Equipment and rules of use
- Tools needed
- How to remove rivets?
- Connection of links
- Bad consequences of incorrect circuit repair
- Contact an experienced welder
- How to make the right rivets using an electric drill?
- Why do chains stretch?
Virtually every owner of a suburban home has a chainsaw. And we don’t even have to talk about the inhabitants of rural areas: such a tool is an urgent necessity for them. And the chainsaw asks for careful handling and timely maintenance. All service rules are correctly stated in the annotation.
Equipment and rules of use
The saw kit should include several chains (minimum 3) plus 2 bars. After 3 hours of operation, it is recommended to rotate the tire. After another 3 hours, the chain is replaced. Such ordinary rules can significantly extend the service life of all parts of the chainsaw. But in life, we actually do not adhere to advice and are guided by our own ideas about what is necessary.
Comparison chart of chainsaw features.
After a certain time of operation of the chainsaw, we simply tighten the chain. And at a certain moment we notice that the tension system no longer allows us to tighten the chain. The chain has stretched to its maximum. You cannot work with it further, because the stretched chain will begin to break the driven sprocket, as a result of which tire wear will greatly increase. The chain needs to be shortened.
Another reason why you have to shorten the chain is to “fit” a longer chain from another chainsaw to fit your bar. This also happens quite often, because there is an opinion among users that higher quality chains are made for “professional” chainsaws.
Required Tools
Chainsaw manufacturers say that it is unrealistic to shorten the chain at home, because the development of their production itself is very complex and requires high-precision equipment. Practice indicates that nothing is impossible. In order to shorten the chain, you will need:
- vice;
- hammer;
- needle file;
- beard;
- pliers;
- electric welding machine (in some cases it is possible to do without it).
How to remove rivets?
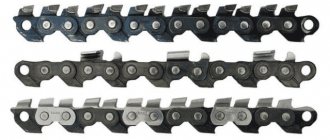
The main characteristics of a chainsaw chain.
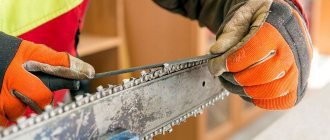
The chainsaw chain is difficult to disconnect. The rivets are made of high quality steel and have a geometric shape that does not allow the rivets to simply be knocked out of the link. The inside of the rivet has a larger radius. At this thickening, the link rotates, and the outer parts of the rivets serve only a connecting function, so they are quite easy to firmly fix on the outside of the chain. Removing the rivet is done in the following way: the chain is fixed in a vice, and the protruding part is ground off. When stitching, we try not to destroy the side parts of the links.
READ Repairing the Oil Pump of Chainsaw Shtil 180
It is not recommended to use a grinder, as the parts will heat up very quickly, which will lead to a change in the physical parameters of the metal. It is better to use a ratfile or needle file for grinding. Stitching is done on both sides of the link. Now the rivets can be knocked out of the chain using a bit, slightly bending the side parts of the links.
The circuit came out to be disconnected. Do not rush to throw away the rivet removed from the chain. It may be that you cannot find a suitable replacement for it. Chainsaw manufacturers do not imply that the chain will be repaired independently, therefore they do not release such rivets on the product market.
Diagram of a chainsaw tooth structure.
It is also more profitable for trading organizations to sell chains in their finished form than small parts for repair. For these reasons, it will be very difficult to find a suitable rivet with a suitable geometry. Making it at home will be even more difficult, so you will have to use an old rivet.
As you may have guessed, the chainsaw chain will have to be disconnected twice. Do not forget to calculate in all this so that the number of guide protrusions on the inside of the chain and the distance between these protrusions are combined with the chainsaw drive sprocket. If you are shortening an unusual chain, this is not necessary. And if this is a chain from another model of chainsaw, then everything needs to be measured and calculated very carefully. A deviation in the chain pitch (even a small one) from the characteristics given by the design will lead to the fact that the chain will stretch again in the shortest possible time (in the best case) or break the chainsaw sprocket. The end of the tire will come, as the driven sprocket will rapidly overheat.
HOW TO RIVET A SAW CHAIN
riveted and riveted the chain
using yews.
Riveted and riveted a chainsaw chain
Normal chain
You need to plug in the connection correctly and everything will be fine.
Connection of links
If all the characteristics of the chain are mixed with the parts of your chainsaw, then you can start connecting the links. We connect the links with a rivet, pressing their side parts . It will no longer be possible to rivet the protrusions, since they are ground flush with the links. You'll have to use electric welding. For this purpose, the electrode must be of the smallest diameter.
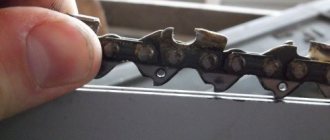
Determination of chain wear: a - wear of teeth, b - installation of an additional locking plate on the lock link.
It is not recommended to start welding right away, as this is a very delicate job. Practice doing this on other parts first. This way you will at least approximately understand at what current you need to weld and what welding time to choose. And the electrode will become shorter, which will allow welding to be performed more accurately. After all, a very short period of time is enough to “grab” the rivet. After training, we weld the rivet with the side parts of the link. All that remains is to file off the excess metal on both sides and the chain can be considered ready for use.
READ Carburetor Adjustment for Husqvarna 142 Chainsaw
Negative consequences of improper chain repair
chain repair option is not the most reliable, since no one guarantees you the high quality of the final product. The following consequences of such repairs are possible:
Scheme for sharpening a chainsaw chain with a file.
- During welding (especially at low current), excessive heating of the circuit elements was produced, which caused a change in the physical properties of the metal. Soft metal will allow the chain to stretch not along its entire length, but at the welding site. The chain guides will shift, and other elements of the chainsaw (sprocket, bar) will quickly fail.
- Welding depth is greater than planned. The inner part of the rivet was welded to one (or several) parts of the link, which became a violation of the mobility of the links. The consequences will be the same as those described in the first case.
- Welding quality is low. In this case, a circuit break may occur during its operation. The fact is that the chain experiences very high lateral loads during operation, so unreliable welding will quickly “wear out.” The possibility of injury will be very high.
Contact an experienced welder
The question may arise about the advisability of repairing a chainsaw chain, since the consequences of its repair can be so serious. But this is all only due to inept welding. An experienced welder will do this work quickly and efficiently, which will reduce the likelihood of negative consequences to almost zero. And when using rivets without subsequent welding, the previously mentioned moments simply disappear. The only question is where to get such rivets. But making them is not so difficult if you have a lathe.
How to make the right rivets using an electric drill?
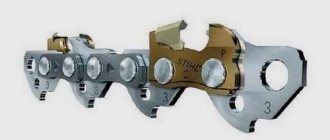
Chainsaw chain structure.
Don’t be afraid: no one is offering you to buy a machine. Use a regular drill. We will describe the entire process of making rivets using an electric drill and a regular needle file as follows. From a nail, the diameter of which is equal to the diameter of the inner part of the rivets (we check with a caliper), a workpiece is cut out - a piece about 7 cm long. This workpiece is fixed in the head of an electric drill. The drill itself must also be securely fixed.
Two files are attached to a wooden beam, the distance between them will be equal to the width of the inner part of the rivet. It may not be possible to do this quickly, but you must achieve absolute accuracy. All that remains is to organize a uniform supply of the block to the workpiece. We recommend using a piece of board, one end of which is secured to the stationary part of the workbench using a wide door hinge, and a block with needle files is attached to the other end of the board.
We check the perpendicularity of the location of the files and the workpiece - and you can get to work. Turn on the electric drill and smoothly lower the files. They will make grooves on the workpiece. It is not recommended to make rivets in one go, since you should not overheat the metal, but it is necessary to control the thickness of the workpiece on the machined part. A part of the rivet that is too thin can also harm you, so you need to achieve maximum accuracy. If you were able to do everything correctly, then all that remains is to cut off the rivet and use it to connect the chain links.
READ Calm Chainsaw High Idle Speed
It is better to cut the rivet manually, without using a grinder. Do not forget that when cutting metal at high tool speeds, a significant increase in the temperature of the material will occur, which is very undesirable. The finished rivet is in no way inferior in quality to the factory product, so the restored chain will last for a long time. Negative aspects when using homemade rivets will be practically eliminated. The main thing is that when installing the rivets, you do not forget to align the side parts of the links (after all, they had to be straightened when dividing the chain). Even slight protrusion of these elements from the design norm will lead to premature wear of the drive sprocket.
It is recommended to make several rivets at once using the previously described method. The point here is not only to stock up on such necessary elements for future use (although this is also important). It is more important to choose the most suitable size from the entire number of products: any deviation from the norm will make the chain vulnerable under high loads.
The use of remanufactured chains is not recommended when working with dense woods.
Why do chains stretch?
The question often arises as to why chains stretch. In a very large number of cases, the cause is the low quality of the chains. Counterfeit goods are present in a very high percentage on the market. But among the main reasons there are other, no less important points. It happens that the chainsaw causes the chain to overheat and stretch.
This happens due to the fact that the oil supply to the driven sprocket is not adjusted. It may happen that the oil supply hole is clogged or the adjustment is broken. The chainsaw requires periodic maintenance and adjustment.
Chains also stretch due to wear on the drive sprocket. It turns out that on a worn sprocket the guide protrusions slip. Parts with such friction are subject to heating very quickly, hence the reason for the chains to stretch. Practically, the same thing happens with low chain tension. The conclusion suggests itself: it is necessary to replace the drive sprocket, chainsaw tire, and adjust all elements. Otherwise, the problem will only get worse: the chainsaw will start to jerk, the chains will continue to stretch, and the engine will fail (with a very high probability).
And we also note that when working with a chainsaw it is necessary to use protective equipment.
This is especially true if you are using a remanufactured chain.
Circuit voltage
Stretching can be done using two methods: quick and forward. If stretch is used, then installing the chain on the chainsaw is carried out as follows:
- The nuts are unscrewed.
- The tire is held and lifted from the edge.
- There is a special bolt that is used to tension the chain.
- The tire is raised to eliminate the possibility of sagging.
It's quite easy to do similar work; you only need a small set of tools.
Tensioning the chain clockwise is carried out when there is not a lot of free time. The chain screw is fixed firmly to eliminate the possibility of rattling during operation.
How to properly put a chain and bar on a chainsaw: assembly
The procedure in question is quite ordinary. It is characterized by the following features:
- First, the chain brake is released.
- The tension screw is located in close proximity to the tire.
- The next step is to tighten the cutting element clockwise.
- If it becomes difficult to move the chain, you will have to loosen the fixing screw.
Modern designs of chainsaws greatly simplify similar work. Therefore, you can perform it without the help of others, even in the absence of special tools.
How to properly put a chain on a chainsaw: direction
When considering how to correctly install a chain on a chainsaw, we note that the modern version of the tool has a special installation wheel. This greatly simplifies the procedure. Among its features, we note the following points:
- Considering how to properly put a chain on a chainsaw, we note that first you should prepare a flat surface. Because of this, the possibility of damage to the instrument can be eliminated. After which the main part of the tool, the bar and the chain .
- The next step is to remove the protection that is designed to protect the sprocket. It is almost always secured using an ordinary wing nut.
- On the tire, the tension sprocket turns to the right until it stops. It is in this position that the tool is installed.
- Then the chain is evenly applied to the fixing element. A fairly common question can be called which side this element is placed on. Installation starts from the top, turning the chain so that the bar is on top. Such operations should only be performed with thick gloves that can withstand the impact of the cutting edge. The cutter on the end surface should be placed forward.
- Both elements are put on the sprocket.
- The next step is to reattach the chain sprocket cover. With all this, it is important to ensure that the pins coincide with the holes. Incorrect fixation can lead to rattling or other problems.
- It is necessary to ensure that the guides fall into a special groove.
- The condition of the chain is visually checked after it is fixed.
The next step is to specifically check that the chain has not been overtightened. To do this, release the chain brake and pull it along the mowing line. The check is carried out only with special gloves.
In general, we can say that the procedure in question is quite simple to perform and does not require special tools. But, servicing not all chainsaws is as simple as indicated above.
Quick chain tensioner
To install the chain, you need to use the installation wheel. There is no need to use other tools.
- We prepare the surface for work. It should be comfortable and level. In order not to spoil the surface and the instrument itself, we cover it with something soft, such as a rug. Now we lay out the tire, chain and motor block separately on the surface.
- The next step is to open the wing nut, and then remove the chain sprocket cover.
- Turn the tension sprocket attached to the tire to the right until it stops.
- Gradually place the chain over the bar, starting from the top of the bar. It is important to ensure that the chain is directed correctly. Don't forget about protective gloves.
- Now the chain must be turned over so that the bar is on top of the chain.
- We re-check the accuracy of the location and direction of movement of the chain. The cutter located on the top of the tire should face forward.
- We put the chain assembled with the tire on the sprocket. In the process, the guide bar is pushed onto the shoulder bolt.
- Now we put the chain sprocket cover back on the engine block, it is important to make sure that all the pins fit into the corresponding holes. Turn the wing nut until the chain sprocket touches the engine housing. The sprocket cap does not need to be fully tightened.
- Next, turn the clamping screw in the direction of the top of the tire. The drive chain links must fit into the tire groove.
- We tighten the wing nut so that the chain sprocket cover sits tightly on the engine block. Close the wing nut until it locks.
- We check visually that the chain is not sagging.
- Next, we check to see if our chain is overtightened. To do this, release the chain brake and pull the chain along the line of movement with your hand (do not forget about protective gloves).
- After this, the saw is ready for use and only the last step remains - activating the chain brake.
Thus, installing a saw chain and bars with a quick chain tensioning device has its clear advantages, namely, that tensioning the chain is not difficult and does not require additional tools.
Functions and structure of a chainsaw
In order to understand the peculiarities of the procedure under consideration, you should carefully examine the devices of the chainsaw. Among the features, the following points can be noted:
- The main part is represented by the engine. A single cylinder design is almost always installed because this is completely sufficient for cutting.
- The piston system is two-stroke, and the cooling is air. During operation, a relatively small amount of thermal energy is released, so blowing is sufficient to remove heat.
- As in almost all other designs, this one requires oil, which ensures smooth movement of the moving element. Oil is added directly to the fuel. Depending on the design features, oil and fuel are mixed in a spectrum of 1:20 or 1:50.
- An air filter can also be called a fundamental structural element. Fuel is mixed with air to obtain a certain consistency, which is supplied to the combustion chamber. If you do not constantly clean the filter element, in other words, there is a possibility that debris will get into the cylinder block. This will be a prerequisite for rapid wear or even jamming of the device.
- The starter is a special design that is driven by a rope with a handle. If the rope is pulled very hard, the flywheel is set in motion.
- The main working mechanism is represented by a tire with a fastener. It is designed to guide the chain and secure it.
- A traditional chain consists of 3 teeth: driving, cutting, connecting. The cutting edge is secured using rivets.
READ Sharpening Wheels for Circular Saws
A fairly common situation is the case when you have to pull the handle for a long time. It is due to the fact that the carburetor incorrectly mixes fuel with air. It is almost always enough to configure the device in accordance with the operating features. Chainsaw
will not last long if proper maintenance is not provided.
Bus problems
Nowadays, there is often a problem associated with unreliable fixation of the tire. It is characterized by the following features:
- The housing with the guide element is secured with a bolt.
- The connection is ensured by two plates, one of which is located on the body, the second on the one that is created to guide the chain during operation.
- The drive sprocket and tire support are protected by a special casing, which eliminates the possibility of damage to the main parts.
- When the locking bolts are loosened, the structural element in question begins to move and vibrate during operation. A similar problem can be solved by tightening the fastening parts.
Other shortcomings simply cannot be solved. Almost always, deficiencies become a prerequisite for which you have to receive a tire and replace it.
How to properly install a chain on a chainsaw
A chainsaw can be used to perform quite a huge amount of work . The main cutting element of such a tool is represented by a chain with different blades. Modern embodiments are characterized by the fact that they can be serviced without the help of others. With long-term cutting or failure to follow the main tips, the cutting edge quickly wears out. That’s why you have to remove and sharpen the chain, and then install it. A similar procedure is characterized by a fairly huge number of features, which we will discuss in more detail later.
How to Correctly Put a Chain on a STIHL Chainsaw
Do-it-yourself chainsaw sharpening
The chain tooth scales the wood as a plane, and the thickness of the chips is adjusted by the height of the stop.
Intense use of the saw leads to rapid dulling of the chain. Several sharpenings may be required within one day. The problem is also made worse by the fact that the tooth quickly becomes dull when it meets the ground. It is enough to put the tire on the tire once or twice, and the work can be stopped. the chips become small and the saw stops penetrating into the wood.
The sooner dull teeth are sharpened, the less material must be removed when sharpening. The service life of the saw chain is longer. To determine the moment when sharpening is already required is quite simple. An important feature is the feeding force. A correctly sharpened chain is pulled into the cut with a slight push. If, on the contrary, the chainsaw is forced to see with increased feeding force, the teeth become dull. A dull chain can also be recognized if, instead of a large thick chip, only small chips are pushed out of the cut.
In this situation, the chainsaw needs to be sharpened urgently. Do not use a dull or defective saw chain. the result is high tension in the body, high cyclic load, and poor cutting results. In addition, this means reduced performance, high fuel consumption and increased wear on all parts of the chain saw.
Why the chain flies - find out the reasons
When considering how to install a chain on a chainsaw, you should also pay attention to what causes it to fall off. There are three main reasons:
- Incorrect tire operation.
- Malfunction of the main elements.
- Weak fixation of the driven sprocket.
- Strong chain elongation.
Each reason becomes the reason why quite a lot of difficulties arise with the use of a chainsaw.
Why does the chain slip off?
Many, even the most experienced chainsaw users, have encountered in their own lives a situation where the chain jumped off the guide bar
while working. The most common cause is insufficient chain tension or wear.
In 80% of cases, stretched chain links slip off the teeth of the drive sprocket, and it flies off the guide under the influence of centrifugal force. Although from time to time a problem arises due to the incorrect position of the sprocket relative to the axis of rotation or a loose saw bar on the chainsaw.
Negative consequences of improper chain repair
The chain repair option considered is not the most reliable, since no one guarantees you the high quality of the final product. The following consequences of such repairs are possible:
Sharpening a chainsaw blade.
- During welding (especially at low current), the circuit elements overheated, which led to a change in the physical properties of the metal. The soft metal will allow the chain to stretch not along its entire length, but at the welding point. The chain guides will move, and other elements of the chain saw (sprocket, bar) will quickly fail.
- Welding depth is greater than planned. The inside of the rivet was welded to one (or more) parts of the link, which interfered with the mobility of the links. The consequences will be the same as described in the first case.
- Welding quality is low. In this case, the circuit may break during operation. The fact is that the circuit is subjected to very high lateral loads during operation, so unreliable welding quickly “develops.” The possibility of injury will be very high.
READ Adjusting the Husqvarna 137 Chainsaw
What to do if the chain sags
If the chain sags, there is a risk of injury to the operator - because the saw blade may break or simply fly off the guide sprockets. Naturally, modern chainsaws have safety and emergency stop systems, but these systems do not always work correctly.
It is important not to install a chain with defective or warped saw links on a chainsaw, except for the risk of breaking at any moment; such a chain will sharpen the guide grooves of the bar, which will lead to its distortion, uneven cutting and failure of the guide bar .
What a chain to sag during even short-term use?
- There may be problems with the guide bar. From time to time, due to operator oversight or due to severe wear of the threads of the fixing bolts at the point where the guide bar is attached, vibration may occur, which causes the chain tension to loosen. It is necessary to check the condition of the fixing bolts and, if necessary, replace them with new ones. When the bolts are sufficiently tightened, such problems do not appear.
- As long as you handle your chainsaw fairly carefully over time, it doesn't matter which chain may wear out. Trying to repair it or assemble one from several is a futile task. If the chain set has stretched due to natural reasons, then it would be best to purchase a new one.
- The asterisk is skewed. Due to the misalignment of the sprocket teeth, sagging may occur. In this case, it would be best to contact a service center for repairs and an option for the position of the drive sprocket. It is quite difficult to secure the driven sprocket in the correct position, because you will have to dismantle many small parts, remove the guide bar, and then reassemble everything in reverse order.
Do-it-yourself electric saw chain sharpening
If signs of wear appear on the cutting teeth, it is recommended to sharpen the chain for the electric saw. To do this yourself, you will need a set of special tools:
- Files – flat and round. Their diameter must match the chain teeth.
- Mandrel.
- Caliber.
How to properly install a chain on a chainsaw.
To avoid unnecessary work, mark the first tooth with a marker before sharpening.
The saw element is not removed when sharpening; it is left on the bar, which is firmly fixed in a vice. Movements must be rhythmic, fast, accurate and made in one direction, observing the sharpening angle. When working with a round file, you need to make sure that it does not extend beyond the level of the chain teeth by more than 20% of its length.
Also, do not forget about the limiter; it also needs to be processed with a file, since over time this part wears out and loses its shape. The gauge (with its end side and at an angle of 90 degrees relative to the saw bar) must be applied to the edge of the stop. When the limiter protrudes beyond the caliber, you will need to trim it using a flat file.
READ First launch of the STIHL ms 180 chainsaw
You can check how correctly the sharpening was carried out only when cutting the wood. This cannot be determined visually.
Despite the apparent complexity of the actions, replacing the saw elements on an electric saw, adjusting the tension and sharpening will not require the master to contact a service center. The main thing is to do everything in a timely manner, avoiding excessive wear of parts and not violating operating conditions.
How to properly put a chain and bar on a chainsaw! ASSEMBLY
- Too much tension causes excessive stress and the product may burst.
- Insufficient tension leads to chain wear and many other problems.
In general, we can say that there are practically no problems with fixing an unworn product.
Chain tension
Chain
Chainsaws, together with the guide bar, experience the heaviest loads during operation, unlike other parts of the chainsaw. Over time, it lengthens in size due to the boring of gaps in the connecting links. This process occurs with all types of chains, therefore, when operating a chainsaw, you need to periodically monitor the correct chain tension and its wear.
The state of the circuit depends on:
- her lifespan;
- safety of felling or dissolving trees;
- ICE resource.
If the chain is overtightened, the efficiency of sawing work decreases, and the motor and gearbox are subjected to increased loads. The guide bar gets very hot due to increased friction, and the operating mode of the chainsaw leads to excessive consumption of fuel mixture.
Direction of the chain and which side to wear
A chainsaw chain, if you look closely, has saw teeth pointing in one direction. Therefore, the correct direction of the saw teeth on the guide bar is painfully easy to find: if you position the chainsaw itself in the plane in which it is in the process of operation, then a row of teeth located on top of the guide bar
, the sharpened edges should be oriented towards the end of the bar. At the same time, the row of teeth, which is located at the bottom of the chainsaw, with sharpened edges should look in the opposite direction, towards the drive sprocket.
READ Chain Sharpening Machine Caliber Master
How to untangle?
When removing an old chain or putting a new one on the chainsaw guide bar, it may become tangled. This can also happen due to careless transportation. When the chain is entangled, it curls into rings.
Due to the lack of flexibility in the transverse direction, the chain is very difficult to untangle with bare hands, because when you try to untangle one ring, a new ring will form in another place.
You need to place the chainsaw chain on a horizontal surface and untwist the rings in different directions, while pulling the blade in such a direction that the diameter of the rings increases. Sooner or later the chain will unravel into its natural position.
There is another way - you can rivet one link of the chain and straighten it, then connect it into a ring and rivet the riveted links back.
Step-by-step installation algorithm
Not all modern chainsaws are equipped with an installation wheel, which significantly simplifies the function of installing the saw blade. Systems with an adjustment wheel among household chainsaws are generally unique. Therefore, it is very important to know the technology and sequence of installing a chain on a chainsaw.
Main points to pay attention to:
- Prepare a flat surface on which you will assemble the chain and bar. This will minimize the chance of damage to the chainsaw or loss of small parts. A tire is laid out on the prepared surface and a chain next to it in parallel.
- Remove the sprocket protection; on modern chainsaws it is enough to unscrew the wing nut; on older models, a spanner of the appropriate size may be useful.
- At the base of the guide bar,
turn the tension sprocket all the way to the right. The chain is installed exclusively in this position. - Later, the chain is placed link by link onto the locking groove on the guide bar. Install the chain from the top of the guide, rotate it evenly so that the bar is always on top and the chain is on the bottom; this will allow it to always be taut and fit into the guide groove without problems. When you do this step, be sure to wear thick protective gloves, because your fingers will touch the cutting edge. If you look from above, the cutter is always placed forward towards the end of the guide bar
. - Place both the bar and chain on the driven sprocket.
- Secure the chain sprocket cover in place. Make sure that all mounting pins line up with the holes. Incorrect installation with distortions or not completely may be a prerequisite for third-party noise and rattling.
- Make sure that the guides fit into the special mounting groove.
- After installation, check that the chain is secure on the chainsaw and on the bar. Everything must be firmly secured without any backlash.
The most important point is the degree of chain tension after installation. Setting the correct tension is painfully simple and takes less than 3 minutes. First you need to loosen the nuts on the protective cover. Using a freely rotating adjusting screw, set the correct tension so that the chain does not pull more than 3-5 mm of the guide bar
All that remains is to tighten the nuts and check the tension. If adjustment is necessary, adjust the tension again.
How to install a bar and chain on a chainsaw, see below. which shows the exact method of action:
How to untangle a chainsaw chain
When removing an old one or when putting a new chain on the chainsaw guide bar, it can get tangled. This can also happen due to careless transportation. When the chain is entangled, it curls into rings.
It is necessary to place chain on a horizontal surface and untwist the rings in different directions, while pulling the blade in such a direction that the diameter of the rings increases. At some point the chain will unravel into its natural position.
There is another method - you can rivet one link of the chain and straighten it, then connect it into a ring and rivet the riveted links back.
At the moment, there are a huge number of models of chainsaw chains on sale. First, you need to know which size is suitable specifically for your chainsaw and not make a mistake in purchasing. The second step is to correctly install it on the chainsaw. This is a somewhat labor-intensive process, but if you know how to independently put on and adjust the chain to the saw bar, then a conscientious owner should not have any problems. We have tried to carefully outline the process of installing a saw blade on a chainsaw.
We hope that after reading this article you will succeed the first time. But in order to minimize the occurrence of problems with a chainsaw and chain in the future, do not forget the 3 main rules:
- If the chain
is worn out and sagging, replace it with a new one; - If vibration occurs during sawing and the cut is not good, watch the chain tension on the chainsaw;
- Never use saw blades that are defective or repaired by unknown specialists; the health of yours and those around you is even more important than saving a little money on purchasing a new and reliable chain.
How to install a saw chain and guide bar
Installing the chain involves checking its tension after each threading session. A poorly secured part slides off the surface of the tire and injures the worker. Inspect the tension with your hands, protecting them with gloves. In addition, new chains change their length during operation, so checking should be carried out very often.
Sometimes during the work an important detail arises: it is not possible to install the chain without additional heating and corresponding deformation from the lower part of the bus. No working professional will ignore the tension of the chain in a chainsaw. By pulling back the track slightly, he instantly assesses the amount of chain stretch.
The sound that appears at the moment of impact may be dull and short. The track is tensioned sequentially, performing several simple operations. Inspect the fuel valve. The worker must ensure that the fuel system is blocked. You can remove the spark plug wiring or open the decompression valve. The power saw plug is pulled out of the socket.
The chain is turned in the direction of its rotation during operation. Defects in chain tension are noticeable visually: lower sagging of the caterpillar is formed. Control is carried out by adjusting the circuit at certain time intervals.
There should be a constant reserve in the upper part of the shank that is formed when the chain is pulled. When pulled too hard, the track barely turns and quickly stops moving. Adjustment of the chain in the working position is not allowed. Such negligence leads to deformation of the tire or breakage of the crankshaft. The track tension during operation is carried out without tools. The maximum cutting depth is mm, the weight of the cutting equipment is 9.4 kg.
All that remains is to tighten the nuts and check the tension. If adjustment is necessary, adjust the tension again
What is important to know: when the chain is in operation, due to frictional forces, its metal heats up greatly and expands, and its length increases. Therefore, it is important to regularly check the tension and adjust it in time.
How to install a bar and chain on a chainsaw, see the following video, which presents a clear algorithm of actions: When removing an old chain or putting a new one on the chainsaw guide bar, it may become tangled.
This can also happen due to careless transportation. When the chain is entangled, it curls into rings. Due to the lack of flexibility in the transverse direction, it is very difficult to untangle with bare hands, because when you try to untangle one ring, a new ring will form in another place. You need to place the chainsaw chain on a horizontal surface and untwist the rings in different directions, while pulling the blade in such a direction that the diameter of the rings increases.
Sooner or later the chain will unravel into its natural position. There is another way - you can rivet one link of the chain and straighten it, then connect it into a ring and rivet the riveted links back. Many, even the most experienced users of chainsaws, have encountered in their lives a situation where the chain jumped off the guide bar during operation. The most common cause is insufficient chain tension or wear.
Although sometimes the problem appears due to the incorrect position of the sprocket relative to the axis of rotation or a loose saw bar on the chainsaw.
The chain is an important element in the design of a chainsaw. It bears the greatest load during operation, so high-quality and systematic care is required.
Nowadays there are many models of chainsaw chains on sale. Click to cancel reply. They're discussing it now. A plastic border at the dacha is beautiful, practical and economical!
Why the chain flies, find out the reasons
How does an oscillating spindle machine work? How an oscillating spindle machine works What is tableted salt and what is it used for Surface grinding machine: advantages and disadvantages Eccentric grinder: main points Vitamin greens at any time of the year: vegetable garden on the windowsill How to choose the right electrodes when welding with an inverter.
How to choose a sandblaster for home use. We tell you how to repair an inverter welding machine.
Bus problems
When working with a bus, the clinker tension is almost always weakened. Usually this problem appears when the tire is attached.
This place is located in the groove between the outer plate, which is located on the body of the chain set and the inner plate located on the motor housing. The body with the tire is secured with a bolt. This mount is called the "motor assembly". The drive sprocket and tire supports are protected by special covers.
If the locking bolts are loose, the tire will begin to move or vibrate. If the tire is in good condition, then the chain tension should be normal. After stretching, she will spend a minimum of 5 working days without braces. Therefore, you need to tighten the bolts that hold the tire tightly.
Lead star problems
From time to time, chain slack occurs due to problems with the drive sprocket. A more common situation is when it is poorly secured. Step-by-step method to tighten the sprocket:
- Remove the motor protective cover.
- Remove the air filter and unscrew the spark plug, placing in its place a special stopper to fix the piston in a stationary position.
- Using an angle grinder wrench, rotate the clutch disc clockwise to its highest position. Check the tightness of the sprocket and adjust its position.
Sketch 3 – Chainsaw Lead Star
After clamping, assemble the chainsaw back, be sure to put on the protective cover. When assembling, you should check that the chain fits tightly onto the bar.
If you have been wondering why the chain is flying off your chainsaw, then there are some problems with the mechanism. There are three main reasons for this malfunction: incorrect tire operation, chain elongation and a poorly fixed driven sprocket. We will carefully discuss each of the likely circumstances of failure.
Functions of the chainsaw device
The main part of a gasoline saw is the engine. Most modern devices have a single-cylinder engine. Air cooling, two-stroke piston system. Oil in these types of engines is added directly to gasoline, and all due to the fact that the fuel is constantly washed away from the crankcase. The oil-gasoline ratio ranges from 1:20 to 1:50, depending on the chainsaw manufacturer.
READ Chainsaw Caliber BP 2600 18u Carburetor Adjustment
The air filter on chainsaws plays a more important role. It needs constant cleaning. If you allow the filter to become very dirty, dust from it will fall directly into the piston system, which will damage the motor.
If the filter is clogged, the saw loses speed and the engine begins to overheat, which can cause the piston rings to burn.
The starter on chainsaws is a rope with a handle, by pulling which you control the engine. When you pull the rope, the teeth catch on the ratchet and the flywheel begins to spin.
Many people complain that it takes a long time to pull the rope to light the engine. This depends on whether the carburetor is positioned correctly. If the carburetor produces the correct mixture of oil and gasoline, then problems will not appear.
The main working mechanism is a tire with a fastener.
The chain consists of 3 types of teeth: leading, cutting and connecting. They are connected with rivets. The cutting teeth are located on 2 sides: right and left.
Chains come in two types: high profile and low profile. The 1st type includes clamps in which the teeth are placed with a huge gap, in the 2nd - with the smallest gap. In addition, chains can vary in the thickness of the shank and the length of the mowing line. The chainsaw chain is attached to a bar that guides it to the right side. The end of the bar has a defined groove that holds the links and allows the chain to spin. There is a driven sprocket in front of the tire. The chain with the bar is called a headset, since they are removable parts of the chainsaw.
The gasoline saw has an automatic chain lubrication system. The tire supplies oil, which then absorbs the sawdust. If the saw is idling, the oil supply stops.
How to Install a Chain on a Husqvarna Chainsaw
Content
Installing a chain on a chainsaw, how to properly pull and check the tension
If you have a chainsaw at home, you should know that it requires special care. It is necessary to periodically clean and sharpen the chains, clean the air filter, oil supply and tires. And, of course, you need to monitor the tension of the chain, since if the tension is poor, there is a risk of not only damaging the saw, but also your health if the chain flies off at high speed.
Functions of the chainsaw device
The main part of a gasoline saw is the engine. Most modern devices have a single-cylinder engine. Air-cooled, two-stroke piston system. The oil in these types of engines is added directly to the gasoline, all because the fuel is constantly flushing the crankcase. The oil-gasoline ratio ranges from 1:20 to 1:50, depending on the chainsaw manufacturer.
The air filter on chainsaws plays an equally important role. It needs regular cleaning . If you allow the filter to get too dirty, dust from it will fall directly into the piston system, causing engine damage.
If the filter becomes clogged, the saw will lose speed and the engine will begin to overheat, which can cause the piston rings to burn.
Starter for chainsaws. It's a rope with a handle that you pull to control the engine. When you pull the rope, the teeth catch on the ratchet and the flywheel begins to rotate.
Many people complain that it takes a long time to pull the rope to ignite the engine. This depends on whether the carburetor is positioned correctly. If the carburetor produces the correct mixture of oil and gasoline, then there should be no problems.
Main working mechanism . tire with fastener.
The chain consists of three types of teeth: leading, cutting and connecting. They are connected with rivets. The cutting teeth are located on both sides: right and left.
Chains come in two types: high profile and low profile. The first type includes clamps in which the teeth are located with a large gap, in the second. with less clearance. Additionally, chains can vary in shank thickness and line length.
The chainsaw chain is attached to a bar that guides it to the right side. The end of the bar has a specific groove that holds the links and allows the chain to rotate. There is a driven sprocket in front of the tire. The chain and bar are called accessories because they are removable parts of the chainsaw.
READ DIY Chinese Chainsaw Repair Video
The gasoline saw has an automatic chain lubrication system. The tire supplies oil, which then absorbs the sawdust. If the saw is idling, the oil supply stops.
Why the chain flies, find out the reasons
If you have been wondering why the chain is flying off your chainsaw, then there are some problems with the mechanism. There are three main reasons for this malfunction: improper tire operation, chain elongation and poorly fixed driven sprocket. We will discuss each of the possible reasons for failure in detail.
Bus problems
, the clinker tension is almost always . This problem usually occurs when the tire is attached.
This space is located in the groove between the outer plate, which is located on the chain set housing, and the inner plate, located on the motor housing. The body with the tire is secured with a bolt. This mount is called the "motor assembly". The drive sprocket and tire supports are protected by special covers.
If the stop bolts are loose, the tire will begin to move or vibrate. If the tire is working properly, then the chain tension should be normal. After stretching, she will spend a minimum of five working days without braces. Therefore, it is necessary to tighten the bolts that hold the tire securely.
How to change the chain on a chainsaw? Replacing a chain on a chainsaw.
chain
on
the chainsaw
should be changed depending on wear.
If the chain
is simply stretching, replacement is not required.
Tire installation
Accessories for chainsaws
.
Chainsaws
. .
To understand how to pull a chain on a chainsaw, you first need to locate and release the chain brake. The tension screw is located next to the bar and is cranked until the chain is tensioned over the bar. Then pull the chain clockwise. If it does not move, you need to loosen it a little by turning the tension screw in the opposite direction.
The chain is stretched
If there is a chain on the chain saw, this indicates a malfunction of some mechanism; one possibility is that the chain is worn out.
Over time, the metal deforms and the chain becomes 0.5-1 cm longer. The best way to fix this problem is to buy a new chain, but there is a way to get the old one working again. Experts say that it is very difficult and almost impossible, but we will tell you how you can do it at home.
For this we will need :
- vice;
- over-file;
- electric welding machine (not necessary in all cases);
- hammer;
- pliers;
- beards
READ How to Make a Snowmobile From a Saw Ural
Regular chainsaws are made of strong steel, making them difficult to separate. Disconnect the chain on the inside of the rivet, which serves as the connecting mechanism.
To start, the chains should be secured in a vice and then gradually grind down the protruding part. You need to shred the file or file. Bulgaria is not recommended for use as there is a risk of damage to the side parts of the links. After grinding, the rivets are knocked out with a beard. A broken rivet cannot be discarded. You may not be able to find a replacement for it. Chainsaw manufacturers do not produce separate chain parts because they do not expect consumers to repair the chain themselves. To make a new rivet yourself, you will most likely not be able to do this, so you will have to install the old one.
To shorten the chain, you need to split it into two places. But remember that the number of guide protrusions on the inside of the chain and the distance between them must be combined with the drive sprocket.
After removing one or more links (depending on the degree of chain stretch), the chains can be connected. We connect with the old rivets, while at the same time pressing them tightly on the sides.
Next we need a welding machine. The rivet must be welded to the sides of the line. After this we remove the excess with the file that was formed during welding. The circuit can be considered operational.
Poorly fixed drive sprocket
One of the possible options for sagging on your device. problem with the drive sprocket . Most often, everything happens because the star is poorly secured. Now we will tell you how to properly attach the sprocket and then put the chain on the chainsaw.
First you need to remove the engine cover. Then remove the spark plug protective cover and pull out the air filter. Then you need to unscrew the spark plug using a special wrench. A special plug is placed in its place, which fixes the piston in a certain position. Using a special wrench (you can use a universal Bulgarian wrench), turn the clutch plate clockwise until the piston reaches its highest position. If you look into the spark plug hole, the piston should remain down. You can use a thick rope as a cork; it needs to be folded several times. Once secured, the drive sprocket can be tightened by rotating the clutch plate counterclockwise.
After clamping, you need to do everything in reverse order, that is, assemble the chainsaw. There is a chain on the tire, it should go to the drive sprocket, which holds it. The tire is placed in special holes for fastening and bolting. Then put down the protection.
READ How to Use a Chain Sharpening Template
How to Tighten: Installing a Chainsaw Cutter
We dismantled the main causes of chain sagging. How to install a chain on a chainsaw, described in the paragraph above. Now you need to tighten the chain correctly and check if it is loose.
Circuit voltage
You can tighten the chain in two ways : fast and frontal. It is best to stretch the frontal path.
If you are holding the front stretch, then you will need to unscrew the nuts holding the tire in place and lift it up along the edge. Using the special bolt on the right, you need to tighten the chain to get an acceptable stretch, and then raise the bar even higher and clamp it.
If you are using the quick stretch method, you will first need to lift the fender nut handle and loosen it. Then tighten the chain tension screw clockwise until it stops. Then tighten the fender nut and lower the handle.
Check the stretch
To check chain tension, you must disable the saw's brake system. Then manually hold the chain on the bar, if it runs smoothly and doesn't sag, then everything is fine. If the chain runs very tightly, it must be slightly loosened, since there is a risk of breaking during operation.
Tips for use
It is not enough to know how the chain is tensioned on the chainsaw. You need to properly care for the saw, then you extend the life of not only the tenacious, but also the entire mechanism. Here are some operating tips :
- Clean the air filter regularly and lubricate it with oil. If necessary, replace the filter with a new one.
- Before starting work, always check that all nuts and bolts are tightened so that there is no malfunction during work.
- Lubricate the bearings regularly and don't forget to clean the spark plug.
- Lubricate the driven sprocket. And after working with the chainsaw, do not forget to clean it.
- Always lubricate, sharpen and tighten the chain on time, then there will be no problems with the bar and chain.
If you use all the tips above, your device will last much longer than the warranty period.
The chain is stretched
If there is a chain on the chain saw, this indicates a malfunction of some mechanism; one possibility is that the chain is worn out.
Over time, the metal deforms and the chain becomes 0.5-1 cm longer. The best way to eliminate this problem is to buy a new chain, but there is a method to return the old one to work. Experts say that this is very difficult and almost impossible, but we will tell you how this can be done at home.
For this we will need:
- vice;
- over-file;
- electronic welding machine (not necessarily in all cases);
- hammer;
- pliers;
- beards
Regular chain saws are made of strong steel, making them difficult to separate. Disconnect the chain on the inside of the rivet, which serves as the connecting mechanism.
To start, the chains should be secured in a vice, and then the protruding part should be crushed evenly. You need to shred the file or file. Bulgaria is not recommended for use because there is a risk of damage to the side parts of the links. After grinding, the rivets are knocked out with a beard. A broken rivet cannot be discarded. You may not be able to find a replacement for it. Chainsaw manufacturers do not create separate parts for the chain because they do not imply that consumers can repair the chain on their own. To make a new rivet without the help of others, most likely it will not work for you, so you will have to install an old one.
To reduce the chain, you need to split it into two places. But understand that the number of guide protrusions on the inside of the chain and the distance between them must be combined with the drive sprocket.
After removing one or more links (depending on the degree of chain stretch), the chains can be connected. We connect with the old rivets, while at the same time pressing them tightly along the edges.
Then we need a welding machine. The rivet must be welded to the sides of the mowing line. After which we remove the excess with the file that was formed during welding. The circuit can be considered operational.
At the moment, there are a huge number of models of chainsaw chains on sale. First, you need to know which size is suitable specifically for your chainsaw and not make a mistake in purchasing. The second step is to correctly install it on the chainsaw. This is a somewhat labor-intensive process, but if you know how to independently put on and adjust the chain to the saw bar, then a conscientious owner should not have any problems. We have tried to carefully outline the process of installing a saw blade on a chainsaw.
We hope that after reading this article you will succeed the first time. But in order to minimize the occurrence of problems with a chainsaw and chain in the future, do not forget the 3 main rules:
- If the chain is worn out and sagging, replace it with a new one;
- If vibration occurs during sawing and the cut is not good, watch the chain tension on the chainsaw;
- Never use saw blades that are defective or repaired by unknown specialists; the health of yours and those around you is even more important than saving a little money on purchasing a new and reliable chain.
Installing a chain on a chainsaw, how to pull it correctly and check the tension
If you have a chainsaw
at home, you should know that this requires special care. It is necessary to clean and sharpen the chains from time to time, clean the air filter, oil supply and tires. And, of course, you need to pay attention to the chain stretching, because if the chain is not stretched properly, there is a risk of not only destroying the saw, but also your health if the chain flies off at high speed.
Do-it-yourself chain shortening
You can shorten the chainsaw chain with your own hands using simple tools. This method is less reliable, but easy to use and does not require special skills in working with riveting equipment. Disadvantage - you cannot control the strength and quality of crushing of rivets. This may cause the tool to break under heavy loads.
What tools will you need for home repairs?
The work can be done using the most accessible tools. Depending on your skills and abilities, you may be required to:
- vice;
- Bulgarian;
- hammer;
- chisel;
- needle file;
- beard;
- pliers or passages.
Some craftsmen also use an electric welding machine. It is not recommended to use it, since the seams after welding quickly become unusable under the influence of vibration during intensive operation of the chainsaw. This method is only suitable for gear chains that transmit force to the drive sprocket.
Removing rivets
To separate the links, physical force is required, since high-quality steel is used to manufacture the headset. Before starting work, secure the chain firmly in a vice to avoid injury during removal. Grind off the protruding part with a needle or file. The rivet itself can be removed with your own hands in the following ways:
Continue sanding until the bridge shows through. Attach the beard and gouge out the metal with a hammer. Grind down the rivets with a grinder. The disadvantage of this method is that you can damage the chain itself.
The work must be carried out carefully, periodically wetting the area with water. After holding the chain in a vice by the guides, cut off the rivets with a chisel.
If it is necessary to increase the number of links or remove one of them, then it is necessary to remove at least two rivets (left and right). When using a grinder, the metal can heat up, so after grinding you need to wait until it cools down or work with protective gloves.
Connection of links
You can purchase a new link for any chainsaw model in any specialized store, remove it from the old headset. The use of donor spare parts is not recommended, as this reduces the quality of the cutting blade. Installation technology:
- Install the link with new rivets on the chain. Place open side up on an anvil.
- Place the top plate on the rivets and tap with a hammer several times to ensure a tight connection.
- Place the beard on the rivet and give 1-2 strong blows with a hammer. Achieve pronounced thickening and flattening of the metal. Repeat the operation on both sides of the link.
After work, you should check that the chain is movable and that all its elements move freely in different directions. This avoids jamming during the sawing process.
How to properly put on and tension a chain?
Before starting work, you should wear gloves to avoid cuts from sharp teeth. You can only tension a cold chain - after cooling it can burst from overvoltage, damaging the mechanism
Remove the protective cover from the chainsaw and carefully place it on the bar
Depending on the configuration of the tool model, tension is applied manually or using a special regulator. In the first case, you need to loosen the bolts on the bus, and after installing the chain, apply tension using a slotted screwdriver. If there is an adjusting bolt, turn it all the way until there is sufficient blade tension. After work, check for sagging; be sure to tighten it after the first use.
Check the stretch
To check the chain tension, you must disable the saw's brake system. Then manually hold the chain on the bar, if it runs smoothly and does not sag, then everything is in order. If the chain runs very tightly, then it needs to be loosened a little, as there is a risk of breaking during operation.
Garden
The chainsaw chain is the element that is subjected to the greatest loads and overheating. From such impacts it can tear, fly off the guide bar , or simply become dull from long-term use. For timely maintenance or replacement with a new one, you should know how to independently remove the saw chain from the chainsaw and install it back. The step-by-step method of these operations will be shown below.
Sources:
https://benzopilok.ru/shiny/kak-ustanovit-tsep-na-benzopilu.html https://moysadiogorod.ru/kakoj-storonoj-odet-cep-na-benzopilu
How to properly put a chain on a STIHL chainsaw
The chainsaw chain is the element that is subjected to the greatest loads and overheating. From such impacts it can tear, fly off the guide bar, or simply become dull from prolonged use. For timely maintenance or replacement with a new one, you need to know how to independently remove the saw chain from the chainsaw and install it back. A step-by-step algorithm for these operations will be shown below.
Chainsaws
STIHL produces two versions of manual machines. stationary FG 2 and mobile FG 1, installed directly on the bus. There are analogues from lesser-known companies, comparable in price to the simpler devices described above, for example, this one.
The working part of these devices is structurally similar to a circular saw, into which a long round file is inserted instead of a saw blade. FG 1 and FG 2 not only sharpen the chains, but also correct them by adjusting the length of the upper edge of all teeth to the same size. the smallest tooth, which is perceived as the control tooth.
A rather complex mechanism allows you to set all the necessary parameters. Sharpening is done for 2-3 movements, then move on to the next tooth, maintaining for it all the settings that were made for the control tooth. This ensures the same grinding parameters for all teeth.
WHICH SIDE AND IN WHICH DIRECTION TO INSERT THE CHAIN INTO THE CHAINSAW - ADVICE FROM A SERVICE ENGINEER
When sewing a stopper, the round file changes to a flat one.
It is easy and convenient to use an electric chainsaw grinder. It has an adjustment system that allows you to set the chain at right angles and bring the blade exactly to the sharpened edge. There are machines that automatically hold the vise when the disc is lowered onto the chain .
The chain is stretched
If the chain is used incorrectly or for a long time, it can become very stretched. This is due to the fact that metal can become deformed over time. Too much wear becomes the reason why you have to purchase a new version, but it is possible to use the old one for a short period. Rapid stretching can only be avoided by following the operating instructions. To carry out the work you need:
- Hammer.
- Vise.
- Welding machine.
- Beards.
- Pliers.
It is not difficult to put on the stretched version, but with restoration there are quite a lot of problems, since the metal is characterized by increased strength. In this case, the main elements are fastened with rivets. The work is carried out as follows:
- The product is fastened in cleats.
- If work is carried out using a grinder, then there is a possibility that the surface will be damaged, since this tool is difficult to control.
- After grinding, the rivets are knocked out. There is no need to throw it away because it can be reused.
- Chain manufacturers do not produce spare parts that are required for maintenance.
- You can make a rivet yourself, but the work is quite complicated.
- The product is divided into two parts. It is worth considering that the number of guides and the distance between them should remain unchanged.
READ Cordless Chain Saw Which One to Choose
When solving a problem with a large length, do not forget that a chain that is too short cannot be tensioned. In addition, it is not recommended to apply oil to the chain of the electric saw.
How to install a chainsaw cutter
After installing the chain, it should be properly tightened and the tension checked. Among the features of this moment we note the following:
- Too much tension causes excessive stress and the product may burst.
- Insufficient tension leads to chain wear and many other problems.
In general, we can say that there are practically no problems with fixing an unworn product.