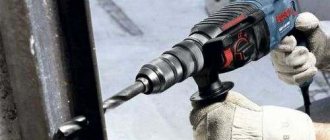
A thermal imager is a device designed to determine thermal radiation on the surface under study. The research method is non-contact; it ensures uninterrupted operation when studying moving objects. A device for monitoring the temperature distribution of the surface under study.
The operating principle of a thermal imager is based on converting the energy of infrared radiation into an electrical signal, which is amplified and reproduced on the indicator screen. The temperature distribution is displayed on the thermal imager display as a color field, where a certain temperature corresponds to a certain color. As a rule, the display shows the temperature range of the surface visible through the lens.
Thermal imager
At what distance does the thermal imager work?
The type of device also affects the distance at which the thermal imager operates.
Observation devices detect an animal or a person hundreds of meters away. Measuring devices require a closer location to the object being measured. The distance depends on the characteristics of the specific model and the lenses used. Typically, the focal range ranges from several centimeters to several meters (on average no more than 25). To increase the range, a telephoto lens is used. If you need to examine a long building, but it is impossible to move away so that it is completely included in the frame, a wide-angle lens is used.
Heat losses can significantly increase heating costs. To determine where heat leaks are located, you can check a building or structure with a thermal imager. A thermal imaging inspection of a premises performed by a specialist is called an energy audit. Such diagnostics help to track how well the thermal insulation of the house is doing, and also to see if electrical appliances are overheating, if there are leaks in communications, etc. But before you get started, you should figure out how to use a thermal imager.
Target tasks of thermal imagers in video surveillance
Having become familiar with all the features of thermal imagers and the physical principles of thermal imaging surveillance, you can move on to a description of the problems that are solved using this equipment in security systems.
The principle of obtaining an image with a thermal imaging camera determines the specifics of its use in the field of security. Let's highlight the main tasks for which it makes sense to use cameras of this type:
- Detection in the absence of any lighting Any thermal imager, regardless of design features, can detect objects in absolute darkness. This allows you to provide both covert surveillance of objects and save on additional lighting on the perimeter. Let us make an important caveat - fixing objects in the dark is possible if the temperature of the object differs from the temperature of the background on which the object is located. We will return to this circumstance;
- control over vast spaces at distant approaches to an object; to record the movement of an object, say a person, it is enough to obtain a contrast image just a few pixels in size; theoretically, the detection distance can be very large, up to several kilometers. This feature allows for high-quality detection of targets at distant approaches to the protected object, incl. in large areas: water area, open field, mountains, etc.;
- work in difficult weather conditions, the thermal imager “sees” through fog, snow and rain. The target detection range in this case drops, sometimes several times, but this cannot be compared with the fact that a conventional camera almost completely ceases to see even in light fog;
- countering sabotage let’s imagine a situation where attackers want to deprive the “eyes” of an object’s security and direct a beam of bright light into an ordinary camera. The camera will be illuminated, the guard will of course notice this, but it will be impossible to understand what is happening in the observed area - how many intruders are there, how they are armed, what they are doing. This situation will not happen with a thermal imager - it is not possible to blind it.
Thermal imager is a unique solution that has no alternatives
The main advantage of using a thermal imager can be formulated as follows: detection of objects at a great distance in the dark in the absence of artificial lighting sources, incl. in difficult weather conditions.
The only way to replace a thermal imager in certain types of tasks is with a radar. And there are such projects too. However, the problem with radar is that it cannot provide an acceptable visual representation of an object.
The image obtained from a thermal imager, although remotely, is still similar to what we get from a conventional camera.
The problems solved by a thermal imager seem fantastic! This is exactly what is needed in security systems. The high cost of a thermal imager can more than pay for itself due to savings on the amount of installed equipment, installation work, and power supply to the illuminators. This may encourage the CCTV designer to replace conventional perimeter cameras with thermal imaging cameras.
In this regard, it is important to talk about the limitations of using thermal imaging cameras.
Basic principles of working with a thermal imager
A thermal imager is otherwise called an infrared camera. This is a device that captures thermal infrared radiation to convert it into a visible image. This picture is displayed on the device screen. It is painted in shades that correspond to the temperature of the object being studied. Another name for an image is a thermogram.
Before you start working with a thermal imager, you need to properly prepare:
- comply with the conditions of the inspection - choose the right time, weather;
- make sure that the doors and windows of the building are closed;
- free the area from disturbing objects - cars, large objects, strangers, etc.;
- heat the house for two to three days.
To accurately interpret the results, you will need to measure the temperature and humidity of the air outside and inside the building. Before operation, the device is configured: the upper and lower temperature levels, the thermal capture range, and the level of thermal protection are set.
From the outside, all the main surfaces of the structure, its main components, are scanned. In addition to the facade, these include windows, doors, roof, and foundation. If the building has several floors, the check begins from the bottom. Inside the premises are examined clockwise. The starting point is the front door.
The resulting images - thermograms - are saved to internal memory for further research. Areas with high temperatures are colored orange-red, yellow, even white. Places with cold areas are indicated by blue, blue, purple, to black. Based on the measurements obtained, a conclusion is made about the presence or absence of serious thermal insulation defects, how protective measures work, and whether there are any leaks. If necessary, recommendations are made to improve the energy efficiency of the building.
It is important to choose the right meter. For construction purposes (checking thermal insulation), instruments whose upper limit is +350 degrees Celsius are sufficient. To check electrical networks and industrial installations, the upper limit should be above +350 degrees. In metallurgical production, foundries, glass, and energy industries, it is more appropriate to use high-temperature thermal imagers capable of detecting temperatures above +1000 degrees Celsius. I recommend choosing a device that has a 25% reserve temperature range.
Features of application
Use in fire extinguishing and emergency rescue operations
Comparison of thermal imager and night vision device
Comparison of a night vision device with a thermal imager
We see people through the smoke
Thermal imaging allows you to see people through smoke
Remaining heat trace
Searching for a person by the thermal trace left at the place of his touch on the furniture, floor (depending on the conditions, the traces last for about 5 minutes)
Application of thermal imager in industry
Using a thermal imager when searching for flammable and toxic liquids (liquefied gases) in containers
Thermal imager cannot see through car glass
Energy applications testing live wiring
The thermal imager is able to see hidden electrical wiring under voltage and distinguish uneven temperature distribution in electrical wires
Brief instructions for getting started with a thermal imager
A brief description of how to use a thermal imager is given in the instructions that accompany the device. Directions may vary slightly for each model. The operating procedure depends on the object being studied.
To inspect a private home for heat leaks, you must:
- move away from the building at a distance of no more than 25 meters;
- find an angle in which the object is not obscured by plants, cars, stones, or other obstacles;
- turn on the device, point the lens or locator at the object being studied;
- after focusing, the device must be fixed for a few seconds;
- save the received thermogram in the device memory.
When moving to another location for further shooting, there is no need to change settings. Frequency, range, and other parameters must remain the same. I recommend making sure that after each change of angle the captured data is saved.
The instructions for studying electrical installations are somewhat broader. Before using the thermal imager, you need to put on personal protective equipment - rubber gloves, helmet, etc. This is especially important if you need to determine if there is damage to the electrical network, as it will help you protect yourself if there is one.
Procedure:
- you need to move no more than 70 centimeters from the object being studied;
- after turning on the device, the maximum sensitivity is adjusted;
- for testing, the device is directed first to a de-energized cable, then to a powered one, the results should be different;
- After making sure that the thermal imager is working correctly, you can begin a detailed examination.
The main thing is not to touch the equipment or installation being tested, even if you have protective equipment. Do not touch closed units and boxes. I remind you that the obtained thermograms must be saved. All images in which object faults are detected must be saved with annotations (text or voice), which indicate the exact location of the defect, for example, support number, distance from the connection point on the cable, etc.
Recommendations for designing video surveillance systems using thermal imagers
The greatest number of questions when designing video surveillance systems using thermal imagers arise at the stage of developing a design solution and determining tactics for protecting an object. For this reason, the main recommendations are devoted to this.
- Precisely formulate the problem It is extremely important to formulate the problem that needs to be solved together with the customer. What will it be - target detection, recognition or identification. Please note that these formulations have a different meaning for a thermal imager.
- Use adjustments for the Johnson criterion Discuss with the customer the likelihood of solving the problem and the ability to work in adverse weather conditions. For particularly important facilities, you may have to install many times more devices than expected.
- Use the thermal imager for its intended purpose. Do not use the thermal imager only as a means of saving on lighting. Its main purpose is to observe open spaces at night without lighting, where the likelihood of a false target appearing is minimal. Most likely, the operator will not look at the image received from the thermal imager (it is simply unpleasant), so the main task of the thermal imager is to provide data for the operation of the motion detector. If objects that do not pose a threat constantly appear in the field of view, the operator’s attention will be dulled and the safety of the object will decrease. In addition, thermal imaging does not allow one to qualitatively identify an object and determine the degree of threat. For example, it is impossible to determine whether a mushroom picker or a saboteur is approaching an object. In this regard, the main purpose of the thermal imager is to protect long-distance approaches to an object in sparsely populated areas and areas with difficult terrain, protect coastal zones, water areas, and control restricted areas. The primary task of a thermal imager is to ensure that the motion detector is triggered.
- Be aware of the limitations of the thermal imager The thermal imager is effective for targets that do not intend to take cover, and is not as effective for camouflaged objects. The thermal imager is not effective on a bright sunny day. A thermal imager will not be able to provide reliable data about the characteristics of an object for its search and effective investigation.
- Combining thermal imagers and conventional cameras gives the best result. The best result in terms of object protection is obtained by combining thermal imaging cameras and conventional ones. In this case, thermal imagers provide detection of objects at distant approaches and its monitoring, and conventional cameras enable the operator to recognize an object at nearby boundaries and classify it according to the degree of threat. On a bright sunny day, conventional cameras allow you to detect an object at distances comparable to the operating ranges of thermal imagers, and replace them when the observed object “merges” with the background temperature.
After all the goals and methods of protecting an object have been determined, among which there is a place for a thermal imager, it is necessary to determine the installation locations of thermal imagers, select viewing angles and calculate the range. As mentioned above, calculations are carried out based on the Johnson criterion with appropriate adjustments for the probability of solving the problem and weather conditions. Once the required pixel densities are determined, an optical calculation is performed. In thermal imagers, there is often a temptation to use long focal length lenses, since detection distances can be up to several kilometers.
And here we never tire of repeating that a lens with a long focal length greatly reduces the viewing angle and increases the dead zone in front of the camera. This should always be kept in mind when determining the location and direction of installation of the thermal imager.
We held a webinar for design specialists on the topic of designing video surveillance systems using thermal imaging cameras:
The VIDEOMAX channel regularly publishes training videos, demonstrations of technology, and recordings of events. Subscribe to stay updated on new video surveillance technologies. Subscribe to the channel
Requirements for a specialist who conducts diagnostics with a thermal imager
If you can check a private cottage, country house or extension yourself - often it is enough to make sure that there are no obvious flaws in the thermal insulation - then a full-fledged energy audit with precise identification of each defect should be carried out by a specialist. He knows exactly how to use a thermal imager correctly, what regulatory documents (SNiPs, GOSTs) the results must comply with, and how to interpret them.
The person conducting the thermal imaging survey meets the following requirements:
- he knows exactly how the device functions, how and why the settings are changed;
- he has all the required permits and licenses;
- the device with which a specialist examines a building or structure must be checked, as evidenced by the corresponding mark in the technical passport;
- the specialist knows that you should not carry out the test during rain or snow - heavy precipitation can distort the result;
- the auditor strictly complies with the requirements for external and internal temperature conditions;
- If the test is repeated, the distance from the lens to the object remains the same.
An important evidence of the auditor’s professionalism is that his admission to paid audits must necessarily include the price of the service provided.
How to measure a person's temperature
Measuring human body temperature is probably one of the most important functions of a thermal imager. After all, people’s lives and health depend on it. Therefore, such a device must have great accuracy. Their error is no more than 0.5 °C. And the measurement is made from a distance of 1 to 1.5 m, which is safe for a medical worker if a person is infected.
Medical thermal imagers have a fairly large amount of built-in memory and can store up to 100,000 thermal images with data from specific people. And the tripod included in the kit allows you to install them, for example, at the entrance of an enterprise.
Condition for carrying out a thermal imager inspection
In order for a full-fledged energy audit to provide reliable information with competent recommendations, before using a thermal imager to inspect buildings, a number of conditions must be met.
They include not only preliminary preparation, but also the choice of suitable weather:
- The examination is not carried out in strong winds. It is advisable to check the building in complete calm, however, according to various sources, a wind speed of 2-7 m/s is acceptable. Stronger gusts will cause heat leaks to shift, making it impossible to determine their position down to the millimeter.
- There should be no precipitation. Light fog often does not distort the results, but rain, snow, or a dense fog curtain delays infrared radiation, so the measurement is inaccurate.
- Before the inspection, the building should not be exposed to sunlight for several hours. Ideally, you should wait at least 12 hours after sunset - usually the inspection is carried out in the early morning, but you can examine the house in the evening if the day was cloudy. The main thing is to eliminate the possibility of heating the walls from the sun’s rays influencing the result.
Infrared radiation does not pass through glass and water, including sprayed water. However, the heated glass will appear as a lighter area on the thermogram. The mirror will almost completely reflect the heat, just like the visible image.
know more
You have questions?
Write!
I'm in touch right now!
What is cheaper - one thermal imager or several video cameras?
Let us immediately make a reservation that asking a question outside the context of the problem is absolutely incorrect. A thermal imager, as mentioned earlier, solves different problems, and it is incorrect to compare it directly with a conventional camera. However, this question is formulated quite often, so let’s formulate the problem as equally as possible for a thermal imager and cameras.
Task:
It is required to ensure the detection of objects on a straight section of the perimeter of 500 meters in the absence of external light sources in normal weather conditions with a probability of solving the problem of 50%.
Solution using a thermal imager:
Two AXIS Q1932-E 19 mm thermal imagers, two TFortis PSW-2G switches, related equipment, materials and work.
Cost of the solution: RUB 1,143,696. (detailed estimate)
Solution using video cameras and IR illumination:
Eight AXIS P1365-E Mk II cameras, eight AXIS T90B20 IR-LED floodlights, three TFortis PSW-2G switchers, related equipment, materials and labor.
Cost of the solution: RUB 1,161,539. (detailed estimate)
From the calculations it is clear that the cost of solving the problem of protecting and detecting targets on the perimeter using thermal imagers and cameras is comparable. The solution using thermal imagers is even a little cheaper. Does this mean that it is now worth switching to thermal imagers everywhere? Of course not. The tasks solved by thermal imagers and cameras are significantly different, and decisions about tactics for protecting an object should be made based on the threat context.
Can a phone be used as a thermal imager?
With the development of thermal imaging technology, miniature devices connected to mobile devices appeared. Thanks to this, a smartphone or tablet is enough to detect heat leaks at home. True, such meters are still inferior in quality and accuracy to “full-fledged” thermal imagers, even the cheapest ones, but their capabilities are sufficient to identify poor-quality installation of windows, doors, and thermal insulation materials.
To turn a smartphone into a thermal imaging measuring device, you need to buy such a mobile gadget and download the corresponding application. However, can a phone be used as a thermal imager just by installing the software? Unfortunately no. Phone camera lenses are made of glass, and it does not transmit IR rays. To capture them and convert them into a thermogram, a special matrix is required, which is not available in a smartphone. Therefore, all applications that promise to show a thermographic image without a mobile thermal imager are just imitations and hoaxes. I recommend carefully reading the description of each program; usually the developers clarify this.
Calibration of thermal imagers
To conduct a full-fledged energy audit, not only training and licensing is required, but also calibration of the thermal imager. It is carried out by specialized laboratories using standard tools. The procedure is especially important for devices not included in the state register. Calibration guarantees the accuracy of the research - after it, the results can be trusted.
Thermal imaging equipment of any type can be calibrated. The inspection may be unscheduled or periodic.
Current metrological standards require that the thermal imager be checked and, if necessary, calibrated at least once a year:
- the device is inspected externally;
- During the initial inspection, the electrical density of the insulation is checked;
- Also, during the first check, the insulation resistance is examined;
- the operation of all available modes is checked;
- the angle of the field of view is determined;
- angular or spatial resolution is revealed;
- the temperature range is specified;
- errors are identified;
- the temperature sensitivity threshold is determined;
- the unevenness of the device sensitivity across the field is measured;
- The consistency of the readings is checked.
After checks, calibrations, and adjustments, specialized centers issue a certificate that complies with the established rules. The results of the examination are recorded. The certificate contains the name of the thermal imager, serial number, and information about the user. The document gives the right to use the device for professional purposes for a year, then the thermal imager will need to be checked again.
Specifications
Like any measuring device, the operation of an infrared pyrometer is characterized by certain parameters. The choice of a specific model is carried out according to their values. Let's look at the most important of them.
Optical resolution
It determines the area of the object on the surface of which the temperature is measured. It directly depends on the angle of the device lens. The larger it is, the larger the temperature measurement area will be. This takes into account the distance to the object.
The main condition for an accurate measurement is to apply the spot only to the surface material. If the area is exceeded, the temperature value will be inaccurate. Optical resolution is the ratio of the diameter of the device spot to the distance to the object. Depending on the model, it can be from 2:1 to 600:1. The latter belongs to the class of professional devices used to take surface heating readings in heavy industry. For household and semi-professional pyrometers, the optimal ratio is 10:1.
Operating range
Determined by the parameters of the pyrometric sensor. In most cases it ranges from -30°C to 360°C. Considering that the coolant in the heating system can have a maximum temperature of up to 110°C, almost all types of pyrometers can be used for domestic purposes.
Error
Indicates the degree to which temperature values fluctuate depending on the accuracy of the device settings. On average, deviations of about 2% from the normalized reading are allowed.
Emissivity
This is the ratio of the power of thermal radiation at the current temperature to the same parameter of the reference absolutely black body. For non-shiny materials it is 0.9-0.95. Therefore, most remote temperature measurement devices are set to this value. However, if you try to use them to measure the degree of heating of the surface of shiny aluminum, the value on the indicator will differ significantly from the actual one.
For accurate measurements, many models are equipped with a laser pointer. The light spot is not located in the center, but indicates the optimal boundary of the measurement area.
How to use
After purchasing the device, you must carefully read the instructions. Despite simple operating rules, incorrect actions can lead to significant distortions in temperature values. The procedure for measuring the degree of heating of a material using a pyrometer:
- Turn on the device.
- Direct the bell towards the surface to be measured.
- Use a laser pointer to determine the boundary of the measurement spot.
- After activation, temperature values will appear on the screen. Depending on the model, they may be written to the device's memory or will be replaced by the values of the following measurements.
As you can see, in practice, anyone can use a pyrometer. Therefore, it is becoming a mandatory measuring device for employees of companies involved in the design and installation of autonomous heating systems.
Setting up the thermal imager
By default, most devices operate in automatic mode, which is enough to get a general idea of the situation. Auto mode gives a rough thermogram. To more accurately study details and identify nuances, manual adjustment of the thermal imager is required. The mode you are using is often displayed in the top right corner of the screen.
Manually selecting parameters is not very difficult; the main thing is to understand the purpose of the buttons and menu items. Details on how to set up your thermal imager are contained in the instructions that came with your specific model. For example, let's look at meters produced by Fluke.
Auto mode is enabled by default and is displayed at the top right as AUTO. To switch to manual mode, press the F2 button and select MANUAL. Another way to switch is to press and hold the F1 button for a few seconds.
In MANUAL mode, you can press F2 again to select LEVEL and SPAN. Having selected a setting, press the same button again to choose to increase the INCREASE or decrease the DECREASE parameter.
Manual mode helps:
- determine the heating location of electrical equipment - for this, the SPAN range is set to a minimum, and the LEVEL level is increased until only the required visible area remains in the picture;
- increase the contrast of the thermogram when the temperature difference between the insulated and non-insulated place is known - for this, this temperature difference is set in SPAN, and in LEVEL - the temperature of the insulated wall;
- determine when the temperature in a constantly changing system reaches a certain level, for example, in a steam trap;
- get a clear image, despite interfering foreign objects that can be bypassed with manual settings.
For a more complete coverage of the situation, I recommend saving thermograms in both manual and automatic modes. Automatic settings show the general context of the situation, and manual settings show the more specific content of the problem.
How is thermal imaging performed?
Thermal imaging inspection (combined use of thermal imager and air door)
The most important role is played by thermal imaging inspection in construction when carrying out insulation work, because the presence of individual places with strong heat losses can negate all efforts to insulate the rest of the surface. In practice, this leads not only to an increase in energy consumption in the room, but also to freezing or dampening of structures, which can lead to their rapid destruction, damage to interior decoration or contribute to an unfavorable microclimate in the premises, the formation of mold, the appearance of fungus, which can adversely affect health living in such a building.
For residential premises in multi-apartment communal buildings, thermal imaging inspection can help identify places of heat leakage through windows and entrance or balcony doors, as well as the efficiency of heating devices. Residents can correct such defects individually. The identified heat leaks in load-bearing structures cannot be eliminated individually, since insulation of apartment walls from the inside, according to thermal engineering calculations, turns out to be ineffective and even leads to a deterioration of the microclimate in the room. The only option is external insulation of the entire house.
Inspection of a house with a thermal imager (thermogram of the cottage on the screen of a thermal imager)
For owners of individual houses and cottages, using a thermal imager to improve the thermal insulation of premises is more productive, since they are free to install external thermal insulation. However, the cost of thermal imagers is high and can reach several hundred thousand rubles, and the price of individual models with a large matrix reaches several million. Therefore, purchasing devices for a one-time examination at home is often unprofitable. In this case, you can resort to the services of companies offering thermal imagers for rent for several thousand rubles per day.
Some offer a specialist for the device, who will quickly and efficiently conduct research and give the necessary recommendations, although for a slightly higher price, usually about 10,000 rubles.
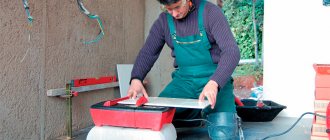
It is better to order thermal imaging diagnostic services in the cool season, when the difference in temperature outside and in an apartment or country house is significant and amounts to more than 15°C. In summer, thermal imaging is practically useless due to the small temperature difference. But don’t despair, there are no hopeless situations, you can bring cold air into the room using a unique system - “aero door”, in places where the cold air forced by the air door exits, the thermal imager will record temperature fluctuations in places with poor thermal insulation.
Top 10 questions from thermal imager users
What temperature does the thermal imager record?
The temperature the thermal imager records depends on the device purchased. They are stationary and portable, as well as observational and measuring.
Stationary models
often have the largest temperature range. They are used in industry where hot processes need to be monitored. Such devices “see” up to +2000 degrees Celsius. They are cooled with liquid nitrogen.
Portable models
more compact. The temperature at which thermal imagers of this type operate depends on the class. They can be household, with a limit of up to +150°C, construction, with a maximum limit of +350°C, industrial and high-temperature with a limit above +1000°C. The lower limit in different devices is -20...-50 degrees.
All the devices described are measuring devices, since they determine the exact temperature.
Unlike measurement observational models
They have a small range but high sensitivity. They often form a monochrome image, since their main purpose is to provide a clear picture of people, animals or their temperature traces. This equipment is used in security, hunting, special forces to detect strangers, intruders or prey.
Where is the best place to check a house, inside or outside?
Thermal imaging inspection of the building is carried out on both sides. The ideal option is an audit that includes 30% external images and 70% internal thermograms. The most important are internal pictures taken from the closest possible distance from the object being examined.
In which rooms can a thermal imager be used?
Infrared cameras are suitable for inspecting any heated premises. They determine the quality of thermal insulation, identify defects in the installation of doors, windows, and electrical appliances. This is especially useful before purchasing real estate.
What you can check
An IR camera checks for changes in material surface temperature. The device is suitable for examination:
- doors;
- door frames;
- window frames, their seals;
- roof;
- floors;
- floor;
- walls.
How to position the camera
Before using a thermal imager, it is advisable to make sure that it is positioned perpendicular to the object being studied. To get the most accurate result, the lens should be positioned as close to the point being examined as the focus allows.
Is it possible to detect wet areas?
Yes. The thermal conductivity of wet materials is higher than that of dry materials. This is shown on the thermogram. This is how leaks in communications, insulation holes, and areas of mold formation are identified without removing the finish or coating.
How to decipher the results and what distorts them
Indoors, corners are checked most carefully. They are always colder than the middle of the ceiling or walls. A temperature difference in the corners and middle of the surface of 2-3 degrees is considered acceptable. If it is 0°C outside, 20°C inside in the center of the wall, and 8-12°C in the corners, then this indicates missing or ineffective thermal insulation.
When checking externally, the results are distorted during dense fog or precipitation. Water droplets absorb infrared radiation. Also, the information will be incorrect if the building is heated by the sun.
What time of day to use the IR camera
A common question is whether a thermal imager works during the day. Yes, it works, but it is better to avoid daytime checks, especially on sunny days. The sun greatly heats the surface, so the result will be distorted. It is best to diagnose at home before dawn or late in the evening, a few hours after sunset.
What is better - buy a thermal imager or order an examination?
Depends on the goal. If you need to check a house or apartment before purchasing or renovating, it is more profitable to order a professional visit to the site with a thermal imager. When ordering inspections with a thermal imager from me, the service will cost you from 8 thousand rubles - despite the fact that purchasing it would cost 15-20 thousand. If you plan to carry out professional energy audit activities, you will have to buy a thermal imager of the appropriate class at a price of 60 thousand rubles.
Johnson criterion
The attentive reader will notice that when we talk about the operation of a thermal imager, we mainly use the term “detection”. What about recognition and identification? How well does a thermal imaging camera cope with these tasks?
First of all, it is worth recalling what is meant by the concepts of detection, recognition and identification when we are talking about observation under normal conditions, i.e., in the visible light spectrum. We consider this issue in a separate material; here we will formulate it briefly:
- Detection – determining the type of object (person, car)
- Recognition - determining the characteristics of an object (a young man in a green jacket)
- Identification - establishing the identity of a specific person (Ivan Ivanovich)
Looking at a standard picture obtained from a thermal imaging camera, we will see that the person in it looks very specific.
The image of a person in a thermal imaging camera is a reflection of the intensity of thermal radiation (temperature) of various parts of the body and clothing. It is almost impossible to identify signs of the object of observation from such an image.
It will be quite difficult to recognize and, even more so, identify it from such an image. And if everything seems to be clear with detection, then with what criteria should we approach the problems of recognition and identification?
It should be said that in relation to ordinary observation, the ability to solve recognition and identification problems has a completely definite numerical expression, presented in such a parameter as the pixel density per meter.
Taking into account the features of the image obtained by a thermal imager, a method was developed to approximate the possibility of solving the above problems for thermal imaging cameras. It was called the “Johnson criterion”, named after the inventor of the method. The method was developed experimentally and consists in the correspondence of the size of the object in units of spatial resolution of the picture and the probability of solving problems of distinguishing objects. Initially, for the Johnson criterion, the size of an object was tied to the line world (a period consisting of dark and light lines). Since for video surveillance it is more convenient to take an element of a digital image as a unit of reference, i.e. pixel, in the evaluation according to the Johnson criterion it is this one that is most often used.
In addition, taking into account the specifics of visual perception of a thermal imaging image, the triad of standard object discrimination tasks takes on a different form. In fact, the tasks for observation with a thermal imager are shifted by one step relative to the tasks for the visible range.
| Task | Observation in the visible spectrum | Observation of thermal radiation |
| Detection | Determining the type of object (person, car) | Object detection (the fact that an object appears in the frame) |
| Recognition | Determination of the characteristics of the object (approximate gender and age of the person, what he is wearing) | Determining the type of object (person, car) |
| Identification | Determining the uniqueness of an object (a specific person) | Determination of characteristics of an object (gender of a person, type of car) |
Typical values of the Johnson criterion for standard problems solved with a probability of 50% in good weather conditions, taking into account the specifics for thermal imaging:
| Problem solved when observing thermal radiation based on the Johnson criterion | Number of pixels according to the smallest size of the object projection |
| Detection | 2 |
| Recognition | 6 |
| Identification | 12 |
The resulting image:
It is these values that are most often cited as instructions for determining the operating range of a thermal imager. Note that the indicated values were calculated to solve the corresponding problems with a probability of 50% in normal weather conditions.
For other probabilities, conversion factors are applied.
| Probability, % | 100 | 95 | 80 | 50 | 30 | 10 | 2 |
| Coefficient | 3 | 2 | 1,5 | 1 | 0,75 | 0,5 | 0,25 |
Thus, if we want, for example, to detect a person with a 95% probability using a thermal imager, it is necessary that in the frame its size in width, i.e., in the horizontal plane, be at least four pixels (2*2, where the first the multiplier is the Johnson criterion for detection, the second is the coefficient for the 95% probability). At the same time, we will not understand that this is a person, but will only record the fact that the object appears in the frame.
As we can see, the Johnson criterion is a probabilistic indicator, but it can give at least an approximate forecast of the efficiency of a thermal imaging camera for solving a specific problem under previously known conditions.
Another important feature that the Johnson criterion does not take into account is the influence of weather conditions. As already noted in the article, adverse weather conditions reduce the ability to “see” objects with a thermal imager. The decrease in detection range (in other words, a decrease in the contrast of the object) can be up to 2-3 times. This means that to ensure the thermal imager operates in a wide range of weather conditions, the object size in pixels should be recalculated by multiplying, for example, by 2.5.
Taking into account the influence of weather conditions
Our proposed accounting for the influence of weather conditions in the form of a conversion factor does not have a scientific or methodological empirical justification.
The indicated values are the result of the experience of implementing thermal imagers by our partners and analysis of an array of information on the Internet. It is obvious that unfavorable weather conditions affect the solution of problems by thermal imagers, and if this is not taken into account, then the security of an object in heavy snow, rain, and fog is reduced. Therefore, our opinion is that if the task is to ensure the operation of the system in the entire range of weather operating conditions, then a certain amendment must be made. What this value will be is up to you to decide. We have provided our recommendations. As an example, here is a table for standard tasks according to the Johnson classification, taking into account a probability of 95% and for working in a wide range of weather conditions (snow, rain, fog):
| Task | Number of pixels according to the smallest size of the object projection |
| Detection | 10 |
| Recognition | 30 |
| Identification | 60 |
Calculation tools
The data indicated in the tables on the number of pixels for the smallest projection size of the object is used to select a lens and determine the operating range of the thermal imager in accordance with the task and taking into account the likelihood of solving it in given weather conditions.
You can calculate the range of a thermal imager under these conditions by remembering a school mathematics course or using ready-made tables from thermal imager manufacturers. To illustrate the application of this method, we present a table of detection range for the Axis Q1932-E thermal imager model.
The data is given for standard values of the Johnson criterion for a probability of solving the problem of 50% and normal weather conditions. The indicated range values must be reduced by multiples to adjust for the probability of solving the problem and worsening weather conditions.
Example: it is necessary to record the fact of a person crossing the boundaries of an object on a straight section of the perimeter at a distance of 300 meters with a probability of 95% in any weather conditions.
To solve the problem, detection is enough. A 95% probability requires reducing the maximum distance by 2 times. Difficult weather conditions - 2.5 times (according to our recommendations). This is a total of 5 times. The table shows that to detect a person, the only possible solution is to use a 60 mm lens, because 1800m/5=360m, which gives us an overlap of the required 300 m.
We have considered all the significant aspects of the operation and use of thermal imaging cameras; now we will summarize and formulate recommendations for designers.
conclusions
The operating instructions for the infrared camera are individual for a specific model. In other words, the description of how to use a thermal imager to inspect a private home differs from how to use the device for hunting or monitoring a protected object. However, each device supports setup and calibration, which helps you use all the built-in functions to achieve the best results.
Don't be afraid of manual settings - it increases the accuracy of the study. The main thing is to understand the parameters. If the instructions seem unclear, I advise you not to hesitate to contact knowledgeable people who will explain all the nuances. For example, to me.
Types of similar devices
Such devices can be divided into 2 main groups:
- Stationary – used in workshops of enterprises to control the operating modes of electric motors and other equipment. All data is displayed on the monitors of the attendant’s console, which controls the indicators. These are quite powerful thermal imagers that require separate cooling for normal operation. Liquid nitrogen is most often used for these purposes. The temperature range of indicators measured by such devices ranges from -50 ˚С to +2000 ˚С.
- Portable (mobile) - convenient devices with a built-in screen that allow you to see a leak or source of heat in real time by pointing the device at the area being tested. Most often, they have the ability to connect to a personal computer to process the received data, and the connection can be either wired or via Wi-Fi, which is also very convenient. All data goes through cloud storage. How to make such switching can be found in the instructions for the thermal imager.