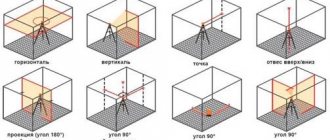
Types of grinding machines
Sanding machines come in several varieties:
Surface grinders are used to process floor boards laid using the floating method.
To process thick floors, drum type grinders are used, weighing about 80 kg.
Such devices are used to process floorboards, but they are not suitable for working with parquet flooring.
This machine has a screw with which the degree of load on the engine is adjusted.
The operation of the drum should be monitored to prevent overload and spontaneous shutdown of the machine.
If the voltage supplied to the device is not high enough, the machine will not be able to operate at full capacity. In this case, you should release the pressure on the engine and also disconnect all electrical appliances from the network. If this does not work, you may have to look for an alternative power source.
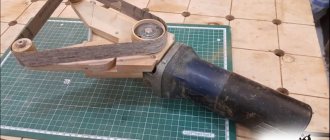
Grinding in hard-to-reach places is done using corner-type machines, popularly called “boots”.
Grinding Tools
It will not be possible to sand a wooden floor with high quality by hand or even with just one device. This job will require several types of sanding devices specifically designed for sanding wood.
Equipment used for grinding:
- Belt type machine.
- Eccentric machine.
- Vibration device.
- Angle grinder.
- Drum type machine.
- Cycle for processing hard-to-reach areas.
This does not mean that you need to use the entire listed list of tools for grinding. Below are the characteristics of each machine, which will help you choose the optimal equipment for floor sanding. The choice of devices largely depends on what material the floor is made of, as well as on its condition.
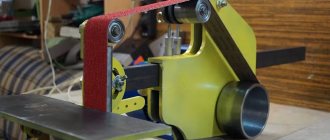
Belt sander
The principle of operation of this device is to process the surface using a sanding belt, which is in constant motion due to the rotation of two shafts. Moreover, the machine itself moves along the floor, and the master only needs to move it back in a timely manner. The device is usually used for pre-scraping of floors. Most models are equipped with a dust collection bag, which significantly reduces room contamination and simplifies work.
But you need to constantly monitor the filling of the dust collector; if it overflows, the device will begin to heat up and its performance will decrease. It should be taken into account that machines of this type effectively sand only a perfectly flat surface; if the floor has uneven surfaces, then the damaged part of the board will remain untreated.
Eccentric machine
The device has a round base where abrasive attachments are attached. The machine copes well not only with flat, but also with curved surfaces. Therefore, if the floor has uneven surfaces, this device will not miss a single damaged area. In another way, the machine is called orbital, because. When working, it rotates in a certain orbit. By simultaneously performing rotational and return movements, the device provides very precise and smooth grinding. The machine can polish wooden floors to a shine.
Vibrating machine
Units of this type provide high quality grinding, due to which they are used for secondary finishing. Due to their light weight, they are used not only for processing plank floors, but also for sanding expensive parquet. There are two types of vibration devices:
- machine for grinding large surfaces with a rectangular flat base;
- devices with an iron-shaped sole for grinding hard-to-reach areas.
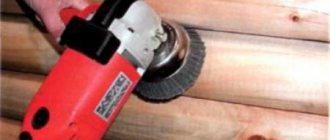
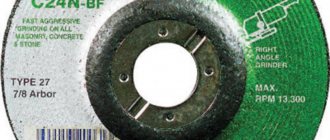
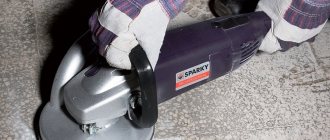
Angle grinder
If you don’t have professional sanding devices at hand, you can sand the wooden floor with a grinder. Due to the availability of a large number of different attachments for grinders on sale, this device copes well with rough sanding of the floor, easily removes old paint, and also sands the surface well.
For work it is best to use petal attachments. The abrasive must be selected in accordance with the type of processing. For rough cleaning, sandpaper 30-40 is suitable, for grinding - 80-120. However, when working with an angle grinder, a lot of dust is generated, because... Unlike sanding machines, it does not have a dust collector. To sand the floor with this tool, you need to provide yourself with protective equipment: masks and goggles.
Drum machine
Belongs to the class of professional equipment. Suitable for primary processing, can perform scraping and rough sanding of floors. With its help you can remove the old coating, make a rough scrape, and level the base
The drum apparatus is heavy, so it can be used to process plank floors, and parquet should be sanded with care so as not to damage the expensive coating. The drum machine has a high price, so it is rarely used for grinding at home.
The procedure for sanding the floor with your own hands
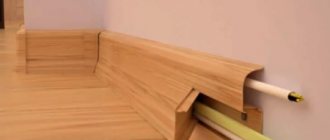
- We prepare the floor for sanding, free up all the space and, if possible, remove the baseboards (this is not necessary, but for better quality work it is better to do it).
- We prepare the grinding machine for work - load it with sandpaper (it is not difficult to use; usually landlords provide advice on the rules for using the device and safety precautions). Right away you need the thickest sandpaper - you will use it to work “roughly”. Do-it-yourself parquet sanding. Your task is to sand the board white in one direction. Those. if you have a board, then you sand perpendicular to the way it lies; if you have parquet, then in any direction, but without changing it. During the sanding process, if you realize that the sandpaper
has already been completely worn out, replace it with new one. - This assumes you sanded “rough”: your floor is as light as possible and you sand in one direction. Now it is necessary to knock down the cuts left after rough grinding. If you used P24, then replace it with P36 or P40, but if you used P40, then replace it with the same new one. Cuts, especially large ones, should be visible to the naked eye. The most common sanding machine is used for sanding parquet floors with your own hands. The task at this stage is whatever happens to them. You need to run the sander in a direction perpendicular to the way you sanded immediately. During the sanding process, you will see that the cuts become invisible and the floor takes on a more pleasant appearance. If there were cracks in the floor, then at this stage, before removing the cuts, you will need to completely putty them (the putty will dry quickly, after which you can knock down the cuts).
- The penultimate stage of sanding is polishing with fine sandpaper (P80). Before starting, you must make sure that there are no more cuts left and the floor is completely level. If everything is so, then you can load the P80 into the device and start grinding. If you are sanding a board, then at this stage you need to sand in the same direction in which the cuts were knocked down. If you are sanding parquet, then you need to sand diagonally (i.e. from corner to corner). This is the end of use.
- Since you will, in any case, have places that could not be sanded with a belt machine (corners, under the battery, etc.), then for these you need a hand sander. Among the features, it can be noted that it is best to use linden trees marked P40. This is the final stage of sanding.
Note: because Most belt sanders have a dust collector, so there will be no dust left after use. But when using a hand sander, there is no possibility of collecting dust, so you will need to have a respirator and safety glasses with you.
- After you have completely sanded the floor, you will need to get rid of the resulting dust - ideally use a powerful vacuum cleaner (if in doubt, it is better not to use a household vacuum cleaner), but if this is not the case, then simply remove the dust with a broom and dustpan.
- Once you have gotten rid of the dust, you can start varnishing. Each layer must be applied after the previous layer has completely dried. Sanding parquet with your own does not require sanding parquet with your own hands using a sanding machine. If you are tinting the floor, then the first thing you need to do is apply the tint, and after it dries (about 6-8 hours) apply varnish. As a rule, after the varnish has dried, the remaining unsanded pile may rise - it is very easy to deal with it: after the first layer of varnish has completely dried, you need to take used P80 sandpaper and manually, without pressing too hard, walk it over the entire floor. After this, sweep and cover the floor with the remaining layers of varnish.
If you have completed all these steps, then you can be proud of yourself - now your floor is completely polished, and you can boast of your new acquired skills. Congratulations!
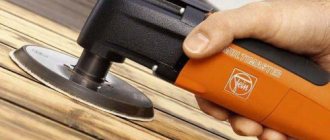
Vibratory sanders
A vibrating sander is a compact universal tool used for coarse and fine sanding of various wooden surfaces, including parquet. During operation, the rectangular sole of the machine vibrates, making reciprocating movements of small amplitude at high speed. As the stroke amplitude increases, the grinding speed also increases, but the quality of processing decreases.
Sandpaper or an abrasive mesh of varying degrees of grain size is fixed on the base of the vibration sander. The paper can be secured with Velcro or with side clips. Metal clamps are used in most designs, as they allow sanding paper (mesh) of any manufacturer to be securely fixed to the soleplate.
The sole - the working element of vibrating grinders - can have different sizes. The most popular machines with traditional sole sizes (“standard”) are approximately 100x200 mm. But for narrow, hard-to-reach places, “mini” class units with dimensions of about 10x10 mm are more suitable.
The platforms of most sanders are rectangular or square. Devices with a triangular sole belong to a separate class. They are designed for processing corners, elements of stairs, and surfaces of complex shapes. The triangular platforms of some models are rotatable and removable (for the possibility of installing another platform).
The base of the sole of budget models is most often steel or plastic, while for more expensive analogues it is made of aluminum or magnesium alloys. In any case, a high-quality sole is characterized by a small vibration amplitude when idling (without load). A soft pad made of rubber or fine-pored polymer is attached to the working surface of the sole. The polymer is denser than rubber, so it “holds” the plane better.
Most models of grinders of this type have a motor with a power of 150–300 W. They are lightweight, maneuverable, but at the same time do an excellent job of grinding. There are also more powerful machines, for example, Makita 9046 (600W). They are larger in size and weight, making them more difficult to handle. However, such machines have a significant advantage: they are able to work at low speeds without interruption (and overheating!) and obtain a higher-quality processing result.
The amplitude of the sole stroke of vibration machines is always small, ranging from 1-6 mm. 5-6 mm is the largest amplitude, allowing you to quickly sand the surface. But the processing will be quite rough. The smaller the amplitude, the better the grinding will be.
Another important characteristic is travel speed. At high speed, the machine is able to quickly remove a thick layer of wood. This corresponds to rough grinding. Finishing fine grinding is possible when using a machine at low speed. Many well-known manufacturers produce models with adjustable speed, which makes it possible to configure the tool for different processing purposes and for different materials.
A short overview to help you understand what to look for when choosing vibratory sanders:
Types of grinding machines
To sand your floor using a special machine, you need to have an idea of what type of machine you are looking for.
So, grinding machines come in the following types:
Drum. This is a machine for initial rough surface treatment. The same machines are used if the floor to be sanded is made of large boards. The advantage of drum machines is that they can be used to process a large wooden floor. Its use is limited by the fact that it is very difficult to achieve ideal evenness of the processed surface when using such a machine - due to the unevenness of grinding, even an experienced craftsman cannot maintain the entire surface at the same level. The operating principle of the machine is that a piece of sanding tape of the required length is installed on one cylindrical drum shaft.
Preparatory stage - preparing the base
Before you start sanding a wooden floor, you need to carefully prepare for this process:
- Remove all furniture from the room;
- Remove the baseboards;
- Make sure there are no protruding nails or screws on the floor surface. If you find any, be sure to drown them in the wood using a hammer. If you need to sand old parquet, check that all the dies are firmly attached to the base.
Important! All professional parquet sanding machines are equipped with a dust collection bag, but even this device will not get rid of it completely. If you don’t want dust to get into other rooms, cover the doorway with a wet cloth.
Sanding a wooden floor
Having prepared the base and collected all the necessary tools, you can start sanding the wood flooring.
The work process is carried out in several stages:
- First you need to prepare the sanding machine by filling it with sandpaper with a coarse abrasive.
- Next comes the initial finishing. At this stage, the sander runs diagonally relative to the direction of laying the wood floor. During operation, you need to adjust the degree of pressure of the drum on the coating, for which an adjusting screw is used. If this is not done, then with low pressure the processing will be insufficient, and too much pressure can cause a decrease in the number of revolutions of the grinder motor.
- Having completed the first pass, you need to change the sandpaper in the sanding machine to an analogue with less abrasive and go over the entire surface again. Typically, four passes are made with 40-grit paper, followed by 60-, 80-, and 120-grit grit. Starting with the second pass, the floor sander moves along the wood grain.
When finishing thin wooden floors, to reduce the risk of damage to the coating, it is worth eliminating one pass by skipping, for example, No. 60 abrasive. The first pass is always carried out with the coarsest abrasive (No. 40 is most often used for this).
How to Sand Wood Floors with a Belt Sander
Sanding wooden floors
: tools and work progress
Wood covering is a beautiful way to create a warm and cozy atmosphere in the family. Especially if parquet or tongue-and-groove boards made of hard rocks are laid. But in order for the wood fibers to acquire the appropriate outline and become very smooth, it is necessary to work well with the equipment after laying a new or restoring an old coating.
We will talk about what actually happens, how to sand a wooden floor and then apply varnish. In addition, we will tell you what tools are used for processing, whether it is possible to do it at home, what to pay attention to when carrying out work.
Content
Preliminary work
First, you need to carry out a number of preliminary measures so that nothing distracts you while you are doing the work:
- if restoration of an old floor is being carried out, then it will be necessary to remove the worn-out coating using special means;
- prepare the room. If only part of the floor is being repaired, it is indifferent to what is available in one company or another. If possible, protect windows and doors from dust by covering them with film;
- inspect the floor covering for protruding nails, screws and other foreign objects. If there are any, recess the protruding fasteners into the floor surface;
- Next, you need to check whether there are any deep cracks, dents or holes in the surface. Any imperfections found must be covered with a special wood putty. Start sanding only after the material has completely dried!
Selecting a tool
To process wood, several types of tools are used, and they have their own characteristics. It should be noted that to obtain an impeccable result, you cannot limit yourself to one device. This is due to the fact that there are always inaccessible places in the rooms, where a large tool will not be able to get through. In this option, manual finishing is done with sandpaper.
READ How to Sand Parquet with a Grinder
What you need, let's conduct a concise review of popular grinding tools:
Angle grinder (angle grinder)
The popular name for this instrument is grinder. myth is a multi-purpose device used for various purposes, including grinding. If you put on a petal attachment, then there is an option to easily and simply remove old varnish or paint. To perform floor grinding on your own, an angle grinder is a universal machine; it has some disadvantages.
When working with an angle grinder, there is simply an exorbitant amount of dust that flies towards our client’s sides. For small areas or outdoor work, this is a good option, but for larger amounts of work indoors, we recommend taking a closer look at other options.
Belt sander
This is a small combine with a moving sanding belt. In other words, the device itself moves forward along the board, and the user only needs to move it backwards just in time. The grinder is even heavier than the angle grinder, so working with it is not as comfortable. But such devices are equipped with dust collectors, which significantly reduce room pollution.
Taking into account that the working surface of this unit is long and flat, when processing an uneven floor, the recessed part of the board remains unaffected. This means that the belt machine is not just aimed at perfectly level floors. While working with it, you need to ensure that the dust collector is filled, otherwise the tool will begin to heat up and the speed will decrease.
Sanding wooden floors at home
Without pretending to know-how, I will show you how I sand a wooden floor
manual
belt sander
. I took it upon myself.
Sanding a wooden floor with a manual belt sander at home is for you!
Sanding a wooden floor
SO-206
Random orbital sander
The device received its name “Mastery” due to the peculiarity of the rotation of the working surface. In contrast to the grinder, the moving part of the eccentric machine rotates with an amplitude of vibration of the disk of several mm, writing out a certain orbit. For this reason it is also called an orbital sander.
READ Which Sander Is Best For Sanding Wooden Floors
This feature of rotation allows you to obtain a more even and smooth surface. Similar devices have a curious mechanism for suctioning wood dust. The working disk has several holes through which waste is sucked in by a vacuum cleaner. The only disadvantage of an orbital sander is the overhead of attachments for attaching discs. Overall, this is a good unit for home use with a minimum of shortcomings.
Drum type machine
This is already a class of professional equipment that is used on huge construction sites. This machine's image resembles a lawn mower. It also has control levers and wheels for moving around the floor. If necessary, there is an option to rent a device from specialized companies. Typically, drum machines are used for sanding parquet floors and tongue and groove boards, where a completely smooth surface is required.
Grinding process
What will you need, you have decided on the equipment, prepared the room and surface, purchased the necessary consumables, it’s time to get to work. But before that, you need to think about your safety. Don’t forget to wear protective gloves, goggles, a respirator and, if possible, a painting overall, then no dust will reach your problems.
Whatever tool you choose, the operating mechanism will be approximately the same. Grinding development takes place in stages:
- Preliminary processing. For this purpose, a hard sanding sheet
, marked P36 or P40, is useful. If you are restoring an old plank floor, the surface of which is quite rough, then there is an option to take a larger one - P20-24. Having installed a tape or disk with a large abrasive, you need to go over the entire surface 2-4 times. To obtain a smooth surface, it is necessary that any passing strip slightly interferes with the sanded area. Watch the force of pressing on the tool. If the pressure is low, the processing will be insufficient, and if the pressure is too high, the device’s engine will begin to overheat. - Next, you need to install a sanding sheet of a finer grit, P60 or P80, and perform 1-2 passes. During your work, monitor the wear of the working surface and replace the sanding sheets as needed. Before treating a pine board floor, it is recommended to remove drops of resin using alcohol, gasoline or white spirit.
- 3rd final step – final sanding of the wooden floor
. Install the best small sandpaper, P100 or P120 and also walk several times.
READ How to Magnetize a Screwdriver Bit
Application of protective coating
If you managed to sand the floors, then there will definitely be no problems with applying varnish. Wooden floor covering
varnish is applied in several layers. What is needed at the cinema level is three layers, but their number can reach 5-7. Depending on the type of wood used, a preparatory surface primer will be required. Nitrocellulose varnish is perfect for such purposes.
The varnish is applied with a wide brush or roller; the layer thickness is not very large. To give the coating uniformity, after each layer has dried, it is better to sand the surface with a small sanding sheet. The only exception is the final layer.
To cover tongue-and-groove boards or parquet, the following types of varnishes are used: water-soluble, polymer, acrylic, oil-based, oil-based, two-component epoxy. What type of varnish to choose for a particular room is decided on a personal basis.
Now you have an idea of how to sand and varnish a wooden floor in artisanal conditions. Don’t rush to get rid of your old plank flooring; with the proper care, it can last for many years to come. If the boards are very deformed, you can use a more “heavy” technique - a sanding machine, but this is a topic for a separate article.
Source
Features of working in hard-to-reach places
After sanding the main area of the flooring, hard-to-reach areas are processed using an angle grinder (angle grinder) or a “boot” type unit is used. The design features of these models allow you to carefully design the perimeter, including the space under the radiators, corner areas and niches. The first time the processing of hard-to-reach areas begins after the scraping stage on the main area is completed. In the same way, they move on to working on the perimeter after finishing grinding, replacing abrasive wheels with a fine-grain option.
Leveling the wooden flooring and preparing the base for final finishing using sanding equipment, at first glance, seems like an elementary task. In fact, this process is complex and time-consuming, requiring special training.
When is the best time to sand?
There are a lot of possible answers to this question. Traditionally, the frame is sanded after at least the main shrinkage has passed. During this time, the log dries out and it becomes easier to work with. It is extremely difficult to remove even a thin layer from raw wood. If you need to level it, it will take a lot of time, money for disks and effort.
On the other hand, if you have a frame made of dried timber and logs, then you can sand and process it right away. In this case, having placed the frame under the roof, it is sanded, immediately treated with impregnations and left to shrink in this form. This is done infrequently, although no one forbids it. They usually act according to the usual scheme.
The log house is polished after it has settled
How to scrape parquet
Above, we figured out what kind of process this is, now let’s consider the question: when does parquet require rough sanding?
Once the roughness and scratches of the old floor covering can no longer be tolerated, the floor requires urgent updating. In this case, you need to choose a method - manual or machine.
If you decide to use a conventional manual cycle, then you should immediately prepare for long-term work, you may even have to spend several days.
- The first thing to do. remove all the furniture from the room and simply dismantle the baseboards.
- Next comes floor preparation, which consists of removing debris and then moistening the parquet.
- Now the floor is ready and having divided the perimeter into several strips, you can begin processing. With progressive, uniform movements, you need to remove the old layer of wood, first along the grain, and then in the opposite direction.
But what if you simply don’t have a couple of free days to treat the floor? Then let's figure out how to properly scrape parquet with your own hands using a special machine?
Let's start with the fact that such sanding differs from manual sanding, because it is much more profitable to do it using a drum or belt sander equipped with coarse sandpaper (from 24 to 40 R). In this case, a couple of days of work will turn into just a few hours.
The only important issue is checking the electrical network in the apartment. If the voltage does not reach 220 W, then you need to connect the machine directly to the electrical panel.
But the way of working is not much different from manual:
- You also need to prepare the room by emptying it of things and furniture, as well as dismantling the baseboards.
- After moistening the flooring, remove the old layer of parquet evenly, pressing the machine with the required force while working.
- Corners and hard-to-reach places should be scraped using an angle machine; you should not use a tape machine in a place for which it is not intended.
- In case you missed a small roughness or crack, it would be best to process this mini-area manually using the same coarse sandpaper.
That's all, the floor is sanded and completely ready for sanding.
Wood floor sander: tips for choosing
There is no universal equipment for grinding. You can evaluate the advantages and disadvantages of each type of grinding machine only after working with the unit.
Depending on the characteristics of the process, the main types of this electrical equipment can be distinguished.
Sanding machines for wooden floors can be of several types
Grinders are:
- Tape. They are used for sanding large flat surfaces. Suitable for working with wood, plastic and metals. The process is similar to the movement of a tank or tractor caterpillar. Disadvantages include the inability to process corners.
- Vibro-grinding. It differs from the previous machine in the fastening of the abrasive (to the base of the unit). The operating principle is based on vibration.
- Eccentric. The machines are similar to vibration grinders, but differ in the abrasive attachments (not rectangular, but round). The platform not only vibrates, but also rotates around its axis.
- Angle grinders. The grinder is capable of sanding any surface, both flat and curved. However, it is a little difficult to work with the floor.
Rough processing
The first step in the grinding itself is sanding. It involves passing over the surface with an abrasive material with a grain size of 40 or 60 units. Professional systems not only remove uneven surfaces and eliminate scratches, but also provide pressure control. The base is covered with tape or a glued strip, then deep processing begins. Its methods are determined by the coating used:
- It is better to work the deck flooring along the grain from one wall to the other. The technology allows walking across only on the condition that the car turns at vertical barriers;
- If the parquet is laid according to the “herringbone” system, you need to move the device diagonally, trying to evenly cover the surface. When the covering is placed according to the principle of braiding, a shield, or the installation was multidirectional, the movement goes crosswise, no areas stand out. Artistic parquet can only be sanded in a circle that turns into a spiral.
Sanding produces a lot of dust, so it needs to be done in a tightly closed room. You should not open a window or door again. From time to time, check what is happening with the abrasive attachment: if it is worn out, you need to immediately install a new one, otherwise even the best equipment will leave streaks and skip areas. When the main part of the work is over, take the circular attachments and use a sander to go around the corners.
READ Choosing a corded screwdriver for your home
Immediately adjust the pressure that the drum will apply to the surface, otherwise either the quality of work or the motor of the grinding system will suffer.
Mistakes when grinding with an angle grinder
A grinder is the most convenient and affordable tool for grinding, but in unprofessional hands it turns into a rather dangerous device, which can cause a lot of problems if handled improperly. Home craftsmen who do not have the skills to use an angle grinder very often make mistakes, which are the main reason for poor-quality grinding.
A typical mistake is working with an angle grinder at high speeds. Inexperienced craftsmen often find it difficult to choose the optimal disk rotation speed. As a result, the tool literally “burns” the wood at high speed, damaging its outer layer. In addition, high speeds contribute to the rapid clogging of the abrasive with wood dust, which shortens the service life of the nozzle.
Another common mistake is pressing too hard on the device while sanding. This is the most common reason for the formation of dents and grooves on the body of logs and beams, which spoil the appearance of the wood. Getting rid of these marks is not so easy; you will have to re-sand, which is not always effective.
Advantages of renting
A floor sanding machine is worth the money spent on it only for companies whose specialization is directly related to carrying out a certain list of works where it is impossible to carry out specific tasks without a grinding machine.
It is advisable to rent a grinder if:
- It is necessary to complete a large amount of work as soon as possible.
- The available equipment is out of order, and it is absolutely impossible to suspend work.
- Your company has a list of non-core work, and you are able to carry it out because you have the necessary staff and time.
- Too much work was taken on - as a result, there is not enough equipment, and there is simply no time to replenish the fleet of equipment.
- You plan to master this type of business, but to understand how everything works and whether it will be profitable, you need to do a small amount of work
The grinder will be needed by employees of companies who are constantly faced with work related to:
- laying and sanding parquet flooring in houses and apartments;
- construction and turnkey finishing of dachas and country wooden houses;
- pouring concrete and mosaic floors with subsequent grinding;
- laying and polishing granite and marble floors;
- installation of polymer self-leveling floors.
Choosing a power tool
If it is not possible to use a professional surface grinding unit, you can use a hand-held power tool with a wider profile. The list of such devices includes:
Angle grinder (angle grinder, grinder). Multi-tool suitable for removing old paint from floors using the paddle attachment
To sand the floor, you will need a tool with adjustable rotation speed and an abrasive attachment, but it is important to take into account that there will be a lot of dust and it is difficult to carefully process large surfaces with a grinder. This is an option for hard-to-reach places. Belt sander - the sanding belt moves in a circle in it
The tool is noticeably heavier than the grinder and is not very comfortable to work with. It is important to consider that due to the length of the working surface, the device is only capable of efficiently processing smooth floors. The belt sander is equipped with a dust collector, which significantly reduces air pollution during work. If you work without a connected construction vacuum cleaner, you should regularly empty the dust container, otherwise the tool will overheat and reduce speed. Random orbital sander (orbital sander). The moving part of this tool rotates with a small vibration amplitude, thanks to which even uneven surfaces can be polished efficiently. The device is equipped with a mount for a construction vacuum cleaner, and dust is sucked through special holes in the working disk.
The disadvantages of an orbital sander include the high cost of attachments for securing the working discs. It is dangerous to replace them with cheap analogues, since low-quality products, under stress or overheating, break into parts that fly apart at high speed and pose a threat to life and health.
It is preferable to use a compact hand-held power tool as an auxiliary tool, especially if you need to process the floor in a spacious room. When working with an angle grinder or orbital machine, pay special attention to safety precautions.
Grinding equipment
This technique is divided into two groups:
- Professional. It is a machine equipped with large discs with abrasive material. The movement of the working elements occurs in different directions, so subsequently a perfectly polished surface is obtained. In addition, the devices are equipped with dust collectors and a control system for the speed of rotation of working parts and the intensity of processing. The main disadvantage is the cost. Even if you rent equipment, the budget can be very large.
- Small household grinders. The most popular is the grinder. To work with this tool you will need an abrasive disc. If polishing is required, it is recommended to buy a special machine. It is inexpensive and very easy to work with.
Grinding methods
Craftsmen sand the floor in two ways: manual and machine.
The manual grinding method is used mainly in small areas, since it is a very labor-intensive job. In addition, in this way it will not be possible to obtain a truly flat surface over the entire floor area.
The machine method is suitable for any object, but purchasing a special grinding machine is an expensive undertaking.
To sand the floor by hand, you will need:
- Sandpaper with grit from 40 to 120 units. You will have to determine the quantity yourself depending on the floor area and the degree of contamination.
- A grater that is loaded with sandpaper. Depending on the volume of work, you can use an inexpensive plastic product, or invest in a quality one - with a wooden or rubberized handle.
- You will also need a manual scraper - a metal plate bent at an angle of 45 degrees and secured in a wooden or plastic handle - to clean the remnants of the old protective coating (paint, varnish) and large defects.
Sanding and sanding parquet, what's the difference?
So, what is hand-scraped parquet? This is the removal of outdated and damaged layers from the floor covering using both hand and power tools. A sharpened metal plate in such devices removes wood shavings from the floor, but such work is difficult and time-consuming. Also, in the absence of the proper skills, scraping parquet will turn out to be of lower quality, because this process requires certain practical skills.
READ Is it possible to cut a ceiling cornice?
Rough processing with coarse sandpaper easily replaces sanding. The processes are similar, but grinding is a less energy-consuming and noisy activity. Coarse finishing is also used to bring the flooring to a smoother finish.
But still, let's look at these issues in more detail.
Indications for sanding wooden floors
The technology is equally relevant both in the process of arranging a new flooring and in the restoration of an old plank floor:
- When laying new parquet, unevenness, differences, areas with sapwood, and small defects in the form of scratches often form. The same problems arise when designing plank flooring. Since the floor structure is a canvas of many elements, it is difficult to achieve a smooth surface of ideal quality. Sanding a wooden floor helps to effectively level the canvas and eliminate all surface defects.
- Old wood flooring also loses its aesthetic appearance during use and its functional characteristics decrease. During restoration, it is necessary to partially replace worn-out structural elements, remove old paintwork, remove scratches, stains, dirt and other surface defects. All these procedures are performed using grinding.
Sanding a wooden floor is recommended when laying new parquet.
Sanding a wooden floor made from boards or parquet is not a simple procedure; it requires a professional approach.
At the same time, having certain knowledge and skills, you can do the work yourself, without the involvement of specialists.
With Dnipro-M it was restored and the parquet was not damaged. Do-it-yourself scraping and sanding of parquet
Among all flooring materials, wooden parquet remains the most aesthetically pleasing and comfortable for most apartment owners to this day. Indeed, wood is ideal for creating a cozy atmosphere in any room, but when using it in the decoration of your living space, a very important question arises - how to preserve the beauty of the material and increase the “life” of the floor?
Of course, periodic scraping of the floor is quite enough to maintain the original appearance of the floor covering. But using an automatic cycler or, in the worst case, a manual cycler is associated with many difficulties, since this process is very long and energy-consuming. A lot of debris and excessive volume make this method of caring for parquet inconvenient, and with the advent of new machines on the market, also outdated.
READ DIY glass cutting
In this case, it is much more profitable to simply figure out how to sand the floor with your own hands, which will save a lot of time and effort. But still, let's look in detail at whether it is necessary to spend time on looping.
How to grind with a grinder
The respirator filter will clog very quickly, so you need to prepare several pieces at once for prompt replacement. Only after thorough preparatory work can you begin sanding.
Sanding wood + (Video)
Wood is a unique material. It can be sanded quite well by hand, but with a grinder you can achieve very good results. Some snobs claim that you can’t grind with a grinder at all, but this is due to ignorance and inability.
The main secret is that the grinder is used at minimum speed. If the grinder has a speed switch, then there will be no problems. At high speeds, the sandpaper will become clogged with wood very quickly and very tightly. In this mode, it will not be enough for even five minutes of work. The optimal speed is no more than 6000 rpm.
Another secret is not to sand the entire area of the wheel. If you sand the entire surface, circular marks will remain on the wood. To ensure that there are no sandpaper marks left at all or that they are minimal, you need to sand only with the upper sector of the wheel. The movements of the machine should be along the grain of the wood.
Using this method you can get excellent results when sanding lining. The board becomes smooth and does not retain tool marks. Just don’t get carried away and change the sanding pads on the wheel in time.
The frame is polished in a similar way. Here it is desirable that the support plate is thin around the edge. With such a plate it will be easier to sand narrow junctions of logs. Otherwise, this work will have to be completed with a chisel.
https://youtube.com/watch?v=6HqSS8Wk9Bo
We work on concrete + (Video)
If you were unable to purchase a branded protective boot with a nozzle for a vacuum cleaner, then you can make it yourself. To do this, take a used putty or glue bucket with a diameter slightly larger than the circle of the grinder. We cut off the bottom part at a height slightly higher than the assembled sanding part.
We cut a hole in the bottom for installation on the gearbox and a hole for the plastic plumbing corner outlet. Now we connect the vacuum cleaner hose to the nozzle and work quietly.
The grinding wheel must be designed for stone processing. It is preferable to grind concrete and concrete surfaces using the entire surface of the wheel. This will save processing time and level the surface well.
When grinding a concrete floor, you must constantly control the plane using a construction ruler, because due to the different densities of concrete, indentations can be made. To process the joints between concrete pours, it will be sufficient to achieve one level combination.
It is good to grind concrete floors and surfaces with a Matrix diamond grinding cup. If the grinder is 150 mm, then the cup is 125 mm.
Grinding metal surfaces + (Video)
The metal is polished to different requirements. Most often, the metal is ground for painting or for further polishing. The main tool is a support cup with replaceable sanding pads. The selection of sandpaper depends on the degree of processing and the condition of the metal.
When sanding, you only need to work with part of the disc. There should be no untreated areas left on the surface.
It is advisable to coat the treated surfaces of ordinary steel with a primer. Moisture in the air can very quickly coat the metal and cause rust.
https://youtube.com/watch?v=73nuIaCKLRQ
Floor sanding
There are belt and drum type grinders. Now we will not go into technical specifications. I can only say that if you are not a professional, it is better to use a belt-type machine. When using a drum one, you can leave grooves in the floor, thereby ruining it. The most reliable parquet equipment is usually made in Germany, for example, the LÄGLER brand.
It is best to turn the machine on/off while moving, so that there are no noticeable marks left on the surface, which are not so easy to get rid of.
The next time you go, use a less coarse abrasive. When grinding in four stages, the following sequence is usually used:
- №36/№40;
- №60;
- №80;
- No. 100/No. 120 - at the final stage.