Which is better for sanding wood - a grinder or a sander?
Carrying out repair work is often accompanied by the need to sand the wood. There are many options for this procedure. Each method has certain pros and cons. Many people are interested in what is better to sand wood: an angle grinder or a sander? Below is a detailed answer to this question.
Sanding wood has a number of features
Grinding technology
It is not recommended to process the entire area of the disc, as beginners often do, resulting in leaving marks from the circle on the surface. Only the upper sector of the nozzle is used for grinding. It is necessary to move the angle grinder along the grain of the wood. This simple technique will help you leave no traces at all or reduce them to a minimum. The main thing is to find a comfortable support point so that your hands don’t get tired quickly.
The process of sanding wooden products (including floors) with a grinder can be divided into six stages.
Coating preparation
If traces of varnish or paint are present, they must be removed before sanding. To do this, you will need an angle grinder with a special stripping accessory.
Primary grinding
For this stage of processing, grinding and polishing discs are used. If you don’t have such an accessory at hand, you can use an ordinary circle to which coarse-grained emery is securely attached.
Fine grinding
For such grinding of wood onto a grinder disc, it is preferable to use a flap version, for example, P80 SMT, with a low grit level.
Filling gaps
When the initial sanding process is completed, it is time for other work on the wood surface. Doing everything yourself is not difficult, but it will take a long time, since it is almost “jewelry” work.
So, the task is to eliminate the smallest defects:
- It will be necessary to use a nozzle with a minimum grain size, which the operator needs to go through the gaps.
- The most inaccessible places will have to be processed manually.
- It is necessary to remove the resulting dust from time to time to improve visibility.
- Apply putty to the surface.
Final sanding stage
Final sanding allows you to bring wooden floors to a condition that is necessary for the subsequent application of paints and varnishes.
After eliminating minor defects and gaps, you will need to select a nozzle. It is worth remembering that the choice depends on the desired result. For a perfectly smooth surface, you should choose a polishing wheel.
Padding
An important process that allows you to finally smooth out unevenness. By choosing a high-quality coating, you can significantly extend the life of the wood and maintain its attractive appearance. At this stage, soft materials are used that are not capable of damaging the structure of the tree and ruining its appearance. You can do the priming yourself using brushes, or use a spray gun.
.
Processing after scraping
In order for the flooring to acquire a rich color, have a matte or glossy tint, and become more impressive and beautiful , after sanding the parquet it must be varnished .
Before applying the varnish, the surface must be vacuumed and washed several times with warm water. The parquet must be clean and dry. When choosing a varnish, you should take into account the effect of color on a specific room so that it does not visually decrease in size or become uncomfortable.
The varnish is applied in several passes . First, the parquet floor is primed to improve the adhesive properties of the coating. When the treated surface has dried well, it is sanded with a fine-grained abrasive material. This technique is necessary to remove formed lint from the floor.
The wooden covering is once again cleaned of dust particles and coated with a high-quality varnish composition.
After the first layer has dried, the manipulation is repeated. For convenience, it is recommended to use a wide roller with velor pile or a wide brush . Depending on the desired result, the number of layers can reach 7.
If the varnish was applied incorrectly, re-sanding .
The eternal question: what to do?
And really, what to do when it is necessary to polish not just one wooden handle of a file or hammer, but wooden pickets for a fence along the entire perimeter of the site, and this can be 100 or more meters of the perimeter alone, without taking into account the height of the fence. Just because of one manipulation, don’t buy a belt sanding machine, which you don’t know when it will come in handy, if at all.
In this case, we remember the possibility of using existing means, in particular grinders. As practice shows, a grinder is perfect for sanding wood; it’s not for nothing that it’s called an angle grinder.
In total, thanks to this tool, you can carry out the following manipulations with wood:
- Sawing;
- Grinding;
- Polishing.
All these manipulations are subject to careful analysis.
To cut or not to cut
Attachment for an angle grinder for working with wood.
Let’s make a reservation right away: you can cut wood with a grinder, but whether there is such a need, there are nuances. When considering this question, initially just answer yourself what kind of cut you need. And be sure to check out our table.
Practical observation! We advise you to read the last column again about the additional capabilities of the angle grinder, or rather, their absence. The fact is that although wood is a fairly hard material, it has a fibrous structure that only accepts one cutting direction.
The slightest changes in angle lead to the fibers “exploding”, chips, roughness and other defects appear. In addition, peeling and scattering of chips is possible, so a safety reminder will not be superfluous.
Don't forget the required activities:
- Cover over the cutting disc;
- Gloves for hands and glasses for eyes;
- Mandatory rigid fixation of the part.
Grinding: what and how
Special grinding wheels.
Sanding wood with a grinder is a process that has several possible scenarios. Therefore, in this section an attempt is made to combine various options; this is a universal instruction for grinding; all you have to do is choose what you need.
Small steps to a smooth board:
- Step 1 – preparing the surface for grinding. Very often, old boards remain in sheds and garages that contain traces of previous painting, or the old paint from an externally suitable wooden fence has lost its marketable appearance. In this case, you need to remove the old paint.
The grinder will cope with this task perfectly. You will need a peeling attachment, which is a bowl with twisted wires around the perimeter.
Photo of the peeling attachment.
Note! There are several types of such attachments; if the wires form thick bundles - rollers, then they are designed to work with metal or concrete bases and, when used on wood, can significantly damage the outer fibers. It is clear that their use is undesirable.
- Step 2 – rough sanding. The purpose of this step is to remove small fragments from the surface of the wood in the form of protruding fibers, remnants of old paint, and lower layers of bark. For this purpose, special grinding and polishing wheels are provided for grinders.
But it is better to take universal bases, to which sanding wheels of varying degrees of abrasive grain size are attached with internal bases - Velcro. These circles at the maximum speed of the grinder are able to quickly eliminate all those defects that may be on the tree.
This step is universal for all types of preparatory work for painting: sanding a wooden floor with a grinder, sanding wooden pickets and terrace partitions, everything is done according to a single template.
- Step 3 – fine sanding. This step is more suitable for wooden products that carry both an aesthetic and functional load. When using the attachments that have already been mentioned above, it is enough to install a circle from the zero, and there you have it, fine grinding.
A well-chosen nozzle is half the battle!
A little more practice! How to sand wood with a grinder has already been described. Do not attempt to use metal cutting wheels to sand wood. Despite the fact that the wheel itself is an abrasive, there is a high probability of its uncontrolled destruction with flying fragments and injury to the worker.
This is the result of incorrect application.
Polishing – as a separate type
Polishing and grinding are twin sisters, with the only difference being that grinding is carried out with abrasive materials at high speeds, while polishing requires cloth wheels and low engine speeds.
Advice! At high speeds, the fabric heats up quite strongly when rubbing against the surface, the cost of such an application is thermal destruction of the varnish layer, which is clearly not desirable.
The main thing is to choose the right nozzle and speed.
Sanding wood with an angle grinder
The modern market is flooded with various types of power tools, each designed for its own purpose. Purchasing expensive equipment is advisable in the professional field. In everyday life, you can use the same devices for different purposes and not spend extra money.
Thus, the so-called grinder is often used in sanding wood. Or an angle grinder, designated by the abbreviation angle grinder.
With the help of special attachments, a tool originally intended for metal processing is transformed into a wood grinder.
How to choose the right grinding wheel on an angle grinder for wood
There are various grinders, in different sizes. Accordingly, you need to select a disk according to its size. To secure the disk, the tool has a special nut. You shouldn’t take risks and buy “handicraft” disks. Buy factory wheels designed for a specific model of grinder.
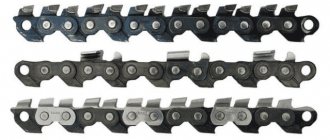
Types of attachments for grinders for sanding wood
There are several types of disks, differing in shape, material and purpose.
The stages of sanding a wooden workpiece are
- Rough processing
- Finish grinding
- Final sanding
Cord brush
The initial stage of wood processing is rough sanding. For rough grinding, so-called cord brushes are used. Cord brush
Designed for removing unevenness from the surface of wood. And also, for performing rough grinding of the surface, as a result of which the wooden workpiece takes on its final shape
Roughing wheel
In order to remove old coating from the surface of wood, including coating that has been painted several times, a grinder attachment called a sanding wheel is suitable.
Roughing wheel
consists of a disc with steel bristles. The location of the metal wire on the disk may be different.
Depending on the desired effect, the metal bristles are placed along the entire perimeter of the disc parallel to the tool or perpendicular to the segment - as in a regular brush.
End disc
For processing the edges of wooden workpieces and bevel cuts, special end disks
. The processing technique is similar to filing, but much more effective than hand tools.
Finish sanding wood with an angle grinder
The most common type of attachment on an angle grinder for sanding wood is a flap disc
.
True to its name, the design of the disc surface consists of sandpaper petals, trapezoidal in shape. The petals overlap, covering three quarters of the previous row.
Using a petal attachment, a soft treatment of the wooden surface is performed.
The disc varies in grain size, depending on the desired degree of surface treatment.
Final sanding of wood with an angle grinder
Relatively recently, a universal attachment for angle grinders appeared on the market. The so-called sticky disc is highly functional.
Replaceable discs with the desired grain size are attached to the sticky base of the nozzle. Changing abrasives is quick and easy. There is no need to change or remove the main nozzle, secured with a nut. First, purchase a sticky attachment for grinding on an angle grinder and replace it with replaceable abrasive discs of various grain sizes.
The final result of grinding is achieved by sequential transition of abrasives, from coarse grains, sequentially, to smaller ones
Cleaning and polishing metal with an angle grinder
Grinding is often necessary when manufacturing metal products using welding. Before painting the finished product, it is necessary to clean the welds, for which ordinary cutting discs are used.
Holding the angle grinder at an angle, remove all irregularities, thus leveling the surface. After this, the disk is replaced with a grinding wheel and the surface is brought to the required condition, if necessary, changing the grain size of the sanding paper.
Thus, you can not only grind metal with a grinder, but also polish it.
Despite the apparent ease of the operation, safety rules should not be neglected. It is necessary to work only using personal protective equipment.
Materials
You will need:
- Additional parquet strips to replace damaged ones.
- Sandpaper of varying degrees of grit. For scraping you need a lot of it, so the supply must be significant.
- Finished wood putty. A composition either water-based or nitro-solvent is suitable. Experts sometimes mix their own solution from wood dust that remains during sanding.
- Spatulas for laying putty.
- Primer for wood.
- Brushes and rollers for applying primer.
- Personal protective equipment: gloves, respirator or gauze bandage, goggles.
- Floor protectants: wax, oil, antifungal compounds.
- Decorative coatings: tinting, stain, varnish.
How to choose grinding attachments for an angle machine
Circles should be selected according to the main parameters:
- outer diameter (larger sizes speed up the processing process and increase service life);
- landing diameter (installation of a larger circle on a smaller one is possible using a special adapter);
- thickness (the greater the thickness, the longer the segment will last);
- grain size (the fraction must correspond to the type of processing: coarse abrasive for rough work, and fine abrasive for soft processing and creating a finishing coating);
- type of segment (special attachments for processing wooden surfaces are suitable).
Sealing cracks in wood floors
Before you start sealing the cracks, you need to clean the floor surface from any dust that has settled on it after sanding.
Sealing cracks in parquet
How and with what to seal cracks in the floor?
- Large cracks, places where nails or pins are attached, and visible scratches on the floor are filled with the prepared solution. If the gap is deep, it is advisable to fill it in two passes, and in order to save paste, use a special stencil;
- The putty is applied in a thin layer to the entire surface of the floor. It is convenient to apply with a rubber spatula;
- after the solution has completely dried, you can make an imitation of the joints of the planks using a sharp tool (awl) and a ruler;
Note. Depending on the composition of the putty, its drying time ranges from several minutes to an hour.
Sanding with a fine abrasive after the putty has completely dried will remove excess paste from the floor surface.
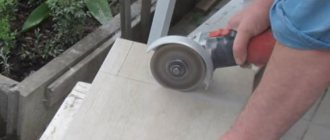
Grinding using an angle grinder
During rough grinding with a cutting wheel, the tool must be held at an angle of 30-40° to the surface being processed.
When working with an angle grinder, do not forget to use glasses, because... they do not have a dust collection device. Only when polishing is there little dust; in all other cases it is better to immediately put on a respirator.
The part being ground by an angle grinder must be secured. We turn on the tool and bring it to the part. There is no need to apply excessive force when sanding. It is better to do the work more slowly, removing the material little by little. This will ensure better grinding quality.
Material that is not heat resistant may start to burn during sanding. To avoid this, you can reduce the speed, if possible, and use a nozzle with a finer grain.
Tools
To restore parquet, you can use either electric units or hand tools. The use of machines certainly makes the process easier , faster and more efficient. The manual method is affordable, but labor-intensive ; it is best used for processing small areas.
You can scrape parquet manually by using a scraper or scraper .
The device is made of a metal plate bent at an angle of 45 degrees relative to the handle. It is often used to clean surfaces from paint and varnish coatings. Subsequent grinding is carried out with a special grater on which sandpaper is fixed , or a power tool is used.
The following equipment is used for sanding parquet flooring:
- belt parquet sanding machine equipped with a drum with an attachment made of rolled abrasive paper. It can be with a single-phase or three-phase drive of various powers. All models come with a fabric bag that collects all the dust and debris while working on parquet. Professional units are designed for sanding wooden boards and parquet. They have a fairly large weight, up to 100 kg, the useful cross-section of the grinding attachment is up to 25 cm, the cost is from 100,000 rubles. If you need to process parquet once, then it is recommended to rent this equipment, which will be more rational;
- a surface grinder equipped with 1 or 3 disc grinding attachments, with a grain size of 120 units or more. This device does an excellent job of fine sanding parquet, with intermediate leveling when you plan to apply varnish. It is classified as professional equipment, which explains the cost of 60,000 rubles. and more. For one-time work, it is better to rent this machine;
- angle grinder, also called “boot”. With its help, you can cycle any hard-to-reach areas. Such a machine is equipped with circular attachments of the appropriate grain size. They have garbage collection bags. Based on the area to be scraped, the unit is either purchased or leased for a certain period. Household units cost from 3,000 rubles, and professional ones – over 40,000 rubles.
In addition to special equipment, for work on the restoration of parquet flooring you will need a construction vacuum cleaner, abrasive wheels, tapes, and devices for fixing sanding machine elements . Also, do not neglect your personal protective equipment: gloves, respirator, goggles, mask, earplugs .
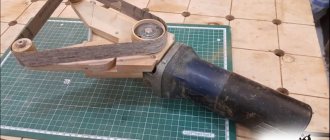
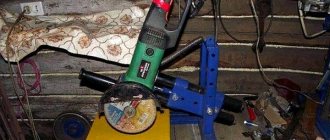
How to make a grinder from a grinder? + (Video)
This question can be confusing, because this is exactly what an angle grinder is - an angle grinder.
But it is very universal and must be prepared for each operation. To prepare the grinder for grinding, you need to purchase a support wheel that is installed directly on the machine shaft. To process wood, you need to stick an emery pad on this circle. The number of sandpaper is selected for the immediate moment of work. On sale you can find both a grinding wheel of the required diameter and sanding wheels of the appropriate size. Sanding wheels with Velcro are also available for sale, which are very easy and quick to change on the tool.
To convert our grinder for concrete grinding, it would be a good solution to purchase a special protective boot. It is good because it has a connection for connecting a vacuum cleaner. Well-known housings are produced by Hilti. The casing from this company has a sliding sector that opens part of the wheel for grinding in the corners.
Grinding metals with a grinder is usually performed with standard metal grinding wheels. They have different diameters, different thicknesses and different grains of the grinding surface. But, if you are going to sand an indecently rusted surface, then first you need to go over it with a metal brush. Such brushes of the required diameters are also available for sale.
How to grind a sander
Remember that sanding always involves a lot of dust. When preparing for polishing, do not forget about yourself! Protective mask and respirator. The best assistants for sanding. You can find an option where the mask is combined with a good respirator.
The breathing filter gets clogged very quickly, so you need to prepare several parts at once for quick replacement. Only after careful preparatory work can sanding begin.
Sanding wood (Video)
Tree. This is a unique material. It can be sanded well by hand, but with a sander you can get very good results. Some snobs claim that you can't grind a coffee grinder, but that's due to ignorance and incompetence.
The main secret. The chopper is used at minimum speed. If the grinder has a speed switch, there will be no problems. At high speeds, the sandpaper will hammer into the wood very quickly and very tightly. In this mode, this will not last for five minutes. The optimal speed is no more than 6000 rpm.
Another secret. Do not sand the entire area of the wheel. If you sand the entire surface, circular marks will remain on the wood. To avoid any or minimal sandpaper marks, you only need to sand the top section of the wheel. The movements of the machine should be along the wood fibers.
With this method you can get excellent results when sanding your substrate. The board becomes smooth and does not retain tool marks. You just need to make and change the sandpaper in circles in time.
The log house is sharpened in the same way. Here it is desirable that the base plate is thin around the edge. With the help of such a plate it will be easier to sand the narrow points of the logs. Otherwise, this job must end with a chisel.
Working on concrete (Video)
If you were unable to buy a branded dust cover with a vacuum cleaner attachment, you can do it yourself. To do this, take a used bucket of putty or glue with a diameter slightly larger than the grinder wheel. The lower part is cut off at a height slightly higher than the assembled sanding part.
Cut a hole at the bottom for mounting on the gearbox and a hole for the corner valve from plastic plumbing. Now connect the vacuum cleaner hose to the nozzle and work quietly.
The grinding wheel must be designed for stone processing. Concrete and concrete surfaces are mainly sanded over the entire surface of the wheel. This saves processing time and smoothes the surface well.
When grinding a concrete floor, it is necessary to constantly monitor the plane using a construction ruler, since due to the different densities of the concrete, notches can be made. A single level combination will be sufficient to finish the joints between concrete castings.
READ Which disc to cut corrugated sheets with a grinder
Sand concrete floors and surfaces using the Matrix Sanding Wheel. If the grinder is 150 mm, then the cup is 125 mm.
Grinding metal surfaces (Video)
The metal is ground to suit various requirements. Most often, metal is sanded for painting or for subsequent sanding. The main tool is a support cup with replaceable sandpaper. The choice of sandpaper depends on the degree of processing and the condition of the metal.
Only part of the disc should be used for grinding. Untreated areas should not remain on the surface.
It is advisable to coat treated surfaces of ordinary steel with a primer. Moisture in the air can very quickly coat the metal and cause rust.
Source
Direct laying of parquet. This is just the first step to achieving a beautiful deck. To achieve the desired result, you will need to carry out a number of tasks, such as leveling the surface, sanding and varnishing. All these measures are also carried out in the case of restoration of old parquet.
Content:
What is the difference between polishing parquet and paving
Today, manufacturers have presented a large selection of modern high-quality tools. But before you look at the most popular equipment, you should clarify the difference between sanding and sanding.
Cycling. Indicates manual sanding of parquet cycles. With this tool the chips are removed.
Grinding. It is carried out with special grinding machines for parquet. Depending on the settings and nozzles, they are based on different depths and surfaces with different smoothness.
But even among professional builders, the first stage of parquet finishing is usually called scraping, and all subsequent ones. Grinding. But there are no special scraping machines, only some models of grinding machines can also perform primary processing.
Parquet sanding technology:
- First stage. This is the primary cleaning. Drum or belt sanders produce rough, rough surfaces on parquet floors.
- Second phase. Grinding. Belt sanders with fine-grained abrasives are used. Angle grinders are used for hard to reach spots.
- Third stage. Final polishing. Using sanding machines, three-disc or single-disc, a perfectly flat surface is secured to the parquet.
- Fourth stage. Application of varnish and protective gel.
Sanding parquet
Drum parquet shredders
This is the most common and versatile tool. They do cyclic and grinding work. The car has a simple and reliable design. Produced in two types of sanding drums. Centrifugal milling. Works with consumable abrasives from all manufacturers. With the help of a drum sander, the surface treatment is carried out taking into account the fibrous structure of the wooden parquet and can be carried out in three directions.
Belt sanding machines for parquet
Wood Floor Sanding Equipment
Both manual and machine methods are used for floor scraping. The choice between them is made based on the amount of work and financial capabilities. As for power tools specifically, the purpose of different types of devices is different, and therefore it is impossible to say which sander is best for sanding a wooden floor - they are all needed.
When performing grinding using any method, you should use protective equipment: goggles and a mask.
Hand tool
Naturally, such equipment is cheap, but it is used only in small areas, since its use requires significant labor costs.
For grinding it is used:
- Sandpaper 40-120 units. As a rule, it is used together with a special holder called a grater.
- A hand scraper is a curved steel plate with a handle. Used for rough grinding.
Drum type
The grinding device is a drum shaft with sandpaper with a grain of 40-80 units on it. It will quickly sand the floor covering, but will not completely level it. They are used for primary sanding, and only when the floor consists of boards.
Tape equipment
It differs from the drum type only in the presence of two shafts along which the sanding belt moves, thus significantly increasing the area of contact with the sanded surface, and hence the uniformity of processing. But because of this same feature, it can only be used on initially more or less flat planes.
Surface (disc) grinding machines
The working surface is made in the form of one or three disks, on which abrasive material with a grain size of 100-340 units is located.
Used on floorings that have already been rough-ground, they allow you to obtain a very smooth, even polished surface. A type of device of this type is a curb scraper, commonly called a “boot.” The principle and result of its operation are the same, but the peculiarity of the layout allows you to conveniently sand wooden floors near walls, in corners, on steps, etc.
Angle grinders: grinders, orbital (eccentric), vibrating
Can be used for any type of processing. Sanding a wooden floor with a grinder and other tools of this type can be done in places where it is not easy to get to with another unit, but it is difficult to process a large area with them.
Sanding parquet on your own - getting started
First of all, we will need coarse sandpaper No. 40. The main task is for all the paper to be cut out according to the template. The paper that is tucked into the drum at the beginning will serve as such a template. We press the “Start” button, the electric motor starts working. In one pass, the machine grinds a strip 20 cm wide. First, we make a penetration along the right wall of the room. We pass to the end and return along it back. Sanding parquet at home lasts a little to the left - we shift the machine one-half of the drum and again go back and forth. So, we go through the entire room. If after the first passes the parquet is not leveled, of course, go not so much along, but also across.
During operation, you should listen closely to the engine and avoid losing speed. The speed may be lost due to a decrease in voltage, also if the drum puts too much pressure on the parquet. There is an option to adjust the drum pressure using an adjusting screw. The speed does not level out even after adjustment - the work must be completed to avoid engine failure. If the problem of low voltage does not help by disconnecting all massive devices from the network, it is better to use a gasoline generator with a power of more than 5 kW.
After using coarse paper, there are variations of danger (scratches) remaining on the parquet. We remove them with finer sandpaper No. 60, and then No. 80. With abrasive No. 40 we scraped along and across the parquet, with Nos. 60 and 80 we sanded what is the duration of the project, at what level is the parquet laid. Parquet scraping
The herringbone is done diagonally; if the parquet is laid using the deck method, then along the dies. Then there is the option of filling the cracks with ready-made putty, you can also mix varnish with parquet dust, or use wood sealant.
sanding the parquet at home with an angle grinder (grinder). It sands places that are inaccessible to a parquet sanding machine. These are, for example, corners, places under radiators.
parquet scraping ends with sanding with No. 120 sandpaper. Using the adjusting screw, we reduce the pressure of the drum on the parquet and work according to the same scheme as with paper No. 60 and 80 - depending on the installation principle.
How to Sand Parquet with a Grinder
After long-term use, the flooring is subject to destruction and requires cosmetic repairs. Occasionally, restoration of the coating is carried out before the expiration of the warranty period of the floor.
The following prerequisites occur: the introduction of soft wood for the production of flooring, which is installed in rooms with high traffic, poor quality of installation, carried out without taking into account the requirements of the technology, lack of proper care for parquet.
To determine the degree of wear, remove all types of coating from the floor and clean it from dirt. Parquet is restored by sanding in this version:
- If only small scratches and cracks are visible, marks from furniture and pet claws.
Some dies have dried out and have huge gaps.
The varnish has faded and lost its original appearance.
The planks became loose and began to creak. To get rid of the nasty feeling, secure the parts to the base with screws, recessing the head by 2-3 mm.
When you knock on the planks, you hear a dull sound, which means there is a void under the board. To get rid of it, drill a hole in the wood and fill the space underneath with glue using a syringe. You can nail the dies with nails or secure them with screws.
How to scrape the floor: all the methods from A to Z
Let's start with the fact that only wooden floor coverings, which include parquet and floorboards, can and should be sanded. Despite the fact that some lovers of perfect floors sometimes try to scrape laminated parquet, they still end up with only a damaged floor. Wooden floors that were previously covered with mastic or varnish, which refers to parquet, or painted with paint, are recycled - this is about boardwalks. Such work is done in order to remove the top layer of wood and expose the pure, pristine one, which has not been touched by the intervention of overly homely owners. You only need to remove the top layer, just a little, so as not to spoil the flooring material.
To be honest, you first need to decide what you will do with it. The surest and fastest way to scrape is to use a special scraping machine. If you often do such work, then it is better to buy such a machine and not give it to anyone, since someone no less diligent than you can easily dull or break the sanding knives. Such a unit is quite expensive, but the time savings are worth the money. When scraping using a machine, you do not have to get rid of family members and pets during work. Household members will somehow survive the noise of the car, and pets will have time to hide. Apart from noise, the mechanism does not particularly bother others; there is not even much dust from it.
Speaking of dust, which will occur with any scraping method. It will not be just dust, but dirt mixed with mastics and varnish. You will have to breathe this mixture until the work comes to an end, which is extremely undesirable. Be sure to stock up on a respirator and safety glasses, because dust will fly not only into your mouth and nose, but also into your eyes.
Dirty floor
Another sanding method is quieter, but also more labor-intensive: sandpaper. You can pick it up and rub the floor with your hands, or you can tie it to the sole of your shoe and rub it with your feet. In any case, both of them get tired quite quickly, so you will have to constantly change your “tools of labor.” When using this method, there will be less noise and less dust. The looping time can last indefinitely, which depends on your strength and desire to finish everything quickly and go lie down on the couch.
Mastic
Another noisy and dusty option in solving the problem of how to quickly cycle the floor. Take a grinder in your hands, apply or glue sandpaper to the disk and clean the floor with sandpaper. It works quite quickly, but an uncomfortable position can provoke an increase in pressure and an attack of radiculitis. Be careful when using this scraping option.
Using a grinder
Now again a quiet but slow way to clean a dirty floor surface. Take something like a scraper, knife, chisel and gradually clean, centimeter by centimeter, the entire surface of the floor. It is good to do such work on vacation, so as not to gain weight during your vacation, and to return to your workplace thinner, rejuvenated and completely satisfied with a successful vacation.
If suddenly, for some reason, you are not satisfied with these four scraping options, the fifth method will come to the rescue. You call a team of craftsmen, give them a task, set deadlines, invest a certain amount of money, and you pack your bags and go on vacation with your family. In this case, you will not be worried about either dust or noise, since you will not be deciding how best to make repairs, but where to get money for a return ticket. Because, having received a telegram from the scraping place about the lack of funds for the needs of the scraping workers, you had to transfer all the cash to your hometown.
But now all the troubles are behind you, and in front of you is an almost new floor, shining with cleanliness. But it’s too early to let household members into the apartment, because the floor needs to be rubbed with mastic or varnished again, and then, after some time, sanded again.
What to choose for wood processing?
The answer to the question asked depends on the final result that the person plans to obtain. If we are talking about absolute evenness and smoothness for subsequent coating with stain, we turn to a sander. For rough processing and visual effect, a grinder is enough.
Note that proper grinding involves a gradual increase in the grain size of the nozzles. To begin with, they take paper with an indicator of 60, then 80, and finish with 150–180. This parameter is sufficient for processing wooden surfaces and logs. After completing the process with the tool, sand it manually. This way, the appearance after painting will not be spoiled by scars from the device.