Good day to all! The body repair season is now in full swing. Everyone is trying to remove the consequences of the past winter and prepare for the new one. In most cases, there is an empty transfer of time, money and materials. Because the materials were chosen incorrectly and the technology for their use was violated in the most gross way!
As I already wrote in my blog, I worked at a car service station for several years, then changed jobs, but now I periodically work for jobs)))
I was mainly involved in the fight against rust and anticorrosion. The work is terribly dirty, not very useful and not at all easy as it seems at first glance.
The main reason for changing jobs was that our people are not ready to pay adequate money for quality work and quality materials. It is impossible to combine quickly, efficiently and cheaply. At best, you can choose 2 options out of these three. As for materials, you can’t make a mess out of an axe. You can create an appearance, but a cheap fish is a bitter fish!
During the time I have been doing this, I have read a lot of information, talked about this topic with many specialists who deal with this, tried a lot of materials and methods. Therefore, I know what to do and what will come of it.
I think this will be useful to many! More precisely, not for many, but for those who want to do this work efficiently and for a long time)))
Let's move from words to action!
So we have a part affected by rust. First, let's determine the scale of the damage. If the metal is eaten away by more than half its thickness, it will no longer be possible to save it. We'll have to cut out that gangrene and digest it. I'll tell you more about this later.
It’s very good if you have a sandblaster! He helps well in this difficult matter.
The surface eaten by rust becomes heterogeneous and bumpy. Therefore, sandblasting is the best option. Only he can knock out rust from the formed craters!
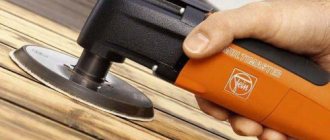
STOP! A short stop. All the work described below will be carried out using various types of attachments and devices for drills and grinders. It may be dangerous! Take care of your safety.
Spend your money and buy at least: 1) Safety glasses. It will be more pleasant to admire the result with two eyes than with one! 2) Respirator or special mask. Don't neglect them. During the work process there will be a lot of dust. I don't recommend breathing this stuff. 3) Gloves. They will protect your hands. 4) Wear thick clothes!
Don't skimp on your health!
If you don’t have a sandblaster, you’ll have to arm yourself with something like this
Yes, it costs money, but it brilliantly removes rust, paint, layers of putty and other nasty things from metal. Without damaging the metal itself.
If you don’t have one and the toad is choking you to buy it, then stock up on sandpaper and petal wheels for the grinder.
Yes, exactly for the Bulgarian. Almost all attachments and accessories are available for both drills and grinders. But! The load on the tool is not small, because work better at low speeds. With increasing speed, the likelihood of overheating the metal increases, and this is not a buzz! And it’s dangerous to operate them at high speeds! If it flies apart, it won't be good! Therefore, I do almost everything with a grinder, except for those places where you can only get to it with a drill.
Wire attachments also help a lot.
IMHO the coolest thing is this configuration
Not even necessarily old paint, maybe new paint. If you dyed it and it’s not the right color for you.
Cleaning metal surfaces before painting, before welding, after painting in case of defects - these are tasks that regularly have to be performed in factories or small workshops. In addition, you may need to perform such work even at home, for example, when repairing a summer house, balcony, or it may be related to a hobby.
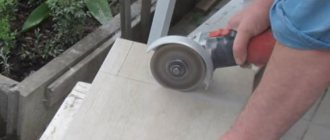
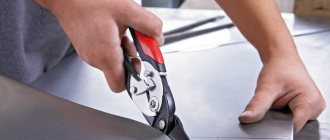
Clean the weld seams with a grinder
Cleaning welds is a job that requires a responsible approach.
In order not to damage the seam, and to keep the surface looking smooth and neat, you need to grind it off with a grinder. During the stripping process, remember that after the processing process, as much metal as possible should remain on the weld. Proper cleaning of weld seams is possible with a disk no less than 3 mm thick. Otherwise, the disc may burst and cause harm to surrounding objects and the health of the operator of the angle grinder.
After welding two metal elements, scale and slag remain within 2-3 cm of the seam, which must be ground. This must be done immediately, because when the surface is covered with paint it should be smooth. And if you don’t clean these places, bulges will remain and the appearance will be ruined.
Where it is difficult or impossible to reach with a grinder, use a flat chisel.
How to remove rust from a gate using a grinder
There is a garage that has a gate that is naturally rusty. We need to paint them, but first get rid of the rust. I don’t want to play around with acid - it’s harmful to health and needs to be washed off before painting. I have a Makita 9558 angle grinder. On sale I saw flap wheels (many strips of sandpaper glued on) and brushes for an angle grinder.
le wrote: petal circles remain.
Will they be able to clean it up? It will be expensive, IMHO. And they can withstand such a speed of 11500.
2le][a It depends on how you press. Buy one petal and one stripper - compare which is more convenient.
le wrote:
which has a gate that is naturally rusty. We need to paint them, but first get rid of the rust
Are you absolutely sure that getting rid of rust is really necessary?
Maybe it would be easier to buy a bottle of car rust converter and turn this very rust into soil? Or even just a can of Tikkurilov paint, which is applied directly to the rust?
I used it on large surfaces, nothing flew off it except rust. The very corners are similar, but for a drill and a drill, of course. I cleaned it, washed it with water, let it dry and two coats of primer. It has lasted for 12 years. Fine.
There are paints that can be applied directly to rust. I recommend and use them. Using a grinder to clean it is ideal for applying regular paint will not work 100%; as a result, the gate will bloom under the paint.
READ MORE: Which cosmetics are better? And what are the differences between natural and organic cosmetics. The best natural cosmetics brand
I painted it with something expensive, like Tikkurila, for my grandmother’s cross - 2 years have passed and the paint still hasn’t come off. And the cross was terribly rusty.
I would do this: Clean off everything loose, loose and generally cleanable with a wire brush (those who have not worked with brushes are afraid of flying wires, well, yes, they fly off, but other than sticking into clothes at the end there are no troubles, and in thick clothes stuck; it is advisable to always wear gloves and glasses when working with an angle grinder), then treat the surface with a rust converter, then paint.
le wrote: I don’t want to play around with acid - it’s harmful to health and needs to be washed off before painting.
The B-52 still holds its mark. Don't underestimate her. Minimum work, acceptable result. But if anything happens, using a brush is also an option.
It’s easier to do it by hand - wrap a simple piece of sandpaper around a block and rub it. and there will be less dust.
It’s easier to buy Hammerite and not fuck your brain with any stripping
Vo.VA wrote: It's easier to do it by hand - wrap a simple piece of sandpaper around a block and rub it. and there will be less dust.
If you have an angle grinder and a brush, it’s easier to combine them. Dust. It depends on what and where the garage is, and what is in it))) Yes, a brush for a small grinder should be taken with a small diameter (60-70mm) and when buying, make sure that the nut is secured evenly so that there is no beating when rotating.
Swarovski wrote: it’s easier to buy Hammerite and not fuck your brain with any stripping
If you don't care about the budget, definitely.
Homemaster wrote: but other than sticking into clothes at the end there are no troubles
Not counting the pulling out of the hands and stomach of the wires that entered almost a centimeter
But it was my own fault that I cleaned it with the wrong brush in just a shirt because of the heat. But wearing a mask. By the way, it was a garage door.
Eddy21 wrote: Maybe it would be easier to buy a bottle of car rust converter and turn this very rust into soil? Or even just a can of Tikkurilov paint, which is applied directly to the rust?
These products require preliminary cleaning of layered and loose rye. Otherwise, you will trap it under the upper crust that the converter will create, and after some time it will still swell and come out. Tested repeatedly on car bodies and rims.
Why isn't the red lead already giving up? As far as they know, they can even paint over rust.
DJGlukBH wrote: Cleaning with a grinder is ideal for applying regular paint will not work 100%, as a result the gate will bloom under the paint.
I will apply primer
The process is also complicated by the fact that in some places the old paint remains - it looks like it will also have to be cleaned off. Moreover, apparently it is better to do all the gates manually.
READ MORE: How to choose a unicycle: nuances when choosing | Blog
munya wrote: Why isn't the red lead already talking?
That's right, I got it wrong in post 8. I didn't apply primer, but red lead. Please excuse me.
go wrote: Apart from pulling out the wires that had entered almost a centimeter from my hands and stomach, but it was my own fault that I cleaned them with the wrong brush in one shirt because of the heat. But wearing a mask. By the way, it was a garage door.
Well, you still have to be able to do this
In principle, of course, there are many things people do, including swallowing swords and eating glass.
The maximum volume that I have done with brushes is a two-story wooden house, all walls and ceilings. The last time I used brushes was about a week and a half ago, I stripped the battery - two cup brushes to zero, one to a third, I worked with 125 and 230 grinders, without adjusting the speed.
Painting a brick wall in the interior
Brick retains its vibrant and attractive texture even under a layer of paint. For a bedroom or living room, many designers are happy to give preference to decorative painting in light colors, which looks more gentle and sophisticated and allows you to combine all the architectural elements of the wall: cornices, niches, protrusions. Most often in interiors, especially by Scandinavian designers, you can find white paint, which is great for small spaces.
Reminder: the porous texture of brick absorbs paint very well, so do not rush if you are not sure whether you want to paint your wall. You will have to remove the paint with caustic solvents and, possibly, with the help of professionals.
If you want to get an unobtrusive brick texture, paint the wall with several layers of white paint; if you want to add the effect of a worn, old surface through which the original color is visible, dilute the white paint with water. You can start with a mixture of 3 parts paint to 1 part water and apply it with a large brush using loose movements. After allowing the composition to absorb into the surface a little, it can be reapplied, independently varying the amount of water and drips.
Tip: if you don’t like white, choose gray paint for a brick wall - this is a universal background for any furniture and accessories.
Another interesting option for decorating a brick wall is the so-called “stained” brick. If the original color of the brick seems too light to you, it can be coated with stain, similar to wood. The brick will darken, maintaining its original texture. In this way, you can create a truly amazing effect of ancient masonry even in a new house, although it will take quite a lot of time. To make the aging effect look natural, you will have to paint almost every brick separately with a small brush.
Brickwork in the interior is a solution that does not become outdated and has not gone out of fashion for many years. Of course, such a wall will require some restoration and processing measures, however, all of them are not comparable in terms of money and time to conventional leveling, putty and plaster and will definitely not create a unique atmosphere in your home.
vote
Article rating
About rust converters and paint removers
To remove rust and clean old paintwork down to metal, Western paintwork manufacturers recommend using exclusively mechanical means - sanders, sandblasting, brushes.
And none of the leading Western manufacturers of paints and varnishes produces or recommends the use of rust converters or neutralizers. This is partly due to the fact that it is generally not customary to repair rotten parts there, but the main reason is that the residues of the acid that is part of such products can provoke corrosion later, after painting. So using a rust converter is tempting (especially if rust is everywhere), but risky.
But some manufacturers have a remover for old paint - it softens and undermines the paint, after which it is cleaned off with a spatula or sander. But the use of such washes is also quite controversial. The aggressive chemical composition of these products does not give us complete confidence that we will be able to completely get rid of their residues after use. This means there is no guarantee that our new paintwork will not receive completely unexpected defects in this way. And even if you use a wash, then you need to apply it only to the entire surface of the part (otherwise the paint will still swell at the borders), which is irrational when removing small defects, for example, a small dent.
Thus, the most effective way to clean paintwork defects to metal today is mechanical processing, that is, grinding. Modern grinding materials make it possible to do this work in no less time than chemical methods, and with absolutely no risk.
The defects awaiting us at this stage can be divided into the following types:
- minor defects (scratches, chips, small dents),
- major damage (parts after straightening, thick layers of old repair coatings, putties, primers),
- pockets of corrosion,
- welds,
- anti-gravel coating,
- sticky tapes.
Let's figure out which tools and materials will be most effective in each specific case.
If the part is new and covered with low-quality shipping primer, then it also needs to be removed. Read more about this here.
READ MORE: Top and inexpensive screwdrivers from AliExpress / Selections, listings, top 10, and so on / iXBT Live
How and how to cut bricks at home
Before cutting a brick, you should securely fix the product, especially if you are cutting by hand. Before cutting ceramic bricks, the surface must be moistened with water. It is also necessary to mark correctly, taking into account the thickness of the cut line. Below we present to your attention a list of tools that can be used to cut brick at home and not only.
Hand tool for cutting bricks
- Chopping using a hammer pick , construction chisel with hand protection.
- hacksaw with a tungsten carbide blade (sputtering) will very accurately cut ceramic bricks at home.
Power tool for cutting bricks
When cutting bricks with an electric tool at home, you should follow safety precautions. You may also need a respirator to protect your lungs from dust.
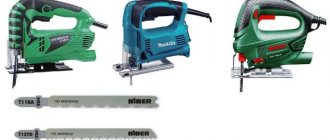
- A hand jigsaw is perfect for small jobs.
- Angle grinder or grinder.
- A handheld gas cutter (cutter) can be used, but this is not its best use.
- cutting machine .
And here is a professional stone-cutting machine
Methods for cutting aerated concrete blocks are described here.
From metal surfaces
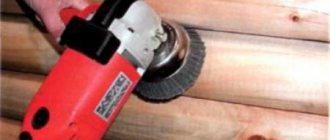
For roughing work on metal, be it removing a layer of old paint or removing rust, craftsmen use wire brushes. They look like a brush made of twisted or untwisted metal wire inserted into a metal glass, or a disk made of the same wire.
You can hear complaints from craftsmen who have used wire brushes for scraping metal that small pieces of wire fly off the nozzle and get stuck into clothing.
Depending on the quality of roughing work you want to carry out, the thickness and hardness of the brushes is selected. You should take into account the fact that the metal wire used in brushes leaves scratches on the surface being treated. Therefore, it is better not to use them to remove paint, for example, from a car body. They can only be useful for removing rust and paintwork from hard-to-reach places.
For gentle metal stripping, it is better to use special wheels made of silicone carbide fibers (XCS) - they are usually black. Clean and Strip discs, which are more wear-resistant, are also used for these purposes. They come in blue color, have a similar structure, but consist of nylon threads.
This grinding wheel is available in 2 versions: for a drill and for an angle grinder. Its distinctive feature from other types of nozzles for removing paint from metal is that it does not clog and does not cause damage to the metal in the form of scratches. It also successfully removes welding spatter, rust, various sealants and anti-corrosion coatings.
Clean and Strip wheels have good wear resistance and can be used until completely worn out.
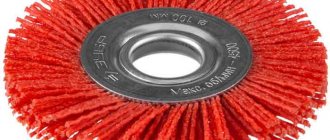
Often, petal attachments for an angle grinder are used to remove paint from metal. They are a disk with sandpaper in the form of petals glued to its surface.
For rough surface treatment, nozzles with a large grain size are used. For finishing work, it is necessary to select a grinding wheel with fine sandpaper. Although this sanding disc wears out quickly and becomes clogged with remnants of removed paint, it can be restored quite simply. You can understand how this is done from this video.
Rust removal
To quickly and effectively combat pockets of corrosion, you should also use a stripping machine.
The best materials are the fiber and petal discs described above - with their help you can quickly and effectively remove rust on large surfaces. If, after working with these circles, rust pores remain on the metal, additionally use SCM disks, which will remove rust from small depressions and pores.
However, we often have to deal with rust, which is located in hard-to-reach places that are difficult to process (on thresholds, edges, in recesses). In such cases, an axial grinder such as the Rodcraft 7040 or the small Rodcraft 7100 angle grinder will be most convenient.
Rodcraft 7040 axial grinder
In tandem with these machines, special grinding rollers (spiraband) and small grinding wheels (siafix) are used. Working speed with rollers - up to 23,000 rpm, with siafix circles - from 15,000 to 30,000 rpm. for 50 mm discs, and 13000-27000 rpm. for discs with a diameter of 75 mm.
Sanding rollers
As a result, the small size of the machine and grinding wheels provide good access to repair areas, and the high speed of work ensures fast and effective rust removal.
In the case of processing the edges of doors, the edges of the hood or trunk lid, various recesses and “narrow” places on the body, a regular cutting disc can help out. It is clear that its main task is cutting metal, but with careful handling using a cutting wheel you can very quickly and effectively remove rust, especially in hard-to-reach places.
Types of discs for electric tools
There are 2 types of equipment for stone: diamond and abrasive cutting discs. Abrasive discs for cutting are inexpensive, but they wear down quickly and are prone to deformation and destruction during operation.
Diamond blades (diamond-coated wheels) are safer and last longer. Based on the type of edges, they are divided into 3 types:
- Solid. The working surface may overheat and, as a result, a short service life.
- Segmental. The edge is divided into separate sections by radial cuts. The cutting area is ventilated, but there is a risk of waste sticking between the segments when cutting wet.
- Turbocharged. The teeth in the edge are arranged in a spiral, due to this, wet and dry waste is well removed. It has the best performance characteristics and a long service life.
Modern tools that help craftsmen cut fireclay or sand-lime bricks are attractive due to their high processing accuracy and ease of use . They significantly reduce the time spent on the operation; the edges of the resulting materials are distinguished by a smooth surface.
You can cut building materials using the following devices :
For small volumes of work, a grinder is suitable, and for large-scale production, stone-cutting machines are usually used. Petrol cutters and laser machines are used when sawing brick walls , but the second option is expensive equipment, so choosing it at home will be unprofitable.
Durable fireclay brick is quite difficult to saw, and the process itself is accompanied by a large emission of sparks. Pre-soaking it in water for 15 minutes helps solve the problem.
Cutting an opening in a brick wall
A budget option for creating a door or window opening in a wall is to gouge it out with a sledgehammer. In this case, the operation is considered dangerous, since there is a risk of the wall breaking due to weakening of the stone ligament.
The nuances of getting an opening using a sledgehammer:
- the sizes are taken a little larger than usual, their width is increased by 0.6 cm, and their height by 1 cm;
- the surface in the right place is cleaned of plaster;
- first, use a screwdriver to pick out the binding solution, and then hit the bricks with a sledgehammer, starting from the top strip;
- Having removed the first row, insert the upper support beam and fill it with concrete mortar;
- after the composition “sets”, perform identical actions to remove the next strip.
When making a window opening, you need to take into account that its lower edge should run along the edge of the cement belt.
After using a sledgehammer, the wall must be trimmed with a grinder , since the bricks are placed “in a dressing.” On such halves, cuts are made with a tool, and then the building materials are carefully beaten with a hammer.
The leading technology that ensures maximum quality of work is diamond cutting . The price of such an operation is higher, but it is safer, since the dustiness during its implementation is minimal. The advantages also include a low noise threshold of operation and obtaining smoother cut edges. During diamond cutting, bricks do not fall out of the working area.
Removing thick layers of paintwork
An indispensable tool when working on surfaces with large damage (for example, after straightening), as well as on surfaces that have previously been repaired and have thick layers of old repair materials on them, is an angle grinder, popularly called a “grinder”.
For example, a Rodcraft 7150 pneumatic grinder or an electric rotary sander Festool RAS 115.04 E.
Cleaning with Festool RAS 115.04 E
The most commonly used materials for this task are fiber discs: regular or with Velcro fastening. For Sia, these are siamet and siatop circles, respectively. These are very aggressive materials, so they can easily cope with the removal of thick layers of paintwork. However, these materials should be used carefully so as not to leave too rough marks on the metal surface.
siamet fiber cleaning wheel
The recommended speed for working with siamet wheels is 10,000 rpm. For siatop discs, the speed should be limited to 8000 rpm, as at higher speeds the Velcro on the edges of the discs may burn.
Wiping wheel based on synthetic fibers SCM
Special cleaning wheels based on synthetic SCM fibers also do an excellent job of removing thick layers of paintwork materials. Due to their structure, these wheels are almost not clogged with paint particles and leave virtually no marks on the metal, which makes it possible to avoid regrinding the surface with finer abrasives to avoid subsidence. As mentioned above, these circles are also great for eliminating small defects.
The grain size of these materials is indicated by the letter “K”. They have three gradations: K060 (coarse), K100 (medium) and K150 (fine). To attach these circles, the same plate is suitable as for fiber circles with Velcro. Operating speed - no more than 85000 rpm.
Very good for removing old paintwork and stripping flap discs. Sia has siaflap wheels. Due to the fan-shaped arrangement of the abrasive blades, such discs wear evenly and do not clog. They last 6 or more times longer than regular circles! Operating speed with 115 mm discs is up to 13,000 rpm.
siaflap cleaning flap disc
Methods for manually sanding a wall after plastering
Before sanding the base, you need to choose a sanding method.
The list of popular methods includes:
- dry grinding;
- wet grinding;
- glossing;
- rubbing seams on plasterboard walls, etc.
Dry sanding of walls
Before treating the walls, you need to install a lamp and check for any irregularities to eliminate them. The sandpaper or abrasive mesh is fixed on the sanding block. Processing is carried out with movements from top to bottom in sections measuring 1 * 1 m. Movements should be circular, pressure is necessary with moderate force. If you apply excessive pressure, the putty coating can be completely erased. In the areas where the walls join, the float is applied parallel to the corners and grouting is carried out using vertical movements.
After processing, the level of smoothness of the panel is checked. When preparing the wall for wallpapering, there may be small scratches on the surface.
Wet
This method of sanding surfaces is less dusty. To work you will need a spatula and a sponge grater. The sponge is moistened with water. Then the surface is rubbed. At the next stage, the wall is smoothed using a spatula, movements are performed from top to bottom. When sanded wet, the gypsum surface becomes smooth, prepared for wallpapering. When processing a wall with cement plaster, grains of sand may remain due to the specific composition of the finishing mixture. The wet grinding method does not use mechanical equipment.
Glazing
The method allows you to create a smooth, shiny layer on plastered walls. The surface will be ready for wallpapering or painting. This type of treatment is used only for surfaces with gypsum plaster mixture. A cement-sand coating cannot be made completely smooth.
The work will require a wide metal spatula and a sponge grater. After applying the plaster and leveling the base using the rule, you need to wait 15-20 minutes. Then the wall panel is wetted with a damp sponge or using a sprayer. At the next stage, the wetted base is polished with a spatula.
To increase smoothness, repeat the glossing procedure within 24 hours. After processing, there is no need to apply putty to the wall.
Do-it-yourself drywall seams
It is carried out using the dry method using a grinding machine or manually.
The work is carried out in compliance with the following stages:
- The joints of the plasterboard sheets are covered with a putty mixture, the residues are removed using a spatula, running along the seam joints.
- Paper masking tape or mesh is glued on top of the wet putty.
- The tape is puttied in a thin layer and dried.
- After drying, the joints on the plasterboard boards are rubbed down with fine-grained sandpaper.