Is the game worth the candle?
The environment, trips out of town and not always high-quality road surfaces lead to cracks, chips and scratches on the body and bumpers. Exposure to direct sunlight will cause paint to fade, resulting in the need to refinish or repair your vehicle's paintwork.
There are a lot of opinions on polishing and minor repairs, and some believe that polishing a car with an angle grinder can lead to even worse results. This opinion can be called erroneous because the correct and precise approach to work and the choice of the right technology will allow you to get an excellent result.
By choosing the right materials, even the most neglected car can be restored to its original appearance. Initially, you need to determine the scope of work and select the appropriate paste and polish, among which there are several types:
- abrasive and non-abrasive - this applies to paste and polish;
- silicone polishes;
- restorative polishes.
Pastes are marked; for abrasive pastes the designations J3, J6, J7, J10 and M3 are used. Polish pastes are in demand. It is worth remembering that the polishing spray is designed to provide the final look and shine.
When preparing the body, fine sandpaper P 2000 is used. It clogs quickly, so it is necessary to frequently wet the surface with water. This fine sandpaper will get rid of deep scratches and paint chips.
Abrasive polishes are used to remove scuffs and scratches from car paintwork. Treatment with this product removes a slight layer of varnish, after which it will need to be restored. At the next stage of work, protective silicone polish is applied. It fills the smallest cracks, micro-scratches and adds shine.
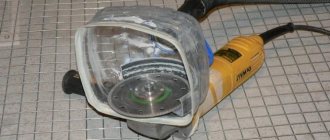
In order not to perform the entire range of work manually, the car is processed with a grinder. When working, special circles are used. For grinding machines, eccentric ones with high runout speeds are chosen. It is better to purchase a professional tool, for example, from brands such as Makita or Bosch.
How to Make a Polishing Machine With Your Hands
At home. How to do
himself
Content
How to do something yourself, on your own. DIY website
Polishing your car yourself
How to polish a car at home
That every car owner is sure that polishing a car is purely aesthetic, allowing the car to shine brightly and sparkle in the rays of the sun, also called the light of street lamps and headlights of other road users. But the process under consideration has another – not so trivial, but even more fundamental and responsible role, associated with the protection of the coating and, as follows, everything that is under it.
Why is it necessary to polish your own “iron horse”, with what and how, and in what case should you do this? Before answering all the identified problems and moving on to advice regarding the technical part of the process, it is necessary to clarify that polishing can be abrasive and protective.
Protective polishing is a fairly common process. There is an option to do it as often as you like, although it is also not recommended to get carried away here: any mechanical effect on the car’s coating (the accepted abbreviation is paintwork), especially with the use of chemical compounds, is excellent within certain limits. In fact, protective polishing allows you to give the car a chic, shiny look and at the same time protect the paint from the effects of all sorts of negative reasons - dust, ultraviolet rays, etc.
The essence of abrasive (also called restorative) polishing is to remove a very small layer of the car’s coating to remove scratches, as well as deposits of dirt, various salts, reagents, etc., inevitably formed during the use of any vehicle. Due to the fact that this operation reduces the thickness of the paint layer, it is strictly not recommended to do it unless absolutely necessary.
Restoration with abrasive
It should be noted right away that polishing, no matter how deep it may be, is not a panacea for various ills; it will not help correct complex coating defects, for example, large chips or deep scratches.
But it will remove small problems such as microscratches, microcracks, abrasions, surface clouding, fading, loss of brightness, etc. without effort. Although it looks different: you still need to work hard, and a lot at that.
READ How to Charge a Nickel Cadmium Screwdriver Battery
The technological process of polishing a car body is quite complex, unfortunately, once you master it. a car enthusiast will be able to not only save a lot on caring for his four-wheeled pet, but also give a beautiful look to things outside the auto sphere, for example, furniture and other interior elements. But we should start with the basics, or more precisely, by considering the structure of the car’s coating, which consists of:
- primer - a composition applied as the first layer to a metal surface prepared for painting, smoothing its absorption characteristics and ensuring reliable adhesion of the entire coating to body parts:
- paint - a substance used to give objects (in this case, the body) one or another color and flavor;
- varnish is a solution based on polymer resins that form a strong film that acts as a protective coating. Restoring, also known as abrasive polishing, eliminates defects that arise specifically in the topmost layer of the car’s varnish coating. Now, having summarized the theoretical basis of the process, of course, move on to the practical part.
Self-polishing preliminary step
To polish the body, you will need a number of chemicals and compounds, as well as some devices, special tools and consumables for them. Depending on the degree of impact on the car’s coating, polishing compounds are abrasive, medium-abrasive and non-abrasive.
. In addition to them, you should arm yourself with a solvent, a degreaser and, perhaps, a special means for removing bitumen. In this case, chemistry ends and physics begins, i.e. tools, devices and some consumables, and more specifically:
- polishing machine;
- polishing wheels (plus, perhaps, a mandrel for attaching them);
- microfiber napkins or towels;
- cardboard (painting) tape.
Speed controller for a grinder (grinder) or how to make a polishing machine from a grinder
Homemade sander . To make the sander with your hands. nothing complicated. The video shows how to make a homemade centrifugal.
Homemade sander.
Polishing a car with a grinder. Our client is left with the pros and cons of painting a car. car polishing car primer. putty.
Before starting work, you need to wash it as thoroughly as possible (preferably with a high pressure washer using special shampoos) and dry it.
At this point, the preparation is complete: it’s time to actually move on to polishing.
Rough impact before polishing
The first step is to remove especially persistent dirt with a special means, which always remains even after the most painstaking washing - splashes of bitumen, traces of insects, etc. Here, both special aerosol cleaners and an ordinary neutral solvent are used.
Next, the polished surface needs to be degreased using a napkin (also called microfiber towels) and any suitable degreaser. If there are still persistent stains on the body, they should be removed by treating with special clay. Fundamental note: only those surfaces that are dirty are treated with clay!
READ Do-It-Yourself Drilling From a Screwdriver
Now it’s time for matting
.
Here, as in various other matters, the main thing is not to overdo it, not to overdo it, since this very operation determines 90% of the success of the entire polishing venture.
There is an option to use an eccentric sander with adjustable spindle
(very high speeds are guaranteed to damage the car body coating), but in the absence of adequate experience, it is better not to risk it and use the manual grinding method.
It is this that will be examined in detail, since obvious logic suggests that most of the readers of this article are not specialists in the field of polishing. What you need is to take a sheet of moisture-resistant sandpaper with a grit size of P2000 and soak it in a bowl of water at room temperature to give it elasticity. A very important point is the correct position of the skin in the hand: the corner is sandwiched between the little and ring fingers, and the thumb holds and guides the piece of paper. We moisten the selected area generously with a sprayer or (better) a hose with running water.
At the level of thoughts, we divide the workpiece into several imaginary parts and begin to matte (grind) each one with cross movements. At the same time, we obviously don’t touch the plastic elements, but we sand other areas, not reaching approximately 1-1.5 cm from the edge. Certainly. We do not matte the edges of the parts. As the part being processed becomes dull, we move to the next section, etc. As a result of this operation, you need to wipe the body with a soft cloth and let it dry completely.
Check the quality of matting without special expenses: the surface should become uniformly matte, in this case there is no point in getting carried away with removing scratches, otherwise, of course, it will destroy the varnish, and during the upcoming polishing it will be completely damaged. It’s easy to imagine, and therefore the part will have to be repainted.
We move on and move on to gluing plastic and other unpainted parts. If you are lazy and skip this step, the abrasive paste will remain on untreated surfaces and will be very difficult to remove.
But now the most exciting part: actually polishing
on your own
Here you will need a polishing machine with a special foam attachment, which you will like in different types - from soft to rough. Initially, what will be useful for polishing is a coarse nozzle and a coarse-grained polishing paste, applied to the surface to be treated and distributed evenly over it in a cross-shaped motion using a polishing machine at minimum speed without the slightest pressure.
READ Makita How to Recognize a Fake
We repeat this function a couple of times, then increase the spindle
polishing machine and go over a suitable surface several times, then carefully on another with a waffle towel to remove the remaining paste and dirt. Using the same scheme, we process any part of the car body.
Soft finishing
The rough restorative treatment is complete, now we are polishing it. We proceed in a similar way, only using a softer polishing wheel together with an intermediate, and then a softer (final) polishing paste. After every 3-4 passes over the surface to be treated, it is recommended to wash the polishing
circle in hot water and dry. When, the simplest and relatively fast method of drying this attachment is to install it on a polishing machine and let it run at high speed for 1-3 minutes.
Protective polishing
At the end of the restoration procedure, it is necessary to apply a layer of polishing protection to the body using the technology discussed above, but using a special foam rubber or felt wheel and an appropriate fine-grain polishing paste.
The main thing at the moment is to prevent the formation of clots and lumps. Experts advise applying a layer of protection at least once a month, then the car will always look like new, without the slightest hint of the appearance of pockets of corrosion.
Polishing not only a car...
The polishing technique discussed here is suitable for processing almost all surfaces. Using special pastes, you can add shine to any
materials, as it is also called, objects, but it is strongly recommended to make sure in advance that such an effect is permissible by trying to polish an invisible (for example, the back) part of the part. Uncoated elements are also polished using the same method: namely, an ordinary sheet of iron treated with suitable compounds looks shiny.
After all, a polishing machine is used in the household with the intention of bringing the blades of kitchen knives and other household cutting surfaces to a perfect sharpness. Any polishing compound is suitable here, from the simplest GOI paste to products from expensive world brands. The softness of the polishing wheels and the grain size of the composition are selected from the parameters of the specific intended purpose.
Source
For the average motorist
For minor damage, a regular grinder or hand drill will suffice. The processing circles are made of wool or foam rubber. The tool must have a speed regulator to avoid unnecessary scratches and abrasions. The desired type of paste is applied to the circle and a little to the work area.
Polishing should be done crosswise, gradually moving vertically and horizontally. This will allow you to apply the paste evenly and properly treat the surface, the main thing is that the paste does not dry out while working. Polishing is carried out until the desired shine appears. All excess paste is wiped off with a soft cloth or napkin.
After the area is polished, silicone paste is applied and the same actions are carried out with a softer circle. The whole job takes several hours. The final step is to apply a protective layer using a soft cloth or a special mitten. The layer should be distributed evenly so that there is no excess polishing left; all drips should be removed with a napkin.
Working method
At the moment, there are only two best known ways to polish a car: manually and using a power tool.
The first method is the most economical and is more suitable for applying protective polish. To implement it, you will have to stock up on everything you need to avoid problems when starting work. What does the list of such necessary things include?
The first is a special polishing cloth. Such napkins can be purchased at a specialized store: usually there are several pieces in a package at once, so you don’t have to worry that you won’t be able to limit yourself to just one pack.
It is necessary to polish in small areas, applying the product in sufficient quantities successively to small squares. In this case, after application, you need to wait a few minutes until the product dries: this will make it easier to rub it over the surface of the body and achieve the desired effect.
In the case of working with a grinder, you will have to pay more attention to not overdo it: the rotation speed of the wheel is high, and it is not so difficult to ruin the paintwork. This method is somewhat more expensive: you will have to additionally purchase polishing wheels with an abrasive surface. However, the main advantage of this method is speed and efficiency, which cannot always be achieved using the manual method.
Advantages of the method
Such a low-cost and accessible method for every car enthusiast will allow not only corrections for minor damage, but also giving the car a well-groomed appearance. The technology is simple, and it won’t be difficult to do all the work yourself. In this way, headlights, bumpers and windows can be perfected.
When processing headlights, do not use silicone polishes. In some cases, it may be necessary to treat the headlight glasses with sandpaper R 600-800, it all depends on their original condition.
About prices
If we calculate the approximate cost of the entire amount of work, then car centers for polishing will announce a price of 150 USD. The price includes polishing with all the products offered by the center. It is not always possible to be sure of an excellent result when placing a car in the wrong hands. Moreover, many of these services do not bear responsibility.
The work done yourself will cost much less. On average, a can of polishing paste in an authorized store will cost more than 15 USD. One can is enough for five cars. Polishing wheels will cost 5 USD. If you don’t have a grinder or polishing machine, you can borrow it from friends or rent it; in extreme cases, a drill with the ability to adjust the speed will do. As a result, the total amount will be no more than 30 USD. In addition to significant savings, you will be confident in high-quality work done with your own hands.
Minor scratches or chips on the car body do not need to be fixed in specialized workshops, nor do you need to buy paints and putties in stores. Abrasive car polishing will do a great job with minor damage and unevenness. This action will correct the shortcomings and save a significant part of the budget. All motorists have a lot of questions about polishing technologies, related products for polishing work, costs, grinding machines and many others. The main one is the possibility of correct and high-quality polishing of a car at home.
Restoration work
Let us dwell in more detail on the question of how best to carry out restorative polishing with your own hands and at home. In particular, we cannot help but talk about the choice of materials that will be needed during the work and will have a fairly noticeable impact on the final result.
Let’s immediately agree and clarify that working with a car body with your own hands requires significant skills or at least a couple of hours of training on some door from disassembly, which you don’t mind ruining and rendering the paint layer unusable.
To distribute air evenly at the jet inlet, use foam, felt or perforated card. Cover the tray with flannel or polyurethane foam to prevent marking of the molded part. The main ring or mold ring can be made with a board of approximately 40.0mm thickness. Pressure clamps can be used to secure the heated platen and ring to the molding platform.
Molding equipment with rings and molds
Rings or blocks can be made of wood, plywood or metal. Molds are usually made of wood and may be coated with a layer of rubber flakes to reduce casting marks. To produce large quantities of parts, rings and molds must be made of aluminum.
Let's talk about why restoration work requires a lot of attention and skills, as well as good preparation and well-chosen materials. The fact is that during restoration work, a very insignificant layer of varnish is removed or sanded off, the thickness of which is measured in microns. Together with this thinnest layer, microscopic irregularities, scratches and dirt that have adhered over time are removed.
Be sure to follow sheet manufacturers' safety recommendations as each product reacts differently when heated prior to molding. Due to molecular orientation induced during manufacturing, acrylic sheets shrink slightly when heated at molding temperatures.
The original dimensions will not change when making parts that do not require heat, or if the acrylic sheet is heated as clamped or attached to the frame. However, sheets heated to thermoforming temperatures change size. Extruded acrylic sheets achieve up to 3% shrinkage in the direction of sheet production, that is, in the longitudinal direction and up to 0.5% in the transverse direction.
As a result of this work, the varnish, or more precisely, the surface of the car’s paintwork, is leveled and begins to reflect the sun’s rays evenly. Due to this, the old elements of the car body begin to play with new colors: a transparent layer of varnish is exposed, which no longer hides the true color located under its thickness.
Cast or cast slabs achieve a maximum shrinkage of 1.5% equally in both directions. Measure the shrinkage of the sheet in a preliminary test and, based on this test, determine the required material dimensions to compensate for the shrinkage before cutting the sheet.
Pre-drying is rarely used on acrylic sheets. However, to prevent bubbles from forming in sheets with high humidity, circulation of heated air or drying oven can be forced before heating. Drying time depends on the water or moisture content and thickness of the material.
In order to do the work yourself, you should take care in advance of purchasing the so-called abrasive paste. Usually, a high-quality product is not cheap, but it is enough for more than one cycle of work, and, in principle, next time you will not need to purchase another package soon. But the result is highly likely to meet all expectations and leave no doubt about its high quality.
To prevent bubbles or distortion, heat the platen to the lowest temperature in the molding window or range using convection heating, conduction or irradiation. The standard procedure for vacuum forming equipment is to mount a cold plate on a frame and heat it through infrared radiation. Cracks or cracks can occur when the center of the plate is already hot but the edges remain cool. Drips, edge distortion, and asymmetrical shadows may also occur.
Currently, the range of such products is off the charts. For cars, you can choose both a domestic product and pastes produced abroad and imported into our country.
In the first case, the price of materials will be low: if you consider that the work is done at home and with your own hands, then the costs will be measured in hundreds of rubles and will be several times less than if you had to use the services of a professional.
Uniform temperature distribution throughout the sheet thickness is also critical to molding success. Before molding, the board should be heated to a temperature higher than the required temperature to prevent the cooling it will receive between heating and molding.
The approximate temperature of the plate can be measured using a laser pyrometer specific for measurements on plastics. We recommend that papers that change color should not be used as thermometers as they will cause marks on the surface of the plate when heated.
However, it is believed that the result will not be of particularly high quality. Strictly speaking, this economical option is best suited for those for whom a perfectly leveled surface is not of great interest and for whom simply the absence of noticeable scratches is enough.
Expensive polishes are often chosen by professionals, although amateurs who work with their own hands and at home also do not ignore them. The use of such pastes guarantees that the result will be of high quality. In addition, when used correctly, relatively little material is used, so one package is enough for several uses.
Temperature requirements depend on the molding conditions, and mold parts - deeper recesses require additional drawing of the heated sheet to match the shape of the required part. To avoid potholes, bubbles, discoloration and other damage, avoid temperatures that are higher than necessary. Platform or mold may mark overheated material.
Heating time depends on the thickness of the material and the heating method used. Conditions during heating, such as air speed inside the oven, also affect heating time. The design of the part and its components are other influencing factors. These variables are too large for mathematical prediction. The minimum heating time must be established by testing treatment cycles. With some experience, it is possible to develop uniform and precise heating cycles in acrylic sheets.
For the average motorist
For minor damage, a regular grinder or hand drill will suffice. The processing circles are made of wool or foam rubber. The tool must have a speed regulator to avoid unnecessary scratches and abrasions. The desired type of paste is applied to the circle and a little to the work area.
Polishing should be done crosswise, gradually moving vertically and horizontally. This will allow you to apply the paste evenly and properly treat the surface, the main thing is that the paste does not dry out while working. Polishing is carried out until the desired shine appears. All excess paste is wiped off with a soft cloth or napkin.
After the area is polished, silicone paste is applied and the same actions are carried out with a softer circle. The whole job takes several hours. The final step is to apply a protective layer using a soft cloth or a special mitten. The layer should be distributed evenly so that there is no excess polishing left; all drips should be removed with a napkin.
Main stages
Today, this operation can be divided into two types, since different types of polishes are used.
- Restorative or needed to remove abrasions, scratches and microcracks that have appeared. There are special tools and sandpaper for this. At the very beginning, you need to properly remove a thin layer of varnish, and then begin to smooth out the defects. It is better to use abrasive paste no more than ten times, otherwise all the varnish will be erased.
- Protective polishing can be used more frequently and can be done two to five to six times a year. The polish must be applied to the restored coating immediately, without waiting for small particles to get in. This will fill all the pores and microcracks, giving a richer shade of color and shine.
If you don’t have a special tool, you can use a regular drill or grinder, as well as a polishing block, which is an attachment. During friction, the pad will quickly warm up the paintwork, and the polish particles will fill all defects.
The process itself usually does not cause any particular difficulties, and the video will allow you to learn how to do it correctly.
To restore, you need to choose a polish of at least several types.
- Coarse or fine abrasive is applied, starting from the front bumper or hood of the car, to small square areas measuring forty or fifty centimeters in size. The amount should not exceed 10-20 grams so that drying occurs faster.
- After a minute, use a soft cloth to rub the paste. Soon you can see the appearance of a shiny film on the car body.
- A polishing machine with a round attachment or a drill is also used. You should work at low speed, trying not to press too hard so as not to damage the varnish layer. Movements can be circular or left to right, up and down. It is necessary to distribute everything evenly and remove the remaining paste. Then proceed to processing the next area.
- After completing the first stage, it’s time for soft polishing. The paste is evenly distributed in a circular motion over the area, and after it dries a little, when it starts to turn white, a machine operating at medium speed will help polish everything.
- The finishing touch will be made after applying the protective composition. You will have to repeat the already familiar procedure.
The sponge and polishing wheel should be rinsed well and dried after processing three or four areas.
If at the very beginning a low rotation speed is used, then it gradually increases to medium speed. The main task is to avoid the appearance of clots or lumps, since they are immediately removed, so you need to correctly calculate the pressure force.
Advantages of the method
Such a low-cost and accessible method for every car enthusiast will allow not only corrections for minor damage, but also giving the car a well-groomed appearance. The technology is simple, and it won’t be difficult to do all the work yourself. In this way, headlights, bumpers and windows can be perfected.
When processing headlights, do not use silicone polishes. In some cases, it may be necessary to treat the headlight glasses with sandpaper R 600-800, it all depends on their original condition.
About prices
If we calculate the approximate cost of the entire amount of work, then car centers for polishing will announce a price of 150 USD. The price includes polishing with all the products offered by the center. It is not always possible to be sure of an excellent result when placing a car in the wrong hands. Moreover, many of these services do not bear responsibility.
The work done yourself will cost much less. On average, a can of polishing paste in an authorized store will cost more than 15 USD. One can is enough for five cars. Polishing wheels will cost 5 USD. If you don’t have a grinder or polishing machine, you can borrow it from friends or rent it; in extreme cases, a drill with the ability to adjust the speed will do. As a result, the total amount will be no more than 30 USD. In addition to significant savings, you will be confident in high-quality work done with your own hands.
Bulgarian
Using the so-called “grinder” you can also polish a car, but the speed of this tool is too high. Take for modifications only models that have a speed control function. True, at low speeds the torque decreases sharply. If your grinder is small, then the polishing disc will constantly “freeze” or even stall.
Good for meat, not always good for baking: how to store honey and cook with it
What does a cat want to say when it crushes its owner (and what to do in this case)
A woman’s abilities are revealed through objects of power: the shaman gave valuable advice
But it is comfortable to hold, just like a professional polishing machine. Some manage to mix a drill with an angle grinder gearbox.
To do this, cut off the anchor from the angle grinder, and use ordinary PVC plastic pipes as an adapter.
Some people make an adapter printed on a 3D printer to the desired size, but this is not for everyone.
All that remains is to put on the polishing sponge and get to work. This is the most perfect homemade “creation”, which, by the way, is relatively easy to make.
Why polish?
Polishing may be necessary not only for minor damage or scratches. With the help of abrasive pastes and polishing agents, the car body can be kept in almost its original condition. Polishing the instrument panel, headlights and bumpers will keep it in perfect condition. The main thing is to choose the right type of product for a specific job.
Abrasives gradually remove top coats of varnish and paint; constant polishing will have the opposite effect. If there is no need to process the car body, there is no need to abuse abrasive polishing. This can result in complete removal of the paintwork, right down to the metal, which will require more expensive paint restoration, varnish application and final polishing.
How to polish a car with a polishing machine
The body is polished using a machine as follows:
The finished look of the car will be given by absolutely transparent and shiny glass. Read about methods for polishing the latter in our article -.
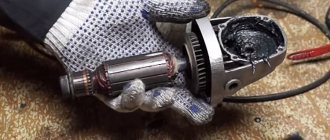
I decided to assemble this device to simplify the cleaning of the legs of radio components and other surfaces that need to be prepared for soldering.
This is actually the detail that gave me this idea:
You can get it from a Soviet cassette recorder.
Glue fine-grained sandpaper to it :
The working part of the grinder is ready
, let's start
creating the drive
. We need any motor with a shaft diameter of 1.5 mm; it will fit perfectly with the nozzle.
And a button like this:
We bend the button fastenings for subsequent fastening to the engine:
And solder it to the electric motor in any place convenient for you:
One of the button pins is also soldered to the body.
We bend one leg of the motor and close it with solder to the body:
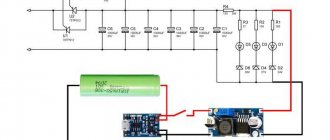
Now we need to deal with nutrition. I used a 7 volt power adapter:
We begin to connect the adapter to the motor. We solder one contact of the adapter to the free leg of the switch, the other to the free leg of the electric motor:
That's all! The machine is ideal for cleaning solder joints and other small work.
Using the same principle, you can make
a small drill
using a collet chuck. If you already have a drill bit, you can leave the attachment on the original shaft and simply clamp it into the chuck.
In various consumer products - watches and other consumer electronics - protective glass is made from plexiglass. This is a good material, if not for one of its drawbacks - scratches appear on it easily.
We tried to describe the most accessible technology for polishing plexiglass, which will allow you to get rid of scratches on the screens of mobile phones, players and other electronics. In addition, it is possible to polish even small metal products (for example, polish a coin, bracelet and other jewelry to a shine).
To create the device we will need:
1) A small electric motor 2) GOI paste - polishing paste based on chromium oxide. Can be easily purchased at hardware stores and most hardware stores. 3) Cotton swabs 4) 9 volt battery (or other voltage, depending on the motor)? Let's cut a cotton swab and place it on the motor shaft. You need to turn on the motor so that the cotton wool, when it touches your fingers, twists and does not fluff up.
Apply a little GOI paste to the rotating stick.
Our test sample was a piece of plexiglass on which the word Licrym was scratched with an awl. Let's start polishing. Using slow, careful movements, we move the rotating end of the stick over the scratch, without stopping in one place (if we linger, the paste will be squeezed out and the cotton wool will rub the plexiglass dry, as a result of which it will heat up and melt, creating a hole)
The paste, although very thin, is abrasive. Gradually, the material along the edges of the scratch is ground to the level of the bottom of the scratch, and such a smooth hole is formed. As a result, we will get a smooth depression that follows the shape of a scratch, but without sharp, light-scattering edges. This means that the scratch becomes invisible.
In 10 minutes of polishing the “Lic” part we achieved the following result:
If you look through it, it is impossible to say that there were letters at the polishing site. Their blurred silhouette can only be seen at an angle in reflected light.
The cat comments:
I tried it and polished the glass of my watch and all my wife’s jewelry. The motor was taken from an old joystick with vibration
Shooter comments:
TOsha comments:
It polishes well, but it seems to me that a Dremel would do it just as well!
Sonic comments:
I did the same thing when polishing scratches on a car. The motor was connected by wires directly to the car battery.
Roman comments:
It will completely replace an expensive Dremel!