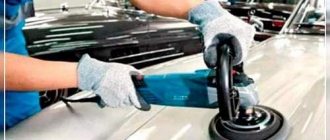
Features of contact spot welding
This type of welding is considered thermomechanical. It is used if you need to solder thin metal sheets or homogeneous small elements together.
The photo of spot welding clearly shows its key phases:
- combining elements in the desired position;
- securing them between the electrode contacts of the unit;
- heating leading to the formation of a strong weld.
This method of connecting parts realized in metal to each other is very popular. Its advantages are as follows:
- ease of the process;
- low cost of consumables;
- high performance.
Basic functional principle
The spot welding scheme is simple. First, the metal products are pressed tightly against each other. Then, at short intervals, a current is supplied to them, which heats the metal and starts the diffusion process.
As soon as the device is turned off, the electrode contact area begins to cool and the material begins to crystallize.
Technological process
The spot welding process is carried out in the following stages:
- The elements to be welded are overlapped.
- At the point of future connection, the elements are clamped between two electrodes . These electrodes, when connected to a transformer, conduct current to the welding site.
- With the supply of current, the parts being welded are heated at a point that is sandwiched between the electrodes.
- It is necessary to wait until the inner layers of the metal reach plasticity.
- After turning off the current, you need to apply pressure to the electrodes for some time . This is done so that the molten metal crystallizes normally.
After carrying out the work at the welding site, you can see the cast point of the welded joint.
Structural design of the welding unit
The pictures of spot welding show that its structural design is represented by three blocks (two main and one auxiliary). The mechanical unit includes:
- electrodes in the form of clamping pliers;
- clamping mechanism;
- rotation drive (in suture equipment);
- compression and upset mechanism (in butt welding).
Key elements of the electrical unit:
- transformer device;
- output voltage regulator;
- secondary contour unit;
- primary circuit breaker;
- cycle regulator.
The auxiliary unit contains water cooling and pneumatic hydraulic systems.
Note!
- DIY induction heater ♨️ - reviews of the best manufacturing options. Varieties of homemade device designs + step-by-step master class (160 photos)
Do-it-yourself Gauss cannon: TOP-130 photos of the best ways to create it yourself. Design features + master class for beginners
- DIY clamps - a step-by-step master class for beginners. Schemes for manufacturing different designs + 170 photos
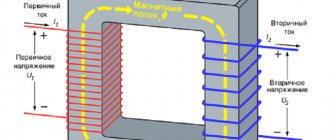
To obtain a discharge of the required power at a low voltage, an induction transformer is required. A correctly selected balance of windings will provide the powerful impulse necessary for melting the metal in the contact zone of the electrodes.
The clamping pliers in a do-it-yourself spot welding machine look like two contacts made of graphite or copper. They are mounted on various levers and driven by a compression mechanism, the drive of which can be:
- mechanical;
- pneumatic;
- hydraulic;
- electromagnetic.
Equipment on capacitors
A resistance spot welding machine may consist of a capacitor charging unit, a large battery of capacitors, a control unit and electrodes with a workpiece clamping mechanism.
The principle of contact welding lies in the initial rather long accumulation of electrical energy on the plates of capacitors and its instant release when creating an artificial short circuit through the point of contact.
The ability to accumulate charge in a capacitive battery allows the use of equipment of lower power compared to other welding machines.
Due to the constant battery capacity, a normalized energy release per welding pulse is obtained, which allows you to obtain a stable result regardless of changes in the mains voltage and other network characteristics.
Capacitor resistance welding lasts for milliseconds, resulting in a powerful release of energy in a small contact area. This allows it to be used when welding alloys with high thermal conductivity such as copper, as well as metals with different thermal characteristics.
Capacitor resistance spot welding machines with a rigid characteristic and fast discharge are widely used in radio electronics and instrument making.
When calculating the required energy for welding a particular joint, you can use the formula:
W = C*U2/2,
where C is the capacity in farads, W is the energy in watts; U is the charging voltage in volts. By including an active variable resistance in the charging circuit, you can regulate the amount of charging current, charging time and power consumption.
Required inventory
To get a compact welding tool, you will need a number of things:
- transformer device of an unnecessary microwave oven;
- terminal block;
- copper rod 0.17 cm thick;
- a piece of 8 mm multi-core cable;
- timer mechanism;
- adapter for 12 volts and 0.5 amperes;
- PSU case from an old computer;
- switch;
- micro button;
- lath (made of wood);
- steel spring.
Operating procedure
Below are instructions on how to make spot welding using a microwave you don’t need in your household:
Disassemble the old microwave oven. Pull out the 800 A transformer device. Disassemble the computer power supply. You only need a steel case and a 220 volt power connector. In the future, it will be used to accommodate the “filling” of the welding unit.
Note!
- Do-it-yourself electric scooter - a master class with step-by-step instructions for doing it yourself. Tips and simple patterns for beginners + the best photo reviews
- DIY rocking chair: TOP-120 photos of the best manufacturing options. Master class on creating a rocking chair at home
Smokehouse from a gas cylinder - the best master class on making a homemade smokehouse with step-by-step photo diagrams for beginners
Place the transformer, timer board and power adapter inside the case. Try on and mark the locations of the holes - then you will need to make them using a drill.
Remove the secondary winding of the transformer, replacing it with a power cable. In this case, there is no need to dismantle the transformer plates. It is enough to cut off the winding first from one edge, then from the other, using a chisel and hammer. After this, all that remains is to remove the remaining wire with a drill.
Make new windings from the power cable. Place the modified transformer in the housing. Drill 2 holes in the area where the grill is located. Pass the coil leads through them. Make more holes, now in the bottom of the body, to install the trans.
Connect the timer mechanism to the front panel. Insert the LED, soldered from the board and extended with wires, into the hole made earlier.
Attach the power switch to the rear panel. Cut off the plug from the adapter. Solder all the elements of the future device using wires and terminals. Connect a microbutton to the timer - there is no need to fix it. Set the pulse duration for welding.
Use steel corners to attach a wooden strip to the body of the welding machine.
Note!
- Do-it-yourself compressor: TOP-130 photo reviews of finished compressors. Step-by-step instructions + diagrams and drawings
- Do-it-yourself wind generator: TOP-170 photo reviews of finished devices. Detailed DIY instructions for beginners
Do-it-yourself tennis table: TOP-150 photos of the best manufacturing ideas. Master class on creating a tennis table at home
Remove the terminal strips from the terminal block, put them on the cable contacts that need to be cleaned beforehand, and screw them to the rail. Equip the rail with a start button, having previously made a hole for it.
Use copper wire to create electrodes. Don't forget to sharpen the ends. Secure the electrodes made of copper into the terminal blocks.
Supplement the design with a spring to return the device contacts to their original position. For this purpose, you need to screw another wooden strip to the top of the case. That's all. Work on creating a homemade spot welding unit has been completed.
The resulting tool has quite high power. Therefore, in order to avoid burning holes in thin metal sheets, it is recommended to set lower time parameters on the timer. In addition, the compact dimensions of such welding allow it to be placed even in a small studio.
How to make your own spot welding from a microwave transformer
The topic of the article is for handy craftsmen, spot welding - we make the device with our own hands from improvised means. And a used microwave oven will help us with this. Or rather, a high-voltage transformer from it, which is suitable for connecting thin sheet metal at home.
Just don’t have to run headlong into the kitchen to disassemble your microwave. You can ask your neighbors for experimental material, find it at a landfill, or buy it second-hand for cheap.
How to mount a transformer correctly
So, we make spot welding with our own hands from the microwave. We need a transformer that consists of a welded core and primary and secondary windings.
We take it out of the old cracked oven. The desired transformer power is from 800 watts, the more powerful the better.
We will need a core and a primary winding (with a thicker wire). We remove the secondary winding, for example, cut it off with a chisel or saw it with suitable tools.
Sometimes, in the case of a tight fit of the secondary winding, in order to remove it, you have to disassemble the core and then glue it together.
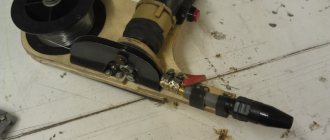
After removing unnecessary junk, we take a copper cable (with a cross-section of 16mm2, determined experimentally) and wind 2 turns in the transformer windows.
We securely attach copper lugs to the ends of the cable.
So, the main part for homemade spot welding from the microwave is ready. We are thinking about the design of the future structure.
Appearance of the device
If the head works and the arms grow correctly, then the entire structure can be made of metal (reliably and beautifully). Let's look at a complex circuit first.
Internal structure of the device:
- transformer from a microwave with a wound copper wire;
- terminals for copper wire;
- 20 ampere circuit breaker for de-energizing the network;
- terminal block for connecting wires;
- computer fan with 12 volt transformer;
- diode bridge with capacitor;
- relay REK 74;
- 2 indicator lights;
- microwave button.
External microwave spot welding design:
- base with side walls;
- closing lid with handle;
- corners with bolts;
- 2 pieces of profile for pliers;
- soldering iron handle mounted on a hexagon while hot;
- spring from carburetor;
- electrodes are attached to the corners.
The angles allow you to change the angle of the electrodes for precise contact. Electrodes can be made from a soldering iron tip with sharp or blunt tips; in the case of welding different materials, it will be possible to change them. At the attachment point, the electrode rod is thinner with a thread cut for the nut.
Watch the video to learn how to make this type of spot welding yourself.
I understand that not everyone will make such a design. Therefore, we will consider simpler options for a do-it-yourself spot welding machine.
Simple welding machine body
A wooden structure is the simplest design that anyone can make. The photo below shows design ideas.
Let's take the last option as a basis: take a tape measure and take the dimensions of the prepared microwave transformer. Based on the measurements taken and our idea, we prepare wooden blanks for the device.
We make the upper lever (do-it-yourself spot welding pliers) with a recess. This is if you make a device with a closing lid. If the device is planned to be open, then a recess is not needed.
On the back wall we cut out suitable holes for the power button and wiring.
For beauty lovers: the blanks for the device can be painted in your favorite color.
Also, for do-it-yourself spot welding you will need the following materials:
- switch;
- handle for closed structure;
- circuit breaker (micrik);
- power cord.
Take these accessories from the disassembled microwave.
Also needed:
- electrodes can be made from a soldering iron tip or thick copper wire;
- copper holders for attaching electrodes (you will have to buy);
- self-tapping screws for assembling the structure.
We insert the prepared electrodes into the holders and clamp them with a screwdriver.
We secure the back wall with the screwed switch and power cord to the main board with self-tapping screws.
We also attach the microwave transformer with self-tapping screws to the base of the device. We screw one of the screws with a grounding wire, which we connect to the switch.
Also, we run a wire from the switch to the transformer, and we lead the second wire from the transformer to the circuit breaker, which we borrowed from the microwave.
You can do without a circuit breaker installed in series in the electrical circuit. It serves for convenience and is installed on the upper arm of the spot welding machine.
Using wooden blanks and self-tapping screws, we close the electrical part. The top board must have a handle for carrying the device.
Device levers
Next, we think over the design and attach the levers (pliers) for spot welding with our own hands. First, we drill holes for self-tapping screws at the ends.
We attach the electrical circuit breaker to the upper lever with a convenient slope.
We insert the pliers into the device and determine the attachment location by eye. We drill through holes in the side walls and levers, and secure them using metal rods.
Using self-tapping screws, we attach the holders with contact electrodes to the end part of the pliers.
After assembly, the electrodes usually face in different directions; we bend them with our hands to center them.
To raise the upper arm, we screw it into it and into the body of the device using a self-tapping screw, not completely, and attach a spring or a tight rubber band to them.
Trying a welding unit
Our spot welding is ready, we are testing the machine. Turn on the power and press the breaker with your thumb.
Sparking appears between the electrodes, but this cannot be done.
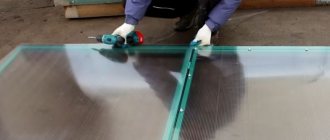
Thin sheets of metal can now be reliably joined with our device. If you have a vehicle, then homemade spot welding for welding a car will make it easier to repair the body.
To do this, we made the levers removable; just pull out the metal rods and remove the pliers to weld large-sized metal and you can crawl into hard-to-reach places.
Also, there is a plus in removable electrodes, which are easy to replace if necessary.
Video: he will tell you about the correct winding of a transformer and show the entire process of assembling a resistance welding machine.
PS We looked at how to make spot welding with your own hands using materials from a microwave oven. I note that many craftsmen have a problem; they cannot find a wire to wind the secondary winding on the transformer. You can take a demagnetization loop from an old TV, buy a meter of large-section wire, or assemble it from several thin ones.
Battery welding machine
Many craftsmen are tormented by the question of how to make a machine for spot welding batteries with their own hands? Friends, anything is possible!
What materials are needed:
- transformer (discussed above);
- copper plates for shooting electrodes;
- base (table, board, etc.);
- wooden lever, one is enough;
- support for the lever - metal profile;
- spring with fastenings;
- self-tapping screws and bolt with washers.
So, we already have a microwave transformer with a wound secondary winding. All that remains is to build the apparatus and electrodes for connecting the batteries.
The design of the future structure can be anything up to your imagination. Let's look at the simplest option.
We screw the support (profile) onto the base, drill a hole in the middle for the bolt and also attach a spring to the edge of the lever. We install the lever in the support, tighten the bolt, and attach the spring to the base of the device.
From a suitable copper plate we cut out 2 electrodes for homemade spot welding for batteries.
We attach them together with the wires at a slight angle to the free end of the lever.
We install the transformer itself with the power button as close as possible to the electrodes. The shorter the wires, the better.
The operating principle of the constructed device is simple: with one hand we press the lever to the material being welded, and with the other we turn on the current for a few seconds.
Video: will help you assemble such a machine.
PS Now you know how to install spot welding for batteries yourself. The design of the structure can be any. It may not work out the first time, but with trial and error, you will create your own welding machine for home needs. Good luck!
Spot welding from hand-assembled welding equipment
The algorithm for creating a unit for spot welding from a welding tool, as well as the materials required for this, are almost the same as in the case of a transformer from a microwave oven. But there are a number of points.
Creating resistance welding from an inverter device with your own hands is irrational, because direct current is not needed for operation. As a result, we opt for a transformer device from an alternating current device.
The number of turns is calculated using the following formula:
N=50/S. Here N is the number of turns, and S is the core size.
Handmade welding pliers
The pliers are an important part of the welding machine. Their design solution depends on what work is planned to be carried out, the expected dimensions of the elements to be connected and the type of drive. The electrodes are made of copper wire, the thickness of which must be equal to or greater than the thickness of the secondary winding cable.
Welding nuances for lithium batteries
Often, craftsmen are faced with the need to attach a thin steel plate to lithium-ion batteries. And for 18650 batteries, elevated temperatures are terrible.
The solution to the problem is self-made special spot welding. Its specificity is the automatic control of the progress of work.
Basic DIY spot welding parts for batteries:
- modified microwave oven transformer;
- primary winding control board;
- auxiliary power supply;
- incoming circuit with fuse;
- microswitch;
- secondary winding wires with electrodes made from electric soldering iron tips.
Now let's look at how to make spot welding with your own hands for lithium batteries:
- Having stocked up with the necessary components, place the knobs that regulate the pulse time and power of the welding machine itself on the body.
- Install a switch from an old microwave oven.
- Take a steel plate and a lithium battery. Set the electric pulse time to 8-11 μs.
- Place the plate on the battery and place the contacts on top. The device is ready!
Modes of technology implementation
Depending on the characteristics of the metal structure being manufactured, the current resistance welding method is selected.
Each specific case must be considered separately:
- to connect two parts into one product over the entire surface area, resistance butt welding is suitable;
- for welding metal products at individual points, the point method is used;
- To connect metal parts along a pre-existing seam relief, the suture method is suitable.
Another important task for a welder is monitoring welding equipment when working with metal structures. It is extremely important to analyze the compliance of the selected unit parameters with the requirements for performing this operation.
Contact seam welding.
It is important to choose the correct welding mode:
- Soft mode. Used at moderate current and electrode density up to 100 A/mm2. It is characterized by a longer welding process, smooth heating of metal surfaces, and low power. But at the same time, the welder can reduce the power of the welding unit consumed from the electrical network, which will generally reduce the load on the network.
- Hard mode. It is used for high-strength steels under high pressure with a density of up to 300 a/mm2 and is characterized by an increased power level, high load on the electrical network, and increased cost. The advantages of the hard mode include a short duration of welding work and high labor productivity.
The soft mode is relevant for steels with a high carbon content, as well as alloy steels.
Important! When performing resistance spot welding, it is necessary to follow the technology, the selected mode and provide the craftsman with current conditions, otherwise the welds may turn out to be of poor quality. Various defects may occur, the most dangerous of which is lack of penetration of the point with a complete absence of the cast core or its tiny dimensions.
It is important not only to know how to make spot welding, but also to understand how to increase the strength characteristics of the manufactured structure after the work is completed. This requires heat treatment of the metal product.
Heating the metal using the contact method of connecting metal parts using high lowering or passing electric current immediately after completion of work will eliminate the internal stress generated during the work process.
Also, high-quality heat treatment of the created weld will help improve the structure of the joint and destroy dangerous martensite, which in general will increase the service life of the metal structure several times.
Where is spot welding used?
Spot welding is used if it is necessary to manufacture any metal structure. Advantages of this technology:
- environmental Safety;
- high strength characteristics of the connection;
- speed and ease of work automation.
Due to the above advantages, spot welding is used:
- in the automotive industry;
- in shipbuilding;
- in the aviation industry;
- in the production of electronic products and household appliances;
- when creating jewelry;
- at enterprises producing consumer goods, etc.
The power parameters and capabilities of manually made resistance type welding cannot be compared with the performance of a factory-assembled machine. Despite this, it can be used for welding metals of all types of steel and alloys.
Microwelding: nuances of creation and use
Having decided to make spot welding in artisanal conditions, you need to remember a number of nuances of its application:
- Before starting the device for the first time, you need to check the reliability of the insulation and connections of all parts of the structure.
- It is required to organize an auxiliary ventilation system.
- Do not use the device for a long time without breaks.
- Electrode tips must be sharpened regularly.
- Before starting work, it is worth performing a test run at low power.
Any craftsman can assemble spot welding with his own hands. You only need to have a minimum of knowledge in the field of electrical engineering. Making your own welding machine is much more profitable and fun than buying an industrial tool.
This equipment will invariably come in handy in a garage hangar, as well as for those who make jewelry or repair electronics.
Assembling the device
These are the main design details. Now let's look at a diagram for manufacturing a spot welding machine. There are quite a few of them on the Internet. And each has its own set of radio components. But the main similarity of all the schemes is their simplicity and low power.
Therefore, homemade devices are suitable only for small household work. They will be able to weld thin sheets of iron, or wire strands. For the printed circuit board you will need the following elements:
- Variable resistor – 100 Ohm;
- Capacitor – 1000 mKF, from 25V;
- Thyristor;
- A pair of diodes - D232A;
- Several diodes - D226B;
- Fuse – F (fuse type).
The next stage of assembling a do-it-yourself welding machine is to construct the TR1 transformer. It is based on Sh40 iron, the required plate thickness is 70mm. The design has two windings. A PEV2 conductor with a cross-section of 0.8 mm is used for the primary winding. Next, 300 turns are wound.
The secondary winding is made with a multi-core copper cable with a cross-section of 4 mm. The number of turns does not exceed 10.
For the second transformer TR2, no manual work is required. It can be replaced with any weak converter with a power of 5-10V. Its secondary winding should have no more than 5-6V output. The third winding should output up to 15V.
By completing this assembly, you can get a device with a power of up to 500A. The pulse duration will not exceed - 0.1 sec, but only if the values of the resistance and capacitor coincide with those in the diagram. The power of homemade spot welding will allow you to weld metal sheets with a thickness of no more than 0.2 mm, as well as steel wire with a diameter of 0.3 mm.
Types of homemade spot welding machines differ mainly in power. Some models are capable of delivering current up to 2000A, which allows welding steel sheets up to 1.1mm thick and steel wires up to 3mm in diameter.