Carrying out work on straightening a car body often comes down to more than just basic skills in working with standard tools. Almost always you will need knowledge of design features, the geometry of body parts, and maintaining banal accuracy plays an important role. Even if you have very rich experience and knowledge in this matter, you will need to use a special tool, which is a spotter.
Spotter - general information
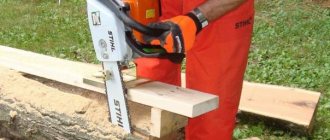
This word is used all over the world to describe all types of resistance welding tools (from the English spot - “point”). In the former post-Soviet space, this is the name given to single-sided welding machines used for repairing body surfaces of various types of vehicles, and the set of which includes a reverse hammer. The main purpose of using a spotter is to eliminate the need to replace a damaged part and instead carry out spot repairs, which allows you to save on running costs.
Any professional straightener knows that spot welding is indispensable for complex body geometry. Using this tool, the surface on the machine is processed in any place, regardless of inaccessibility. Working with the tool is quite simple and does not require long training - that is why the devices have become widespread.
The device, in fact, is universal - it is well suited for straightening body parts, such as: hood, sills, doors, fenders, etc. The main function of the device is to create a straightening force with fixation on the outside of the part.
Spot welding in repair work
The resistance welding machine is used to restore damaged parts of the body and other parts of the car. The spot welding technique promotes the crystallization of the metal being processed, resulting in the formation of a strong, reliable and durable seam.
That is why, if you require contact welding in your work, it is best to buy a high-quality microprocessor-controlled spotter. Such products are widely used in professional auto repair shops and are characterized by a wide range of advantages:
- high work efficiency;
- prostate application, maintenance and prevention;
- long service life;
- compact dimensions;
- relatively low energy intensity.
Thus, a spot welding machine used by qualified personnel can significantly improve the quality of many jobs. Thus, we guarantee positive customer reviews and increased loyalty - and therefore repeated calls to our service.
Operating principle and device
In a nutshell, a spotter is used to heat up a small area of a body element that needs to be freed from deformation unforeseen by the design. In this case, minimal damage is caused to the car itself.
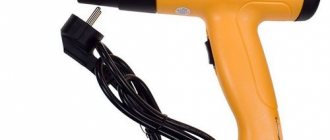
The simplest spotter tool consists of:
- Housings;
- Electrical cable;
- Stadder attachments;
- An ordinary electrode (it can be replaced with a pointed tip).
Any casing that is safe enough when performing work can act as a housing. You can make a spotter yourself, but such a device is unlikely to cope with long-term operating conditions - only factory models are suitable for this.
The welding procedure includes the following steps:
- A fastening element is attached (welded) to the damaged area;
- The return hammer of the device clings to the latch;
- Pulling is done using the muscular strength of a person, but sometimes additional tools are used.
The processing process itself does not require any special effort and straightening can be carried out in a standard garage.
Device and characteristics
A spotter is equipment designed for car body repairs using spot welding technology. Such a device allows you to level out dents and other body damage from the outside without the need to cut the metal body structure or a separate part of the car.
The technology used in the spotter is resistance welding. All equipment control occurs using a microprocessor, to which a panel with settings regulators is connected.
In simple terms, a spotter for body repair is one of the subtypes of welding machines. Its main difference from classical welding is that the welding current pulse is formed due to the discharge of a large capacitor and operates for a very short period of time, so short that even the paint on the reverse side does not have time to burn.
What is a spotter for? With the help of this device, car doors, roofs, bumpers and other body elements are pulled out, without wasting time on their removal, disassembly and alignment on the reverse side. Any auto repair shop that does body work cannot do without a high-quality spot. This device speeds up repair work.
The settings that are present on the spotter body are set based on the following parameters:
- metal thickness of the part.
- nozzle type.
- time interval for carrying out work.
- power.
Additional devices that are used with the spotter include:
- clamps.
- spotter point fasteners.
- electrodes.
- dent removal devices.
- elements for stretching ribs.
- nozzles in the form of crescents and hairpins.
By using this device, you will retain the factory seams, and the result will be of high quality.
Depending on the direction of repair, such welding equipment is divided into several categories:
- for straightening the body and individual parts of the car. This is a compact hand tool that comes complete with a reverse hammer and a set of attachments.
- for resistance welding of body panels using pliers. This group includes low-power spotters that are aimed at resistance spot welding.
They work approximately the same, but some craftsmen say that better seams are obtained from spotters connected to 380V.
The basic delivery package for such equipment includes:
- fasteners. Loops, corrugated wire, etc.
- reverse hammer.
- pneumatic pliers.
All additional components for complex body repairs can be found in any specialized online store. Try not to skimp on equipment, because the quality of its manufacture determines the level of work that you will offer to the client.
You can easily carry out repair work using a spotter yourself, you just need to study the theory and practice a little on test surfaces.
The work algorithm here will be as follows:
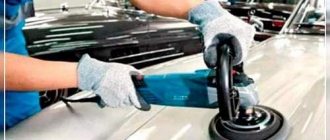
- Cleaning the surface to be treated. You need to use a grinder and sandpaper to remove the paint layer from the damaged area of the body where you will weld washers to pull out dents.
- We connect grounding to the part we are repairing. Important! If you align the part directly on the car body, without removing it, be sure to remove the battery terminals to avoid shorting the electronics.
- Using a spotter, in places of dents and damage, we weld the fasteners, which we will eventually use to pull the metal, to its original shape. Such fasteners include: washers, studs, triangles, “snakes”.
- Using a reverse hammer, which is usually supplied with the spotter, we pull out the damaged areas of the body. In addition to a reverse hammer, you can use chains, cables, a slipway, a crowbar and other devices with which you can pull metal.
- After alignment, remove the fasteners by unscrewing them.
- We clean the welding area and proceed to the stage of degreasing and puttying the surface of the part.
At this point, the body repair work has been completed, and then the stage of applying new paintwork will begin.
Video examples of working with such equipment.
There are many offers on the market now, there are both well-known and expensive manufacturers, as well as a cheaper price segment. The market for used spotters is also widely developed.
At the moment, there are several main brands:
- Holex spotters, which are manufactured by the German company Hoffman. This is quality equipment used by reputable auto repair shops.
- French manufacturer Gys. An example of their Gyspot machines, which are used for welding stars and rings, pulling out small dents, and crimp welding to straighten rounded surfaces.
- Chinese spotters of the Solary brand. Low price and optimal quality make this equipment very popular on the market among beginners.
- Italian equipment from Deca. It has a built-in microprocessor that allows automatic adjustments under various operating conditions, for example, depending on the thickness of the metal.
- Ukrainian spotters "Temp". Affordable price and good equipment.
What spotter do you use? Write the brand and a short review about working with this equipment. Thanks in advance for your answer. This advice will be useful for beginning craftsmen.
What's important here?
Working as a spotter involves heating a small area of a body element; the effect causes minimal damage to the car.
Read more: Catching perch in winter with a balance beam - TOP catchy lures
The welding algorithm includes the following stages:
- A fastening element is welded to the damage site.
- The reverse hammer is hooked onto the latch.
- Pulling is done manually, but auxiliary tools are often used.
Straightening with a spotter is carried out without much effort, this allows you to carry out repairs in any garage.
Scheme of an elementary unit:
- frame;
- cable;
- studder (nozzle);
- electrode (can be replaced with a sharp twist).
Any box serves as a housing to which all components of the device are attached.
The main design element is the welding gun. The homemade version does not allow long-term operation and is somewhat inferior in characteristics, but is suitable for work with small volumes of straightening. Long-term operation is implemented in a factory device.
The biggest advantage of the spotter is that the force is applied only to the outer surface of the damaged part
The spotter consists of a welder module for resistance welding, and this can be an option for both direct and alternating current.
Adjacent to this block is a ground wire and a cable ending with a special welding gun.
At the end of the latter, depending on the specifics of the work, various attachments are attached.
On the front panel of the welder there are controls for setting various welding modes, power, current, and advanced units also have a display that displays real operating parameters, allowing you to fine-tune the equipment and monitor the progress of the process.
The work of the spotter looks like this:
- The battery is removed from the car.
- The ground wire is fixed to the body.
- The gun with the nozzle is brought to the repair area.
- The electrical circuit is completed by pressing the trigger, which results in the flow of current.
- At the point of contact of the nozzle with the body, the temperature rises until the electrode is welded to the metal, but this prevents overheating of the part and its through burning.
- The next step is to pull out the dent.
Material
The contents of modern spotters are hidden in a body made of sheet metal or aluminum; sometimes individual elements made entirely of impact-resistant plastic are used, such as the back cover and carrying handle.
The front panel is metal; adjustment knobs can also be made of metal or plastic.
Legs with rubber pads are attached to the bottom of the welder, which increases its stability.
Visually, the device strongly resembles a welding inverter.
For ease of movement around the workshop, some models are assembled on the basis of a vertical metal cart with wheels.
Dimensions and weight
Depending on the design, the weight of the spotter can vary widely.
Portable options weigh on average 14 - 25 kg, and models assembled on a trolley can weigh up to 90 - 100 kg.
As a rule, the dimensions of the spotter are within the following limits:
- for portable options (mm) – 210 – 390x 260 – 360 x 155 – 240
- for models with a trolley (mm) – 1000 – 1800 x 500 – 600 x 700 – 950
Modern spotters are equipped with electronic control, which allows you to simply select from the available operating modes and set the required contact time, after which the device will automatically stop supplying voltage to the gun.
The operating modes of the device are numbered and additionally indicated by corresponding icons.
The following main operating modes are distinguished:
- Welding is performed with a reverse hammer or puller, and the mode itself is designed to remove dents of small diameter and shallow depth.
Considering that such damage occurs extremely often, it is in this mode that a greater amount of work is performed, especially since modern materials from which car bodies are made easily return to their original shape due to elasticity. - Using special electrodes, any pulling element is welded to the metal. Due to this, it is possible to correct significant defects, for example, restore jammed ribs and thresholds.
- A short-length copper-plated electrode is used, which is used to deposit convexities formed, for example, by a ground terminal.
- Used to heat a decent surface area using a carbon electrode. If you pull out a large damaged surface, a so-called “pop” is formed, which in this mode is eliminated due to the deposition of metal.
- During the repair process, it is often necessary to remove fastenings, for example, moldings. Upon completion of the work, they must be welded, for which copper-plated electrodes are used.
- The mode is suitable for pulling out metal with hooks and rings using a reverse type hammer weighing 2.5 kg, but its main purpose is welding the washer for securing the ground terminal.
- A copper-plated electrode with a magnet is used, through which the welded bolt is held. It is used for welding bolts, installing ground terminals, and brake pipes.
Types of spotters
In total, there are two main types of tools: transformer and inverter. Depending on the method and area of use, two more classes are distinguished: for welding the body using the contact method and for straightening.
Straightening spotters are small devices designed for small work. They require the installation of a reverse hammer and additional attachments to perform repairs. In addition, the design may include special pliers. However, many of these devices have low power, are prone to rapid overheating, and therefore are not able to provide high-quality welding.
In addition, spot welding equipment can be classified according to the power supply voltage consumed from the electrical network. Standard tools are designed for 220V, and the most powerful ones are designed for 380V.
How to make a spotter from a semi-automatic machine
A spotter is a welding unit used specifically for organizing spot welding, and also allows you to work on straightening thin sheet workpieces.
This type of welding is especially common in workshops whose employees are engaged in straightening work that requires preliminary disassembly of the body.
Using a spotter allows you to avoid the mandatory dismantling of the load-bearing parts of the car and straighten surfaces without using a reverse hammer (figure below).
In this case, the welding procedure is used for the purpose of point-fixing an additional holder on the restored surface, by pulling which it is possible to straighten the existing dent.
Spot Welding Properties
The design of this device is somewhat different from typical units with a continuously burning arc.
You can make a spotter from a welding machine with your own hands only if you know the basic principles of the formation of the operating current.
The fact is that with the contact welding method, heating occurs not by melting the metal, but by concentrating heat in a point zone between the workpiece and the electrode.
In the case of an incorrectly selected resistance welding mode (with a lack of experience on the part of the operator), sticking of the electrode is often observed, which can lead to unpleasant consequences in the form of a short circuit or even breakdown of the unit. That is why the spot welding machine is manufactured so that the welding time is strictly limited and does not exceed a second.
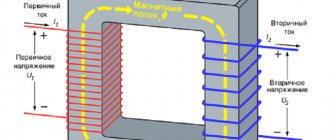
In addition, such a device is designed for small values of effective voltage (since ignition of the arc is not required in this case) and for significant operating currents. In this regard, the transformer (CT) included in its composition must also withstand high current loads, sufficient for high-quality heating of the welding site.
Features of the conversion
You can make a spot welding machine with your own hands without unnecessary effort if you use the option of converting it from an unnecessary welding device. When preparing for work, you will need to pay attention to the following points:
- For an ordinary CT, the voltage when operating at idle (no-load), as a rule, is selected to be no more than 70 Volts;
- In a situation with a spot welding unit, this figure should not exceed 6 Volts;
- To implement this condition, a new secondary winding will be required, designed for a reduced output voltage.
Note! You can also make a new low-voltage coil by winding it over the existing secondary winding (if space allows).
Otherwise, it is better to unwind the old “secondary” and use its wire to form a new working winding.
Before doing spot welding with an updated transformer, it is advisable to familiarize yourself with the existing types of these electrical products and try to choose the most suitable one.
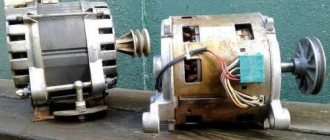
Core types
The cores used in welding transformers can have several different designs (picture below).
Among them, the following types of CT stand out:
- With the so-called “W-shaped” or armored core;
- With a rod base (in the shape of the letter “O”);
- And finally, with a core made in the form of a torus.
Of all the listed options, the most suitable for the purposes under consideration is a transformer with a toroidal core, which has small dimensions and relatively light weight (see the figure below).
Additional Information. The cross-section of such a core in any transformer will be determined by the expected welding current.
For do-it-yourself spot welding to work properly, the output current of the unit must be at least 1000 Amperes. The latter means that a sufficiently thick wire must be used in the CT output winding. This requirement is fully satisfied by the selected version of the toroidal core, since there is plenty of space for placing the output winding in it.
Selecting parameters
When remaking a CT, the main attention should be paid to the parameters of the secondary winding, which determine the output characteristics of the device (its load current, in particular).
In this case, it is important to select a bus cross-section that would provide a current density of about 8 A/mm² (with a cross-sectional area of about 120 mm²).
Since it is very difficult to handle such a thick busbar when winding on a torus, they are most often limited to a value of 80 mm².
Note! The specified cross-section can be obtained by putting together several wires of slightly less thickness.
To facilitate the conditions for converting a CT into a point unit, it is advisable to pre-calculate the amount of wire required for rewinding it. After this, it will be possible (based on the space occupied by the winding) to decide whether it will fit into the free space remaining on the torus or not.
Important! In the case where the new winding does not fit into the torus, the old secondary coil will have to be completely disassembled (dismantled).
To make it easier to handle new wires during the winding process, it is recommended to wrap them with fabric-based insulating tape. To determine the exact number of turns that affect the output voltage, we recommend using the test winding method with a small-section wire in insulation.
Since the winding in this case is not connected to the load, the cross-section of the test wire is not very important. Experience has shown that during rough tests it is sufficient to use no more than 10 turns.
After winding them, the transformer should be connected to the network and the voltage produced by the test coil should be measured, after which it is divided by the number of turns.
The result is a figure indicating the number of turns required to produce one volt of output.
Since in this case it is necessary to obtain 6 Volts, multiplying the number obtained from the test connection by 6, we obtain the required number of turns.
In order to make a new device with your own hands, you must first calculate the amount of wire required for rewinding the CT. After this, it will be possible (based on the space occupied by the bus winding) to determine whether it will fit into the free space remaining on the torus.
Winding diagrams and placement
The connection diagram and the order of placement of the “secondary” depend on the type of core selected. Given the toroidal base of the CT that we have declared, it is more convenient to divide it into two half windings connected in series (3 Volts each).
In order to increase the load capacity (increase the welding current), you can make two windings of 6 Volts each and connect them in parallel. In this case, the output voltage will not change, and the load current can be doubled. This design option allows us to solve the problem of the large cross-section of the secondary bus, which can then be reduced by half.
Various types of connections of such windings are shown in the picture below.
The order in which they are connected is very important to obtain the required output parameters, and mistakes made in this case can lead to completely different indicators. So, in particular, if you make a mistake during installation and turn on two windings in opposite directions, as a result they will be short-circuited to one another and will produce zero voltage at the output, which is equivalent to a short circuit.
At the ends of ready-made secondary windings, special tips should be equipped by crimping.
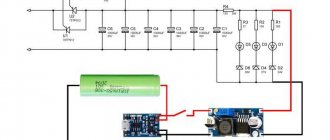
Control circuit
To control the welding process, short pulses are used, generated in a special electronic circuit. When manufacturing a spotter based on an old unit, it is also necessary to provide a control unit that allows switching a significant output current.
To solve this problem, manually generated pulses are applied to the primary winding of the CT (the simplest control circuit is shown in the figure below).
The disadvantages of such management include:
- Using the button shown in the figure, the mains voltage is switched, which is extremely dangerous;
- When mechanical contacts open, strong sparking occurs;
- Even if you replace the mains switch with a traction relay from the starter, controlled by a push-button mechanism, then such a circuit, despite the improvement, will still be unfinished.
Note! To implement the traction principle, it is allowed to use a combination of “powerful starter plus automotive relay” (and the latter can be of any brand).
When this combination is selected, the relay is activated when a voltage of 12 Volts is applied, and its switching causes the power contactor to operate. However, this control option is not without drawbacks, since in this case it is not possible to precisely control the impact interval (pulse width).
For those who know the basics of electronics and know how to handle a soldering iron, a more complex in design, but reliable in operation, electronic control circuit will be suitable (see photo below).
Here, operating pulses are supplied to the input winding of the CT from an electronic device - a thyristor, which opens when voltage is applied to its control electrode.
The capacitor (C1) included in its circuit, with the button contact open, is charged through the elements V1-V4 of the diode bridge.
When the button is pressed, the capacitance is discharged through resistor R1 and directly through the thyristor control electrode circuit, which causes it to turn on.
The electronic device will remain on until the capacitor is completely discharged (this interval can be adjusted with variable resistor R1). For the subsequent start operation, the button must first be released and then pressed again (its shutter speed determines the welding interval).
Detailed usage procedure
The work of smoothing out the dent begins with current being supplied to the electrode from the welding machine. For straightening, a reverse hammer is used, which can be replaced with a pointed stop. Impacts on the deformable surface must be carried out until it is completely leveled. Upon completion of all operations, the processing area must be cleaned, as electrode slag remains on it.
The algorithm for straightening work includes the following steps:
- Preparation of the surface to be treated (regardless of the body material - aluminum or iron), by removing any coating from it, be it putty, paint layer, primer;
- Connecting the “negative” terminal from the device to the vehicle body for grounding purposes;
- Installation of fasteners by welding various fastening devices (loops, hooks and hooks) to the place of deformation, by performing spot welding;
- Equipment preparation – the tool base and additional equipment are coupled (at this stage it is convenient to use a puller);
- Straightening an element, i.e. stretching it in order to restore its original appearance;
- Dismantling fasteners - banal removal of fastening means (usually using a “grinder”);
- The final stage is grinding, during which the surface is cleaned and preparatory work is carried out for subsequent painting.
To perform the above algorithm, minimal knowledge of working with a welding machine is sufficient. If the spotter is equipped with a set of attachments, this will allow you to work with any fastener elements.
How to work as a spotter
The principle of operation of the spotter is simple: due to the presence of electrical resistance at the point of contact with the part, when current is passed at the moment the circuit is closed, the electrode made of softer steel is strongly heated and welded to the part being repaired. Next, use a reverse hammer to remove the dent, and finally carefully break off the electrode from the welding point.
What's important here?
The electrode at the repair point should be lightly fixed by welding and should not be welded in or burn a hole under any circumstances. The electrode should not come off when hit by a reverse hammer, but should easily break off at any time. The current strength and duration of the welding pulse are calculated depending on the thickness of the steel part and the shape of the electrode.
The combination of these values (A t) allows you to easily, efficiently and quickly perform complex operations without rework. The incorrect choice of one of these values leads to damage to the part, increasing time and material resources to correct the damaged part. But sometimes some manufacturers of cheap spotters distort these parameters by indicating inflated values (for example, for a transformer, not for an electrode).
Even more often, manufacturers offer the user to adjust the current strength and pulse duration, relying on reading the instructions and diagrams included with the spotter. But, as you know, they resort to instructions at the very last moment, if they are available at all and are clearly written.
Is it possible to make a convenient spotter with intuitive controls, in which the lack of instructions at hand will not be so critical?
Here's what's most important to a modern spotter:
- Light weight and dimensions that provide the necessary maneuverability in a busy workshop
- Sufficient power and efficiency, the ability to connect to a single-phase 220V 16A network, connection to standard sockets in a car repair shop or garage
- Simple and clear control display, eliminating operator errors when setting programs for different electrodes
- Low price is a requirement that is difficult to ignore.
The HAMMER TT spotter is manufactured in Europe. The weight of the device is no more than 14 kg, and its dimensions do not exceed the size of a soccer ball. Thanks to all-copper wiring, including the transformer, and a high-quality copper recoil hammer rod, maximum efficiency was achieved with a power consumption of 2.3 kW.
HAMMER TT is designed for professional use in industrial environments and allows you to repair steel body parts of any complexity. Tool selection is carried out by a single rotary control on the control panel, which significantly reduces time and eliminates errors associated with setting the pulse duration.
The spotter is used in auto repair shops for body repairs, where the lining metal has an average thickness of 0.6 – 0.8 – 1.0 mm. Taking these values into account, it became possible to create a device that automatically calculates welding parameters. All that remains is to select the required tool using the rotary control.
A frequently asked question is: “Does the spotter have enough power to straighten the sills and pillars?” Answer: “Yes, if the electrodes are used as intended.” Do straightening accessories need to be welded tightly? There are special rings and attachments to increase the drawing force up to 4 tons, which will help minimize damage from welding.
The power of the device is sufficient to weld triangles and rings with a current of 800 - 1000 A, corrugated wire - 1000 - 1200 A, a copper electrode - 1400 A, heat the surface with a graphite electrode with a current of 2200 A and deposit convexities after welding the triangle.
The spotter cannot perform welding with pliers, since welding modern steels requires currents of 9000 - 13000 A, which can only be provided by an inverter unit, and these are completely different welding machines with different technologies.
Working as a spotter, auto straightening has been perfected by many specialists, but the technique is not particularly difficult for beginner straightening artists. Using the device, it is possible to level out a dent in any area, regardless of location.
The electrode receives current from the welding machine, thus making a connection to the deformed area. For straightening, a reverse hammer is used, which can be replaced with a special stop. Mechanical influences continue until the surface is completely leveled. After completion of the work, the area is cleaned, as slag from the electrode remains on it.
To learn how to use a spotter, you don’t need to go to special courses
Algorithm for using a spotter for straightening:
- Surface preparation. Regardless of the body material (aluminum or iron), all coatings are removed from the surface: paint layer, putty, primer.
- Connection "minus". A negative terminal is connected to the body for grounding.
- Installation of fasteners. The clamps (any hooks, loops or hooks) are welded to the deformed area of the body. Spot welding is used for connection.
- Tool preparation. The main tool is coupled and auxiliary structures are prepared. It is convenient to use a puller - a device to facilitate the restoration of parts.
- Editing a detail. Pulling out the body element until the original appearance and shape is restored.
- Removing fasteners. A grinder is suitable for removing the clamps.
- Grinding. The final stage is cleaning the surface and preparing for painting.
Read more: 7 best tampons
There are several fundamental differences between leveling small and large-scale dents:
- only one hook is fixed for pulling;
- cleaning is carried out exclusively on the deformed area, the rest of the paintwork is not touched;
- the part is covered with masking tape around the perimeter to prevent paint destruction;
- It is recommended to perform straightening carefully, without applying strong force, to avoid deformation of the entire part.
The operating algorithm remains the same, but additionally small attachments are used.
If we compare a regular welding machine, we can say that the spotter is much safer, since it does not produce sparks and does not heat up the metal
Repairing major damage will require extensive work:
- many fasteners are welded along the dent, mainly in places of the deepest damage;
- each element should be pulled out a little - and so on in a circle until complete restoration. If you immediately level one section, at the time of straightening the second, the condition of the previous place may be disrupted;
- A relatively large reverse hammer will come in handy, but strong impacts should still be avoided, otherwise there is a risk of damaging the fastening of the body element.
Removing small dents
Despite the similarity of the work algorithms, all work on a small scale has some differences, namely:
- For pulling, a single fastener is fixed;
- Cleaning is carried out only at the site of damage; it is better not to touch the surrounding area;
- The perimeter of the treated area is covered with special (preferably masking) tape so as not to destroy the surrounding paint;
- Straightening is carried out without the use of much effort, again, to avoid damage to the part as a whole.
It may be necessary to use additional attachments.
Repairing deep damage
To eliminate such deformations, large-scale actions will be required, the distinctive features of which will be:
- Welding more fasteners in places of more severe damage;
- The drawing is done more slowly - little by little you need to pull out each element “in a circle”. If one area is completely leveled, then when moving to another the previous result may be destroyed;
- The reverse hammer is used in large sizes, however, heavy blows should still be avoided due to the risk of damaging the fasteners.
Functional orientation of factory-made spotters
Their useful properties include:
- They interact perfectly with repair washers during straightening;
- The metal electrode maintains the connection on a permanent basis for subsequent rapid transition to operations;
- Works great with graphite electrodes;
- Comfort in use and ease of maintenance;
- Support switchable operating modes: long-term and short-term. In the first case, a metal electrode is used, or repair washers are generally used. In the second case, a carbon electrode is installed;
- They have their own cooling system that will automatically turn off the device if it overheats.
Key part of the spotter
The welding gun is the main part of the device. For continuous operation, a factory-made device is used. You can make it using a construction glue gun with your own hands. An alternative method would be to use semi-automatic welding parts. Identical parts with lengths from 12 to 14 mm are cut out of textolite. There should be 2 of them. A bracket is installed in them, used as a fastening of the electrode for welding. If desired, you can mount a light bulb for illumination, as well as an impulse switch.
The bracket can be made of copper. It can have a cross-section - rectangular or square. A copper rod with a thickness of 8 to 10 mm is used as an electrode for welding. The gun must be designed in such a way that the electrode can be changed without disassembly. To connect the gun to the device, use a combination of a welding cable with the required cross-sectional area and a 5-core control cable. The latter is connected in accordance with the diagram.
Three wires are connected to the switch. Two more are moved to the backlight bulb and the engine. The welding cable must be stripped and soldered into a special hole in the bracket.
Standard characteristics of serial spotters
These include the following variations:
- Power supply type – 220 V/380 V network;
- AC frequency – 50-60 Hz;
- Maximum power – 10 kW;
- When welding, the maximum current reaches 1300 A;
- The voltage generated on the secondary winding is 8-9 V;
- The built-in timer can be set from 0.1 to 1.2 seconds;
- They have the ability to switch welding modes from spot to constant;
- The performance of the device depends on the selected program - with precision, the device operates at maximum power, and with coal welding, the output power is minimal;
- Through the iron electrode, the breaking force is more than 100kg;
- When installing a repair washer, the pulling force is more than 100 kg.
Completeness of spotter equipment
As a rule, devices made in China immediately come with the maximum number of accessories and attachments and are even equipped with a special cart, so you don’t have to buy anything in addition.
At the same time, European models can’t often boast of a complete camping kit. However, due to the simplicity of the design of the tool itself, there are no problems in using “non-native” attachments when working.
Typically, the design of equipment from Western manufacturers necessarily uses a copper secondary winding of the transformer, which makes it possible to reduce energy consumption at the same current, which significantly reduces the load on the network.
They are also equipped with special smart microprocessors that will eliminate possible incorrect burning of metal. This function has been especially relevant recently, when the global automotive industry began to use metal sheets of very thin thickness (up to 0.6 mm).
Parameters on which the price of a spotter depends
A huge role in the price of a spotter is played by parameters that indicate the current consumed by it, the general quality of performance and functionality. The higher each of the listed parameters, the higher the price of the device. Thus, before purchasing, you should decide on the scope of work for which you will need equipment. If one-time small work is expected, then you should not shell out for professional equipment. If you plan to constantly provide qualified services using this tool (for example, as part of the work of a service station), then you should take care of purchasing powerful equipment.
Among the significant price factors, the following trend can be established:
- Transformer models are cheaper and more reliable, but tools with an inverter type converter perform well in spot welding;
- Higher power models are designed for spot welding and are used for stronger parts. Standard power will be quite enough for straightening individual body elements;
- Tools with double-sided welding have the highest price; moreover, it is performed using special pliers that unfold from the reverse side and instantly create a hook.
Rating of the best equipment for spotting for 2021
7th place: Pilot MT type MINI
One of the most budget-friendly, but at the same time reliable devices on the Russian market. At the end of 2021, it became the most popular equipment among devices of this type among Russians. Compatible with attachments from other manufacturers.
Specifications:
| Name | Index |
| Supply voltage, V | 220 |
| Power consumption, W | 6 |
| Current frequency, Hz | 50 |
| Minimum welding current, A | 200 |
| Maximum welding current, A | 1500 |
| Maximum thickness of welded parts, mm | 2 |
| Weight, kg | 14 |
| Price, rub. | 14000 |
Pilot MT type MINI
Advantages
- Comes with its own set of attachments;
- Works both with its own puller and with attachments from third-party manufacturers;
- The kit includes 10 repair washers.
Flaws
- It is forbidden to deposit metal with a copper electrode.
6th place: Elitech ATS 5
A highly specialized device for car body repair. It is intended to be used only in conjunction with a more powerful model, as its main function is to weld studs for subsequent straightening of parts using a reverse hammer.
Specifications:
| Name | Index |
| Maximum current, A | 15 |
| Power, W | 3500 |
| frequency Hz | 50 |
| Diameter of welded studs, mm | 2020-03-02 00:00:00 |
| Weight, kg | 4 |
| Class | "semi-pro" |
| Price, rub. | 8000 |
Elitech ATS 5
Advantages
- Compactness;
- Reasonable price;
- Low power consumption.
Flaws
- Narrow functionality (impossibility of welding even thin sheets of metal together).
5th place: Fubag TS 3800
The tool is designed to remove dents from vehicle bodies. It has gained well-deserved popularity due to its convenient pistol, the presence of a microprocessor discharge, and a simple control panel.
Specifications:
| Name | Index |
| Maximum welding current, A | 3800 |
| frequency Hz | 50 |
| Net weight, kg | 23 |
| power, kWt | 7.4 |
| Product height, mm | 235 |
| Voltage, V | 220 |
| Product width, mm | 360 |
| Mains fuse, A | 16 |
| Product length, mm | 225 |
| Price, rub | 24600 |
Fubag TS 3800
Advantages
- 7 programmable modes for 11 power options;
- Overheat indicator;
- Light weight.
Flaws
- Relatively short cable - only 4 meters.
4th place: Atis S52L
This multifunctional spotter is designed to perform complex work on straightening body surfaces. Equipped with an overheating microprocessor and automatic input of the welding mode. The main operating cycle of the device is designed for 10 minutes of operation at rated load with the exception of overheating.
Specifications:
| Name | Index |
| Maximum current, A | 5200 |
| Power, W | 20000 |
| Thickness of sheets to be welded, mm | 2 |
| Adjusting the operating time | machine |
| Cooling | air |
| Voltage, V | 220-380 |
| Weight, kg | 78 |
| Price, rub | 30000 |
Atis S52L
Advantages
- Increased compression strength (180 kg);
- Automatic cooling mode;
- Availability of a convenient trolley for moving.
Flaws
- Increased power consumption.
3rd place: Redhotdot Hammer T-26
Professional grade tool for fixing steel car panels. Allows you to make the smallest repairs that do not require disassembling the machine. It has a comfortable pistol grip that operates on automatic charge and an intuitive control panel.
Specifications:
| Name | Index |
| Maximum current, A | 3800 |
| Power, W | 5200 |
| Welding adjustment | Machine |
| frequency Hz | 50 |
| Voltage, V | 220-230 |
| Additionally | portable type |
| Weight, kg | 24 |
| Price, rub | 43000 |
Redhotdot Hammer T-26
Advantages
- Simplified SINERGIC type setup system;
- Connecting additional tools using a Euro connector;
- Relatively light weight.
Flaws
- Does not fit well with attachments from third-party manufacturers.
2nd place: Wiederkraft WDK-6000
An excellent tool for professional work in a car service. Completely copes with single-sided spot welding. It has increased power, the housing is made in a dust and waterproof version.
Specifications:
| Name | Index |
| Maximum current, A | 4400 |
| Power, W | 11000 |
| frequency Hz | 50-60 |
| Weight, kg | 67 |
| Additionally | manual adjustment of welding time possible |
| Price, rub | 46000 |
Wiederkraft WDK-6000
Advantages
- A professional device that does not place special demands on the operator’s knowledge;
- Provided with a convenient trolley for movement;
- Intuitive setup.
Flaws
- Extremely poor equipment.
1st place: Telwin Digital Car Spotter 5500
This professional device was specially developed for use in the automotive repair industry. Focused on welding thin-walled metal (welding two sheets 1.5 mm thick is not a problem). Designed for correcting deformed surfaces and welding washers, screws and nails.
Specifications:
| Name | Index |
| Weight, kg | 30 |
| Voltage, V | 380 |
| Overall dimensions, mm | 390x260x225 |
| power, kWt | 11 |
| Welding current max, A | 3000 |
| Power at 50% load, kW | 3.0 |
| Thickness of welded materials (each) max, mm | 1.5+1.5 |
| Price, rub. | 73000 |
Telwin Digital Car Spotter 550
Advantages
- Supplied complete with attachments designed specifically for body repair (Studder);
- Easy to set up;
- Has high power and performance.
Flaws
- High price even for a professional tool.
How to make a spotter from a welding machine with your own hands: algorithm of actions, purpose of the device
A spotter is a device classified as a welding machine. Designed for spot welding. Works based on current resistance.
The device operates by releasing a certain amount of heat energy in the area of contact with the welding material when electric current is supplied. You can make a spotter from a welding machine yourself.
It is classified into inverter and transformer models.
A homemade spotter is used for car body work. This is done when, for some reason, to level the surface of the part .
You can locally heat the metal using the specified tool if there is minor damage to the body area.
It is important to figure out how to make a spotter with your own hands in order to get a high-quality and functional product.
The welding process looks like this. Fasteners are fixed in place of the damaged metal. A device is connected to it and the dents are pulled out using auxiliary devices or with your own hands.
The body repair tool makes it possible to quickly and efficiently restore a car without painting the damaged area. The good thing about a spotter is that during its operation it is possible to keep the functioning of every part under control.
This is due to the fact that the likelihood of overheating and breaking the wires is quite high.
Unit design properties
The device consists of components such as a box, a gun, a cable, and an electrode.
The box contains the entire apparatus system that is necessary for welding . In order to carry out body work clearly and quickly, you must adhere to the order and technology of the process.
If the surface has undergone deformation, it must be cleaned of any coating. It could be rust, paint or varnish.
This stage is very important, since the quality of the metal connection directly affects the outcome of the entire process. Contacts are attached to the surface that has been adjusted.
A fastener is welded onto the cleaned area of the damaged area, to which the device in question is connected.
Following this, the device is grabbed with a gun, after which the dent is pulled out. For leveling, they resort to using a hammer, hydraulic cylinders and other devices. Pay attention to the thickness of the metal.
Here you should understand what equipment will make it possible to straighten the machine so as not to cause harm to it. The back hammer is not used in combination with aluminum. In addition, not every unit can cope with a galvanized body.
When the body straightening is completed, the welded part is twisted. The contact area is cleaned with a grinding machine.
The welding gun is the main part of the device. For continuous operation, a factory-made device is used. You can make it using a construction glue gun with your own hands.
An alternative method would be to use semi-automatic welding parts. Identical parts with lengths from 12 to 14 mm are cut out of textolite. There should be 2 of them. A bracket is installed in them, used as a fastening of the electrode for welding.
If desired, you can mount a light bulb for illumination, as well as an impulse switch.
The bracket can be made of copper. It can have a cross-section - rectangular or square. A copper rod with a thickness of 8 to 10 mm is used as an electrode for welding.
The gun must be designed in such a way that the electrode can be changed without disassembly.
To connect the gun to the device, use a combination of a welding cable with the required cross-sectional area and a 5-core control cable. The latter is connected in accordance with the diagram.
Three wires are connected to the switch. Two more are moved to the backlight bulb and the engine. The welding cable must be stripped and soldered into a special hole in the bracket.
DIY manufacturing algorithm
To make the unit yourself, you need some skills and an understanding of the basics of working with such equipment. You can make a spotter from a welding machine yourself in accordance with the drawings. To do this, you need to carefully study the design features of the device. You can use available parts.
It is not always advisable to purchase a factory-made device. A quality unit can cost a pretty penny. It is necessary to consider the configuration of the device and its drawings.
Equipment from inverter apparatus
Most often, an inverter-based unit is made using homemade material. The main components of the device are a thyristor relay and a welding inverter. To assemble the device you will need:
- thyristor with an indicator of 200 Volts;
- transformer to step down 122 volts to control the relay using a button;
- relay with a power of 30 amperes;
- diode bridge;
- button for control and monitoring;
- contact group 220 volts.
The transformer is connected using a diode bridge. The relay thyristor is connected to it. The transformer powers the control branch of the circuit. Before making a spotter with your own hands, you need to ensure safe working conditions. For this purpose, rubber mats are placed under your feet and standard safety regulations are followed.
Main assembly steps
To make a homemade unit, a Nordic welding machine is ideal. It is necessary to be able to change the configuration of the device so that the DC spotter outputs 1500 amperes, at a minimum. Assembly is carried out according to the following rules:
- Remove the secondary layer from the apparatus. Sometimes there are several of them.
- Before installation, determine the number of turns per 1 Volt. For this purpose, the primary winding is wrapped in copper wire. Then the Volt indicator is measured.
- The resulting figure is divided by the number of turns. The result will indicate the number of turns per volt.
- The secondary layer that has been removed is used to produce a tire. It is advisable not to allow this parameter to fall below 160 square mm.
- The voltage should be 6 volts. If the cross-section is smaller, you can divide the tire into several parts. They are secured with insulating tape.
The number of fragments depends on the initial indicators. Let's say if the parameter is 40 sq. mm., the tire breaks into 4 parts. You need to take two tires wrapped with electrical tape or adhesive tape for painting work. Isolation must be consistent. First there is a layer of insulating tape, then adhesive tape, and insulating tape is wound on top. Rivets can be installed on open areas.
The resulting busbars are moved to the transformer. This process is not easy and requires certain skills. A hammer and an additional assistant are required.
Thanks to this, the tire will fit better and will not suffer any damage. If the power indicator is normal, then the device can be considered ready.
If not, you will have to conduct a series of experiments by connecting wires to the primary winding.
Assembling the transformer is a mandatory step in the manufacture of a spotter from a welding machine. This kind of work is the most difficult. Winding requires a lot of time, but this step is not necessary.
The winding is carried out on a ring iron. The wire for the secondary winding should be made of aluminum or copper. High-quality insulation should be laid between the coils. Transformer paper in several layers is suitable for this.
For maximum reliability, it is impregnated with paraffin.
The pistol is made from a semi-automatic machine . It will require some additions to secure the tool to the drawing device. To make pliers, a simple 20 by 20 mm pipe will do. The power wires connecting the transformer and the gun must have an identical cross-section.
Alternatively, they must exceed the tire cross-section. Do not use wires that are too long. Their maximum size should be 2.5 m. The operating cable connecting the transformer and the gun should be made on the basis of a thermally insulated commutation cable.
Each time it is heated, this layer will shrink.
Important nuances in the design
The greatest difficulty in adapting a transformer lies in increasing the output current. To do this, they experiment with a bus, which is installed instead of the secondary winding. Experience makes it clear that the cross-sectional indicator should be at least 160 square meters.
mm. As for the bus voltage, it should not be less than 6 volts. The most important point when assembling a transformer is maintaining optimal insulation of the network windings. If the overlay was done incorrectly, it will lead to undesirable consequences.
Instead of an epilogue
In straightening work today it is simply impossible to do without spotters, because they significantly reduce the labor intensity of the process and improve the quality of work. You can purchase them in any specialized store or order them on a trustworthy online trading platform (significant money savings are possible). The market for spotters and accessories for them is quite large, so choosing a model will not be difficult. However, not all devices are complex technical products, so simpler models will have a minimum warranty period.
A correctly selected model, combined with a well-defined scale of work, will allow you to get the best result.