Methods of gating in concrete
There is a need to shallowly dig 6-7 meters in fairly hard concrete for wiring.
It is not possible to use an angle grinder - the room is a living room. It is also not possible to use a grinder or wall chaser with a vacuum cleaner.
I’m thinking of making shallow holes with a hammer drill, and then using the chiseling mode to break the partitions between them.
Most likely I will do this with a perf or Interskol P710 or Makita 2450
- Do you think this is a realistic way to make a shallow groove?
- Is there a more efficient way to do the same without a lot of dust?
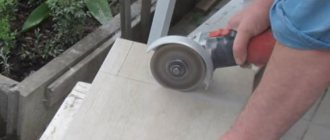
Strobe with a grinder on concrete
That's what I usually do. It is more convenient to punch a groove not with a straight chisel or a groove chisel, but with an ordinary drill without rotation, and the size of the drill is the same as the width of the desired groove.
7 meters say, have pity on your household.
You don’t have to drill the holes, but just dig out the groove with a drill in the chiselling mode. Only markings are needed, otherwise it will turn out crooked. Work for 30 minutes.
Sergey_G. wrote: You don’t have to drill the holes, but just use a drill in the chiselling mode to dig out the groove.
How to make a groove for a cable using a grinder.
Only without the groove holes it will work. How to put it mildly. If the concrete , then with a depth of a centimeter, the width of the chips will be about five centimeters. This is not a groove, but a gentle ditch with holes, the width of the chips will be smaller
By the way, there will be NO LESS dust from chasing with a hammer drill than from working with a wall chaser and a vacuum cleaner, believe me. Although, of course, much less than from a wall chaser without a vacuum cleaner
I will try all the methods described, and according to my feelings, I will choose the most optimal one for myself
holes (drill 10) is the best option, there is no dust, just the level.
if the hole is narrow - about 2cm - then it’s better to make , and then knock out the middle with a 6mm drill like a chisel
Another follow-up question. What could be the risk of making a very narrow groove , literally 5mm, so that the wire can be pushed in there and sealed with plaster?
2murik 2Specky Another follow-up question. What could be the risk of making a very narrow groove, literally 5 mm, so that the wire can be pushed in there and sealed with plaster?
-=AlexuS=- wrote: What could be the consequences of making very narrow groove , literally 5 mm?
J.Walker wrote: By the way, there will be NO LESS dust from chasing with a hammer drill than from working with a wall chaser with a vacuum cleaner,
There will not only be “NO LESS” dust - sand and gravel will scatter evenly throughout the room
and you calculate how wide the grooves (drill 10) will be. Well, of course, if there are 2 lines. Personally, I can get by with just one without any problems.
Just like in Barnaul! I was born there myself.
Sergey_G. wrote: sand and gravel will scatter throughout the room evenly
Well, apparently, none of them have seen a normal wall chaser with dust removal, or they really don’t have the opportunity to use the right tool.
tvmaster wrote: well, apparently, none of them have seen a normal wall chaser with dust removal, or they really don’t have the opportunity to use the right tool.
Yes, we saw, we saw. What this means is that when punching with a punch, the radius of scattering of pieces is maximum. They fly from the heart!
When I needed to widen the doorway upward by 2 cm (two pieces), I did not cover the first one with anything. The whole room is in shards! The second one covered it with plastic, so it only scattered along the corridor.
And a wall chaser, even with the best dust removal, will still lift a little into the air, no matter how you turn around
There is some dust, mostly when you approach the wall and move away from it. But this is nothing compared to what they planned to do with a hammer drill.
Specky wrote: if the hole is narrow - about 2cm - then it’s better to make two mowing lines with a 4-5mm drill, and then knock out the middle with a 6mm drill like a chisel
Have you tried it yourself? Personally, the option that worked best for me was 10 (the shortest), I outline the route and then go through it in chiseling mode. I also made the recesses for the socket boxes (ANAM, square) - I outlined the outline with a ten and off I went
yes, we tried - with all drills from 4 to 20mm and a groove chisel and a pick and a chisel in one row, in a checkerboard pattern and in two rows and with showdowns with neighbors, among others
READ Do-it-yourself chiselling of walls for wiring using a grinder
let's say this: I liked this method the most - minimum dust and noise, pieces don't fly anywhere, the middle almost falls out by itself
it takes a certain amount of patience to make many, many small holes
The socket boxes are the same: small holes along the contour and in the middle - they keep falling out in larger pieces
-=AlexuS=- wrote: What could be the risk of making very narrow groove , literally 5 mm, so that the wire can be pushed in there and sealed with plaster?
Maybe it makes sense to make a groove for the thinnest 15mm plastic corrugation? It’s much more convenient to lay wires and all sorts of maneuver possibilities appear
How to grind concrete, brick and wooden walls with a grinder
During a major overhaul, there is a necessary type of work that cannot be done without - gating the walls for wiring. The process will speed up if you know the characteristics of the tools used, and also have an idea of how effective they are in each individual case. Drilling with a grinder or a hammer drill, a wall cutter or a hammer and a chisel, laying channels in walls made of brick and concrete - these are nuances that will be reflected in the result of the performed actions for wiring the electrical wire. To avoid any difficulties, you should choose the right tool.
Features of gating of different materials
Grooves in aerated concrete and foam concrete
These are quite soft materials; a drill, an angle grinder, and a hammer drill can easily handle it. You can even use a manual wall chaser , which is equipped with a pointed arc. A groove of the required depth can be made in 3-4 approaches. If necessary, such a tool can even be made independently from rigid punched paper tape or a metal plate sharpened on one side. For convenience, attach a handle or pipe.
Grooves in wood
It is prohibited to install hidden electrical wiring in wooden houses . All cables are laid openly and can be hidden in cable ducts, so there is no need to ditch the walls.
Grooves in drywall
Drywall is too fragile a material to be chipped. All wires are laid behind it, and holes for sockets are made using a crown attachment on a drill or hammer drill.
Grooves in brick and concrete
For horizontal grooves in a brick wall, even a hammer and chisel will do if you can get into the seam, but vertical grooves are best done using a power tool - a drill, hammer drill, wall chaser.
Concrete is a durable material, so you definitely can’t do anything with a hammer and chisel, but all other methods will do. If the concrete is of high strength, then it is better not to use a grinder - the circle may break when pressed.
Grilling load-bearing walls
You should be extremely careful with internal load-bearing walls. An awkward movement - the reinforcement is exposed, and now the strength of the entire building is compromised. What should apartment owners do? There are several options:
- from the local construction department obtain permission to groove walls, trying to prove that the grooves will not be so deep and you will not reach the reinforcement frame;
- Apply a layer of plaster to the wall and only then trench the wall. The entire depth of the grooves will fall mainly on the plaster layer;
- hide the wires behind the drywall , this will also solve the problem of wall alignment;
- lay wires in electrical skirting boards. If you choose a model of the right color and design, you won’t do much harm to the aesthetics.
Standards and restrictions when tapping walls for wiring
Before you take the tool to the wall, you need to properly prepare for the process. Initially, you need to calculate the wiring plan on a piece of paper. Mark the locations of future sockets, switches and lighting points throughout the house. There shouldn't be too many of them. Each element must be defended by a vital necessity. You also need to take into account the materials of the walls and decide on the best method of gating this material.
Regulatory documents on the distribution of wires are collected in SNiP 3.05.06-85. It is best to study them in detail once, so as not to have to redo everything again later. Here are the main points to focus on when performing work:
- The groove (deepening) must be carried out strictly horizontally or vertically. Oblique mowing lines should not be present. The only exception is when the wiring needs to be installed on walls with a slope, for example, in the attic. Then the line can run parallel to the slope of the wall.
- Between two electrical points, the groove can only be turned once. Each turn is a bend in the cable, which will heat up more in these places. Such conditions can lead to dangerous situations.
- The grooves have size restrictions. The maximum permissible groove width is 30 mm, and the depth is 26 mm. The total length of the route from the distribution box to a specific point should not exceed 3 meters.
- It is imperative to maintain indentations: from the battery and gas pipes - at least 40 cm, from the door - 10 cm, and from the ceiling and floor at least 5 cm, although it is advisable to still adhere to 10 cm.
- It is prohibited to do grooves on internal load-bearing walls. The thickness of the external walls will not be affected by a shallow ditch, but for load-bearing partitions you need to obtain permission from the municipal authority. This is especially true for panel houses. Grooving walls for wiring on the first floors must be done with special care - the lower walls support not only the roof, but the entire building.
- It is forbidden to touch a reinforced concrete structure when cutting. This may lead to a violation of the integrity of the structure and, as a result, loss of its reliability. In case of urgent need, the grooves in reinforced concrete should be shallow and the reinforcing mesh should not be affected.
- When making grooves in the ceiling, it is necessary to calculate the shortest path to the lighting point.
- It is prohibited to make grooves in the floor slab. If you need to conduct wiring along the floor, then the best solution would be to do it in a concrete screed. It needs to be filled with the grooves for the wires in mind.
- Brick walls are easier to chip than concrete walls. This must be taken into account when choosing a tool and having the appropriate skills.
- When gating, it is necessary to protect the respiratory tract from dust with a mask or respirator.
Important! Grooving always occurs with increased noise effects. The whole house will hear your work, thanks to the inevitable vibration of the walls. Therefore, such work should be carried out on weekdays from 10 to 17 hours. Then mutual understanding between the residents will save your nerves during neighbor renovations.
Is it possible to groove walls in a panel house?
If the grooved channel does not expose the reinforcement of the reinforced concrete slab, then there is no need to worry. To prevent the interior of the room from being spoiled by wall communications, they are made hidden. To do this, the walls in the enclosing structures are grooved for wiring and pipes. Is it possible to groove a wall in a panel house for wiring? Of course, this is possible, but only if a number of conditions are met.
The installation of channels in the body of partitions in a monolithic house does not cause problems. This also applies to panel houses. A partition is a structure that bears the load only from its own weight and does not affect the load-bearing capacity of the entire structure.
Another thing is gating load-bearing walls. A significant violation of the integrity of concrete walls will lead to a loss of their load-bearing capacity, and this, in turn, can cause irreparable consequences.
On the Internet you can find many articles on this topic that state in a categorical tone that it is impossible to rave walls in a panel house. You should try to refute such statements.
To understand the essence of the problem, you need to know the design features of reinforced concrete walls. The main load-bearing load is taken by a metal reinforcing frame, “pierced” by a mass of concrete. The top surface layer of concrete plays a protective role. Therefore, if gating walls for wiring does not expose the reinforcement, then monolithic fences will not suffer from this.
The protective layer of concrete is usually from 30 to 50 mm. For a two-core wire, a channel depth of 10 - 15 mm will be sufficient. To lay several cores, you should punch a groove in the load-bearing wall with a depth of 20 - 25 mm. The wider the channel, the more wires can be laid.
The groove must be made in such a way that the load-bearing wall does not have channels with exposed reinforcement.
Dust-free chipping
During repairs or when replacing wiring, you will have to lay grooves or make holes in the walls.
This creates a large amount of construction dust that settles throughout the room.
To groove a wall for wiring without dust, you can use the advice of experts:
- It is good to moisten the surface on which the wiring channel will be made.
- Use a household vacuum cleaner to catch dust.
- It is best to take a wall chaser with a special vacuum cleaner connected to it. Then making holes in the walls will take place in a comfortable environment.
There is also a method for cutting channels with a grinder without dust, such as wet cutting of concrete. This method is carried out using a hose that continuously supplies water to the cutting disc and the cutting area. You need to be very careful, otherwise liquid may get on the power tool, which will render it unusable.
READ Is it possible to lubricate an angle grinder with lithol
After finishing the gating, the channels should be treated with a primer and the cable should be secured in them. Seal the grooves with plaster, mortar or putty.
How to make a groove using a regular grinder
Scoring with a grinder can be done in walls made of brick, concrete, cinder block and other materials. In order to make a groove with a grinder you will need:
- Apply markings. To do this you will need a tape measure, a rule or level, and a pencil. The lines you mark with the mowing line should be greasy, since when the angle grinder operates, dust is released, which can make the markings invisible.
- Cutting out the grooves. You should follow the drawn lines with a grinder with a diamond cutting disc, but keep in mind that you should hold the tool with both hands, and the work should be carried out in protective devices: glasses, a mask, gloves.
- Knocking out or removing plaster. At the final stage, you will need to use a hammer and chisel to remove the plaster between the cut lines.
It is important to know! Sometimes experts use two instead of one fixed disk on an angle grinder, which allows them to get a finished groove in one pass. This significantly saves time and physical effort.
The main disadvantage of this gating method is the release of a large amount of dust. If the work is carried out in a non-residential premises, then this is not so scary. If the room is residential, then dust not only interferes with the gating process, but it also settles on the surface of furniture and household appliances, that is, it dirty the decor.
Rules and restrictions when gating
Wall slitting should be done only after the location of hidden electrical wiring or water pipes in the room has been drawn out. When performing gating work, it is important to consider the following factors:
- Procedures are usually carried out only in the vertical or horizontal direction.
- The slope of the groove is allowed in exceptional cases.
- Horizontal grooves are made at a distance of no more than 15 cm from the floor slabs.
- Vertical grooves must be at a distance of at least 10 cm from door and window openings, as well as corners. At least 40 cm from gas pipes.
- The width and depth of the groove should not be more than 2.5 cm. The length of the groove should not be more than 3 meters.
In conclusion, it is worth noting that before starting work, you should prepare not only the appropriate tool, but also make a control check on the location of the groove.
From all of the above, the following conclusions can be drawn . Scoring concrete surfaces for laying hidden wiring is a responsible job that requires knowledge of norms, rules and restrictions. To do it yourself, you will need skills in using power tools.
Video description
The video shows how to make a groove with a hammer drill:
Drill for drilling
Another option using a drill. That is, if a situation arises when professional tools are not available, then you can get by with a simple tool that the owner of the house always has in his arsenal. The whole process consists of drilling holes every 1-2 cm along the marked line, as in the previous case. For this, a Victory drill is used. But keep in mind that if the wall is concrete, you will have to drill it for a long time, which will increase the work time several times.
And then they use their grandfather’s old tools: a chisel and a hammer. They simply knock out the building material remaining between the holes in the wall.
The method is actually primitive. But if the task is to groove a short section of wall, then it justifies itself one hundred percent.
We will not separate into a separate section a method that uses a chisel and a hammer without additional tools. The option can be described as labor-intensive, time-consuming and with a low speed of construction operations. But it also happens if there is no drill at hand, and the length of the groove is within a couple of meters. True, the groove for the wiring will be of poor quality, and you will have to forget about its dimensions. But, as usual, a repair solution will fix everything.
How to make a groove with a chisel and hammer Source avatars.mds.yandex.net
tips for tapping walls for wiring
Very often, when renovating premises, it is necessary to replace old wires with new ones. After all, new modern wiring can withstand all the requirements of the Nth number of household appliances in the house, while maintaining excellent fire safety. Often, owners also want to install additional sockets. This is much more convenient than carrying a few extra meters of extension cords with you everywhere.
It is best to hide new wiring in the walls - it is both safe and pleasing to the eye. To do this, it is necessary to make grooves - cutting out recessed channels of standard sizes in the ceiling or walls, into which the cable is then placed. At the end of the work, the recesses are sealed with mortar or putty. This technology is used not only for major home repairs, but also for cosmetic ones, and even in the construction of new houses with the installation of a pipeline.
So where should we start? How to groove walls for wiring?
Is it possible to ditch load-bearing walls?
Monolithic and panel houses have special structures called load-bearing structures. Their basis is reinforced concrete slabs, the frame of which is formed by reinforcement. It is deepened by 2-2.5 cm. And any furrow exposes it and reduces the thickness of the wall. This increases the risk of deformation and destruction.
Therefore, when asked whether it is possible to groove load-bearing walls, the standards give a negative answer. If in an apartment building many of the walls are load-bearing or a certain percentage of the partitions are made of reinforced concrete, the situation becomes much more complicated. And the question changes: is it possible to ditch load-bearing walls with additional protective measures?
First, you need to coordinate the work with the construction department and prove that the depth of the furrows will not touch or damage the reinforcement. In the situation with panel houses, permits are not issued. With brick buildings - approved
The main dilemma here is related to how deep to ditch such walls so as not to damage important elements? To play it safe, increase the thickness of the wall beyond the layer of plaster - up to 2-2.5 cm.
For owners of private houses, the picture is much simpler, especially if the buildings are brick or block. Here I advise you to take into account the density and load-bearing potential of the wall.
If the wall assembly is implemented in 1.5 bricks, then feel free to arrange grooves in it. For walls made of other materials in a private home, I recommend:
- carry out plastering, arrange grooves in the resulting layer;
- cover the walls, options: plywood, plasterboard, OSB or chipboard, lay cables under them;
- install the wiring in a special plinth.
A hammer drill with an attachment is a tool for punching walls
Most often, chipping concrete walls is performed with a hammer drill, since it is considered a fairly powerful power tool. A rotary hammer can easily replace a drill, a screwdriver, and even a jackhammer. Its use allows you to speed up gating and make the process less messy. For this purpose, a hammer drill with an 18-24 drill bit (depending on the required groove width) is suitable for working on concrete. The hammer drill is set to the “impact with drilling” mode and holes are made along the entire length of the intended groove. You should try to drill them as close to each other as possible. Then the drill is replaced with a spatula, with which they begin to select a groove. It is important to place the spatula along the groove so that its edges are even.
The procedure for carrying out work and the rules for the location of grooves
- Before trenching a concrete wall, the locations of electrical outlets and switches are determined.
- Before developing a plan, it is worth studying the rules for the location of grooves when laying wiring in order to know how to properly tap a concrete wall in one step.
- The developed scheme is transferred with a marker onto the surface of the walls.
- The cutting tool is being prepared. Ideally, it is better to use a wall chaser.
- Using the previously marked mowing line, parallel cuts are made to a given depth.
- A sample of concrete is taken between the cuts and a groove is obtained.
- for closed wiring, the grooves are laid parallel to the ceilings (horizontally) or perpendicular to the floor (vertical);
- the location of the grooves at an angle is permissible only on attic floors;
- rotation of the grooves is allowed only by 90 (diagonal connection of route sections is unacceptable);
- intersection of grooves is allowed if there are no alternative options;
- when laying the route horizontally, indentations are made from the ceiling of 10-15 cm and from gas pipes of 40 cm;
- To make vertical grooves on concrete walls, you need to step back from the window and door by 10 cm.
READ DIY chain attachment for an angle grinder
How to make a groove with a hammer drill. Bulgarian
There are three ways in which you can make a strobe :
Make a groove with a wall chaser
Well, this method is simple. Markings are drawn on the wall and calmly follow the markings. slowly, using a wall chaser, a groove is made. Next, using a hammer drill, the remaining concrete is knocked out.
In this article I would like to focus more on those. who will be making a wall and does not have a professional tool, such as a wall chaser. For those. who has a hammer drill and... maybe Bulgarian . Two ways. described below. more suitable for beginners.
Make a groove with a grinder
Making a groove with an angle grinder is not difficult. For this, a grinder with a power of at least 800 W is sufficient. 125 diameter and a diamond wheel for concrete. There are two types of concrete circles. with and without technological slots. Take it for working with technological slots. The grooves are not suitable without cutting slots. Also, don't save money. Buy a good quality diamond wheel. because you can burn the grinder.
When you cut concrete . stop the grinder every 30 cm for 3 seconds without removing it from the groove. so that it blows dust out of the engine at idle and cools down a little.
The width of the groove is made depending on the type and amount of cable laid in it. If you are installing one cable. then it makes sense to make the groove not the width of the cable. and on the thickness and lay it end-to-end in the groove . Such a groove does not need to be cleaned later with a hammer drill and is small in size. just cover it up.
A groove for one cable laid end to end.
Perforate the groove
This is one of the simplest and most cost-effective methods. You only need a hammer drill and an 8mm drill if you are doing it for one cable. A marking line is immediately drawn along which holes are drilled as close to each other as possible. Then, using the same drill in the “impact” mode, a groove is knocked out. I do not recommend using a spatula, etc. Various devices were tested and nothing turned out to be better than a regular drill for concrete. Only the drill should be as small in length as possible. Do not forget to lubricate the tip of the drill with grease.
1 meter of groove is knocked out in 7 minutes (3 minutes to drill and 3 minutes to clean).
Preparing for the workflow
Before you start working, you need to draw up a plan taking into account all the sockets, switches and paths along which the cable will be laid. For proper planning, you should have certain knowledge in order to strictly follow the rules for making grooves.
When drawing up a plan, do not forget about such important conditions as bypassing the cable, which is most likely already located in the wall structure. The next stage, according to the drawn up plan, is marking the walls and ceiling.
Since we will touch upon a list of processes where there is a need to use tools, it is worth talking about them in more detail (despite the fact that this same stage involves their preparation).
Having a pencil and ruler is quite obvious to focus on. But what else needs to be prepared besides this? The list of all necessary tools for the job consists of:
- a detector, which is used to check whether there are already cables in the wall;
- level (preferably laser);
- hammer drill;
- attachments for the hammer drill for gating: a drill, a blade (peaks) and a crown, which will allow you to make recesses for the socket.
In addition, it is mandatory to have personal protective equipment. These include a respirator and goggles, since a little dust will still be present, and this is very harmful to health. If there is a need to carry out work at height, since grooves are often made on the ceiling, then it is worthwhile to provide support in advance. A stepladder is not the most reliable option for this type of work, so it is advisable to use scaffolding, because they are safer.
The use of construction stilts is gaining some popularity today. They are quite convenient, reliable and ergonomic, and their assembly requires the minimum amount of time.
Before starting work, be sure to turn off the electricity. This is necessary for safety reasons, since you may accidentally bump into the cable.
Wall chaser
A specialized wall chaser is exactly the tool that is best used to groove concrete walls for wiring. It successfully overcomes the resistance of high-strength reinforced concrete. The operating principle of the electric machine is based on two diamond-coated discs making neat, even, parallel cuts in one step to a given depth. Subsequently, the material is removed using a hammer drill. The design of many wall chaser models allows you to adjust the distance between the cutting wheels and obtain grooves of a certain width and depth. A wall chaser is often used at home, since it can take quite a long time to drill holes into a concrete wall for wiring with this tool. Thanks to the ability to connect a construction vacuum cleaner to the furrow cutter, the dust concentration in the room air does not exceed permissible standards. The disadvantage of this tool is considered to be too high a cost, which makes it unprofitable to purchase it for one-time use.
How to seal the groove
Finally, the groove is done, all the cables are laid in place. All that remains is to seal the recess well and efficiently, so that we can then begin the final painting. So, what does the whole process consist of:
p, blockquote 32,0,0,0,0 —>
- First, the furrow must be cleaned thoroughly. For these purposes, both a construction vacuum cleaner and a dust broom are suitable.
- Then it is necessary to properly prime the furrow. To do this, you should generously moisten the brush with primer and fill the recesses without sparing the material.
- Wait for the primer to dry completely.
- Before the final stage of embedding, it is necessary to moisten the furrow with water.
- Immediately begin sealing with one of the materials - either plaster mortar for cables (option - building gypsum), or polyurethane foam for pipes.
p, blockquote 33,0,0,0,1 —>
By following these simple tips, you can tackle the walls yourself. The main thing is desires and a little patience!
Dust-free chipping
During repairs or when replacing wiring, you will have to lay grooves or make holes in the walls.
This creates a large amount of construction dust that settles throughout the room.
To groove a wall for wiring without dust, you can use the advice of experts:
- It is good to moisten the surface on which the wiring channel will be made.
- Use a household vacuum cleaner to catch dust.
- It is best to take a wall chaser with a special vacuum cleaner connected to it. Then making holes in the walls will take place in a comfortable environment.
There is also a method for cutting channels with a grinder without dust, such as wet cutting of concrete. This method is carried out using a hose that continuously supplies water to the cutting disc and the cutting area. You need to be very careful, otherwise liquid may get on the power tool, which will render it unusable.
After finishing the gating, the channels should be treated with a primer and the cable should be secured in them. Seal the grooves with plaster, mortar or putty.
Sources:
https://c-triada.ru/podelki/kak-sdelat-shtrobu-v-betone-bolgarkoj.html
Preparation and marking of the working surface
First of all, you need to check the walls for old wiring. For this, there are special testers and indicators, the principle of which is based on the general electrical circuit. It looks like this - from the general switch to the electrical point, for example, the socket has two wires - phase and neutral. According to the phase current, current flows from the switch to the point constantly, regardless of whether something is connected there or not. The neutral wire is energized only when the device is turned on. And only then does the current return back to the switch. The indicators catch the phase wire. Many indicators have a special light on top that lights up when a target is found. This preparation stage is necessary to protect yourself from electric shocks.
p, blockquote 11,0,0,0,0 —>
After checking, you need to draw the future route on the wall - from the junction box to each connection point.
p, blockquote 12,0,0,0,0 —>
Before starting work, be sure to curtain the doorways with a damp cloth or construction film. Don’t rely on a tightly closed door - small particles of dust will still find a loophole.
p, blockquote 13,0,0,0,0 —>
p, blockquote 14,0,0,0,0 —>